
このドキュメントでは、Agent Development Kit(ADK)フレームワークで構築された AI エージェントを計測する方法について説明します。ADK フレームワークには、エージェントの主要なアクションからテレメトリーを収集する OpenTelemetry 計測機能が組み込まれています。組み込みの計測機能を有効にすると、その計測機能によりテキスト プロンプトやエージェント レスポンスなどの情報が Google Cloud プロジェクトに送信されます。このドキュメントでは、必要な変更の概要を説明し、サンプル アプリケーションへのリンクを示します。
ADK を使用するアプリケーションは、マルチモーダル プロンプトとレスポンスを収集することもできます。このドキュメントでは、テキスト プロンプトとレスポンスを収集する方法について説明します。マルチモーダル データを収集する場合は、追加の構成が必要です。詳細については、マルチモーダル プロンプトとレスポンスを収集して表示するをご覧ください。
ADK が提供するデフォルトのオブザーバビリティは、アプリケーションのユースケースによっては不十分な場合があります。OpenTelemetry を使用してアプリの他の部分からテレメトリーをキャプチャする、または独自のカスタム計測を使用してアプリケーション固有のデータをキャプチャすることによって、他の計測ライブラリを追加し、より詳細なオブザーバビリティを実現できます。たとえば、アプリケーションで次のような計測コードを記述できます。
- エージェントが起動したツールのリソース消費量を追跡する。
- アプリケーション固有の検証の失敗、ビジネスルールの違反、カスタムエラー回復メカニズムを追跡する。
- ドメイン固有の基準に基づいて、エージェントの回答の品質スコアを追跡する。
生成 AI アプリケーションを計測してテレメトリーを収集する
AI エージェントを計測してログ、指標、トレースデータを収集する手順は次のとおりです。
このセクションの残りの部分では、上記の手順について説明します。
OpenTelemetry パッケージをインストールする
次の OpenTelemetry 計測パッケージとエクスポータ パッケージを追加します。
uv add 'google-adk>=1.17.0' \
  'opentelemetry-instrumentation-google-genai>=0.4b0' \
  'opentelemetry-instrumentation-sqlite3' \
  'opentelemetry-exporter-gcp-logging' \
  'opentelemetry-exporter-otlp-proto-grpc' \
  'opentelemetry-instrumentation-vertexai>=2.0b0'
ログデータは、Cloud Logging API または Cloud Monitoring API を使用して Google Cloud プロジェクトに送信されます。opentelemetry-exporter-gcp-logging ライブラリは、Cloud Logging API のエンドポイントを呼び出します。
指標データは収集されません。通常、コレクタベースのソリューションを使用しないアプリケーションには opentelemetry-exporter-gcp-monitoring ライブラリが含まれます。このライブラリは、Cloud Monitoring API のエンドポイントを呼び出します。
トレースデータは、OpenTelemetry Line Protocol を実装する Telemetry(OTLP)API を使用して Google Cloud に送信されます。opentelemetry-exporter-otlp-proto-grpc ライブラリから、Telemetry(OTLP)API エンドポイントが呼び出されます。
トレースデータは、OpenTelemetry Line Protocol で定義された proto ファイルと概ね一致する形式で保存されます。ただし、フィールドは保存前に OpenTelemetry 固有のデータ型から JSON データ型に変換されることがあります。ストレージ形式の詳細については、トレースデータのスキーマをご覧ください。
ADK 環境を構成する
ADK フレームワーク バージョン 1.17.0 以降には、OpenTelemetry の組み込みサポートと、OpenTelemetry テレメトリー データをGoogle Cloud Observability に送信する機能が含まれています。これを有効にするには、ADK 環境を構成します。
adk webコマンドでアプリケーションを実行する場合は、--otel_to_cloudフラグを指定します。opentelemetry.envファイルで、次の環境変数を設定します。OTEL_SERVICE_NAME='adk-sql-agent' OTEL_PYTHON_LOGGING_AUTO_INSTRUMENTATION_ENABLED='true'生成 AI の最新のセマンティック規約を使用するように OpenTelemetry を構成します。
OTEL_SEMCONV_STABILITY_OPT_IN='gen_ai_latest_experimental'メッセージをイベントとして関連付けるように OpenTelemetry を構成します。
OTEL_INSTRUMENTATION_GENAI_CAPTURE_MESSAGE_CONTENT='EVENT_ONLY'使用できる列挙値の詳細については、
genai/types.pyをご覧ください。次の環境変数も
opentelemetry.envファイルに追加することをおすすめします。ADK_CAPTURE_MESSAGE_CONTENT_IN_SPANS='false'この環境変数により次の処理が行われます。
- ADK 計測が属性サイズの上限を超えるスパン属性を付加しないようにします。
- 個人を特定できる情報(PII)が属性としてスパンに付加されるのを防ぎます。
他の環境変数を設定する必要がある場合があります。たとえば、Gemini Enterprise Agent Platform にデプロイする場合は、次の環境変数も設定します。
GOOGLE_CLOUD_AGENT_ENGINE_ENABLE_TELEMETRY='true'
サンプル アプリケーションをダウンロードして実行する
このサンプルコードは、ADK を使用して構築された生成 AI エージェントを実装します。エージェントは OpenTelemetry で計測され、指標、トレース、ログを Google Cloud プロジェクトに送信するように構成されています。プロジェクトに送信されるテレメトリーには、生成 AI のプロンプトと回答が含まれます。
ADK エージェントのペルソナ
生成 AI エージェントは、エフェメラル SQLite データベースへの完全アクセス権を持つ SQL エキスパートとして定義されます。エージェントは Agent Development Kit で構築され、SQLDatabaseToolkit を使用してデータベースにアクセスします。データベースは最初は空です。
始める前に
- Google Cloud アカウントにログインします。 Google Cloudを初めて使用する場合は、 アカウントを作成して、実際のシナリオでの Google プロダクトのパフォーマンスを評価してください。新規のお客様には、ワークロードの実行、テスト、デプロイができる無料クレジット $300 分を差し上げます。
-
Google Cloud CLI をインストールします。
-
外部 ID プロバイダ(IdP)を使用している場合は、まず連携 ID を使用して gcloud CLI にログインする必要があります。
-
gcloud CLI を初期化するには、次のコマンドを実行します。
gcloud init -
Google Cloud プロジェクトを作成または選択します。
プロジェクトの選択または作成に必要なロール
- プロジェクトを選択する: プロジェクトの選択に特定の IAM ロールは必要ありません。ロールが付与されているプロジェクトであれば、どのプロジェクトでも選択できます。
-
プロジェクトを作成する: プロジェクトを作成するには、
resourcemanager.projects.create権限を含むプロジェクト作成者ロール(roles/resourcemanager.projectCreator)が必要です。詳しくは、ロールを付与する方法をご覧ください。
-
Google Cloud プロジェクトを作成します。
gcloud projects create PROJECT_ID
PROJECT_IDは、作成する Google Cloud プロジェクトの名前に置き換えます。 -
作成した Google Cloud プロジェクトを選択します。
gcloud config set project PROJECT_ID
PROJECT_IDは、 Google Cloud プロジェクトの名前に置き換えます。
Vertex AI、Service Usage、Telemetry、Cloud Logging、Cloud Monitoring、Cloud Trace の各 API を有効にします。
API を有効にするために必要なロール
API を有効にするには、
serviceusage.services.enable権限を含む Service Usage 管理者 IAM ロール(roles/serviceusage.serviceUsageAdmin)が必要です。詳しくは、ロールを付与する方法をご覧ください。gcloud services enable aiplatform.googleapis.com
serviceusage.googleapis.com telemetry.googleapis.com logging.googleapis.com monitoring.googleapis.com cloudtrace.googleapis.com -
サンプル アプリケーションがログ、指標、トレースデータを書き込むために必要な権限を取得するには、プロジェクトに対する次の IAM ロールを付与するよう管理者に依頼してください。
- Cloud テレメトリー トレース書き込み (
roles/telemetry.tracesWriter) - ログ書き込み (
roles/logging.logWriter) - モニタリング指標の書き込み (
roles/monitoring.metricWriter) - Vertex AI ユーザー (
roles/aiplatform.user)
Cloud Shell、 Google Cloud リソース、ローカル開発環境でサンプルを実行する場合は、これらの権限で十分です。
- Cloud テレメトリー トレース書き込み (
割り当てプロジェクトを指定してください。Vertex AI API(
aiplatform.googleapis.com)では、割り当てプロジェクトを指定する必要があります。詳細については、割り当てプロジェクトを設定するをご覧ください。たとえば、次のコマンドで割り当てプロジェクトを設定できます。gcloud config set billing/quota_project PROJECT_ID
アプリケーションを起動する
サンプルアプリケーションを起動する手順は次のとおりです。
Cloud Shell で、リポジトリのクローンを作成します。
git clone https://github.com/GoogleCloudPlatform/opentelemetry-samples.gitサンプル ディレクトリに移動します。
cd opentelemetry-samples/python/adk-sql-agentこのサンプルには、2 つの環境変数を設定する
.envファイルが含まれています。1 つの変数で、SDK が使用するエンドポイントを制御します。もう 1 つの変数は場所を設定します。別のモデルを使用する場合は、
main.pyを編集します。選択したモデルが.envファイルで指定されたロケーションをサポートしていることを確認します。モデルについては、Google モデルをご覧ください。仮想環境を作成してサンプルを実行します。
uv run --env-file opentelemetry.env adk web --otel_to_cloudアプリケーションにより、次のようなメッセージが表示されます。
Appplication startup complete
Uvicorn running on http://127.0.0.1:8080
エージェントとやり取りするには、前のステップの出力に表示された URL を選択します。
[Select an app] を開き、エージェントのリストから
sql_agentを選択します。
エージェントとやり取りする
エージェントに質問したり、指示を出したりして、エージェントとやり取りします。たとえば、次のような質問をします。
What can you do for me ?
同様に、sql_agent のペルソナは SQL エキスパートであるため、アプリケーションのテーブルを作成し、作成したテーブルを操作するクエリを記述するように依頼することもできます。エージェントは、アプリケーションを実行しているマシンで作成された .db ファイルを使用するエフェメラル データベースのみを作成できます。
sql_agent とユーザーのやり取りの例を以下に示します。
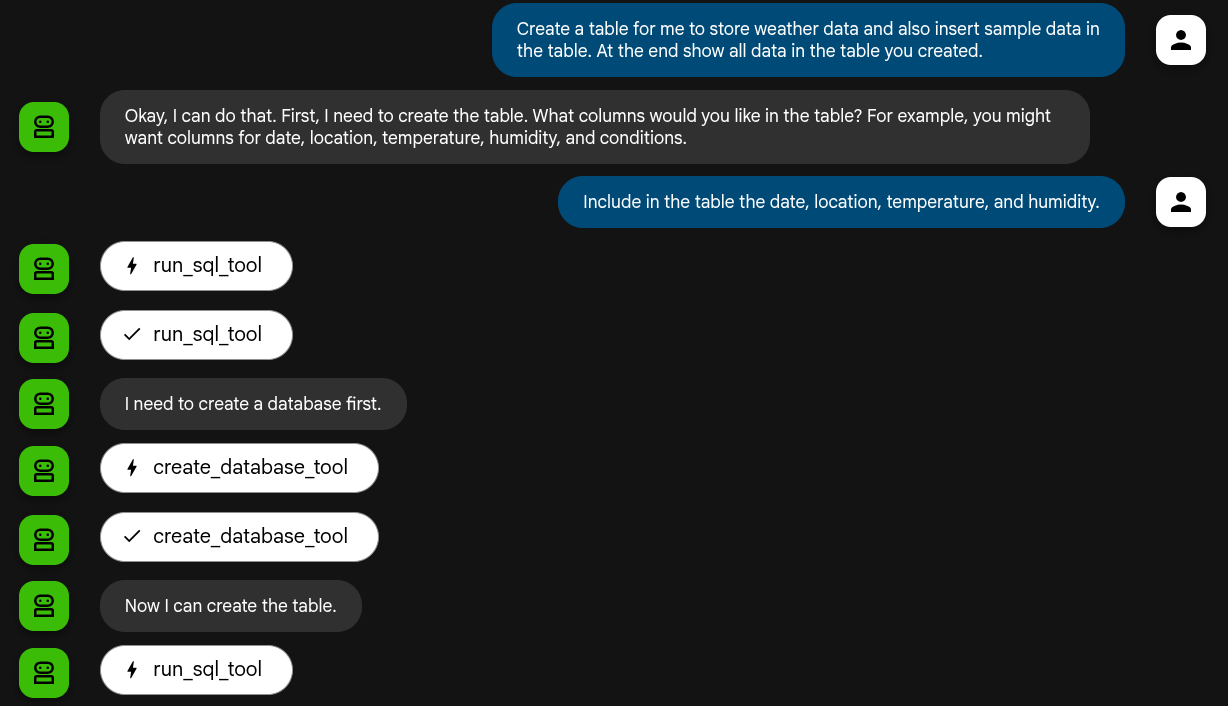
生成 AI エージェントによって実行されるアクションは決定的ではないため、同じプロンプトでも回答が異なる場合があります。
アプリケーションを終了する
アプリケーションを終了するには、アプリケーションの起動に使用したシェルで Ctrl-C キーを押します。
トレース、指標、ログを表示する
このセクションでは、生成 AI イベントを表示する方法について説明します。
始める前に
ログ、指標、トレースデータを表示するために必要な権限を取得するには、プロジェクトに対する次の IAM ロールを付与するよう管理者に依頼してください。
- ログビューア(
roles/logging.viewer) - モニタリング閲覧者 (
roles/monitoring.viewer) - Cloud トレース ユーザー(
roles/cloudtrace.user)
ロールの付与については、プロジェクト、フォルダ、組織へのアクセス権の管理をご覧ください。
必要な権限は、カスタムロールや他の事前定義ロールから取得することもできます。
テレメトリーを表示する
アプリケーションによって作成された生成 AI イベントを表示するには、[Trace エクスプローラ] ページを使用します。
-
Google Cloud コンソールで、
 [Trace エクスプローラ] ページに移動します。
このページは、検索バーを使用して見つけることもできます。
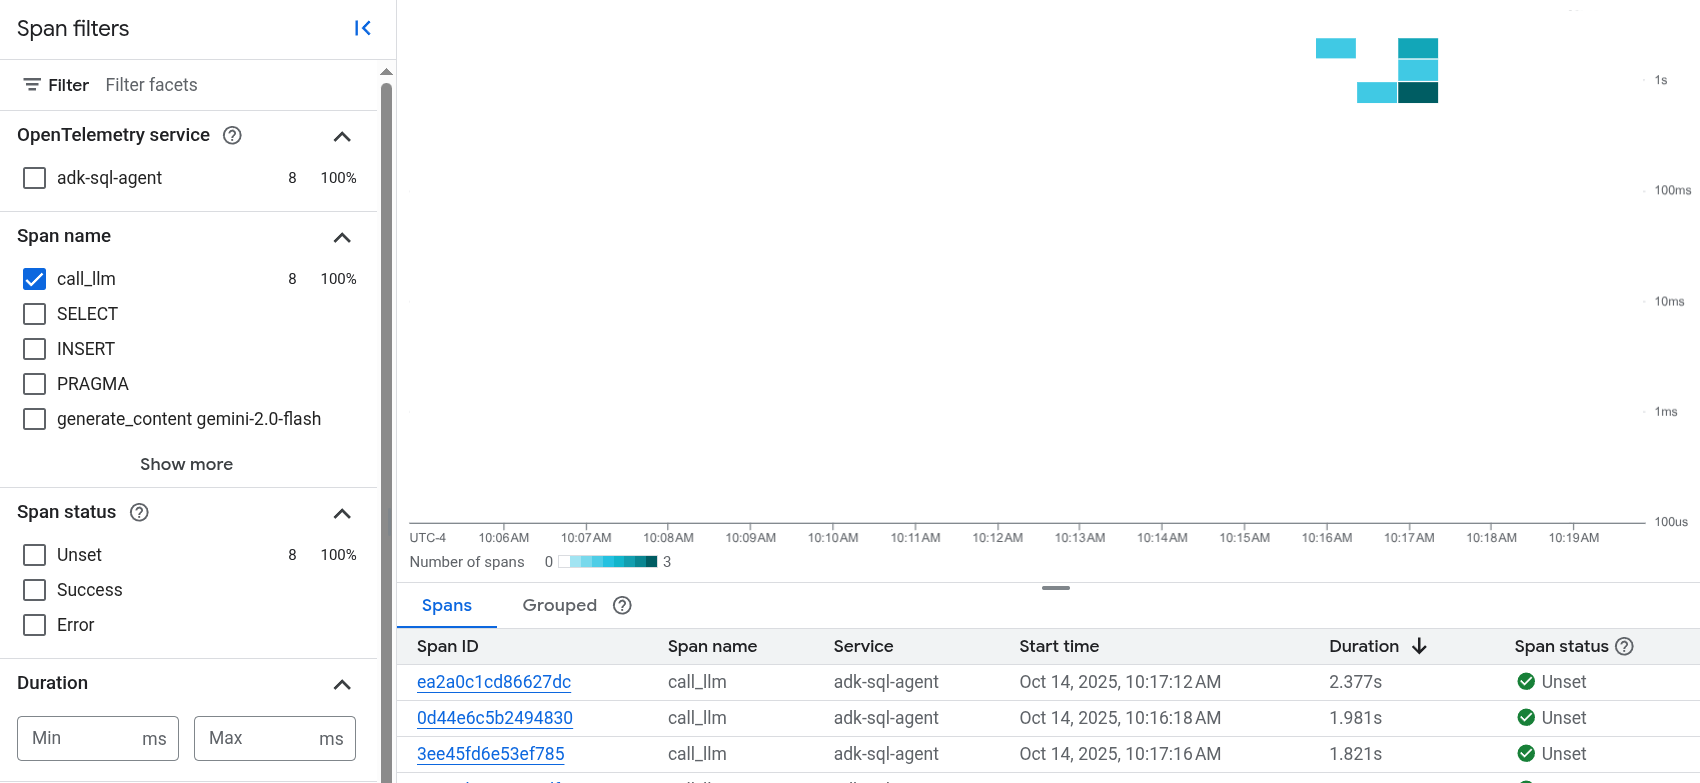
ツールバーで [フィルタを追加]、[スパン名]、[
call_llm] の順に選択します。データのフィルタリング後の [Trace エクスプローラ] ページを以下に示します。
Cloud Trace を初めて使用する場合は、Google Cloud Observability によって、トレースデータを保存するデータベースが作成される必要があります。データベースの作成には数分かかることがあり、その間トレースデータを表示することはできません。
スパンデータとログデータを調べるには、[スパン] テーブルでスパンを選択します。
[詳細] ページが開きます。このページには、関連するトレースとそのスパンが表示されます。ページ上のテーブルには、選択したスパンの詳細情報が表示されます。詳細情報には次の情報が含まれます。
[Inputs/Outputs] タブには、生成 AI エージェントのイベントが表示されます。これらのイベントの詳細については、生成 AI イベントを表示するをご覧ください。
次のスクリーンショットは、1 つのスパンに
call_llmという名前が付けられているトレースを示しています。このスパンは、このエージェントで使用される LLM(大規模言語モデル)を呼び出します。このサンプルでは、Gemini です。Gemini スパンには生成 AI イベントが含まれます。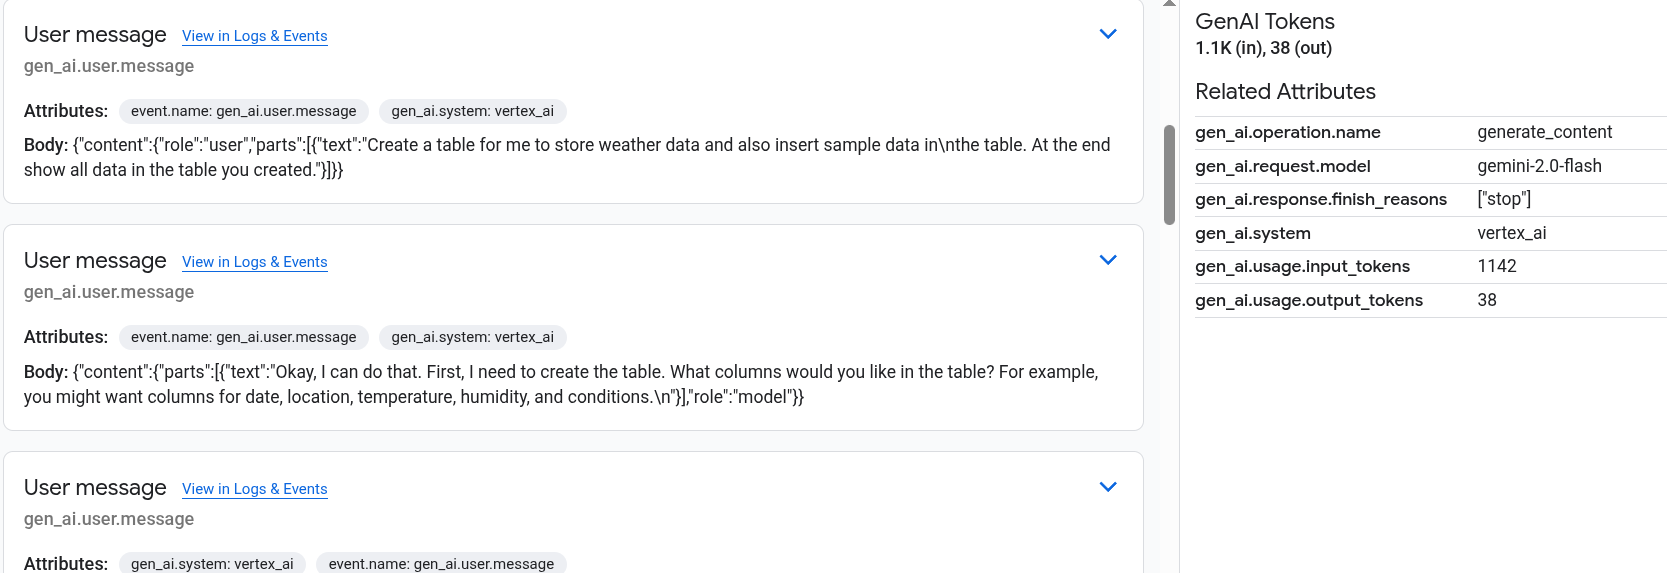
[ログとイベント] タブには、スパンに関連付けられているログエントリとイベントが一覧表示されます。ログ エクスプローラでログデータを表示する場合は、このタブのツールバーで [ログを表示] を選択します。
ログデータには、
sql_agentの回答が含まれます。たとえば、サンプル実行の場合、JSON ペイロードには次の内容が含まれます。{ "logName": "projects/my-project/logs/otel_python_inprocess_log_name_temp", "jsonPayload": { "content": { "parts": [ 0: { "text": "Now I can create the table." } 1: {1} ], "role": "model" } }, ... }
サンプルが計測され、指標データが Google Cloud プロジェクトに送信されますが、指標は生成されません。