
本頁說明 Spanner 中可感知領導者的路由,以及如何使用這項功能。Spanner 會使用領導者感知路由,在雙區域和多區域執行個體設定中動態路由讀寫交易,以減少延遲並提升資料庫效能。系統預設會啟用領導者感知路徑。
讀寫交易的 Spanner 路由
Spanner 會複製資料,以提供額外的資料可用性和地理本地性優點。在 Spanner 雙區域和多區域執行個體設定中,雙區域和多區域執行個體設定中的一個區域會指定為主要區域,並包含資料庫的主要副本。使用雙地區或多區域執行個體設定時,如果用戶端從非主要區域對資料庫發出讀寫交易,寫入作業一律會在主要區域處理,然後傳回非主要區域。因此,從非主要區域提交的讀寫交易需要多次往返主要備用資源,才能成功提交。
領導者感知式路由機制會智慧地路由這些交易,進而改善讀寫交易的延遲。如果啟用領導者感知路由,即使寫入作業並非源自主要區域,工作階段建立要求也會路由至主要區域,以將 Spanner API 前端與主要區域對齊。這種轉送機制可減少非領導者區域 (用戶端應用程式所在位置) 與領導者區域之間所需的網路往返次數,進而將讀寫交易的延遲時間縮短至兩次。
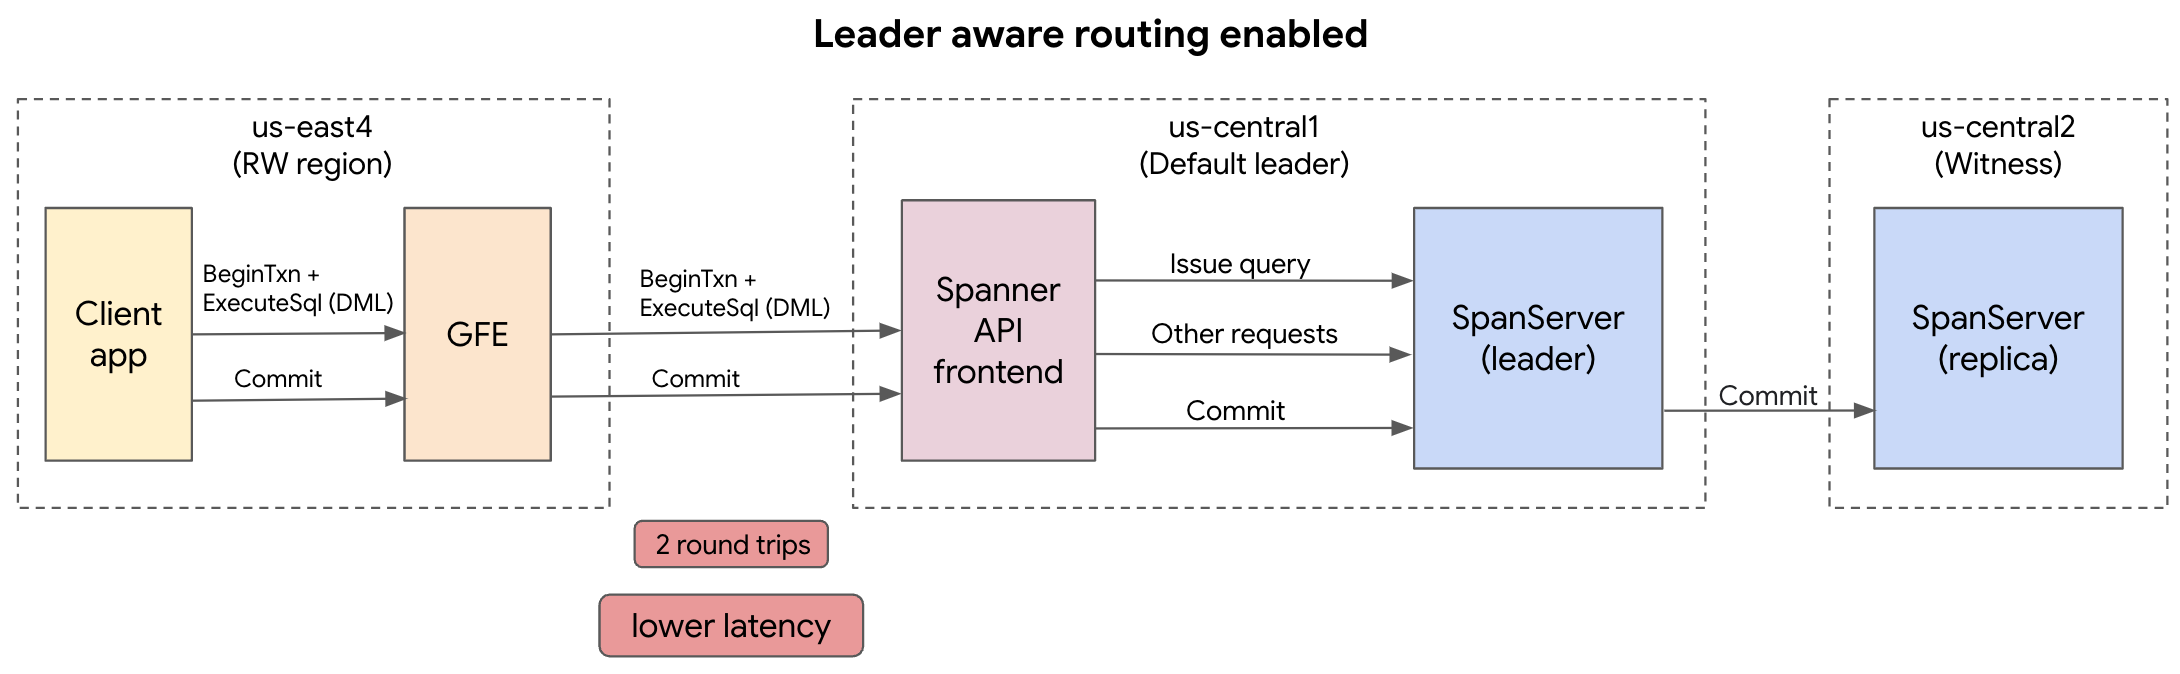 圖 1. 啟用領導者感知路由的 Spanner 路由範例。
如果停用領導者感知型轉送,用戶端應用程式會先將要求轉送至用戶端應用程式區域 (非領導者區域) 內的 Spanner API 前端服務。接著,從用戶端應用程式區域的 Spanner API 前端,會對主要區域的 Spanner 伺服器 (SpanServer) 進行三次以上的往返,以認可寫入作業,進而增加延遲時間。為支援次要索引、限制檢查及讀取寫入內容,需要這些額外的往返行程。
 圖 2. 停用領導者感知路由的 Spanner 路由範例。
用途
使用領導者感知路由後,下列用途可享有低延遲優勢:
- 大量更新:從非領導者區域執行 Dataflow 匯入作業,或執行背景變更 (例如批次 DML)。
- 容許災害並提高可用性:在主要和非主要區域部署用戶端應用程式,容許區域性服務中斷,同時從非主要區域啟動寫入作業。
- 全球應用程式:在全球部署用戶端應用程式,並在廣泛的區域位置提交資料。
限制
如果用戶端應用程式部署在主要區域以外,且您寫入值時未讀取資料 (「盲寫」),則啟用領導者感知路由時,可能會發現延遲時間變長。這是因為啟用領導者感知路由時,非領導者區域的用戶端應用程式與領導者區域的 Spanner API 前端之間,會有兩次跨區域的往返行程 (beginTransaction 和 commit 要求)。不過,如果停用領導者感知型路徑,不含讀取作業的寫入作業只需要一次跨區域往返,即可完成 commit 要求 (beginTransaction 會在本地 Spanner API 前端處理)。舉例來說,如果您將資料大量載入新建立的資料表,交易不太可能從該資料表讀取資料。如果您經常提交寫入作業,但應用程式中沒有讀取作業,建議停用領導者感知路由。詳情請參閱「停用領導者感知路徑」。
使用領導者感知路徑
Spanner 用戶端程式庫預設會啟用領導者感知型轉送。
建議您處理讀寫要求時,啟用領導者感知型路徑。您可以停用這項功能,比較成效差異。
啟用領導者感知路由
您可以使用 Spanner 用戶端程式庫,手動啟用領導者感知路由。
C++
使用 RouteToLeaderOption 結構,設定已啟用領導者感知路由的用戶端應用程式:
void RouteToLeaderOption(std::string const& project_id, std::string const& instance_id,
              std::string const& database_id) {
namespace spanner = ::google::cloud::spanner;

// Create a client with RouteToLeaderOption enabled.
auto client = spanner::Client(
  spanner::MakeConnection(
      spanner::Database(project_id, instance_id, database_id)),
  google::cloud::Options{}.set<spanner::RouteToLeaderOption>(
      spanner::true));
C#
使用 EnableLeaderRouting 設定用戶端應用程式,並啟用領導者感知路由:
// Create a client with leader-aware routing enabled.
SpannerConnectionStringBuilder builder = new
SpannerConnectionStringBuilder();
Builder.EnableLeaderRouting = true;
Go
使用 ClientConfig 設定用戶端應用程式,並啟用領導者感知路由:
type ClientConfig struct {
    // DisableRouteToLeader specifies if all the requests of type read-write
    // and PDML need to be routed to the leader region.
    // Default: false
    DisableRouteToLeader false
}
Java
使用 SpannerOptions.Builder 設定用戶端應用程式,並啟用領導者感知路由:
SpannerOptions options = SpannerOptions.newBuilder().enableLeaderAwareRouting.build();
Spanner spanner = options.getService();
String instance = "my-instance";
String database = "my-database";
Node.js
使用 SpannerOptions 設定用戶端應用程式,並啟用領導者感知路由:
// Instantiates a client with routeToLeaderEnabled enabled
const spanner = new Spanner({
projectId: projectId,
routeToLeaderEnabled: true;
});
PHP
使用 routeToLeader
設定用戶端應用程式,並啟用領導者感知路由:
// Instantiates a client with leader-aware routing enabled
use Google\Cloud\Spanner\SpannerClient;

$routeToLeader = true;
$spanner = new SpannerClient($routeToLeader);
Python
使用 route_to_leader_enabled 設定用戶端應用程式,並啟用領導者感知路由:
spanner_client = spanner.Client(
route_to_leader_enabled=true
)
instance = spanner_client.instance(instance_id)
database = instance.database(database_id)
Ruby
使用 self.new 設定用戶端應用程式,並啟用領導者感知路由:
def self.new(project_id: nil, credentials: nil, scope: nil, timeout: nil,
     endpoint: nil, project: nil, keyfile: nil, emulator_host: nil,
    lib_name: nil, lib_version: nil, enable_leader_aware_routing: true) ->
    Google::Cloud::Spanner::Project
停用領導者感知路由
您可以使用 Spanner 用戶端程式庫停用領導者感知路由。
C++
使用 RouteToLeaderOption 結構,設定用戶端應用程式並停用可感知領導者的路由:
void RouteToLeaderOption(std::string const& project_id, std::string const& instance_id,
              std::string const& database_id) {
namespace spanner = ::google::cloud::spanner;

// Create a client with RouteToLeaderOption disabled.
auto client = spanner::Client(
  spanner::MakeConnection(
      spanner::Database(project_id, instance_id, database_id)),
  google::cloud::Options{}.set<spanner::RouteToLeaderOption>(
      spanner::false));
C#
使用 EnableLeaderRouting
設定用戶端應用程式,並停用領導者感知路由:
// Create a client with leader-aware routing disabled.
SpannerConnectionStringBuilder builder = new
SpannerConnectionStringBuilder();
Builder.EnableLeaderRouting = false;
Go
使用 ClientConfig
設定用戶端應用程式,並停用領導者感知路由:
type ClientConfig struct {
    // DisableRouteToLeader specifies if all the requests of type read-write
    // and PDML need to be routed to the leader region.
    // Default: false
    DisableRouteToLeader true
}
Java
使用 SpannerOptions.Builder 建立與 Spanner 資料庫的連線,並停用領導者感知路由:
SpannerOptions options = SpannerOptions.newBuilder().disableLeaderAwareRouting.build();
Spanner spanner = options.getService();
String instance = "my-instance";
String database = "my-database";
Node.js
使用 SpannerOptions
設定用戶端應用程式,並停用領導者感知路由:
// Instantiates a client with routeToLeaderEnabled disabled
const spanner = new Spanner({
projectId: projectId,
routeToLeaderEnabled: false;
});
PHP
使用 routeToLeader
設定用戶端應用程式,並停用領導者感知路由:
// Instantiates a client with leader-aware routing disabled
use Google\Cloud\Spanner\SpannerClient;

$routeToLeader = false;
$spanner = new SpannerClient($routeToLeader);
Python
使用 route_to_leader_enabled
設定用戶端應用程式,並停用領導者感知路由:
spanner_client = spanner.Client(
route_to_leader_enabled=false
)
instance = spanner_client.instance(instance_id)
database = instance.database(database_id)
Ruby
使用 self.new
設定用戶端應用程式,並停用領導者感知路由:
def self.new(project_id: nil, credentials: nil, scope: nil, timeout: nil,
     endpoint: nil, project: nil, keyfile: nil, emulator_host: nil,
    lib_name: nil, lib_version: nil, enable_leader_aware_routing: false) ->
    Google::Cloud::Spanner::Project
後續步驟
- 瞭解區域、雙區域和多區域設定。
- 瞭解複製。
- 瞭解如何修改資料庫的主要區域。