
Google Managed Service for Apache Spark 叢集內建的一些開放原始碼元件,例如 Apache Hadoop 和 Apache Spark,會提供網路介面。這些介面可用於管理及監控叢集資源和設施,如 YARN 資源管理工具、Hadoop 分散式檔案系統 (HDFS)、MapReduce 和 Spark。透過元件閘道,您可以安全地存取 Managed Service for Apache Spark 預設和選用元件的網頁端點。
使用支援的 Managed Service for Apache Spark 映像檔版本建立叢集後,即可啟用元件網路介面存取權,不必依賴 SSH 通道或修改防火牆規則來允許傳入流量。
注意事項
- 使用者必須具備 dataproc.clusters.use Identity and Access Management 權限,才能存取已啟用的元件網頁介面。請參閱「Managed Service for Apache Spark 角色」。
- 您可以使用元件閘道存取 REST API,例如 Apache Hadoop YARN 和 Apache Livy,以及歷來伺服器。
- 啟用元件閘道後,Managed Service for Apache Spark 會將下列服務新增至叢集的第一個主要節點:
- Apache Knox。預設 Knox Gateway SSL 憑證的效期為 13 個月,自叢集建立日期起算。如果過期,所有 Component Gateway 網頁介面網址都會失效。如要取得新憑證,請參閱「重新產生 Component Gateway SSL 憑證」。
- 反向 Proxy
- 元件閘道不會直接存取
node:port介面,但會自動代理特定服務子集。如要存取節點上的服務 (node:port),請使用 SSH SOCKS Proxy。
建立具有元件閘道的叢集
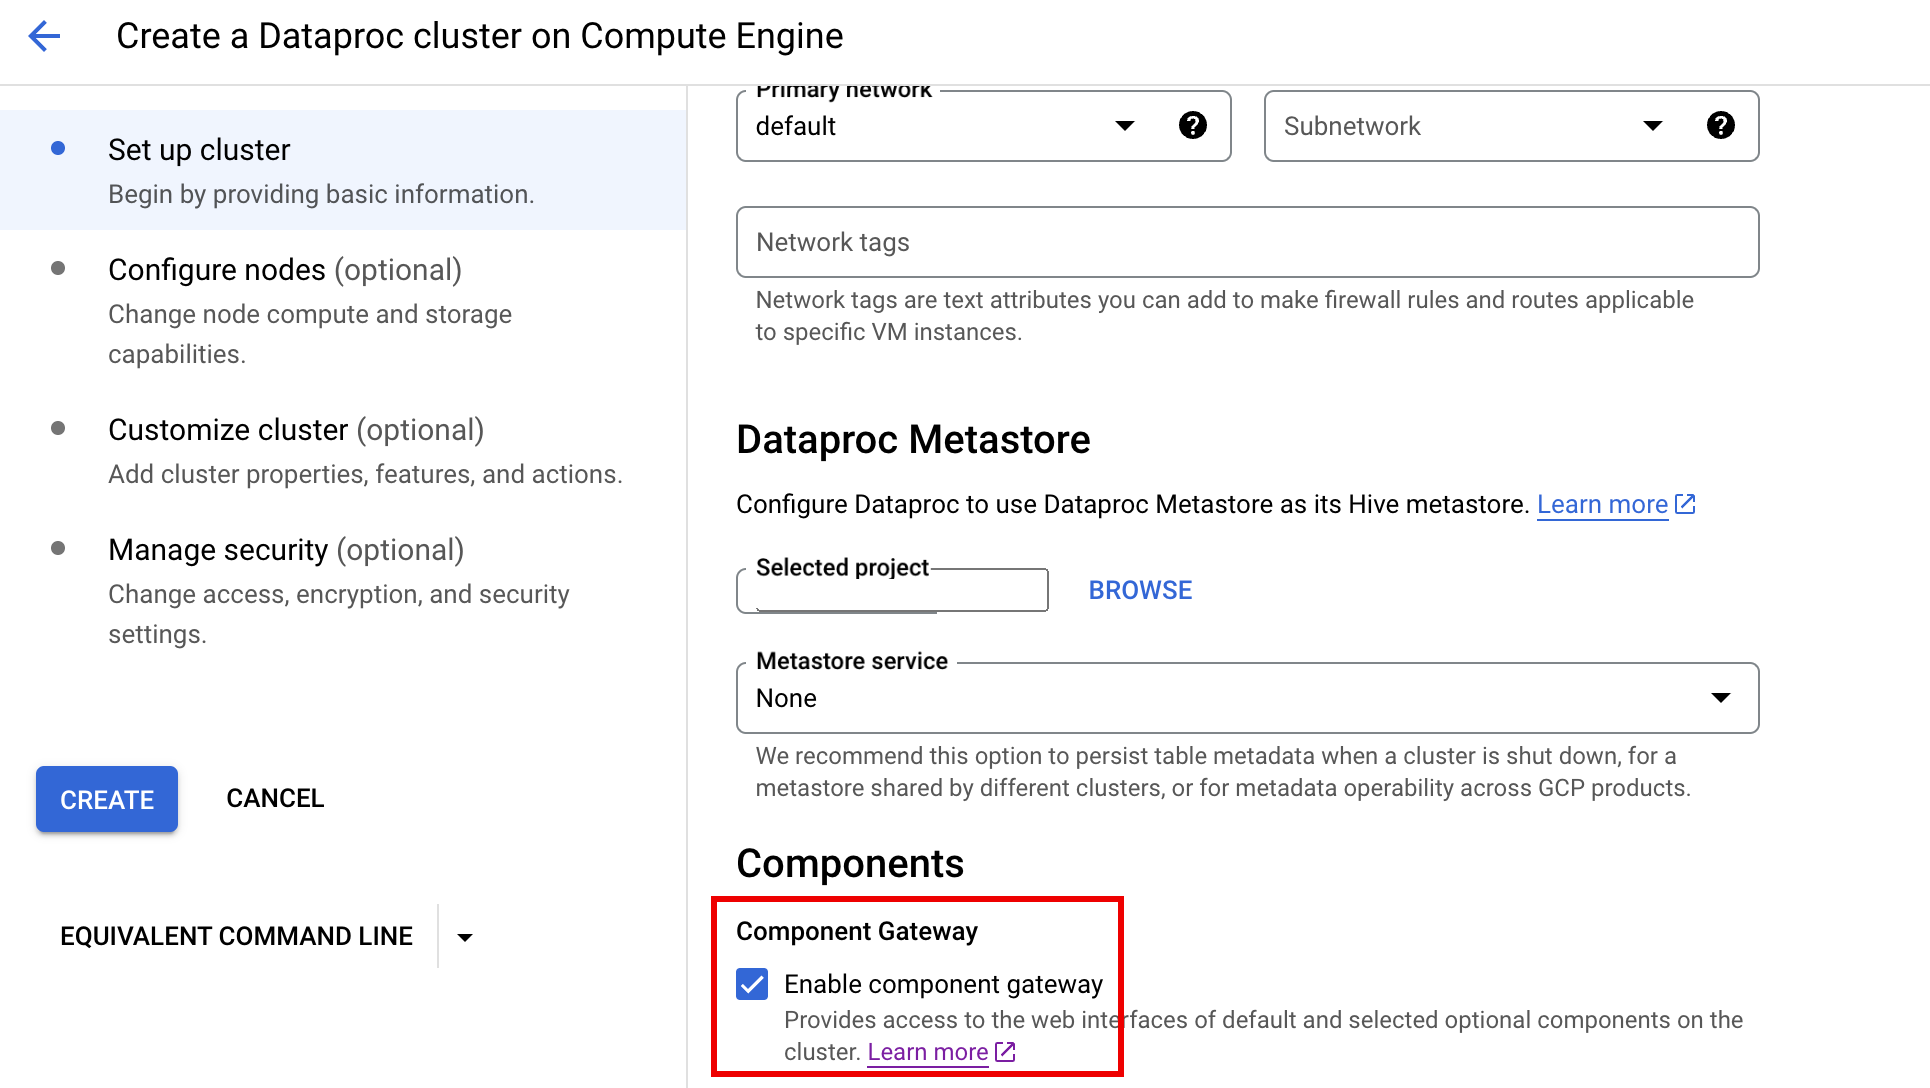
控制台
使用 Google Cloud 控制台建立叢集時,系統預設會啟用 Managed Service for Apache Spark 元件閘道。如要停用這項設定,請在 Managed Service for Apache Spark 在 Compute Engine 上建立 Managed Service for Apache Spark 叢集 頁面的「設定叢集」面板中,取消勾選「啟用元件閘道」部分。
gcloud 指令
在本機的終端機視窗或在 Cloud Shell 中執行 gcloud CLI gcloud dataproc clusters create 指令。
gcloud dataproc clusters create cluster-name \
    --enable-component-gateway \
    --region=region \
    other args ...
REST API
將 EndpointConfig.enableHttpPortAccess 屬性設為 true,使其成為 clusters.create 要求的一部分。
使用元件閘道網址存取網路介面
在叢集上啟用元件閘道後,只要按一下 Google Cloud 控制台中提供的連結,即可連線至叢集第一個主要節點上執行的元件網頁介面。Component Gateway 也會設定 endpointConfig.httpPorts,並將通訊埠名稱對應至網址。除了使用控制台,您也可以使用 gcloud 指令列工具或 Managed Service for Apache Spark REST API 查看這項對應資訊,然後將網址複製並貼到瀏覽器中,連線至元件的 UI。
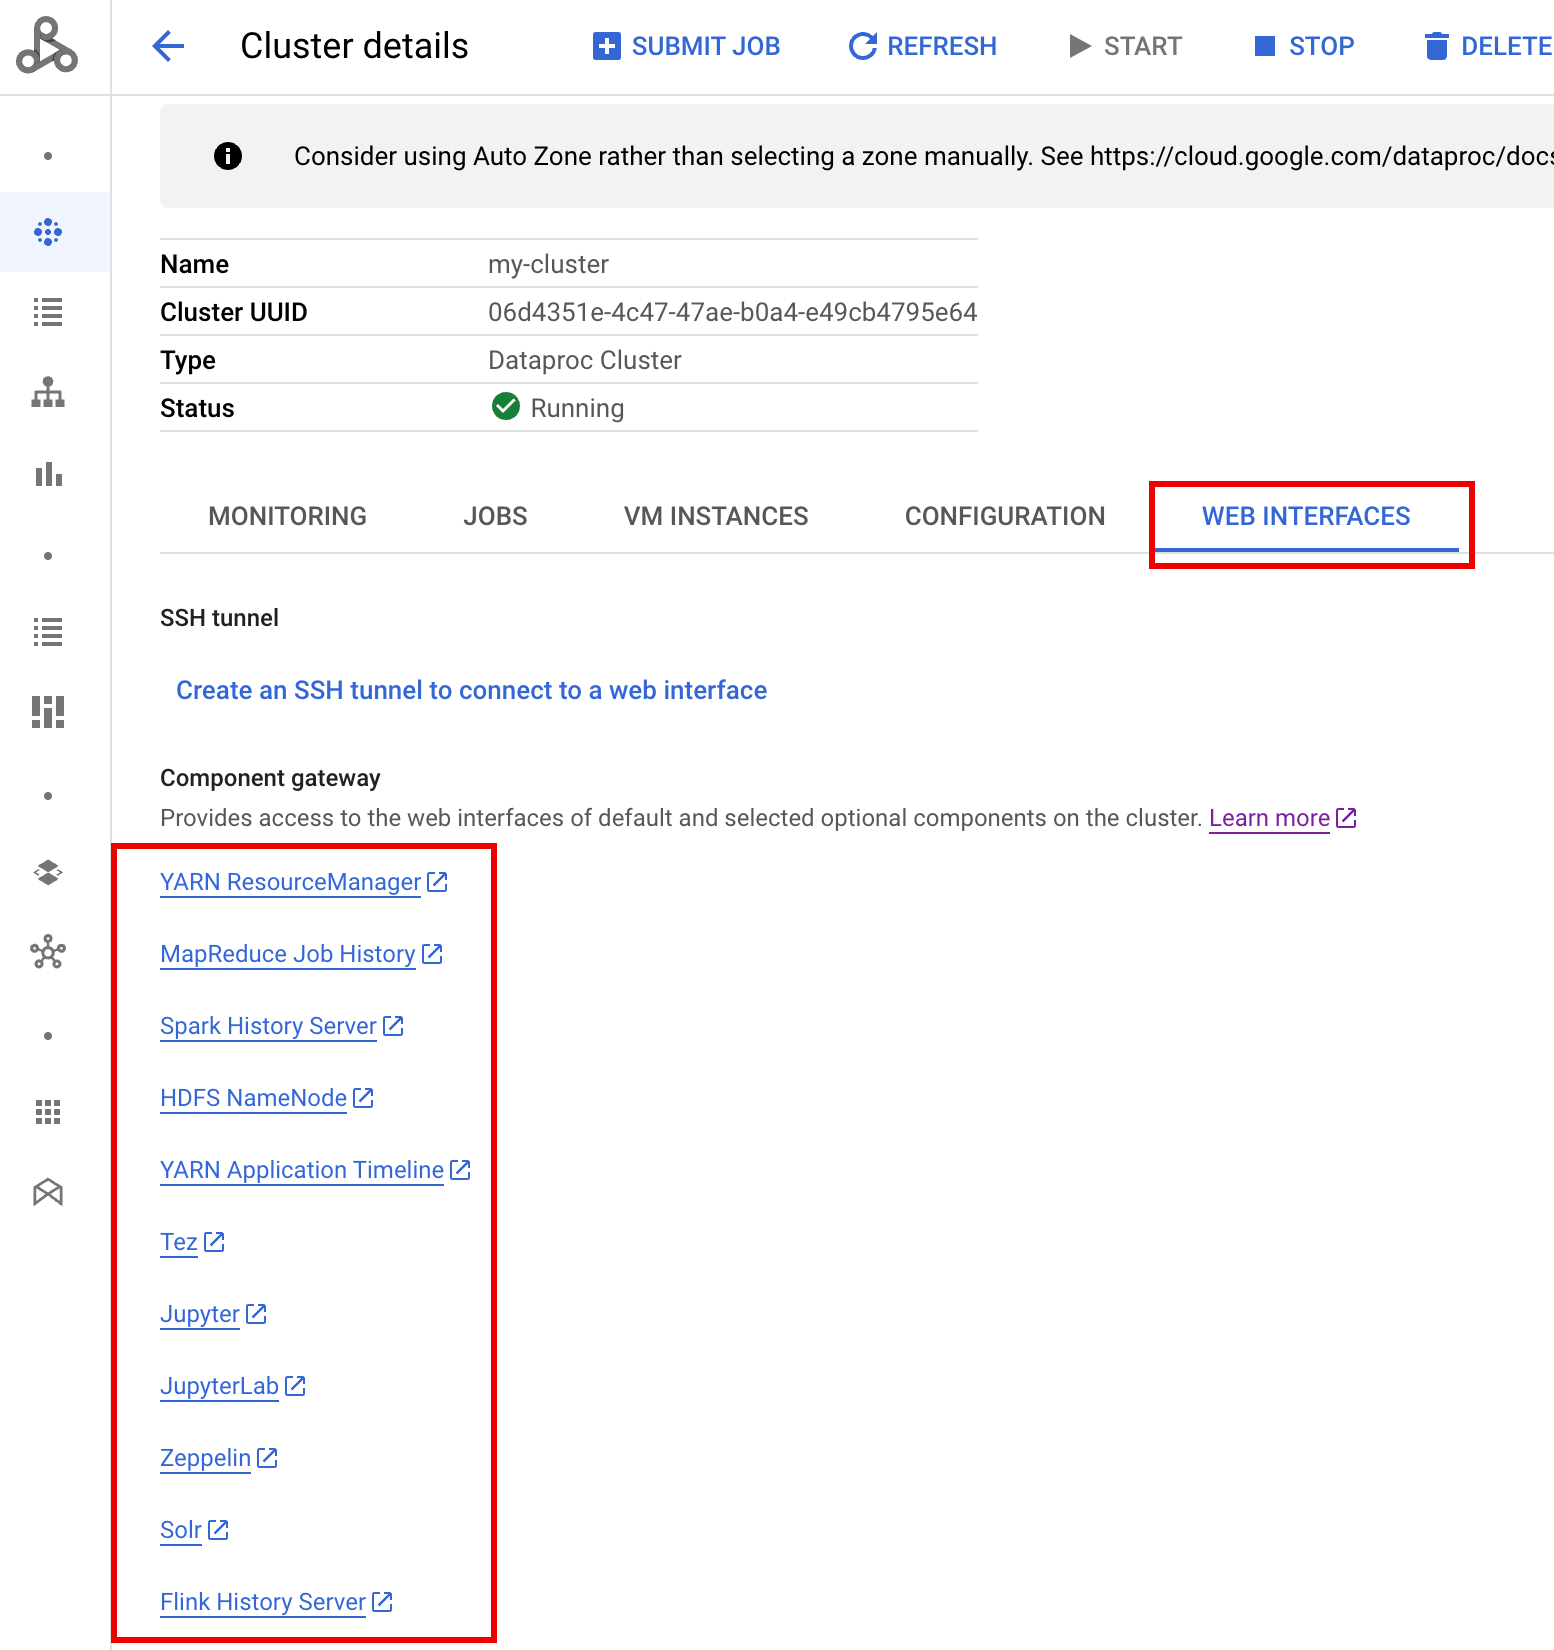
控制台
前往 Google Cloud 控制台的 Managed Service for Apache Spark「叢集」表單,然後選取叢集以開啟「叢集詳細資料」表單。按一下「Web Interfaces」(網路介面) 分頁標籤,即可顯示元件閘道連結清單,這些連結會連至叢集上安裝的預設和選用元件網路介面。按一下連結,在本機瀏覽器中開啟叢集主要節點上執行的網頁介面。
gcloud 指令
在本機的終端機視窗或在 Cloud Shell 中執行 gcloud CLI gcloud dataproc clusters describe 指令。
gcloud dataproc clusters describe cluster-name \
    --region=region
輸出內容範例
...
config:
  endpointConfig:
    enableHttpPortAccess: true
    httpPorts:
      HDFS NameNode:
 https://584bbf70-7a12-4120-b25c-31784c94dbb4-dot-dataproc.google.com/hdfs/
      MapReduce Job History:
 https://584bbf70-7a12-4120-b25c-31784c94dbb4-dot-dataproc.google.com/jobhistory/
      Spark HistoryServer:
 https://584bbf70-7a12-4120-b25c-31784c94dbb4-dot-dataproc.google.com/sparkhistory/
      YARN ResourceManager:
 https://584bbf70-7a12-4120-b25c-31784c94dbb4-dot-dataproc.google.com/yarn/
      YARN Application Timeline:
 https://584bbf70-7a12-4120-b25c-31784c94dbb4-dot-dataproc.google.com/apphistory/
...
REST API
呼叫 clusters.get,取得通訊埠名稱對應至網址的 endpointConfig.httpPorts 對應。搭配 VPC-SC 使用元件閘道
元件閘道支援 VPC Service Controls。為強制執行服務範圍,透過元件閘道對介面提出的要求會視為 Managed Service for Apache Spark API 途徑的一部分,而控管 dataproc.googleapis.com 權限的任何存取權政策,也會控管元件閘道 UI 的存取權。
Component Gateway 也支援 VPC-SC 設定,這些設定依賴私有 Google 連線,適用於沒有外部 IP 位址的 Managed Service for Apache Spark 叢集,但您必須手動設定網路,允許從 Managed Service for Apache Spark 主 VM 透過受限的 Google 虛擬 IP 範圍 *.dataproc.cloud.google.com199.36.153.4/30 存取 *.dataproc.cloud.google.com,方法如下:
- 按照操作說明為所有 Google API 設定 Google 私人連線。
- 使用 Cloud DNS 設定 DNS,或在 Managed Service for Apache Spark 主節點上本機設定 DNS,以允許存取
*.dataproc.cloud.google.com。
使用 Cloud DNS 設定 DNS
建立 Cloud DNS 區域,將傳向 *.dataproc.cloud.google.com 的流量對應至受限 Google API 虛擬 IP 範圍。
建立虛擬私有雲網路的代管私人區域。
gcloud dns managed-zones create ZONE_NAME \
 --visibility=private \
 --networks=https://www.googleapis.com/compute/v1/projects/PROJECT_ID/global/networks/NETWORK_NAME \
 --description=DESCRIPTION \
 --dns-name=dataproc.cloud.google.com \
 --project=PROJECT_ID
ZONE_NAME:您要建立的區域名稱。例如:
vpc。後續步驟都會用到這個名稱。PROJECT_ID:託管虛擬私有雲網路的專案 ID。
NETWORK_NAME 是您虛擬私有雲網路的名稱。
DESCRIPTION:代管區域的選用人類可讀說明。
啟動交易。
gcloud dns record-sets transaction start --zone=ZONE_NAME
- ZONE_NAME 是區域名稱。
新增 DNS 記錄。
gcloud dns record-sets transaction add --name=*.dataproc.cloud.google.com. \ --type=A 199.36.153.4 199.36.153.5 199.36.153.6 199.36.153.7 \ --zone=ZONE_NAME \ --ttl=300- ZONE_NAME 是區域名稱。
gcloud dns record-sets transaction add --name=dataproc.cloud.google.com. \ --type=A 199.36.153.4 199.36.153.5 199.36.153.6 199.36.153.7 \ --zone=ZONE_NAME \ --ttl=300- ZONE_NAME 是區域名稱。
執行交易。
gcloud dns record-sets transaction execute --zone=ZONE_NAME --project=PROJECT_ID
ZONE_NAME 是區域名稱。
PROJECT_ID:託管虛擬私有雲網路的專案 ID。
使用初始化動作在本機設定 Managed Service for Apache Spark 主要節點的 DNS
您可以在 Managed Service for Apache Spark 主節點上設定本機 DNS,允許與 dataproc.cloud.google.com 建立私人連線。這項程序適用於短期測試和開發作業。不建議用於正式環境工作負載。
將初始化動作暫存至 Cloud Storage。
cat <<EOF >component-gateway-vpc-sc-dns-init-action.sh #!/bin/bash readonly ROLE="$(/usr/share/google/get_metadata_value attributes/dataproc-role)" if [[ "${ROLE}" == 'Master' ]]; then readonly PROXY_ENDPOINT=$(grep "^dataproc.proxy.agent.endpoint=" \ "/etc/google-managed-spark/dataproc.properties" | \ tail -n 1 | cut -d '=' -f 2- | sed -r 's/\\([#!=:])/\1/g') readonly HOSTNAME=$(echo ${PROXY_ENDPOINT} | \ sed -n -E 's;^https://([^/?#]*).*;\1;p') echo "199.36.153.4 ${HOSTNAME} # Component Gateway VPC-SC" >> "/etc/hosts" fi EOF gcloud storage cp component-gateway-vpc-sc-dns-init-action.sh gs://BUCKET/- BUCKET 是可從 Managed Service for Apache Spark 叢集存取的 Cloud Storage bucket。
建立 Managed Service for Apache Spark 叢集,並啟用暫存初始化動作和元件閘道。
gcloud dataproc clusters create cluster-name \
    --region=region \
    --initialization-actions=gs://BUCKET/component-gateway-vpc-sc-dns-init-action.sh \
    --enable-component-gateway \
    other args ...
- BUCKET 是步驟 1 中使用的 Cloud Storage bucket。
透過元件閘道以程式輔助方式使用 HTTP API
元件閘道是整合 Apache Knox 的 Proxy。透過 Apache Knox 公開的端點可透過 https://component-gateway-base-url/component-path 存取。
如要透過程式以 Component Gateway 進行驗證,請傳遞包含 OAuth 2.0 不記名權杖的 Proxy-Authorization 標頭。
$ ACCESS_TOKEN="$(gcloud auth print-access-token)"
$ curl -H "Proxy-Authorization: Bearer ${ACCESS_TOKEN}" "https://xxxxxxxxxxxxxxx-dot-us-central1.dataproc.googleusercontent.com/yarn/jmx"
{
  "beans" : [ {
    "name" : "Hadoop:service=ResourceManager,name=RpcActivityForPort8031",
    "modelerType" : "RpcActivityForPort8031",
    "tag.port" : "8031",
    "tag.Context" : "rpc",
    "tag.NumOpenConnectionsPerUser" : "{\"yarn\":2}",
    "tag.Hostname" : "demo-cluster-m",
    "ReceivedBytes" : 1928581096,
    "SentBytes" : 316939850,
    "RpcQueueTimeNumOps" : 7230574,
    "RpcQueueTimeAvgTime" : 0.09090909090909091,
    "RpcProcessingTimeNumOps" : 7230574,
    "RpcProcessingTimeAvgTime" : 0.045454545454545456,
...
Component Gateway 會先移除 Proxy-Authorization 標頭,再將要求轉送至 Apache Knox。
如要找出元件閘道基本網址,請執行下列指令:
gcloud dataproc clusters describe:
$ gcloud dataproc clusters describe <var>cluster-name</var> \
--region=<var>region</var>
...
endpointConfig:
enableHttpPortAccess: true
httpPorts:
HDFS NameNode: https://xxxxxxxxxxxxxxx-dot-us-central1.dataproc.googleusercontent.com/hdfs/dfshealth.html
MapReduce Job History: https://xxxxxxxxxxxxxxx-dot-us-central1.dataproc.googleusercontent.com/jobhistory/
Spark History Server: https://xxxxxxxxxxxxxxx-dot-us-central1.dataproc.googleusercontent.com/sparkhistory/
Tez: https://xxxxxxxxxxxxxxx-dot-us-central1.dataproc.googleusercontent.com/apphistory/tez-ui/
YARN Application Timeline: https://xxxxxxxxxxxxxxx-dot-us-central1.dataproc.googleusercontent.com/apphistory/
YARN ResourceManager: https://xxxxxxxxxxxxxxx-dot-us-central1.dataproc.googleusercontent.com/yarn/
...
基準網址是 httpPorts 底下網址的架構和授權部分。在這個範例中為 https://xxxxxxxxxxxxxxx-dot-us-central1.dataproc.googleusercontent.com/。
重新產生 Component Gateway SSL 憑證
元件閘道的預設 Knox Gateway SSL 憑證適用於:
如果叢集是使用 2.0.93、2.1.41、2.2.7 以上版本的映像檔建立,則為自 Managed Service for Apache Spark 叢集建立日期起算 5 年。
使用較舊的映像檔版本建立叢集時,自 Managed Service for Apache Spark 叢集建立日期起算 13 個月。
如果憑證過期,所有 Component Gateway 網頁介面網址都會失效。
如果 SSL 憑證是由貴機構提供,請向該機構取得新憑證,然後以新憑證替換舊憑證。
如果您使用預設的自行簽署 SSL 憑證,請按照下列步驟續訂:
使用 SSH 連線至 Managed Service for Apache Spark 叢集主要執行個體,並加上
m-0名稱後置字元。在
/var/lib/knox/security/keystores/gateway.jks路徑中找出gateway.jks。keytool -list -v -keystore /var/lib/knox/security/keystores/gateway.jks
將
gateway.jks檔案移至備份目錄。mv /var/lib/knox/security/keystores/gateway.jks /tmp/backup/gateway.jks
重新啟動 Knox 服務,建立新的自行簽署憑證。
systemctl restart knox
確認元件閘道和 Knox 狀態。
systemctl status google-dataproc-component-gateway
systemctl status knox
後續步驟
- 建立叢集,並使用 Managed Service for Apache Spark 元件。