


本教學課程說明如何使用 MaxDiffusion,在 Google Kubernetes Engine (GKE) 上透過 Tensor Processing Unit (TPU) 提供 SDXL 圖像生成模型。在本教學課程中,您會從 Hugging Face 下載模型,並使用執行 MaxDiffusion 的容器,將模型部署至 Autopilot 或 Standard 叢集。
如果您在部署及提供 AI/機器學習工作負載時,需要代管型 Kubernetes 的精細控制、自訂、擴充性、韌性、可攜性和成本效益,本指南就是不錯的起點。如果您需要統一管理式 AI 平台,以便快速建構及提供機器學習模型,同時兼顧成本效益,建議您試用 Vertex AI 部署解決方案。
背景
在 GKE 上使用 TPU 和 MaxDiffusion 服務 SDXL,即可建構穩固且可用於正式環境的服務解決方案,同時享有代管型 Kubernetes 的所有優點,包括成本效益、擴充性和高可用性。本節說明本教學課程中使用的主要技術。
Stable Diffusion XL (SDXL)
Stable Diffusion XL (SDXL) 是 MaxDiffusion 支援推論的潛在擴散模型 (LDM)。生成式 AI 方面,您可以使用 LDM 根據文字描述生成高品質圖片。LDM 適用於圖片搜尋和圖像說明文字等應用程式。
SDXL 支援單一或多主機推論,並提供分片註解。 這項功能可讓 SDXL 在多部機器上訓練及執行,進而提升效率。
詳情請參閱 Stability AI 存放區的生成模型和 SDXL 文件。
TPU
TPU 是 Google 開發的客製化特殊應用積體電路 (ASIC),用於加速機器學習和 AI 模型,這些模型是使用 TensorFlow、PyTorch 和 JAX 等架構建構而成。
在 GKE 中使用 TPU 之前,建議您先完成下列學習路徑:
- 如要瞭解目前可用的 TPU 版本,請參閱 Cloud TPU 系統架構。
- 瞭解 GKE 中的 TPU。
本教學課程涵蓋 SDXL 模型服務。GKE 會在單一主機 TPU v5e 節點上部署模型,並根據模型需求設定 TPU 拓撲,以低延遲提供提示。在本指南中,模型會使用 TPU v5e 晶片和 1x1 拓撲。
MaxDiffusion
MaxDiffusion 是一系列參考實作項目,以 Python 和 Jax 撰寫,適用於各種潛在擴散模型,可在 XLA 裝置 (包括 TPU 和 GPU) 上執行。MaxDiffusion 是研究和製作擴散專案的起點。
詳情請參閱 MaxDiffusion 存放區。
目標
本教學課程適用於使用 JAX 的生成式 AI 客戶、SDXL 的新舊使用者,以及對使用 Kubernetes 容器協調功能提供 LLM 服務感興趣的任何機器學習工程師、MLOps (DevOps) 工程師或平台管理員。
本教學課程包含下列步驟:
- 根據模型特性,建立具有建議 TPU 拓撲的 GKE Autopilot 或 Standard 叢集。
- 建構 SDXL 推論容器映像檔。
- 在 GKE 上部署 SDXL 推論伺服器。
- 透過網頁應用程式提供模型並與其互動。
架構
本節說明本教學課程使用的 GKE 架構。 此架構包含 GKE Autopilot 或標準叢集,可佈建 TPU 並代管 MaxDiffusion 元件。GKE 會使用這些元件部署及提供模型。
下圖顯示這個架構的元件:
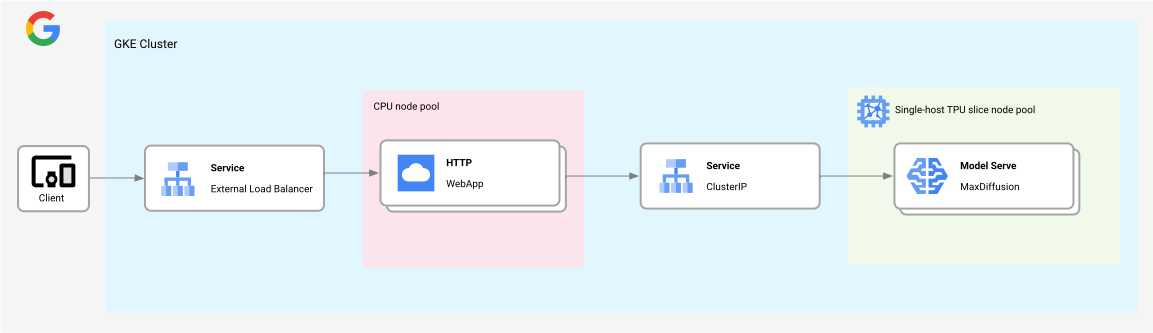
這個架構包含下列元件:
- GKE Autopilot 或 Standard 區域叢集。
- 一個單一主機 TPU 節點集區,用於在 MaxDiffusion 部署作業中代管 SDXL 模型。
- 服務元件,負載平衡器類型為
ClusterIP。這項服務會將傳入流量分配給所有MaxDiffusion HTTP副本。 WebApp HTTP伺服器,具有可分配傳入流量,並將模型服務流量重新導向ClusterIP服務的外部LoadBalancer服務。
事前準備
- 登入 Google Cloud 帳戶。如果您是 Google Cloud新手,歡迎 建立帳戶,親自評估產品在實際工作環境中的成效。新客戶還能獲得價值 $300 美元的免費抵免額,可用於執行、測試及部署工作負載。
-
In the Google Cloud console, on the project selector page, select or create a Google Cloud project.
Roles required to select or create a project
- Select a project: Selecting a project doesn't require a specific IAM role—you can select any project that you've been granted a role on.
-
Create a project: To create a project, you need the Project Creator role
(
roles/resourcemanager.projectCreator), which contains theresourcemanager.projects.createpermission. Learn how to grant roles.
-
Verify that billing is enabled for your Google Cloud project.
Enable the required APIs.
Roles required to enable APIs
To enable APIs, you need the
serviceusage.services.enablepermission. If you created the project, then you likely already have this permission through the Owner role (roles/owner). Otherwise, you can get this permission through the Service Usage Admin role (roles/serviceusage.serviceUsageAdmin). Learn how to grant roles.-
In the Google Cloud console, on the project selector page, select or create a Google Cloud project.
Roles required to select or create a project
- Select a project: Selecting a project doesn't require a specific IAM role—you can select any project that you've been granted a role on.
-
Create a project: To create a project, you need the Project Creator role
(
roles/resourcemanager.projectCreator), which contains theresourcemanager.projects.createpermission. Learn how to grant roles.
-
Verify that billing is enabled for your Google Cloud project.
Enable the required APIs.
Roles required to enable APIs
To enable APIs, you need the
serviceusage.services.enablepermission. If you created the project, then you likely already have this permission through the Owner role (roles/owner). Otherwise, you can get this permission through the Service Usage Admin role (roles/serviceusage.serviceUsageAdmin). Learn how to grant roles.-
確認您在專案中具備下列角色: roles/container.admin、roles/iam.serviceAccountAdmin、roles/artifactregistry.admin、roles/cloudbuild.builds.editor
檢查角色
-
前往 Google Cloud 控制台的「IAM」頁面。
前往 IAM - 選取專案。
-
在「主體」欄中,找出所有識別您或您所屬群組的資料列。如要瞭解自己所屬的群組,請與管理員聯絡。
- 針對指定或包含您的所有列,請檢查「角色」欄,確認角色清單是否包含必要角色。
授予角色
-
前往 Google Cloud 控制台的「IAM」頁面。
前往 IAM - 選取專案。
- 按一下「Grant access」(授予存取權)。
-
在「New principals」(新增主體) 欄位中,輸入您的使用者 ID。 這通常是指 Google 帳戶的電子郵件地址。
- 按一下「Select a role」(選取角色),然後搜尋角色。
- 如要授予其他角色,請按一下「Add another role」(新增其他角色),然後新增其他角色。
- 按一下「Save」(儲存)。
-
- 確認您有足夠的 TPU v5e PodSlice Lite 晶片配額。在本教學課程中,您將使用隨選執行個體。
準備環境
在本教學課程中,您將使用 Cloud Shell 管理Google Cloud上託管的資源。Cloud Shell 已預先安裝本教學課程所需的軟體,包括 kubectl 和
gcloud CLI。
如要使用 Cloud Shell 設定環境,請按照下列步驟操作:
在 Google Cloud 控制台中啟用 Cloud Shell。
控制台底部會開啟 Cloud Shell 工作階段,並顯示指令列提示。 Google Cloud Cloud Shell 是已安裝 Google Cloud CLI 的殼層環境,並已針對您目前的專案設定好相關值。工作階段可能要幾秒鐘的時間才能初始化。
設定預設環境變數:
gcloud config set project PROJECT_ID
gcloud config set billing/quota_project PROJECT_ID
export PROJECT_ID=$(gcloud config get project)
export CLUSTER_NAME=CLUSTER_NAME
export CLUSTER_VERSION=CLUSTER_VERSION
export REGION=REGION_NAME
export ZONE=ZONE
替換下列值:
- PROJECT_ID:您的 Google Cloud 專案 ID。
- CLUSTER_NAME:GKE 叢集的名稱。
- CLUSTER_VERSION:GKE 版本。您必須指定支援 TPU Trillium (v6e) 的 GKE 版本。詳情請參閱「在 GKE 中驗證 TPU 可用性」。
- REGION_NAME:GKE 叢集、Cloud Storage 值區和 TPU 節點所在的區域。這個區域包含提供 TPU v5e 機器類型的可用區域 (例如
us-west1、us-west4、us-central1、us-east1、us-east5或europe-west4)。 - (僅限 Standard 叢集) ZONE:提供 TPU 資源的可用區 (例如
us-west4-a)。如果是 Autopilot 叢集,您不需要指定可用區,只要指定區域即可。
複製範例存放區,然後開啟教學課程目錄:
git clone https://github.com/GoogleCloudPlatform/kubernetes-engine-samples
cd kubernetes-engine-samples/ai-ml/maxdiffusion-tpu
WORK_DIR=$(pwd)
gcloud artifacts repositories create gke-llm --repository-format=docker --location=$REGION
gcloud auth configure-docker $REGION-docker.pkg.dev
建立及設定 Google Cloud 資源
請按照下列操作說明建立必要資源。
建立 GKE 叢集
您可以在 GKE Autopilot 或 Standard 叢集中的 TPU 上提供 SDXL。建議使用 Autopilot 叢集,享有全代管 Kubernetes 體驗。如要為工作負載選擇最合適的 GKE 作業模式,請參閱「選擇 GKE 作業模式」。
Autopilot
在 Cloud Shell 中執行下列指令:
gcloud container clusters create-auto ${CLUSTER_NAME} \
  --project=${PROJECT_ID} \
  --location=${REGION} \
  --release-channel=rapid \
  --cluster-version=${CLUSTER_VERSION}
GKE 會根據部署的工作負載要求,建立含有 CPU 和 TPU 節點的 Autopilot 叢集。
設定
kubectl與叢集通訊:gcloud container clusters get-credentials ${CLUSTER_NAME} --location=${REGION}
標準
建立使用 Workload Identity Federation for GKE 的地區 GKE Standard 叢集。
gcloud container clusters create ${CLUSTER_NAME} \
    --enable-ip-alias \
    --machine-type=n2-standard-4 \
    --num-nodes=2 \
    --workload-pool=${PROJECT_ID}.svc.id.goog \
    --location=${REGION}
建立叢集可能需要幾分鐘的時間。
執行下列指令,為叢集建立節點集區:
gcloud container node-pools create maxdiffusion-tpu-nodepool \
  --cluster=${CLUSTER_NAME} \
  --machine-type=ct5lp-hightpu-1t \
  --num-nodes=1 \
  --location=${REGION} \
  --node-locations=${ZONE} \
  --spot
GKE 會建立具有
1x1拓撲和一個節點的 TPU v5e 節點集區。如要建立具有不同拓撲的節點集區,請瞭解如何規劃 TPU 設定。請務必更新本教學課程中的範例值,例如
cloud.google.com/gke-tpu-topology和google.com/tpu。設定
kubectl與叢集通訊:gcloud container clusters get-credentials ${CLUSTER_NAME} --location=${REGION}
建構 SDXL 推論容器
請按照下列操作說明,為 SDXL 推論伺服器建構容器映像檔。
開啟
build/server/cloudbuild.yaml資訊清單:執行建構作業,並建立推論容器映像檔。
cd $WORK_DIR/build/server
gcloud builds submit . --region=$REGION
輸出內容會包含容器映像檔的路徑。
部署 SDXL 推論伺服器
在本節中,您將部署 SDXL 推論伺服器。本教學課程使用 Kubernetes Deployment 部署伺服器。Deployment 是 Kubernetes API 物件,可讓您執行多個 Pod 副本,並將這些副本分散到叢集中的節點。
探索
serve_sdxl_v5e.yaml資訊清單。更新資訊清單中的專案 ID。
cd $WORK_DIR
perl -pi -e 's|PROJECT_ID|PROJECT_ID|g' serve_sdxl_v5e.yaml
perl -pi -e 's|REGION|REGION_NAME|g' serve_sdxl_v5e.yaml
套用資訊清單:
kubectl apply -f serve_sdxl_v5e.yaml輸出結果會與下列內容相似:
deployment.apps/max-diffusion-server created確認模型狀態:
kubectl get deploy --watch輸出結果會與下列內容相似:
NAME                          READY   UP-TO-DATE   AVAILABLE   AGE
stable-diffusion-deployment   1/1     1            1           8m21s
擷取
ClusterIP位址:kubectl get service max-diffusion-server輸出結果含有一個
ClusterIP欄位,記下 CLUSTER-IP 值。驗證 Deployment:
 export ClusterIP=CLUSTER_IP
 kubectl run curl --image=curlimages/curl \
    -it --rm --restart=Never \
    -- "$ClusterIP:8000"
將 CLUSTER_IP 換成您先前記下的 CLUSTER-IP 值。輸出結果會與下列內容相似:
{"message":"Hello world! From FastAPI running on Uvicorn with Gunicorn."}
pod "curl" deleted
查看 Deployment 的記錄:
kubectl logs -l app=max-diffusion-server部署完成後,輸出內容會類似於下列內容:
2024-06-12 15:45:45,459 [INFO] __main__: replicate params:
2024-06-12 15:45:46,175 [INFO] __main__: start initialized compiling
2024-06-12 15:45:46,175 [INFO] __main__: Compiling ...
2024-06-12 15:45:46,175 [INFO] __main__: aot compiling:
2024-06-12 15:45:46,176 [INFO] __main__: tokenize prompts:2024-06-12 15:48:49,093 [INFO] __main__: Compiled in 182.91802048683167
INFO:     Started server process [1]
INFO:     Waiting for application startup.
INFO:     Application startup complete.
部署網頁應用程式用戶端
在本節中,您將部署網頁應用程式用戶端,提供 SDXL 模型。
探索
build/webapp/cloudbuild.yaml資訊清單。執行建構作業,並在
build/webapp目錄下建立用戶端容器映像檔。cd $WORK_DIR/build/webapp gcloud builds submit . --region=$REGION輸出內容會包含容器映像檔的路徑。
開啟
serve_sdxl_client.yaml資訊清單:在資訊清單中編輯專案 ID:
cd $WORK_DIR
perl -pi -e 's|PROJECT_ID|PROJECT_ID|g' serve_sdxl_client.yaml
perl -pi -e 's|ClusterIP|CLUSTER_IP|g' serve_sdxl_client.yaml
perl -pi -e 's|REGION|REGION_NAME|g' serve_sdxl_client.yaml
套用資訊清單:
kubectl apply -f serve_sdxl_client.yaml擷取
LoadBalancerIP 位址:kubectl get service max-diffusion-client-service輸出結果含有一個
LoadBalancer欄位,記下 EXTERNAL-IP 的值。
透過網頁與模型互動
透過網路瀏覽器存取下列網址:
http://EXTERNAL_IP:8080將 EXTERNAL_IP 換成您先前記下的
EXTERNAL_IP值。透過對話介面與 SDXL 互動。新增提示,然後點按「提交」。例如:
Create a detailed image of a fictional historical site, capturing its unique architecture and cultural significance
輸出內容是模型生成的圖片,類似於下列範例:

清除所用資源
為避免因為本教學課程所用資源,導致系統向 Google Cloud 收取費用,請刪除含有相關資源的專案,或者保留專案但刪除個別資源。
刪除專案
- 前往 Google Cloud 控制台的「Manage resources」(管理資源) 頁面。
- 在專案清單中選取要刪除的專案,然後點選「Delete」(刪除)。
- 在對話方塊中輸入專案 ID,然後按一下 [Shut down] (關閉) 以刪除專案。
刪除個別資源
保留專案並刪除個別資源,如下一節所述。執行下列指令並按照提示操作:
gcloud container clusters delete ${CLUSTER_NAME} --location=${REGION}
後續步驟
- 使用其他 TPU 拓撲設定本教學課程。如要進一步瞭解其他 TPU 拓撲,請參閱「規劃 TPU 設定」。
- 在本教學課程中複製的範例存放區中,探索 MaxDiffusion 推論伺服器程式碼範例。
- 進一步瞭解 GKE 中的 TPU。
- 探索 JetStream GitHub 存放區。
- 探索 Vertex AI Model Garden。