

ClusterNetworkPolicy lets you define global GKE security postures across the entire cluster. This document is intended for cluster administrators who need to enforce mandatory security guardrails or establish zero-trust baselines.
This resource relies on a strict evaluation hierarchy that operates at a higher
precedence than standard, namespace-scoped NetworkPolicy resources. You can
use the ClusterNetworkPolicy resource to implement explicit Deny,
Accept, or
Pass actions. These actions let you configure global allow or deny policies,
delegate traffic control to specific namespaces, and restrict egress traffic to
CIDR blocks.
Before you begin
Before you configure a cluster network policy, ensure that you meet the following requirements:
- Ensure your GKE cluster runs version 1.36.0-gke.4447000 or later.
- Ensure your cluster uses GKE Dataplane V2.
Supported protocols and ports
ClusterNetworkPolicy rules can match traffic based on the TCP, UDP, or SCTP protocols. You can specify destination ports in the following ways:
- Specific port number: use the
destinationPort.numbersetting to target a single port (for example,80). - Port range: use the
destinationPort.rangesetting to target a range of ports (for example,8000to9000). - Named port: use the
destinationNamedPortsetting to target a symbolic name defined in a Pod specification.
Policy evaluation hierarchy
Unlike standard, additive NetworkPolicies, a ClusterNetworkPolicy (CNP) relies on a strict evaluation hierarchy where the first matching rule wins. Traffic flows sequentially through a three-layer pipeline:
- The tier: Admin rules execute first, cascading down to NetworkPolicy, then Baseline.
- CNP priority: within a tier, policies are evaluated based on their explicit numeric priority.
- CNP rule order: inside a single policy, rules are processed top-to-bottom like an access control list (ACL).
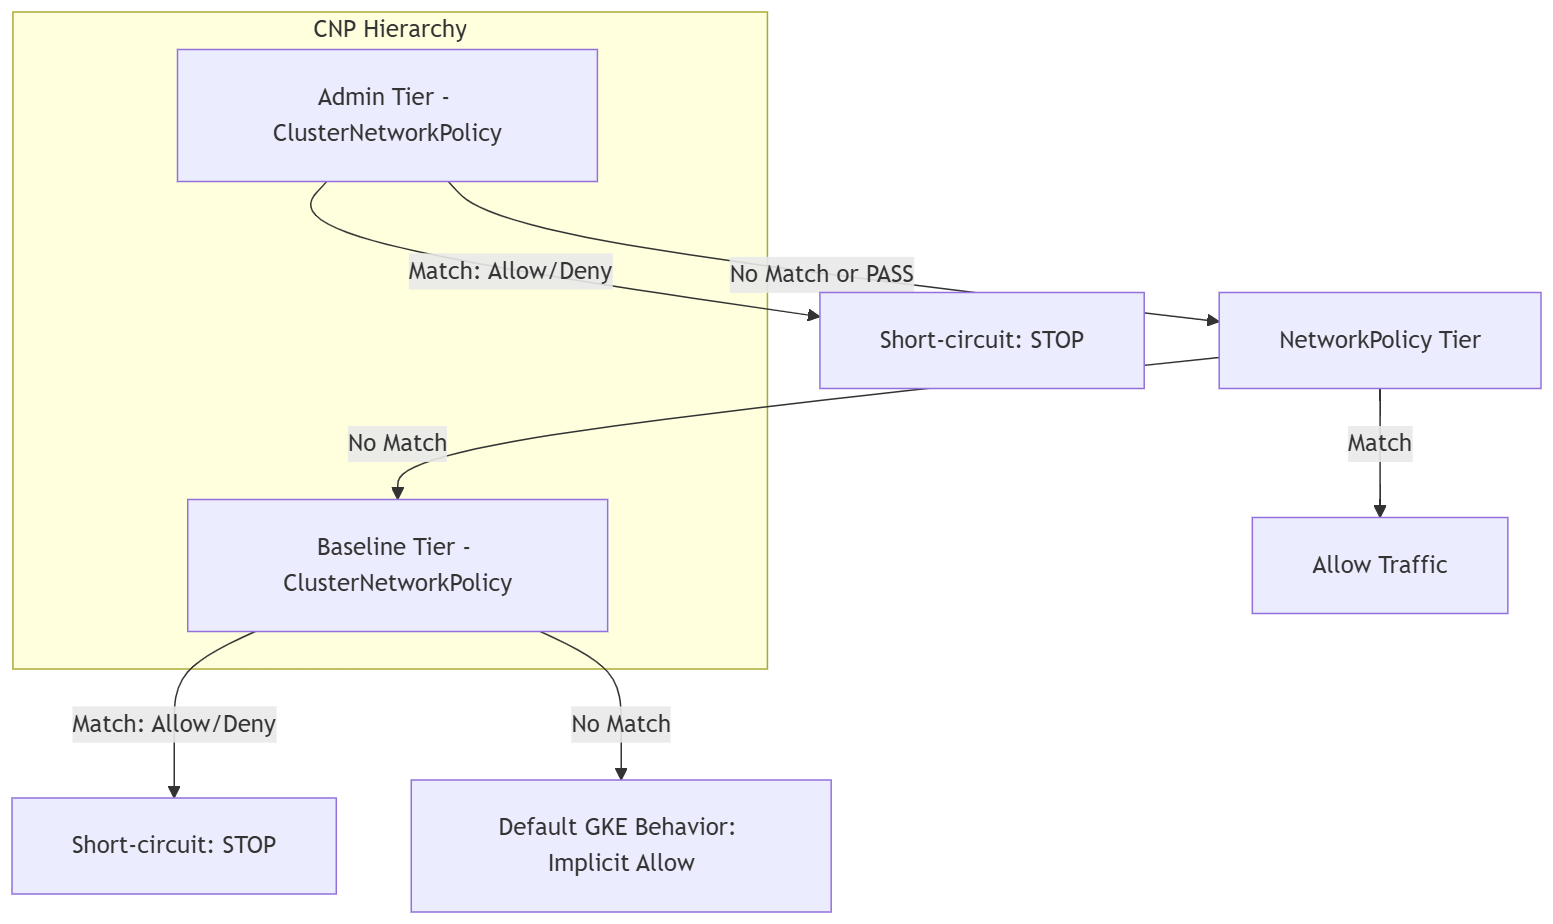
The preceding diagram illustrates the decision flow of the CNP evaluation hierarchy:
- Admin Tier: traffic is first evaluated against the
ClusterNetworkPolicyrules in theAdmintier. If there is an Allow or Deny match, evaluation stops. If there is no match or a Pass action, traffic proceeds to theNetworkPolicytier. - NetworkPolicy Tier: traffic is evaluated against standard namespace policies. If there is a match, traffic is allowed. If there is no match, traffic proceeds to the Baseline tier.
- Baseline Tier: traffic is evaluated against the
ClusterNetworkPolicyrules in the Baseline tier. If there is an Allow or Deny match, evaluation stops. If there is no match, traffic proceeds to the default behavior. - Default GKE Behavior: if no policies match in any tier, traffic is subjected to an implicit allow behavior.
Verdict actions: Allow, Deny, and Pass
Upon matching a packet, every rule triggers one of three strict actions:
- Deny: immediately blocks the traffic.
- Accept: permits the traffic. Both actions instantly short-circuit the pipeline, which ignores all remaining policies.
- Pass: transfers control down to the next tier, allowing platform engineers to delegate specific traffic decisions to standard namespace-level policies without giving up overarching administrative control.
Configure a global deny policy
To isolate a sensitive namespace from all other cluster internal traffic, apply a non-overridable deny rule. This default-deny policy helps ensure that any traffic to or from the sensitive namespace is blocked at the administrative level. This policy acts as a protective baseline that cannot be accidentally bypassed by namespace-level rules.
Save the following manifest as
global-deny.yaml:apiVersion: policy.networking.k8s.io/v1alpha2 kind: ClusterNetworkPolicy metadata: name: cluster-wide-deny-sensitive spec: tier: Admin priority: 10 subject: namespaces: matchLabels: kubernetes.io/metadata.name: sensitive-ns ingress: - action: Deny name: deny-all-ingress from: - namespaces: matchLabels: {} egress: - action: Deny name: deny-all-egress to: - namespaces: matchLabels: {}Apply the manifest to your cluster:
kubectl apply -f global-deny.yaml
Configure a global allow policy
A global allow policy can help ensure that all Pods can reach the cluster DNS service, regardless of any developer-created network policies.
Save the following manifest as
global-allow-dns.yaml:apiVersion: policy.networking.k8s.io/v1alpha2 kind: ClusterNetworkPolicy metadata: name: allow-kube-dns-admin spec: tier: Admin priority: 20 subject: namespaces: {} egress: - action: Accept name: allow-dns-egress to: - pods: namespaceSelector: matchLabels: kubernetes.io/metadata.name: kube-system podSelector: matchLabels: k8s-app: kube-dns protocols: - udp: destinationPort: number: 53 - tcp: destinationPort: number: 53Apply the manifest to your cluster:
kubectl apply -f global-allow-dns.yaml
Delegate traffic to namespace policies
Delegate specific traffic patterns to standard namespace-scoped NetworkPolicy objects.
Save the following manifest as
delegate-policy.yaml:apiVersion: policy.networking.k8s.io/v1alpha2 kind: ClusterNetworkPolicy metadata: name: delegate-to-netpol spec: tier: Admin priority: 30 subject: namespaces: {} egress: - action: Pass name: delegate-web-traffic to: - namespaces: matchLabels: app: web-backend protocols: - tcp: destinationPort: number: 8080Apply the manifest to your cluster:
kubectl apply -f delegate-policy.yamlTo permit the delegated traffic within the target namespace, save the following standard
NetworkPolicymanifest asallow-web-backend.yaml:apiVersion: networking.k8s.io/v1 kind: NetworkPolicy metadata: name: allow-web-backend namespace: backend-ns spec: podSelector: matchLabels: app: web-backend ingress: - from: - namespaceSelector: matchLabels: app: web-frontend ports: - protocol: TCP port: 8080Apply the standard
NetworkPolicymanifest to your cluster:kubectl apply -f allow-web-backend.yaml
Configure baseline guardrails
Establish a default GKE security posture that namespace administrators can override using standard network policies.
Save the following baseline manifest as
baseline-deny.yaml:apiVersion: policy.networking.k8s.io/v1alpha2 kind: ClusterNetworkPolicy metadata: name: default-deny-baseline spec: tier: Baseline priority: 100 subject: namespaces: {} ingress: - action: Deny name: baseline-deny-all from: - namespaces: {}Apply the baseline manifest to your cluster:
kubectl apply -f baseline-deny.yamlSave the following developer override manifest as
developer-allow.yaml:apiVersion: networking.k8s.io/v1 kind: NetworkPolicy metadata: name: allow-frontend-access namespace: my-app-ns spec: podSelector: matchLabels: app: frontend ingress: - from: - namespaceSelector: matchLabels: kubernetes.io/metadata.name: ingress-nginxApply the override manifest to your cluster:
kubectl apply -f developer-allow.yaml
Configure policies using named ports
To abstract port numbers from your security policies, reference named ports defined in your Pod specifications.
Save the following deployment manifest as
app-deployment.yaml:apiVersion: apps/v1 kind: Deployment metadata: name: my-webapp spec: template: spec: containers: - name: web-container image: nginx ports: - name: http-web containerPort: 8080Apply the deployment manifest to your cluster:
kubectl apply -f app-deployment.yamlSave the following policy manifest as
named-port-policy.yaml:apiVersion: policy.networking.k8s.io/v1alpha2 kind: ClusterNetworkPolicy metadata: name: allow-web-named-port spec: tier: Admin priority: 40 subject: namespaces: {} egress: - action: Accept to: - namespaces: matchLabels: app: my-webapp protocols: - tcp: destinationNamedPort: http-webApply the policy manifest to your cluster:
kubectl apply -f named-port-policy.yaml
Restrict egress to CIDR blocks
Control access to external resources or corporate intranets by specifying CIDR blocks.
Save the following manifest as
cidr-policy.yaml:apiVersion: policy.networking.k8s.io/v1alpha2 kind: ClusterNetworkPolicy metadata: name: allow-egress-to-intranet spec: tier: Admin priority: 60 subject: namespaces: {} egress: - action: Accept name: allow-intranet to: - networks: - 10.0.0.0/8 - 192.168.0.0/16Apply the manifest to your cluster:
kubectl apply -f cidr-policy.yaml
Configure priority precedence
To control evaluation order when multiple policies apply to the same Pods,
specify a priority. Priorities range from 0 to 1000, where lower numbers
indicate higher precedence. A single ClusterNetworkPolicy object can contain a
maximum of 100 ingress rules and 100 egress rules.
Save the following manifest as
priority-policies.yaml:apiVersion: policy.networking.k8s.io/v1alpha2 kind: ClusterNetworkPolicy metadata: name: deny-beta spec: tier: Admin priority: 10 subject: namespaces: matchLabels: team: alpha ingress: - action: Accept name: allow-beta-monitoring from: - pods: namespaceSelector: matchLabels: team: beta podSelector: matchLabels: app: monitoring - action: Deny name: deny-all-other-ingress-from-beta from: - namespaces: matchLabels: team: beta --- apiVersion: policy.networking.k8s.io/v1alpha2 kind: ClusterNetworkPolicy metadata: name: allow-beta spec: tier: Admin priority: 50 subject: namespaces: matchLabels: team: alpha ingress: - action: Accept name: allow-all-ingress-from-beta from: - namespaces: matchLabels: team: betaApply the manifest to your cluster:
kubectl apply -f priority-policies.yaml
Troubleshoot
To find methods for diagnosing and resolving policy errors, use the following commands.
List all cluster network policies in your cluster:
kubectl get clusternetworkpolicies
Describe a specific policy to inspect its status and evaluation tier:
kubectl describe clusternetworkpolicy/<policy-name>
The status.conditions field in the output provides information about whether
the policy has been successfully reconciled by your cluster's networking
implementation.
To monitor traffic flows and policy decisions, use GKE Dataplane V2 Observability.
What's next
- Learn more about GKE Dataplane V2 Observability.
- Refer to the Kubernetes Network Policy API documentation.