


CodeMender 可掃描持續整合和持續推送軟體更新 (CI/CD) 管道中的每項提取要求。如果 CodeMender 在提取要求變更的程式碼中,發現嚴重程度為 CRITICAL 或 HIGH 的安全漏洞,檢查就會失敗。報表會顯示提取要求未變更的程式碼發現項目,但不會導致檢查失敗。
本文將說明如何執行下列操作:
- 使用 GitHub Actions 掃描提取要求,並讓 CodeMender 開啟含有修正內容的提取要求。
- 使用 Cloud Build 掃描提取要求。
- 每次提交前,使用 Git 預先提交掛鉤掃描變更。
提取要求掃描的運作方式
如要掃描提取要求,請執行 cm find,並加上 --diff 旗標和提取要求的基礎分支版本:
cm find . --diff=origin/main
CodeMender 會根據這項指令執行下列操作:
- 比較提取要求分支與基本分支,並掃描修改過的來源檔案,以及直接依附於這些檔案的檔案,例如呼叫端和匯入者。
- 區分提取要求引入或揭露的新安全漏洞,以及標示為
[LEGACY /
UNTOUCHED]
的現有發現項目。CI 檢查只會封鎖因提取要求而導致的安全漏洞。 - 如果提取要求導致的發現項目符合
--fail-on中的嚴重程度,則會以狀態 1 結束。預設值為CRITICAL,HIGH。
如要進一步瞭解 --diff 與其他掃描模式的比較,請參閱「CodeMender 尋找模式」。
事前準備
CodeMender 目前僅開放部分客戶參與公開測試。 如要使用,請與業務團隊聯絡。
- 登入 Google Cloud 帳戶。如果您未曾使用過 Google Cloud,歡迎 建立帳戶,親自體驗實際使用我們產品的成效。新客戶還能獲得價值 $300 美元的免費抵免額,用於執行、測試及部署工作負載。
-
In the Google Cloud console, on the project selector page, select or create a Google Cloud project.
Roles required to select or create a project
- Select a project: Selecting a project doesn't require a specific IAM role—you can select any project that you've been granted a role on.
-
Create a project: To create a project, you need the Project Creator role
(
roles/resourcemanager.projectCreator), which contains theresourcemanager.projects.createpermission. Learn how to grant roles.
-
If you're using an existing project for this guide, verify that you have the permissions required to complete this guide. If you created a new project, then you already have the required permissions.
-
Verify that billing is enabled for your Google Cloud project.
Enable the Agent Platform API and Cloud Resource Manager API APIs, if any are not already enabled.
Roles required to enable APIs
To enable APIs, you need the
serviceusage.services.enablepermission. If you created the project, then you likely already have this permission through the Owner role (roles/owner). Otherwise, you can get this permission through the Service Usage Admin role (roles/serviceusage.serviceUsageAdmin). Learn how to grant roles.-
Install the Google Cloud CLI.
-
If you're using an external identity provider (IdP), you must first sign in to the gcloud CLI with your federated identity.
-
To initialize the gcloud CLI, run the following command:
gcloud init -
In the Google Cloud console, on the project selector page, select or create a Google Cloud project.
Roles required to select or create a project
- Select a project: Selecting a project doesn't require a specific IAM role—you can select any project that you've been granted a role on.
-
Create a project: To create a project, you need the Project Creator role
(
roles/resourcemanager.projectCreator), which contains theresourcemanager.projects.createpermission. Learn how to grant roles.
-
If you're using an existing project for this guide, verify that you have the permissions required to complete this guide. If you created a new project, then you already have the required permissions.
-
Verify that billing is enabled for your Google Cloud project.
Enable the Agent Platform API and Cloud Resource Manager API APIs, if any are not already enabled.
Roles required to enable APIs
To enable APIs, you need the
serviceusage.services.enablepermission. If you created the project, then you likely already have this permission through the Owner role (roles/owner). Otherwise, you can get this permission through the Service Usage Admin role (roles/serviceusage.serviceUsageAdmin). Learn how to grant roles.-
Install the Google Cloud CLI.
-
If you're using an external identity provider (IdP), you must first sign in to the gcloud CLI with your federated identity.
-
To initialize the gcloud CLI, run the following command:
gcloud init
確認 CodeMender CLI 版本支援提取要求掃描。本文中的管道每次執行時,都會下載最新的穩定版本。如要檢查本機安裝,請執行 cm find --help 並找出 --diff 標記。如要更新 CLI,請執行 cm update。詳情請參閱「安裝及設定 CLI」。
必要的角色
如要取得設定 CodeMender 的 CI/CD 整合功能所需的權限,請要求管理員授予您專案的下列 IAM 角色:
- 服務帳戶管理員 (
roles/iam.serviceAccountAdmin) - 專案 IAM 管理員 (
roles/resourcemanager.projectIamAdmin) -
為 GitHub Actions 設定 Workload Identity Federation:
Workload Identity 集區管理員 (
roles/iam.workloadIdentityPoolAdmin) -
建立 Cloud Build 自動建構觸發條件:
- Cloud Build 編輯者 (
roles/cloudbuild.builds.editor) - 服務帳戶使用者 (
roles/iam.serviceAccountUser)
- Cloud Build 編輯者 (
-
在本機執行 Git 預先修訂版本掛鉤:Agent Platform 使用者 (
roles/aiplatform.user)
如要進一步瞭解如何授予角色,請參閱「管理專案、資料夾和組織的存取權」。
為確保 CI/CD 服務帳戶具備必要權限,可在 CI/CD 管道中執行 CodeMender,請要求管理員將下列 IAM 角色授予 CI/CD 服務帳戶:
- 專案的 Agent Platform 使用者 (
roles/aiplatform.user) -
寫入 Cloud Build 建構記錄:
專案的記錄寫入者 (
roles/logging.logWriter) -
將 SARIF 報告儲存至 Cloud Storage bucket:bucket 的 Storage 物件使用者 (
roles/storage.objectUser)
如要進一步瞭解如何授予角色,請參閱「管理專案、資料夾和組織的存取權」。
管理員或許也能透過自訂角色或其他預先定義的角色,為 CI/CD 服務帳戶授予必要權限。
安全性考量
在 GitHub Actions 工作流程、Cloud Build 自動建構觸發條件或 Git 預先提交掛鉤中執行 CodeMender 時,系統不會要求確認,設定這些整合功能前,請先考量以下事項:
- 確認提示:
--yes旗標會關閉提示,不再要求您確認代理的指令和檔案寫入。--bypass-warning旗標會略過警告,指出代理程式可以修改檔案,並在系統上執行指令。使用這些標記前,請先詳閱本文件開頭的「預覽版條款」,包括有關停用人工確認的條款。 - 沙箱:管道會使用
--sandbox=false關閉 CodeMender 沙箱。代理修復發現項目時執行的指令 (例如建構和測試),與工作具有相同的存取權,包括Google Cloud 憑證和網路存取權。Linux 沙箱會使用使用者命名空間,但部分 CI 環境 (例如無權限容器) 不支援這類命名空間。請只在隔離的一次性環境中關閉沙箱。如果 CI 環境支援沙箱,請移除--sandbox=false。 - 執行器:在 GitHub 託管的執行器 (例如
ubuntu-24.04) 上執行 GitHub Actions 工作流程,在新的虛擬機器中執行每項工作。請勿使用在工作之間重複使用的自行託管執行器。 - 不受信任的程式碼:提取要求中的程式碼可能包含試圖引導代理的文字。GitHub Actions 工作流程只會掃描相同存放區中分支版本的提取要求,只有具備寫入權限的使用者才能建立。在 Cloud Build 中,請使用註解控制項,讓擁有者或協作者必須核准其他貢獻者提取要求的建構作業。
- 存取權:僅授予各服務帳戶管道所需的 Identity and Access Management (IAM) 角色。
使用 GitHub Actions 掃描提取要求
本節的工作流程會掃描 GitHub.com 存放區中的每個提取要求。如果 CodeMender 在提取要求的變更中發現嚴重程度為 CRITICAL 或 HIGH 的安全漏洞,工作流程會執行下列操作:
- CodeMender 掃描檢查失敗。
- 針對每項發現執行
cm fix,並開啟提取要求,將修正項目併入提取要求的分支版本。
工作流程也會將發現項目上傳至 GitHub 程式碼掃描。
設定 Workload Identity Federation
工作流程會使用 Workload Identity Federation 向 Google Cloud 進行驗證,因此您不必在 GitHub 中儲存服務帳戶金鑰。使用 Google Cloud CLI 執行下列指令:
為專案和存放區設定殼層變數:
PROJECT_ID="PROJECT_ID"
GITHUB_ORG="GITHUB_ORG"
REPO="GITHUB_ORG/REPOSITORY"
更改下列內容:
PROJECT_ID:您的 Google Cloud 專案 ID。GITHUB_ORG:您的 GitHub 機構名稱,或個人帳戶中存放區的 GitHub 使用者名稱。REPOSITORY:GitHub 存放區名稱。
啟用 Workload Identity Federation 使用的 API:
gcloud services enable iam.googleapis.com \
    cloudresourcemanager.googleapis.com iamcredentials.googleapis.com \
    sts.googleapis.com --project="${PROJECT_ID}"
為工作流程建立服務帳戶,並授予 Agent Platform 使用者 IAM 角色 (
roles/aiplatform.user):gcloud iam service-accounts create codemender-ci \ --project="${PROJECT_ID}" \ --display-name="CodeMender CI" gcloud projects add-iam-policy-binding "${PROJECT_ID}" \ --member="serviceAccount:codemender-ci@${PROJECT_ID}.iam.gserviceaccount.com" \ --role="roles/aiplatform.user"建立 workload identity pool。如果您已有 GitHub Actions 集區,請略過這個步驟,並在後續步驟中使用集區 ID,而非
github。gcloud iam workload-identity-pools create github \ --project="${PROJECT_ID}" \ --location="global" \ --display-name="GitHub Actions"在集區中為 GitHub 建立提供者。屬性條件只會接受
GITHUB_ORG擁有的存放區權杖。gcloud iam workload-identity-pools providers create-oidc codemender \ --project="${PROJECT_ID}" \ --location="global" \ --workload-identity-pool="github" \ --display-name="CodeMender" \ --attribute-mapping="google.subject=assertion.sub,attribute.repository=assertion.repository,attribute.repository_owner=assertion.repository_owner" \ --attribute-condition="assertion.repository_owner == '${GITHUB_ORG}'" \ --issuer-uri="https://token.actions.githubusercontent.com"允許存放區中的工作流程使用服務帳戶:
POOL_ID=$(gcloud iam workload-identity-pools describe github \
    --project="${PROJECT_ID}" \
    --location="global" \
    --format="value(name)")

gcloud iam service-accounts add-iam-policy-binding \
    "codemender-ci@${PROJECT_ID}.iam.gserviceaccount.com" \
    --project="${PROJECT_ID}" \
    --role="roles/iam.workloadIdentityUser" \
    --member="principalSet://iam.googleapis.com/${POOL_ID}/attribute.repository/${REPO}"
取得提供者的全名。下一節會用到。
gcloud iam workload-identity-pools providers describe codemender \
    --project="${PROJECT_ID}" \
    --location="global" \
    --workload-identity-pool="github" \
    --format="value(name)"
輸出內容如下:
projects/123456789/locations/global/workloadIdentityPools/github/providers/codemender
Workload Identity Federation 和 IAM 的變更最多可能需要 5 分鐘才會生效。詳情請參閱「使用部署管道設定 Workload Identity Federation」。
新增存放區密鑰
在存放區中,依序前往「Settings」(設定) >「Secrets and variables」(密鑰和變數) >「Actions」(動作),然後新增下列存放區密鑰:
| Secret | 值 |
|---|---|
GCP_PROJECT_ID |
您的專案 ID。 |
GCP_WIF_PROVIDER |
上一節中供應商的全名。 |
GCP_WIF_SERVICE_ACCOUNT |
codemender-ci@PROJECT_ID.iam.gserviceaccount.com,其中 PROJECT_ID 是您的專案 ID。 |
詳情請參閱「在 GitHub Actions 中使用 Secret」。
調整存放區設定
- 如要允許自動修正工作開啟提取要求,請依序前往「Settings」>「Actions」>「General」。在「Workflow permissions」(工作流程權限) 下方,選取「Allow GitHub Actions to create and approve pull requests」(允許 GitHub Actions 建立及核准提取要求),然後按一下「Save」(儲存)。組織中的存放區會沿用組織的這項設定。如果無法變更,請洽詢機構擁有者。如果不使用自動修正功能,請略過這個步驟。詳情請參閱「管理存放區的 GitHub Actions 設定」。
- 確認存放區可使用 GitHub 程式碼掃描功能。如果是私人和內部存放區,則需要 GitHub Code Security 才能掃描程式碼。如果無法使用程式碼掃描功能,請從掃描工作中刪除「Upload results to code scanning」(將結果上傳至程式碼掃描) 步驟,以及
security-events和actions權限。否則上傳作業會失敗,掃描工作也會失敗。詳情請參閱「將 SARIF 檔案上傳至 GitHub」。
新增工作流程
將下列工作流程提交至存放區,做為 .github/workflows/codemender.yml:
name: CodeMender

on:
  pull_request:

permissions: {}

defaults:
  run:
    shell: bash

env:
  CM_DOWNLOAD_URL: https://artifactregistry.googleapis.com/download/v1/projects/cmoc-prod/locations/us/repositories/codemender-cli-production/files/cm%3Astable%3Acm-linux-amd64.zip:download?alt=media

jobs:
  scan:
    name: CodeMender scan
    # Workflows for fork and Dependabot pull requests can't read this
    # repository's secrets, so they can't authenticate to Google Cloud.
    if: >-
      github.event.pull_request.head.repo.full_name == github.repository &&
      github.actor != 'dependabot[bot]'
    runs-on: ubuntu-24.04
    timeout-minutes: 15
    permissions:
      contents: read
      id-token: write         # Workload Identity Federation
      security-events: write  # Upload SARIF to code scanning
      actions: read           # Upload SARIF from a private repository
    outputs:
      findings: ${{ steps.scan.outputs.findings }}
    steps:
      - uses: actions/checkout@v7
        with:
          fetch-depth: 0  # cm needs the base branch history
          persist-credentials: false

      - uses: google-github-actions/auth@v3
        with:
          project_id: ${{ secrets.GCP_PROJECT_ID }}
          workload_identity_provider: ${{ secrets.GCP_WIF_PROVIDER }}
          service_account: ${{ secrets.GCP_WIF_SERVICE_ACCOUNT }}

      - name: Install the CodeMender CLI
        run: |
          curl -fsSL -o "$RUNNER_TEMP/cm.zip" "$CM_DOWNLOAD_URL"
          unzip -q -o "$RUNNER_TEMP/cm.zip" -d "$RUNNER_TEMP/cm"
          echo "$RUNNER_TEMP/cm" >> "$GITHUB_PATH"

      - name: Scan the pull request
        id: scan
        env:
          BASE_REF: ${{ github.base_ref }}
          FAIL_ON: CRITICAL,HIGH
        run: |
          cm init
          status=0
          cm find . \
            --diff="origin/$BASE_REF" \
            --diff-workers=16 \
            --fail-on="$FAIL_ON" \
            --format=sarif \
            --output=codemender.sarif \
            --sandbox=false \
            --yes \
            --bypass-warning || status=$?

          # Save the findings that failed the scan for the autofix job. Like the
          # CI gate, skip findings labeled [LEGACY / UNTOUCHED]: they're in code
          # that the pull request didn't change.
          echo '[]' > "$RUNNER_TEMP/codemender-findings.json"
          if [ "$status" -ne 0 ]; then
            cm report --format=json --status=OPEN \
              | jq --arg fail_on "$FAIL_ON" '
                  ($fail_on | ascii_upcase | split(",")) as $severities
                  | [.[]
                     | select(.title | startswith("[LEGACY / UNTOUCHED]") | not)
                     | select(.severity | ascii_upcase | IN($severities[]))]' \
              > "$RUNNER_TEMP/codemender-findings.json"
          fi
          echo "findings=$(jq length "$RUNNER_TEMP/codemender-findings.json")" >> "$GITHUB_OUTPUT"
          exit "$status"

      - name: Upload results to code scanning
        if: ${{ !cancelled() && hashFiles('codemender.sarif') != '' }}
        uses: github/codeql-action/upload-sarif@v4
        with:
          sarif_file: codemender.sarif
          category: codemender

      - name: Save findings for autofix
        if: ${{ !cancelled() && steps.scan.outputs.findings > 0 }}
        uses: actions/upload-artifact@v7
        with:
          name: codemender-findings
          path: ${{ runner.temp }}/codemender-findings.json
          retention-days: 1

  autofix:
    name: CodeMender autofix
    needs: scan
    if: ${{ !cancelled() && needs.scan.outputs.findings > 0 }}
    runs-on: ubuntu-24.04
    timeout-minutes: 60
    permissions:
      contents: write        # Push the fix branch
      pull-requests: write   # Open the fix pull request
      id-token: write        # Workload Identity Federation
    steps:
      - uses: actions/checkout@v7
        with:
          ref: ${{ github.head_ref }}
          persist-credentials: false

      - uses: google-github-actions/auth@v3
        with:
          project_id: ${{ secrets.GCP_PROJECT_ID }}
          workload_identity_provider: ${{ secrets.GCP_WIF_PROVIDER }}
          service_account: ${{ secrets.GCP_WIF_SERVICE_ACCOUNT }}

      - name: Install the CodeMender CLI
        run: |
          curl -fsSL -o "$RUNNER_TEMP/cm.zip" "$CM_DOWNLOAD_URL"
          unzip -q -o "$RUNNER_TEMP/cm.zip" -d "$RUNNER_TEMP/cm"
          echo "$RUNNER_TEMP/cm" >> "$GITHUB_PATH"

      - uses: actions/download-artifact@v8
        with:
          name: codemender-findings
          path: ${{ runner.temp }}/codemender

      - name: Fix findings
        run: |
          # Keep CodeMender state and the auth action's credentials file out of
          # the commits, and out of the `git clean` that cm fix runs.
          printf '%s\n' .cm_project 'gha-creds-*.json' >> .git/info/exclude

          cm init
          # Fix in the repository root instead of each file's directory.
          printf 'project_paths:\n  - "%s"\n' "$GITHUB_WORKSPACE" \
            >> ~/.codemender/config.yaml
          cm report import -f "$RUNNER_TEMP/codemender/codemender-findings.json"

          git config user.name "github-actions[bot]"
          git config user.email \
            "41898282+github-actions[bot]@users.noreply.github.com"

          cm report --format=json --status=OPEN \
            | jq -r '.[] | [.finding_id, .title] | @tsv' \
            > "$RUNNER_TEMP/findings.tsv"
          while IFS=$'\t' read -r id title; do
            # cm fix exits 0 when it makes no edits, so also check for changes.
            if cm fix "$id" \
                 --sandbox=false --yes --bypass-warning < /dev/null &&
               ! git diff --quiet; then
              git commit -q -a -m "Fix $title" -m "CodeMender finding $id"
            else
              echo "::warning::CodeMender didn't fix \"$title\" ($id)."
            fi
            # Discard files the fix agent created, such as test output.
            git reset -q --hard
            git clean -q -fd
          done < "$RUNNER_TEMP/findings.tsv"

      - uses: peter-evans/create-pull-request@v8
        with:
          branch: codemender/fix-pr-${{ github.event.pull_request.number }}
          base: ${{ github.head_ref }}
          title: "CodeMender fixes for #${{ github.event.pull_request.number }}"
          body: |
            CodeMender generated these fixes for findings in #${{ github.event.pull_request.number }}.
            Review each commit before you merge this pull request into `${{ github.head_ref }}`.
工作流程詳細資料
下圖顯示提取要求掃描和自動修正工作的互動方式:
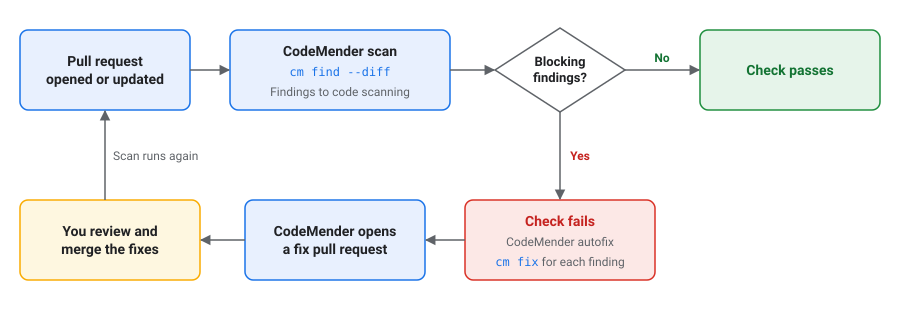
CodeMender 掃描工作會執行下列作業:
- 查看含有完整記錄的提取要求。如果是提取要求,GitHub 會將提取要求分支版本的合併修訂版本,簽出至基礎分支版本。
- 向 Google Cloud 驗證並下載最新穩定版的 CodeMender CLI。
- 針對基礎分支版本執行
cm find --diff。如果 CodeMender 在提取要求的變更中,發現嚴重性列於FAIL_ON的安全漏洞,工作就會失敗。 - 即使掃描失敗,仍將報告上傳至 GitHub 程式碼掃描。報表包含標示為
[LEGACY / UNTOUCHED]的發現項目。如果所有發現的程式碼行都在提取要求的差異中,程式碼掃描也會在提取要求的檢查中顯示發現項目。 - 儲存導致自動修正工作失敗的發現項目。
掃描工作不會針對來自 fork 或 Dependabot 的提取要求執行,因為這些提取要求的工作流程無法讀取存放區的密鑰。GitHub 會將略過的作業回報為成功,因此即使您將檢查設為必要檢查,檢查也不會封鎖這些提取要求。您可以自行查看這些提取要求,或使用 cm find --diff 在本機掃描。
掃描作業儲存結果時,系統會執行 CodeMender 自動修正作業。這個檔案可執行以下作業:
- 簽出提取要求分支。
- 針對每個發現項目執行
cm fix,並分別提交各項修正。如果 CodeMender 未修正發現項目,作業會記錄警告。工作只會提交存放區中現有檔案的變更,並捨棄修正代理程式建立的所有檔案,例如測試輸出內容。 - 從
codemender/fix-pr-NUMBER分支開啟提取要求到提取要求分支,其中NUMBER是提取要求編號。如果修正提取要求已存在,這項工作會更新該要求。如果 CodeMender 未修正任何發現項目,或工作達到 60 分鐘的逾時時間,工作就不會開啟提取要求。
查看並合併修正內容
GitHub 不會自動為工作流程使用 GITHUB_TOKEN 建立的提取要求執行工作流程。如要掃描修正提取要求,具備存放區寫入權限的使用者,必須在修正提取要求中,點選「Approve workflows to run」(核准要執行的工作流程)。
合併修正提取要求時,提取要求分支會變更,工作流程也會再次掃描原始提取要求。
自訂工作流程
您可以透過下列方式自訂工作流程:
- 如要變更檢查失敗的嚴重程度,請在「Scan the pull request」(掃描提取要求)步驟中,將
FAIL_ON設為以逗號分隔的清單,其中包含嚴重程度且清單中不得有空格,例如CRITICAL,HIGH,MEDIUM。有效值為CRITICAL、HIGH、MEDIUM和LOW。 - 如要回報發現項目,而不讓檢查失敗,請設定
FAIL_ON: ""。工作流程仍會將發現項目上傳至程式碼掃描,但不會執行自動修正工作。 如要只掃描部分分支版本的提取要求,請在
pull_request觸發條件中新增branches篩選器。工作流程不會掃描修正提取要求,因為其基礎是提取要求分支:on: pull_request: branches: [main]如要關閉自動修正功能,請刪除
autofix工作和「Save findings for autofix」(儲存自動修正結果) 步驟。
使用 Cloud Build 掃描提取要求
本節中的建構作業會掃描連結至 Cloud Build 的 GitHub 存放區中的每個提取要求。如果 CodeMender 在提取要求的變更中發現 CRITICAL 或 HIGH 嚴重程度的安全漏洞,建構作業和 GitHub 檢查就會失敗。建構作業不會修正發現項目。
開始前,請先完成下列事項:
- 將存放區連結至 Cloud Build,做為第二代存放區。詳情請參閱「連線至 GitHub 存放區」。
在可存取 CodeMender 的專案中,啟用 Cloud Build API 和 IAM API。建構作業會在執行建構作業的專案中使用 CodeMender。
PROJECT_ID="PROJECT_ID"
gcloud services enable cloudbuild.googleapis.com iam.googleapis.com \
    --project="${PROJECT_ID}"
將
PROJECT_ID替換為您的 Google Cloud專案 ID。
建立服務帳戶
為建構作業建立服務帳戶。將 Agent Platform 使用者 IAM 角色 (roles/aiplatform.user) 授予該服務帳戶,以便使用 CodeMender;並將記錄寫入者角色 (roles/logging.logWriter) 授予該服務帳戶,以便寫入建構記錄:
SA="codemender-build@${PROJECT_ID}.iam.gserviceaccount.com"

gcloud iam service-accounts create codemender-build \
    --project="${PROJECT_ID}" \
    --display-name="CodeMender Cloud Build"

gcloud projects add-iam-policy-binding "${PROJECT_ID}" \
    --member="serviceAccount:${SA}" \
    --role="roles/aiplatform.user"

gcloud projects add-iam-policy-binding "${PROJECT_ID}" \
    --member="serviceAccount:${SA}" \
    --role="roles/logging.logWriter"
如要將 SARIF 報表儲存至 Cloud Storage bucket,請一併授予服務帳戶 bucket 存取權:
BUCKET="BUCKET"

gcloud storage buckets add-iam-policy-binding "gs://${BUCKET}" \
    --member="serviceAccount:${SA}" \
    --role="roles/storage.objectUser"
請將 BUCKET 改成您的 Cloud Storage 值區名稱。
新增建構設定
將下列建構設定提交至存放區根目錄,並命名為 cloudbuild.yaml:
# Scans a pull request with CodeMender. The build fails when CodeMender finds
# a CRITICAL or HIGH vulnerability in the pull request's changes.
steps:
  - id: install-codemender
    name: gcr.io/google.com/cloudsdktool/google-cloud-cli:slim
    script: |
      #!/usr/bin/env bash
      set -euo pipefail
      curl -fsSL -o /tmp/cm.zip "$_CM_DOWNLOAD_URL"
      python3 -m zipfile -e /tmp/cm.zip /workspace/.codemender-cli
      chmod +x /workspace/.codemender-cli/cm

  - id: fetch-history
    name: gcr.io/google.com/cloudsdktool/google-cloud-cli:slim
    script: |
      #!/usr/bin/env bash
      set -euo pipefail
      : "${_BASE_BRANCH:?Run this build from a pull request trigger.}"
      # Triggers check out only the pull request's commit. CodeMender needs the
      # history back to where the pull request branched from the base branch.
      # Fetch from origin, or from GitHub if origin isn't configured.
      refspec="+refs/heads/$_BASE_BRANCH:refs/remotes/origin/$_BASE_BRANCH"
      git fetch --quiet --unshallow origin "$refspec" ||
        git fetch --quiet --unshallow \
          "https://github.com/$REPO_FULL_NAME.git" "$refspec"
      merge_base=$(git merge-base HEAD "origin/$_BASE_BRANCH")
      echo "Merge base with $_BASE_BRANCH: $merge_base"

  - id: scan
    name: gcr.io/google.com/cloudsdktool/google-cloud-cli:slim
    script: |
      #!/usr/bin/env bash
      set -uo pipefail
      export PATH="/workspace/.codemender-cli:$PATH"
      # The project that has access to CodeMender.
      export GOOGLE_CLOUD_PROJECT="$PROJECT_ID"
      cm init || exit 1
      status=0
      cm find . \
        --diff="origin/$_BASE_BRANCH" \
        --diff-workers=16 \
        --fail-on=CRITICAL,HIGH \
        --format=sarif \
        --output=codemender.sarif \
        --sandbox=false \
        --yes \
        --bypass-warning || status=$?

      # cm find writes the SARIF report when the scan completes.
      if [ -f codemender.sarif ]; then
        # cm find doesn't print finding details, so print them here.
        cm report --status=OPEN --format=md
        if [ -n "${_REPORT_BUCKET:-}" ]; then
          gcloud storage cp codemender.sarif \
            "gs://$_REPORT_BUCKET/codemender/$BUILD_ID.sarif" || status=1
        fi
      fi
      exit "$status"

substitutions:
  _CM_DOWNLOAD_URL: https://artifactregistry.googleapis.com/download/v1/projects/cmoc-prod/locations/us/repositories/codemender-cli-production/files/cm%3Astable%3Acm-linux-amd64.zip:download?alt=media
  _REPORT_BUCKET: ''  # Optional: a bucket to save the SARIF report in.

timeout: 1200s
options:
  automapSubstitutions: true
  logging: CLOUD_LOGGING_ONLY
建立觸發條件
建立觸發條件,為每個提取要求執行建構作業,並將結果傳送至 main:
REGION="REGION"
CONNECTION="CONNECTION"
REPOSITORY="REPOSITORY"

gcloud builds triggers create github \
    --project="${PROJECT_ID}" \
    --region="${REGION}" \
    --name="codemender-scan" \
    --repository="projects/${PROJECT_ID}/locations/${REGION}/connections/${CONNECTION}/repositories/${REPOSITORY}" \
    --pull-request-pattern='^main$' \
    --comment-control=COMMENTS_ENABLED_FOR_EXTERNAL_CONTRIBUTORS_ONLY \
    --build-config=cloudbuild.yaml \
    --service-account="projects/${PROJECT_ID}/serviceAccounts/${SA}"
更改下列內容:
REGION:Cloud Build 存放區連線的區域。CONNECTION:Cloud Build 存放區連線的名稱。REPOSITORY:Cloud Build 中連結的存放區名稱。
請注意下列選項:
--pull-request-pattern是提取要求基礎分支版本的規則運算式。使用^和$比對整個分支版本名稱。- 啟用
--comment-control=COMMENTS_ENABLED_FOR_EXTERNAL_CONTRIBUTORS_ONLY後,系統會自動為存放區擁有者和協作者的提取要求執行建構作業。如果是其他貢獻者提出的提取要求,則擁有者或協作者必須在提取要求中加上/gcbrun註解,建構作業才會執行。 - 如要將 SARIF 報表儲存在 bucket 中,請新增
--substitutions=_REPORT_BUCKET="${BUCKET}"。
您也可以在 Google Cloud 控制台建立觸發條件。詳情請參閱「從 GitHub 建構存放區」。
如要在 GitHub 中顯示建構記錄,請在建立觸發條件時新增 --include-logs-with-status,並將記錄檢視者角色 (roles/logging.viewer) 授予服務帳戶。這樣一來,凡是能在 GitHub 中查看檢查結果的使用者,都能讀取建構記錄,包括發現項目。
建構作業的運作方式
建構作業包含三個步驟:
install-codemender會下載 CodeMender CLI 的最新穩定版本。fetch-history會擷取 CodeMender 需要的基本分支版本和記錄。Cloud Build 只會簽出啟動建構作業的修訂版本。這個步驟會從origin遠端擷取。如果未設定origin,步驟會從 GitHub 擷取,不需憑證,但這項操作僅適用於公開存放區。在這種情況下,私人存放區需要憑證,例如安全殼層金鑰。詳情請參閱「在建構作業中透過安全殼層金鑰存取 GitHub」。scan會針對基礎分支執行cm find --diff。掃描完成後,這個步驟會將所有發現結果列印到建構記錄中。如果設定_REPORT_BUCKET,這個步驟也會將 SARIF 報表複製到gs://BUCKET/codemender/BUILD_ID.sarif。
如要變更導致建構失敗的嚴重程度,請編輯 scan 步驟中的 --fail-on。如果執行建構作業時沒有提取要求觸發程序,系統會顯示 Run this build from a pull request trigger. 訊息,導致作業失敗。
每次修訂前掃描
Git 預先提交掛鉤可以掃描暫存的變更,並在 CodeMender 發現 CRITICAL 或 HIGH 嚴重程度的安全漏洞時封鎖提交。開發人員可以略過這個掛鉤,因此請一併使用這個掛鉤和 CI 掃描功能,而非取代 CI 掃描功能。
使用這個 Hook 的每位開發人員都需要:
- 按照「安裝及設定 CLI」一節所述安裝及設定的 CodeMender CLI,包括
gcloud auth application-default login和cm init。掛鉤需要PATH的cm。 - 專案中的 Agent Platform 使用者角色 (
roles/aiplatform.user),可存取 CodeMender。CodeMender 會使用GOOGLE_CLOUD_PROJECT環境變數中的專案。如未設定,CodeMender 會使用應用程式預設憑證或 gcloud CLI 預設專案中的專案。
如要新增 Hook,請將下列指令碼儲存為存放區中的 .git/hooks/pre-commit:
#!/bin/sh
# Scans staged changes with CodeMender before each commit.
if ! cm find . --diff --staged --fail-on=CRITICAL,HIGH \
    --yes --bypass-warning; then
  echo "CodeMender blocked this commit. To see the findings, run:" >&2
  echo "  cm report --status=OPEN" >&2
  echo "To commit anyway, run git commit --no-verify." >&2
  exit 1
fi
將指令碼設為可執行,然後在 .gitignore 檔案中加入 .cm_project,這樣就不會提交 CodeMender 建立來追蹤存放區的檔案:
chmod +x .git/hooks/pre-commit
echo .cm_project >> .gitignore
執行 git commit 時,掛鉤會掃描已暫存變更的檔案。掃描作業可能需要幾分鐘才能完成。這個掛鉤不會關閉 CodeMender 沙箱。
如要在不掃描的情況下提交,請執行 git commit --no-verify。
掃描旗標
下列 cm find 標記可控管提取要求掃描作業。如要查看所有旗標,請執行 cm
find --help:
| 標記 | 預設 | 說明 |
|---|---|---|
--diff[=REF] |
關閉 |
掃描與 REF 相比的變更,例如 origin/main。如果沒有 REF,系統會掃描追蹤檔案中未提交的變更 (與 HEAD 相比)。無法與 --deep 搭配使用。 |
--staged |
關閉 | 使用 --diff 時,只會掃描暫存的變更。 |
--diff-depth DEPTH |
1 |
影響分析的遍歷深度 (1 到 3,預設為 1 個躍點)。 |
--diff-workers COUNT |
4 |
可同時掃描的檔案數量,範圍為 1 到 16。 |
--diff-max-neighbors COUNT |
10 |
要掃描的相依檔案數量上限。 |
--fail-on SEVERITIES |
CRITICAL,HIGH |
使用 --diff 時,嚴重程度會導致 cm find
以狀態 1 結束。如果值為空白,發現項目就不會影響結束狀態。 |
--fail-on-truncation |
關閉 |
如果使用 --diff,且 CodeMender 找到的依附檔案數量超過 --diff-max-neighbors 允許的數量,則會以狀態 1 結束。 |
--format FORMAT |
table |
報表格式:table、json 或 sarif。 |
--output FILE |
標準輸出內容 | 要寫入報表的檔案。 |
疑難排解
本節說明在 CI/CD 管道中執行 CodeMender 時,如何解決常見問題。
權限遭拒
記錄會顯示類似下列的行:
[1/1] ❌ src/app.py: start session failed: StartSession failed with HTTP 403 Forbidden.
訊息也可以包含 Permission 'aiplatform.interactions.create'
denied。請確認下列事項:
- 專案可存取 CodeMender。
- 服務帳戶或使用者在專案中具備 Agent Platform 使用者角色 (
roles/aiplatform.user)。 - 專案已啟用 Agent Platform API。
- CodeMender 會使用正確的專案。在 GitHub Actions 中,檢查
GCP_PROJECT_ID密鑰。Cloud Build 會使用執行建構作業的專案。在本機檢查GOOGLE_CLOUD_PROJECT環境變數,如果未設定變數,則檢查預設專案。
正在設定資源
如果記錄顯示 Resource setup has just started. Please try again shortly. 或 Resource setup is in progress. Please try again shortly.,表示 CodeMender 正在為專案設定資源,這通常需要幾分鐘的時間。請稍後再執行工作。
不明旗標:--diff
如果 cm find 失敗並顯示 Error: unknown flag: --diff,表示您的 CLI 版本不支援提取要求掃描。執行 cm update,或下載最新版本。
找不到基底分支
如果 cm find 失敗並顯示類似下方的錯誤,表示基準分支版本不在檢出中:
Error: retrieving VCS diff: git diff failed: exit status 128: fatal: ambiguous argument 'origin/main': unknown revision or path not in the working tree.
請先擷取基礎分支版本及其記錄,再執行 cm find。在 GitHub Actions 中,將 fetch-depth: 0 設為 actions/checkout。
未掃描的檔案
如果行首有 ❌,例如 [1/1] ❌ src/app.py: start session failed,表示 CodeMender 無法掃描該檔案。檢查該行中的錯誤,然後再次執行工作。
沒有修正提取要求
如果工作流程未開啟修正提取要求,請檢查下列事項:
- 如果自動修復工作在建立提取要求時失敗,請開啟「Allow GitHub Actions to create and approve pull requests」(允許 GitHub Actions 建立及核准提取要求)。詳情請參閱「設定存放區設定」。
- 如果自動修正工作成功,但未開啟提取要求,表示 CodeMender 未修正任何發現項目。工作記錄會針對 CodeMender 未修正的每個發現項目顯示警告。
無法上傳掃描的代碼
如果上傳步驟失敗並顯示 GitHub Code Security or GitHub Advanced Security
must be enabled for this repository to use code scanning,請為存放區啟用 GitHub Code Security,或刪除上傳步驟。詳情請參閱「調整存放區設定」。
未確認警告
如果 cm 失敗並顯示 warning not acknowledged. Please run interactively once to
acknowledge or pass --bypass-warning,CodeMender 需要確認,但無法在非互動式環境中要求確認。在指令中加入 --bypass-warning。請先詳閱本頁頂端的預先發布版條款。
如需進一步協助,請與業務團隊聯絡。