"Managed Service for Apache Spark" is the new name for the product formerly known as "Dataproc on Compute Engine" (cluster deployment) and "Google Cloud Serverless for Apache Spark" (serverless deployment).
Create an Apache Iceberg table with metadata in Lakehouse runtime catalog
Stay organized with collections
Save and categorize content based on your preferences.
This document shows you how to create an Apache Iceberg table with metadata in
Lakehouse runtime catalog using the Managed Service for Apache Spark Jobs service,
the Spark SQL CLI or
the Zeppelin web interface
running on a Managed Service for Apache Spark cluster.
Before you begin
If you haven't done so, create a Google Cloud project, a
Cloud Storage bucket,
and a Managed Service for Apache Spark cluster.
Set up your project
Sign in to your Google Cloud account. If you're new to
Google Cloud,
create an account to evaluate how our products perform in
real-world scenarios. New customers also get $300 in free credits to
run, test, and deploy workloads.
In the Google Cloud console, on the project selector page,
select or create a Google Cloud project.
Roles required to select or create a project
Select a project: Selecting a project doesn't require a specific
IAM role—you can select any project that you've been
granted a role on.
Create a project: To create a project, you need the Project Creator role
(roles/resourcemanager.projectCreator), which contains the
resourcemanager.projects.create permission. Learn how to grant
roles.
Enable the Dataproc, BigQuery, and Cloud Storage APIs.
Roles required to enable APIs
To enable APIs, you need the serviceusage.services.enable permission. If you
created the project, then you likely already have this permission through the
Owner role (roles/owner). Otherwise, you can get this permission through the
Service Usage Admin role (roles/serviceusage.serviceUsageAdmin).
Learn how to grant roles.
To initialize the gcloud CLI, run the following command:
gcloudinit
In the Google Cloud console, on the project selector page,
select or create a Google Cloud project.
Roles required to select or create a project
Select a project: Selecting a project doesn't require a specific
IAM role—you can select any project that you've been
granted a role on.
Create a project: To create a project, you need the Project Creator role
(roles/resourcemanager.projectCreator), which contains the
resourcemanager.projects.create permission. Learn how to grant
roles.
Enable the Dataproc, BigQuery, and Cloud Storage APIs.
Roles required to enable APIs
To enable APIs, you need the serviceusage.services.enable permission. If you
created the project, then you likely already have this permission through the
Owner role (roles/owner). Otherwise, you can get this permission through the
Service Usage Admin role (roles/serviceusage.serviceUsageAdmin).
Learn how to grant roles.
Choose a location where your bucket's data is permanently stored from the Location type drop-down menu.
If you select the dual-region location type, you can
also choose to enable turbo replication by using the
relevant checkbox.
To set up cross-bucket replication, select
Add cross-bucket replication via Storage Transfer Service and
follow these steps:
Set up cross-bucket replication
In the Bucket menu, select a bucket.
In the Replication settings section,
click Configure to configure settings for the
replication job.
The Configure cross-bucket replication pane
appears.
To filter objects to replicate by object name prefix,
enter a prefix that you want to include or exclude objects from, then click addAdd a prefix.
To set a storage class for the replicated objects,
select a storage class from the Storage class menu.
If you skip this step, the replicated objects will use the
destination bucket's storage class by default.
Click Done.
In the Choose how to store your data section, do the following:
Select a default storage class for the bucket or
Autoclass for automatic storage class management of your
bucket's data.
To enable hierarchical namespace, in the
Optimize storage for data-intensive workloads section, select
Enable hierarchical namespace on this bucket.
In the Choose how to control access to objects section, select
whether or not your bucket enforces public access prevention,
and select an access control method for your bucket's objects.
In the Choose how to protect object data section, do the
following:
Select any of the options under Data protection that you
want to set for your bucket.
To enable soft delete, click the
Soft delete policy (For data recovery) checkbox,
and specify the number of days you want to retain objects
after deletion.
To set Object Versioning, click the
Object versioning (For version control) checkbox,
and specify the maximum number of versions per object and the number of days after which
the noncurrent versions expire.
To enable the retention policy on objects and buckets, click the Retention (For compliance) checkbox, and then do the following:
If you want to run the Zeppelin web interface example in this guide,
you must use or create a Managed Service for Apache Spark cluster with
the Zeppelin optional component enabled.
Note the following mapping between open source database and BigQuery
dataset terms:
OSS database
BigQuery dataset
Namespace, Database
Dataset
Partitioned or Unpartitioned Table
Table
View
View
Create an Iceberg table
This section shows you how to create an Iceberg table with metadata in
Lakehouse runtime catalog by submitting a Spark SQL code to the
Managed Service for Apache Spark,
the Spark SQL CLI,
and the Zeppelin component web interface,
which run on a Managed Service for Apache Spark cluster.
The examples in this section show you how to submit a Managed Service for Apache Spark
Spark SQL job to the Managed Service for Apache Spark
service to create an Iceberg table with metadata in BigQuery
using the gcloud CLI, Google Cloud console, or REST API.
Prepare job files
Perform the following steps to create a Spark SQL job file. The file contains
Spark SQL commands to create and update an Iceberg table.
In a local terminal window or in Cloud Shell,
use a text editor, such as the vi or nano, to copy the
following commands into an iceberg-table.sql file, then save the
file in the current directory.
USE CATALOG_NAME;
CREATE NAMESPACE IF NOT EXISTS example_namespace;
USE example_namespace;
DROP TABLE IF EXISTS example_table;
CREATE TABLE example_table (id int, data string) USING ICEBERG LOCATION 'gs://BUCKET/WAREHOUSE_FOLDER';
INSERT INTO example_table VALUES (1, 'first row');
ALTER TABLE example_table ADD COLUMNS (newDoubleCol double);
DESCRIBE TABLE example_table;
Replace the following:
CATALOG_NAME: Iceberg catalog name.
BUCKET and WAREHOUSE_FOLDER: Cloud Storage bucket
and folder used for the Iceberg warehouse.
Use gcloud CLI to copy the local
iceberg-table.sql to your bucket in Cloud Storage.
gcloud storage cp iceberg-table.sql gs://BUCKET/
Next, download and copy the iceberg-spark-runtime-3.5_2.12-1.6.1 JAR file to
Cloud Storage.
In a local terminal window or in Cloud Shell,
run the following curl command to download the iceberg-spark-runtime-3.5_2.12-1.6.1
JAR file to the current directory.
Select a tab to follow the instructions to submit the Spark SQL job to the
Managed Service for Apache Spark using the gcloud CLI,
Google Cloud console, or Managed Service for Apache Spark
REST API.
PROJECT_ID: Your Google Cloud project ID.
Project IDs are listed in the Project info section on
the Google Cloud console Dashboard.
CLUSTER_NAME: The name of your Managed Service for Apache Spark cluster.
REGION: The Compute Engine
region where your cluster is located.
BIGLAKE_ICEBERG_CATALOG_JAR: the Cloud Storage
URI of the Iceberg custom catalog plugin to use. Depending on your Iceberg version number,
select one of the following:
Perform the following steps to use the Google Cloud console to submit
the Spark SQL job to Managed Service for Apache Spark to create an
Iceberg table with metadata in Lakehouse runtime catalog.
In the Google Cloud console, go to the Managed Service for Apache Spark
Submit a job.
BIGLAKE_ICEBERG_CATALOG_JAR: the Cloud Storage URI of the Iceberg
custom catalog plugin to use. Depending on your Iceberg version number, select one of the
following:
Properties: Click addAdd Property
five times to create a list of five keyvalue input fields, then
copy the following Key and Value pairs to define
five properties.
PROJECT_ID: Your Google Cloud project ID.
Project IDs are listed in the Project info section on
the Google Cloud console Dashboard.
region where your cluster is located.
LOCATION: A supported BigQuery location.
The default location is "US".
BUCKET and WAREHOUSE_FOLDER: Cloud Storage bucket
and folder used for the Iceberg warehouse.
Click Submit
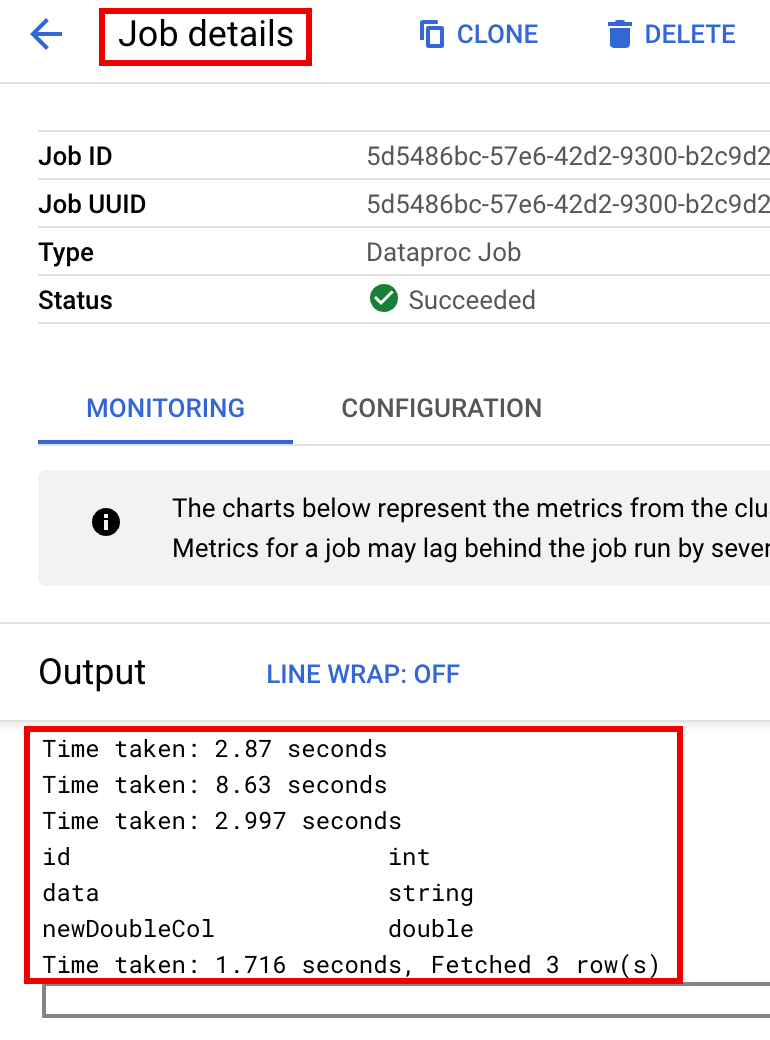
To monitor job progress and view job output, go to the Managed Service for Apache Spark
Jobs page in the Google Cloud console,
then click the Job ID to open the Job details page.
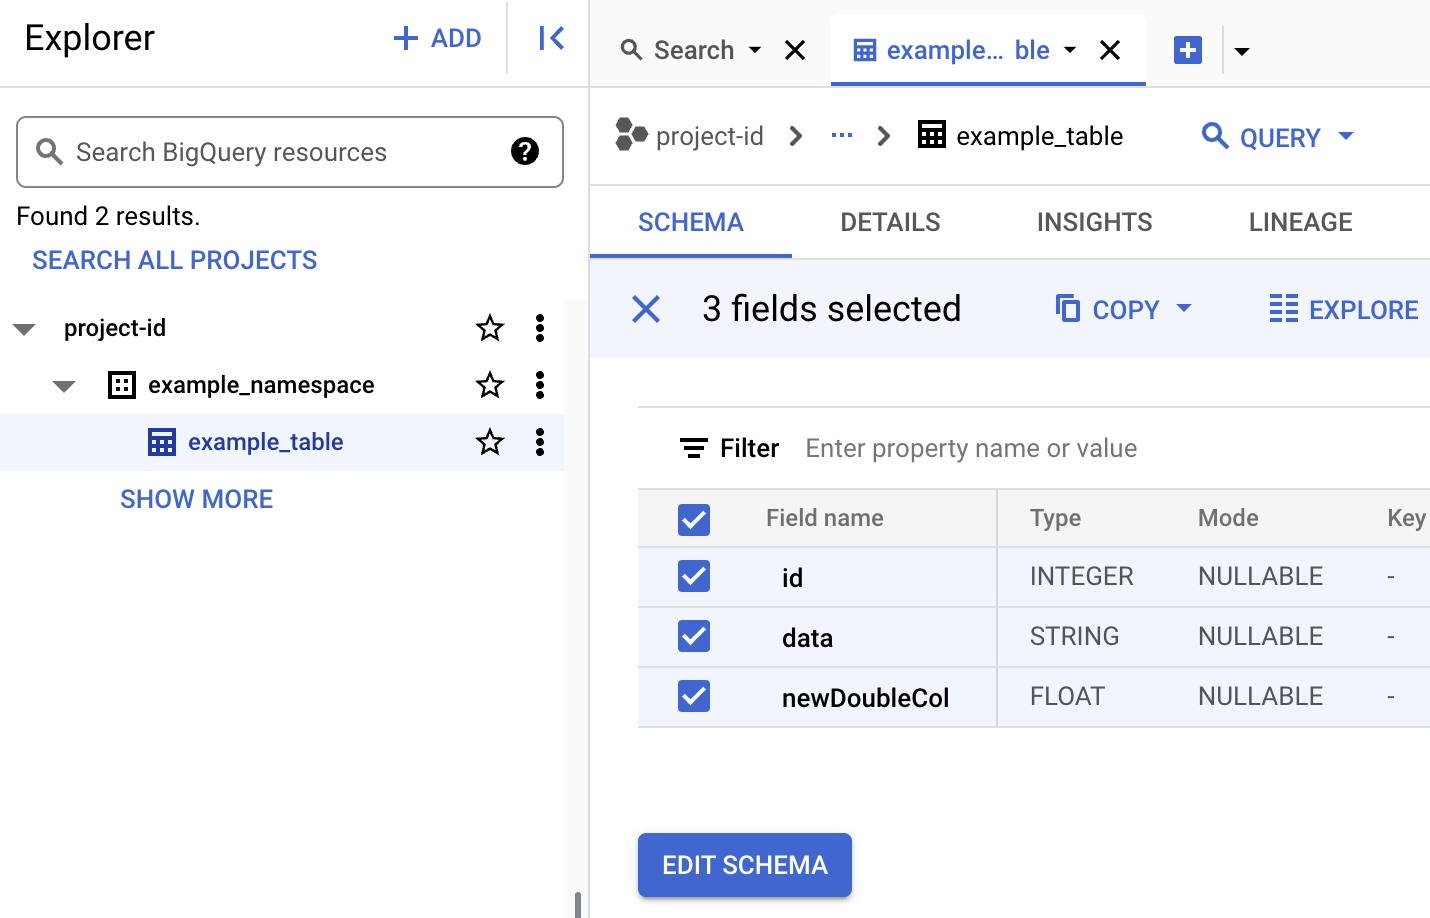
To view table metadata in BigQuery
In the Google Cloud console, go to the BigQuery page.
You can use the Managed Service for Apache Spark
jobs.submit API
to submit the Spark SQL job to Managed Service for Apache Spark to create an
Iceberg table with metadata in Lakehouse runtime catalog.
Before using any of the request data,
make the following replacements:
PROJECT_ID: Your Google Cloud project ID.
Project IDs are listed in the Project info section on
the Google Cloud console Dashboard.
CLUSTER_NAME: The name of your Managed Service for Apache Spark cluster.
BUCKET and WAREHOUSE_FOLDER: Cloud Storage bucket
and folder used for the Iceberg warehouse.
LOCATION: A supported BigQuery location.
The default location is "US".
BIGLAKE_ICEBERG_CATALOG_JAR: the Cloud Storage URI of the Iceberg
custom catalog plugin to use. Depending on your Iceberg version number, select one of the following:
To monitor job progress and view job output, go to the Managed Service for Apache Spark
Jobs page in the Google Cloud console,
then click the Job ID to open the Job details page.
To view table metadata in BigQuery
In the Google Cloud console, go to the BigQuery page.
The following steps show you how to create an Iceberg table with table metadata
stored in Lakehouse runtime catalog using the Spark SQL CLI running on the
master node of a Managed Service for Apache Spark cluster.
Use SSH to connect to the master node
of your Managed Service for Apache Spark cluster.
In the SSH session terminal, use the vi or nano text editor to copy the
following commands into an iceberg-table.sql file.
SET CATALOG_NAME = `CATALOG_NAME`;
SET BUCKET = `BUCKET`;
SET WAREHOUSE_FOLDER = `WAREHOUSE_FOLDER`;
USE `${CATALOG_NAME}`;
CREATE NAMESPACE IF NOT EXISTS `${CATALOG_NAME}`.example_namespace;
DROP TABLE IF EXISTS `${CATALOG_NAME}`.example_namespace.example_table;
CREATE TABLE `${CATALOG_NAME}`.example_namespace.example_table (id int, data string) USING ICEBERG LOCATION 'gs://${BUCKET}/${WAREHOUSE_FOLDER}';
INSERT INTO `${CATALOG_NAME}`.example_namespace.example_table VALUES (1, 'first row');
ALTER TABLE `${CATALOG_NAME}`.example_namespace.example_table ADD COLUMNS (newDoubleCol double);
DESCRIBE TABLE `${CATALOG_NAME}`.example_namespace.example_table;
Replace the following:
CATALOG_NAME: Iceberg catalog name.
BUCKET and WAREHOUSE_FOLDER: Cloud Storage bucket
and folder used for the Iceberg warehouse.
In the SSH session terminal, run the following spark-sql command to create
the iceberg table.
BIGLAKE_ICEBERG_CATALOG_JAR: the Cloud Storage
URI of the Iceberg custom catalog plugin to use. Depending on your Iceberg version number,
select one of the following:
The following steps show you how to to create an Iceberg table with table
metadata stored in Lakehouse runtime catalog using the Zeppelin web
interface running on the master node of a Managed Service for Apache Spark cluster .
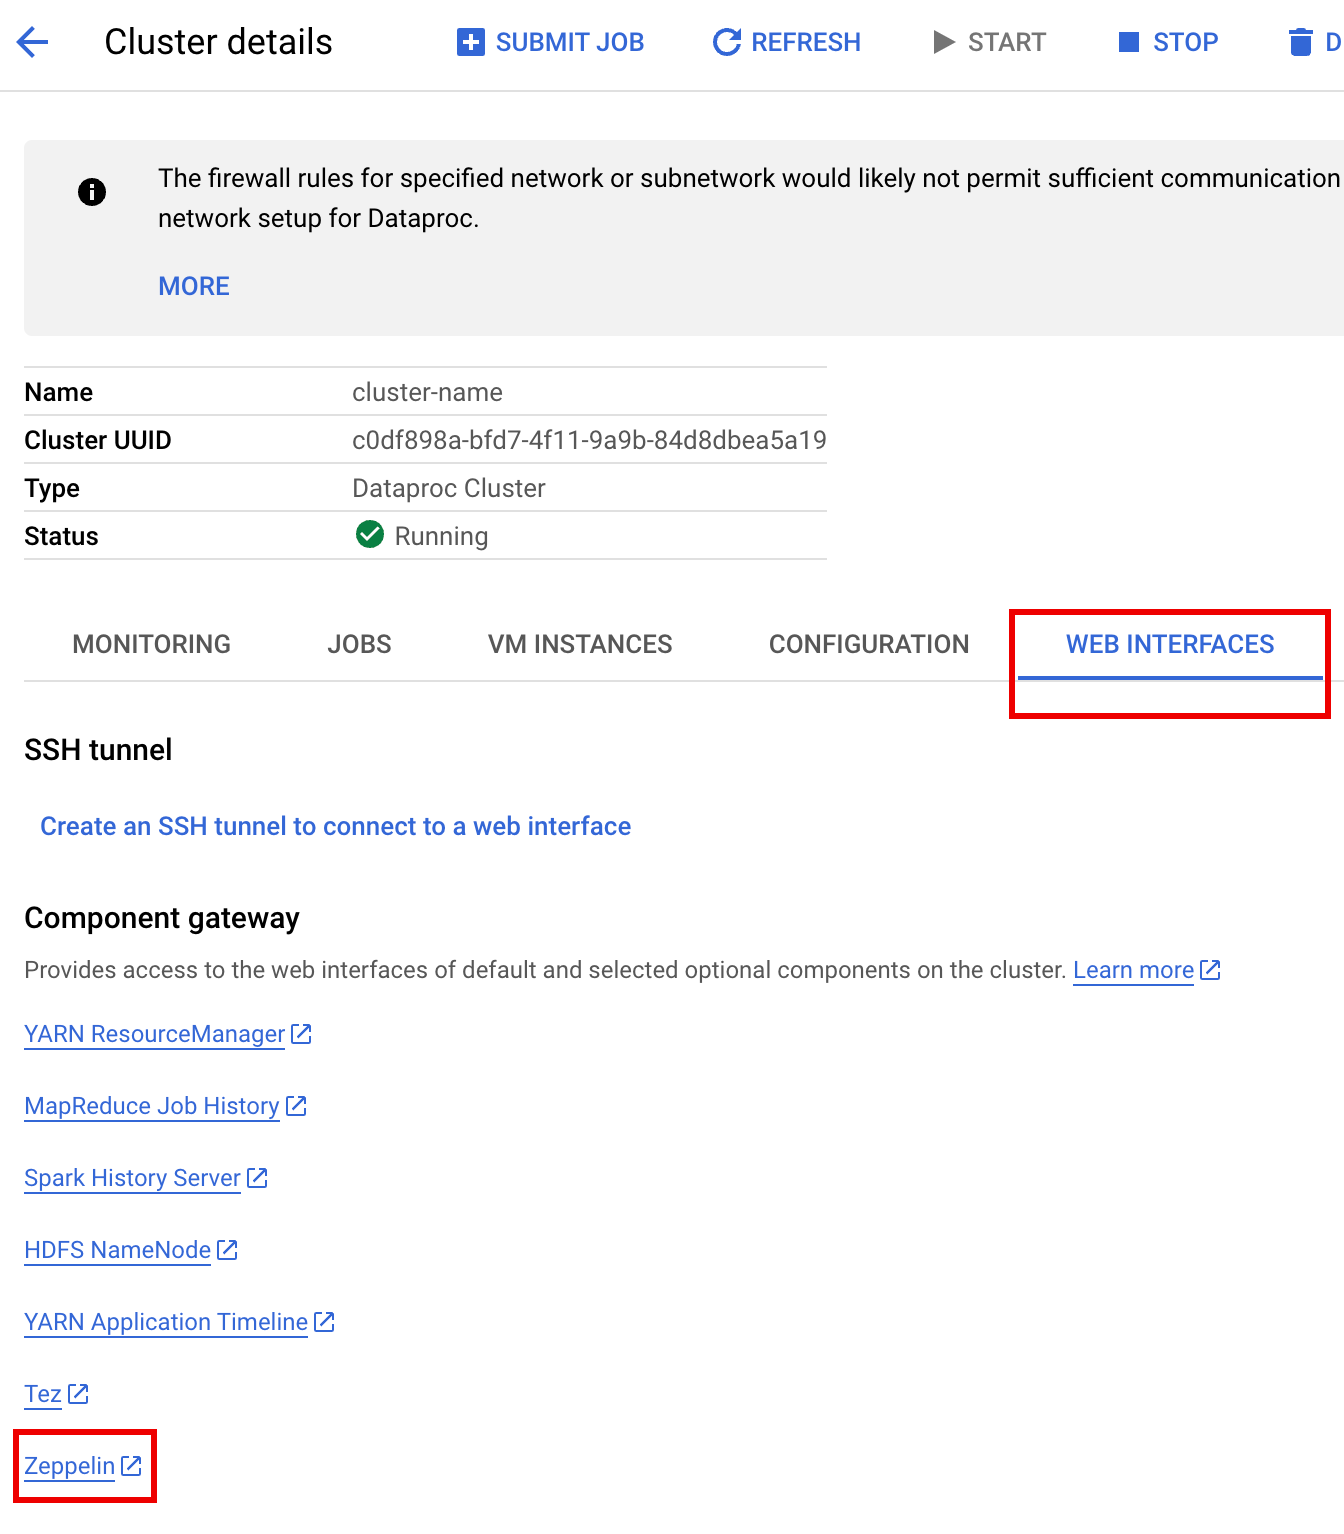
In the Google Cloud console, go to the Managed Service for Apache Spark Clusters
page.
Select your cluster name to open the Cluster details page.
Click the Web Interfaces tab display a list of Component Gateway
links to the web interfaces of default and optional components
installed on the cluster.
Click the Zeppelin link to open the Zeppelin web interface.
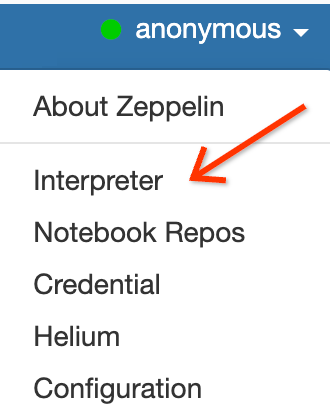
In the Zeppelin web interface, click the anonymous menu, then click
Interpreter to open the Interpreters page.
Add two jars to the Zeppelin Spark interpreter, as follows:
Type "Spark" in Search interpreters box to scroll to the Spark
interpreter section.
BIGLAKE_ICEBERG_CATALOG_JAR: the
Cloud Storage URI of the Iceberg custom catalog plugin to use.
Depending on your Iceberg version number, select one of the following:
Click Save at the bottom of the Spark interpreter section, then
click OK to update the interpreter and restart the Spark interpreter
with the new settings.
From the Zeppelin notebook menu, click Create new note.
In the Create new note dialog, input a name for the notebook, and
accept the default spark interpreter. Click Create to open The
notebook.
Copy the following PySpark code into your Zeppelin notebook
after filling in the variables.
%pyspark
frompyspark.sqlimportSparkSession project_id="PROJECT_ID"catalog="CATALOG_NAME"namespace="NAMESPACE"location="LOCATION"warehouse_dir="gs://BUCKET/WAREHOUSE_DIRECTORY" spark=SparkSession.builder\
.appName("BigQuery Metastore Iceberg")\
.config(f"spark.sql.catalog.{catalog}","org.apache.iceberg.spark.SparkCatalog")\
.config(f"spark.sql.catalog.{catalog}.catalog-impl","org.apache.iceberg.gcp.bigquery.BigQueryMetastoreCatalog")\
.config(f"spark.sql.catalog.{catalog}.gcp_project",f"{project_id}")\
.config(f"spark.sql.catalog.{catalog}.gcp_location",f"{location}")\
.config(f"spark.sql.catalog.{catalog}.warehouse",f"{warehouse_dir}")\
.getOrCreate()
spark.sql(f"USE `{catalog}`;")
spark.sql(f"CREATE NAMESPACE IF NOT EXISTS `{namespace}`;")
spark.sql(f"USE `{namespace}`;") \#Createtableanddisplayschema(withoutLOCATION)
spark.sql("DROP TABLE IF EXISTS example_iceberg_table")
spark.sql("CREATE TABLE example_iceberg_table (id int, data string) USING ICEBERG")
spark.sql("DESCRIBE example_iceberg_table;") \#Inserttabledata.
spark.sql("INSERT INTO example_iceberg_table VALUES (1, 'first row');") \#Altertable,thendisplayschema.
spark.sql("ALTER TABLE example_iceberg_table ADD COLUMNS (newDoubleCol double);") \#Selectanddisplaythecontentsofthetable.
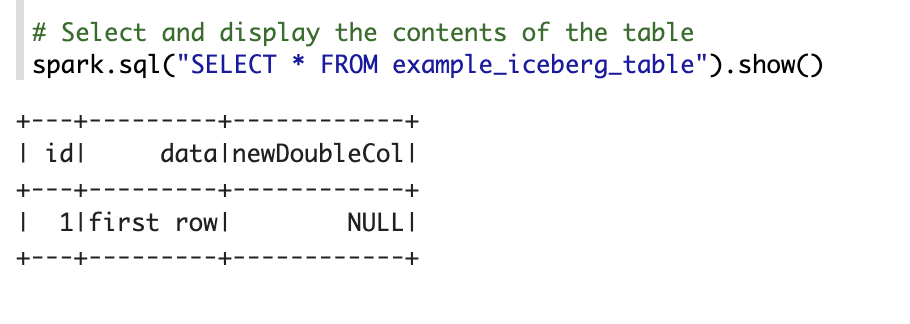
spark.sql("SELECT * FROM example_iceberg_table").show()
Replace the following:
PROJECT_ID: Your Google Cloud project ID.
Project IDs are listed in the Project info section on
the Google Cloud console Dashboard.
CATALOG_NAME and NAMESPACE: The Iceberg catalog name
and namespace combine to identify the Iceberg table (catalog.namespace.table_name).
LOCATION: A supported BigQuery location.
The default location is "US".
BUCKET and WAREHOUSE_DIRECTORY: Cloud Storage bucket
and folder used as Iceberg warehouse directory.
Click the run icon or press Shift-Enter to run the code. When the job
completes, the status message shows "Spark Job Finished", and the output
displays the table contents:
View table metadata in BigQuery
In the Google Cloud console, go to the BigQuery page.
[[["Easy to understand","easyToUnderstand","thumb-up"],["Solved my problem","solvedMyProblem","thumb-up"],["Other","otherUp","thumb-up"]],[["Hard to understand","hardToUnderstand","thumb-down"],["Incorrect information or sample code","incorrectInformationOrSampleCode","thumb-down"],["Missing the information/samples I need","missingTheInformationSamplesINeed","thumb-down"],["Other","otherDown","thumb-down"]],["Last updated 2026-07-22 UTC."],[],[]]