


Google テンプレートをカスタマイズしてデプロイする
このクイックスタートでは、Google 提供のテンプレートをコピーし、その コンポーネントをカスタマイズして、テスト アプリケーションをデプロイします。このクイックスタートでは Cloud SQL を使用した生成 AI RAG テンプレートを使用しますが、 このドキュメントの手順は任意のテンプレートに適用できます。
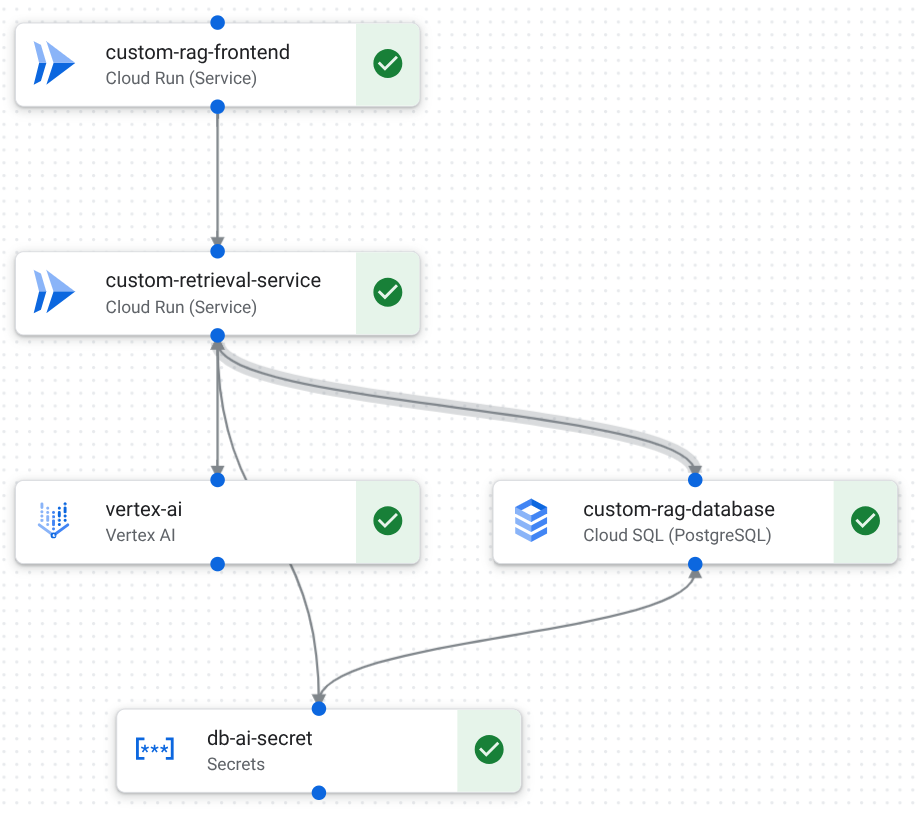
次の図は、デザイン キャンバスでの Cloud SQL を使用した生成 AI RAG テンプレートのコンポーネントと接続を示しています。
始める前に
- アカウントにログインします。 Google Cloud を初めて使用する場合は、 アカウントを作成して、実際のシナリオで Google プロダクトのパフォーマンスを評価してください。 Google Cloud新規のお客様には、ワークロードの実行、テスト、デプロイができる無料クレジット $300 分を差し上げます。
-
In the Google Cloud console, on the project selector page, select or create a Google Cloud project.
Roles required to select or create a project
- Select a project: Selecting a project doesn't require a specific IAM role—you can select any project that you've been granted a role on.
-
Create a project: To create a project, you need the Project Creator role
(
roles/resourcemanager.projectCreator), which contains theresourcemanager.projects.createpermission. Learn how to grant roles.
-
Verify that billing is enabled for your Google Cloud project.
-
In the Google Cloud console, on the project selector page, select or create a Google Cloud project.
Roles required to select or create a project
- Select a project: Selecting a project doesn't require a specific IAM role—you can select any project that you've been granted a role on.
-
Create a project: To create a project, you need the Project Creator role
(
roles/resourcemanager.projectCreator), which contains theresourcemanager.projects.createpermission. Learn how to grant roles.
-
Verify that billing is enabled for your Google Cloud project.
- プロジェクトで App Design Center を設定します。
必要なロール
管理者に、次の表に記載されているロールの付与を依頼します。
| タスク | 必要なロール |
|---|---|
| テンプレートのコピー、設計、編集 | App Design Center 管理者
(roles/designcenter.admin)、またはApp Design Center ユーザー( roles/designcenter.user) |
| アプリケーションと構成のデプロイ | アプリケーション管理者(roles/designcenter.applicationAdmin)、
またはアプリケーション編集者 ( roles/designcenter.applicationEditor) |
| デプロイ中にサービス アカウントを作成する | プロジェクトに対するサービス アカウントの作成
(roles/iam.serviceAccountCreator) |
| サービス アカウントにプロジェクトへのアクセス権を付与する | プロジェクトに対するプロジェクト IAM 管理者(roles/resourcemanager.projectIamAdmin)
|
ロールの詳細については、 IAM を使用したアクセス制御をご覧ください。
環境を準備する
このクイックスタートを完了するには、次のいずれかを使用します。
- コンソールのデザイン キャンバスを使用します。 Google Cloud
- アカウントにログインします。 Google Cloud を初めて使用する場合は、 アカウントを作成して、実際のシナリオで Google プロダクトのパフォーマンスを評価してください。 Google Cloud新規のお客様には、ワークロードの実行、テスト、デプロイができる無料クレジット $300 分を差し上げます。
-
Google Cloud CLI をインストールします。
-
外部 ID プロバイダ(IdP)を使用している場合は、まず連携 ID を使用して gcloud CLI にログインする必要があります。
-
gcloud CLI を初期化するには、次のコマンドを実行します:
gcloud init -
Google Cloud CLI をインストールします。
-
外部 ID プロバイダ(IdP)を使用している場合は、まず連携 ID を使用して gcloud CLI にログインする必要があります。
-
gcloud CLI を初期化するには、次のコマンドを実行します:
gcloud init
テンプレートをコピーしてアプリケーションのドラフトを作成する
Google テンプレートをコピーして、アプリケーションのドラフトを構成します。
デザイナー キャンバス
コンソールで、[Google テンプレート] ページに移動します。 Google Cloud
[Cloud SQL を使用した生成 AI RAG] テンプレート カードで [プレビューとカスタマイズ] をクリックします。
テンプレートがデザイン キャンバスで開きます。
[複製してカスタマイズ] をクリックします。
[新しいテンプレートを作成] ダイアログで、次の詳細を入力します。
[テンプレート ID] フィールドに「
quickstart-custom-gen-ai-rag」と入力します。[テンプレート名] フィールドに「
Quickstart custom Generative AI RAG」と入力します。[説明] フィールドに
A custom template copied from the Generative AI RAG with Cloud SQL template.と入力します。[テンプレートを作成] をクリックします。
テンプレートがスペースにコピーされ、デザイン キャンバスに表示されます。
デザイン キャンバスで、[アプリの設定] をクリックします。
[新しいアプリケーションを作成] をクリックして、次の詳細を入力します。
[名前] フィールドに「
quickstart-custom-gen-ai-rag-test」と入力します。[表示名] フィールドに「
Quickstart custom Generative AI RAG test」と入力します。[リージョン] リストで
us-central1 (Iowa)を選択します。[環境] リストで [
Test] を選択します。[重要度] リストで
Lowを選択します。
[アプリケーションを作成] をクリックします。
アプリケーションのドラフトが作成されます。
gcloud CLI
Google カタログで共有テンプレートをフィルタして、
gen-ai-rag-with-sqlテンプレートのリビジョン URI を見つけます。gcloud design-center spaces shared-templates list \ --google-catalog \ --location=LOCATION \ --filter="displayName:gen-ai-rag-cloud-sql"次のように置き換えます。
LOCATION: スペースのロケーション。 例:us-central1
出力からリビジョン URI を特定します。
そのテンプレート リビジョンからアプリケーションのドラフトを作成します。
gcloud design-center spaces applications create quickstart-custom-gen-ai-rag-test \
  --space=SPACE \
  --location=LOCATION \
  --project=PROJECT \
  --source-shared-template-revision-uri=SHARED_TEMPLATE_REVISION_URI \
  --display-name="Quickstart custom Generative AI RAG test" \
  --environment-type=test \
  --criticality-type=low \
  --scope-type=regional \
  --deployment-region=LOCATION
次のように置き換えます。
SPACE: スペース ID。例:default-spacePROJECT: プロジェクト ID。SHARED_TEMPLATE_REVISION_URI: テンプレートのリビジョン URI。例:projects/gcpdesigncenter/locations/us-central1/spaces/googlespace/sharedTemplates/f8ddfbd3-6393-4a1e-942c-aaa7292fa30c/revisions/r-28
コンポーネントを構成する
アプリケーションのドラフトで必要なコンポーネント パラメータを構成します。コンポーネント パラメータの詳細については、サポート対象のリソースをご覧ください。
デザイナー キャンバス
デザイン キャンバスで [frontend-service] をクリックし、[構成] 領域で次の操作を行います。
[サービス名] フィールドに「
custom-rag-frontend」と入力します。[保存] をクリックします。
デザイン キャンバスで [retrieval-service] をクリックし、[構成] 領域で次の操作を行います。
[サービス名] フィールドに「
custom-retrieval-service」と入力します。[保存] をクリックします。
デザイン キャンバスで [database-postgresql] をクリックし、[構成] 領域で次の操作を行います。
[名前] フィールドに「
custom-rag-database」と入力します。[保存] をクリックします。
デザイン キャンバスで [vertex-ai] をクリックし、[構成] 領域で次の操作を行います。
[プロジェクト ID] リストで、プロジェクトが選択されていることを確認します。
[保存] をクリックします。
デザイン キャンバスで [secret-manager] をクリックし、[構成] 領域で次の操作を行います。
[名前] フィールドに「
db-ai-secret」と入力します。[保存] をクリックします。
キャンバスの各コンポーネントに緑色のチェックマークが表示され、必要なパラメータがすべて構成されていることが示されます。
gcloud CLI
アプリケーションを記述して、コンポーネント パラメータを特定します。
gcloud design-center spaces applications describe quickstart-custom-gen-ai-rag-test \
  --space=SPACE \
  --location=LOCATION \
  --project=PROJECT \
  --format='yaml(name,componentParameters)'
出力には、各コンポーネントのパラメータが表示されます。
コンポーネント URI のリストを取得します。
gcloud design-center spaces applications describe quickstart-custom-gen-ai-rag-test \
  --space=SPACE \
  --location=LOCATION \
  --project=PROJECT \
  --format='value(serializedApplicationTemplate.components.uri)'
作業ディレクトリに構成 JSON ファイルを作成します。
custom-frontend.jsonを作成します。{ "component": "FRONTEND_COMPONENT_URI", "parameters": [ { "key": "service_name", "value": "custom-rag-frontend" }, { "key": "PROJECT", "value": "PROJECT" }, { "key": "location", "value": "LOCATION" } ] }custom-retrieval.jsonを作成します。{ "component": "RETRIEVAL_COMPONENT_URI", "parameters": [ { "key": "service_name", "value": "custom-retrieval-service" }, { "key": "project_id", "value": "PROJECT" }, { "key": "location", "value": "LOCATION" } ] }custom-database.jsonを作成します。{ "component": "DATABASE_COMPONENT_URI", "parameters": [ { "key": "name", "value": "custom-rag-database" }, { "key": "project_id", "value": "PROJECT" }, { "key": "database_version", "value": "POSTGRES_15" }, { "key": "region", "value": "us-central1" }, { "key": "zone", "value": "us-central1-a" } ] }custom-secmanager.jsonを作成します。{ "component": "SECRET_MANAGER_COMPONENT_URI", "parameters": [ { "key": "name", "value": "db-ai-secret" }, { "key": "project_id", "value": "PROJECT" } ] }custom-vertex.jsonを作成します。{ "component": "VERTEX_AI_COMPONENT_URI", "parameters": [ { "key": "project_id", "value": "PROJECT" } ] }
次のように置き換えます。
FRONTEND_COMPONENT_URI: フロントエンド コンポーネントの URI。例:projects/gcpdesigncenter/locations/us-central1/spaces/googlespace/applicationTemplates/gen-ai-rag-cloud-sql/components/frontend-serviceRETRIEVAL_COMPONENT_URI: 取得コンポーネントの URI。例:projects/gcpdesigncenter/locations/us-central1/spaces/googlespace/applicationTemplates/gen-ai-rag-cloud-sql/components/retrieval-serviceDATABASE_COMPONENT_URI: データベース コンポーネントの URI。例:projects/gcpdesigncenter/locations/us-central1/spaces/googlespace/applicationTemplates/gen-ai-rag-cloud-sql/components/database-postgresqlSECRET_MANAGER_COMPONENT_URI: Secret Manager コンポーネントの URI。例:projects/gcpdesigncenter/locations/us-central1/spaces/googlespace/applicationTemplates/gen-ai-rag-cloud-sql/components/secret-managerVERTEX_AI_COMPONENT_URI: Vertex AI コンポーネントの URI。例:projects/gcpdesigncenter/locations/us-central1/spaces/googlespace/applicationTemplates/gen-ai-rag-cloud-sql/components/vertex-aiPROJECT: プロジェクト ID。
JSON パラメータ ファイルを使用して、アプリケーション構成を更新します。
gcloud design-center spaces applications update quickstart-custom-gen-ai-rag-test \
  --space=SPACE \
  --location=LOCATION \
  --project=PROJECT \
  --component-parameters=./custom-frontend.json \
  --component-parameters=./custom-retrieval.json \
  --component-parameters=./custom-database.json \
  --component-parameters=./custom-secmanager.json \
  --component-parameters=./custom-vertex.json
アプリケーションをデプロイする
構成したアプリケーションをデプロイします。
デザイナー キャンバス
[デプロイ] をクリックします。
[サービス アカウントを選択] 領域で、次の操作を行います。
[新しいサービス アカウントを作成] を選択します。
[続行] をクリックします。
[デプロイ] をクリックします。
数分後、アプリケーションがデプロイされ、リソースが作成されます。
gcloud CLI
デプロイをプレビューし、プレビュー サービス アカウントを自動的に作成します。
gcloud design-center spaces applications preview quickstart-custom-gen-ai-rag-test \
  --space=SPACE \
  --location=LOCATION \
  --project=PROJECT \
  --create-sa
アプリケーションをデプロイし、デプロイ サービス アカウントを自動的に作成します。
gcloud design-center spaces applications deploy quickstart-custom-gen-ai-rag-test \
  --space=SPACE \
  --location=LOCATION \
  --project=PROJECT \
  --create-sa \
  --async
オペレーション ID をコピーします。
デプロイのステータスを追跡します。
gcloud design-center operations describe operation-OPERATION_ID \
  --space=SPACE \
  --location=LOCATION \
  --project=PROJECT
次のように置き換えます。
OPERATION_ID: オペレーション ID。
省略可: デプロイをモニタリングする
アプリケーションをデプロイしたら、テレメトリーを表示してパフォーマンスをモニタリングできます。
-
コンソールで、[アプリケーションのモニタリング] ページに移動します。 Google Cloud
検索バーを使用してこのページを検索する場合は、小見出しが [Monitoring] である結果を選択します。
[名前] 列で、デプロイしたアプリケーションをクリックします。
このページには、アプリケーションとそのサービスとワークロードのモニタリング情報が表示されます。
事前定義されたダッシュボードを確認します。詳細については、 Application Monitoring の概要をご覧ください。
クリーンアップ
このページで使用したリソースについて、アカウントに課金されないようにするには、リソースを含むプロジェクトを削除します。 Google Cloud Google Cloud
デプロイされたアプリケーションを削除する
デザイナー キャンバス
ナビゲーション メニューで [アプリケーション] をクリックします。
[Quickstart custom Generative AI RAG test] をクリックします。
[**アクション**] をクリックして、 [**アプリケーションを削除**] を選択します。
[削除] フィールドに「
quickstart-custom-gen-ai-rag-test」と入力します。[削除] をクリックします。
gcloud CLI
CLI を使用してアプリケーションを削除します。
gcloud design-center spaces applications delete quickstart-custom-gen-ai-rag-test \
  --space=SPACE \
  --location=LOCATION \
  --project=PROJECT
省略可: プロジェクトを削除する
- Google Cloud コンソールで [リソースの管理] ページに移動します。
- プロジェクト リストで、削除するプロジェクトを選択し、[削除] をクリックします。
- プロンプトでプロジェクト ID を入力し、[シャットダウン] をクリックします。
次のステップ
- App Design Center の概要で、基本的なコンセプトとメリットを確認する。
- Google テンプレートを基に構築して、事前構成済みのアーキテクチャを使ってみる。
- アプリケーション テンプレートを設計して、独自の構成を定義する。