


自定义和部署 Google 模板
本快速入门将帮助您复制 Google 提供的模板、自定义其组件,以及部署测试应用。在本快速入门中,您将使用通过 Cloud SQL 实现生成式 AI RAG 模板,但您可以将本文档中的步骤应用于任何模板。
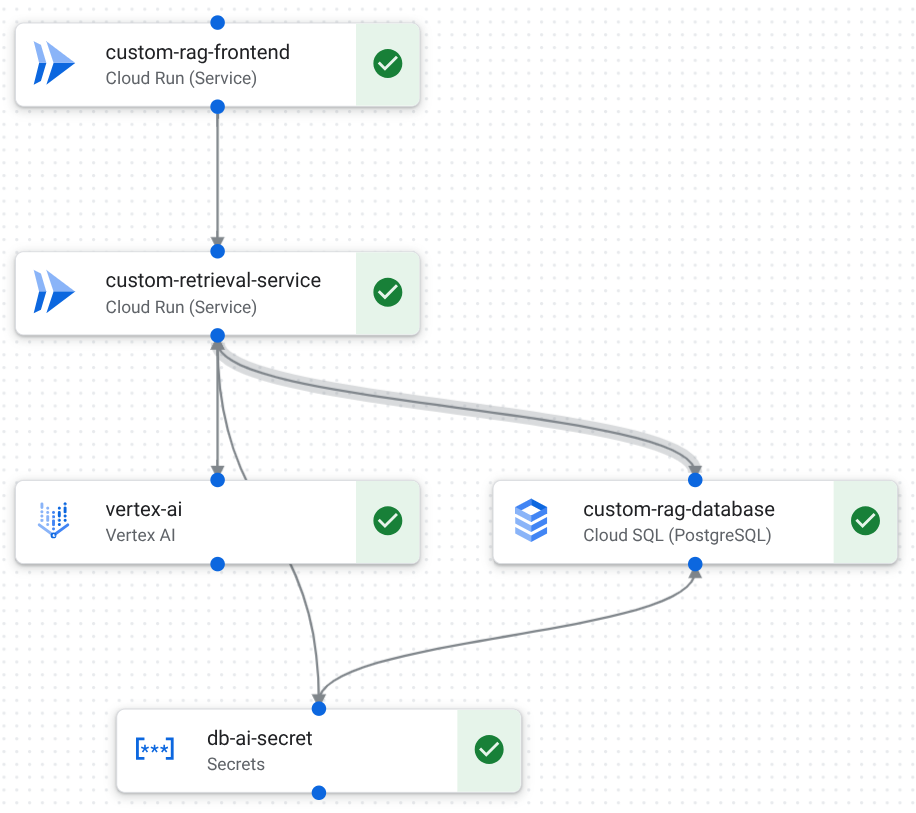
下图显示了设计画布中“使用 Cloud SQL 实现生成式 AI RAG”模板的组件和连接:
准备工作
- 登录您的 Google Cloud 账号。如果您是 Google Cloud新手,请 创建一个账号来评估我们的产品在实际场景中的表现。新客户还可获享 $300 赠金,用于运行、测试和部署工作负载。
-
In the Google Cloud console, on the project selector page, select or create a Google Cloud project.
Roles required to select or create a project
- Select a project: Selecting a project doesn't require a specific IAM role—you can select any project that you've been granted a role on.
-
Create a project: To create a project, you need the Project Creator role
(
roles/resourcemanager.projectCreator), which contains theresourcemanager.projects.createpermission. Learn how to grant roles.
-
Verify that billing is enabled for your Google Cloud project.
-
In the Google Cloud console, on the project selector page, select or create a Google Cloud project.
Roles required to select or create a project
- Select a project: Selecting a project doesn't require a specific IAM role—you can select any project that you've been granted a role on.
-
Create a project: To create a project, you need the Project Creator role
(
roles/resourcemanager.projectCreator), which contains theresourcemanager.projects.createpermission. Learn how to grant roles.
-
Verify that billing is enabled for your Google Cloud project.
- 在项目中设置 App Design Center。
所需的角色
请让管理员为您授予下表中列出的角色:
| 任务 | 所需的角色 |
|---|---|
| 复制、设计和修改模板 | Application Design Center Admin
(roles/designcenter.admin) 或 Application Design Center User ( roles/designcenter.user) |
| 部署应用和配置 | Application Admin (roles/designcenter.applicationAdmin) 或 Application Editor (roles/designcenter.applicationEditor) |
| 在部署期间创建服务账号 | 创建项目中的服务账号 (roles/iam.serviceAccountCreator) |
| 授予服务账号对项目的访问权限 | 项目的 Project IAM Admin (roles/resourcemanager.projectIamAdmin) |
如需详细了解角色,请参阅使用 IAM 进行访问权限控制。
准备环境
您可以使用以下任一方式完成本快速入门。
- 使用 Google Cloud 控制台中的设计画布。
- 登录您的 Google Cloud 账号。如果您是 Google Cloud新手,请 创建一个账号来评估我们的产品在实际场景中的表现。新客户还可获享 $300 赠金,用于运行、测试和部署工作负载。
-
安装 Google Cloud CLI。
-
如果您使用的是外部身份提供方 (IdP),则必须先使用联合身份登录 gcloud CLI。
-
如需初始化 gcloud CLI,请运行以下命令:
gcloud init -
安装 Google Cloud CLI。
-
如果您使用的是外部身份提供方 (IdP),则必须先使用联合身份登录 gcloud CLI。
-
如需初始化 gcloud CLI,请运行以下命令:
gcloud init
复制模板并创建应用草稿
复制 Google 模板并配置应用草稿。
设计画布
在 Google Cloud 控制台中,前往 Google 模板页面。
在 生成式 AI RAG with Cloud SQL 模板卡片上,点击预览和自定义。
模板会在设计画布中打开。
点击复制并自定义。
在创建新模板对话框中,输入以下详细信息:
在模板 ID 字段中,输入
quickstart-custom-gen-ai-rag。在模板名称字段中,输入
Quickstart custom Generative AI RAG。在说明字段中,输入
A custom template copied from the Generative AI RAG with Cloud SQL template.点击创建模板。
模板会复制到您的空间,并显示在设计画布中。
在设计画布中,点击配置应用。
点击创建新应用,然后输入以下详细信息:
在名称字段中,输入
quickstart-custom-gen-ai-rag-test。在显示名称字段中,输入
Quickstart custom Generative AI RAG test。从区域列表中,选择
us-central1 (Iowa)。从环境列表中,选择
Test。从严重性列表中,选择
Low。
点击创建应用。
系统会创建应用草稿。
gcloud CLI
过滤 Google 目录中的共享模板,找到
gen-ai-rag-with-sql模板的修订版本 URI。gcloud design-center spaces shared-templates list \ --google-catalog \ --location=LOCATION \ --filter="displayName:gen-ai-rag-cloud-sql"替换以下内容:
LOCATION:您的空间位置。 例如us-central1。
从输出中识别修订版本 URI。
根据相应模板修订版本创建应用草稿。
gcloud design-center spaces applications create quickstart-custom-gen-ai-rag-test \
  --space=SPACE \
  --location=LOCATION \
  --project=PROJECT \
  --source-shared-template-revision-uri=SHARED_TEMPLATE_REVISION_URI \
  --display-name="Quickstart custom Generative AI RAG test" \
  --environment-type=test \
  --criticality-type=low \
  --scope-type=regional \
  --deployment-region=LOCATION
替换以下内容:
SPACE:您的空间 ID。例如default-space。PROJECT:您的项目 ID。SHARED_TEMPLATE_REVISION_URI:模板的修订版本 URI。例如projects/gcpdesigncenter/locations/us-central1/spaces/googlespace/sharedTemplates/f8ddfbd3-6393-4a1e-942c-aaa7292fa30c/revisions/r-28。
配置组件
在应用草稿中配置必需的组件参数。如需详细了解组件参数,请参阅支持的资源。
设计画布
在设计画布中,点击 frontend-service,然后在配置区域中执行以下操作:
在服务名称字段中,输入
custom-rag-frontend。点击保存。
在设计画布中,点击 retrieval-service,然后在配置区域中执行以下操作:
在服务名称字段中,输入
custom-retrieval-service。点击保存。
在设计画布中,点击 database-postgresql,然后在配置区域中执行以下操作:
在名称字段中,输入
custom-rag-database。点击保存。
在设计画布中,点击 vertex-ai,然后在配置区域中执行以下操作:
在项目 ID 列表中,确保已选择您的项目。
点击保存。
在设计画布中,点击 secret-manager,然后在配置区域中执行以下操作:
在名称字段中,输入
db-ai-secret。点击保存。
画布会在每个组件中显示一个绿色对勾标记,表示所有必需的参数均已配置。
gcloud CLI
描述应用以确定组件参数。
gcloud design-center spaces applications describe quickstart-custom-gen-ai-rag-test \
  --space=SPACE \
  --location=LOCATION \
  --project=PROJECT \
  --format='yaml(name,componentParameters)'
输出会显示每个组件的参数。
获取组件 URI 的列表。
gcloud design-center spaces applications describe quickstart-custom-gen-ai-rag-test \
  --space=SPACE \
  --location=LOCATION \
  --project=PROJECT \
  --format='value(serializedApplicationTemplate.components.uri)'
在工作目录中创建配置 JSON 文件。
创建
custom-frontend.json。{ "component": "FRONTEND_COMPONENT_URI", "parameters": [ { "key": "service_name", "value": "custom-rag-frontend" }, { "key": "PROJECT", "value": "PROJECT" }, { "key": "location", "value": "LOCATION" } ] }创建
custom-retrieval.json。{ "component": "RETRIEVAL_COMPONENT_URI", "parameters": [ { "key": "service_name", "value": "custom-retrieval-service" }, { "key": "project_id", "value": "PROJECT" }, { "key": "location", "value": "LOCATION" } ] }创建
custom-database.json。{ "component": "DATABASE_COMPONENT_URI", "parameters": [ { "key": "name", "value": "custom-rag-database" }, { "key": "project_id", "value": "PROJECT" }, { "key": "database_version", "value": "POSTGRES_15" }, { "key": "region", "value": "us-central1" }, { "key": "zone", "value": "us-central1-a" } ] }创建
custom-secmanager.json。{ "component": "SECRET_MANAGER_COMPONENT_URI", "parameters": [ { "key": "name", "value": "db-ai-secret" }, { "key": "project_id", "value": "PROJECT" } ] }创建
custom-vertex.json。{ "component": "VERTEX_AI_COMPONENT_URI", "parameters": [ { "key": "project_id", "value": "PROJECT" } ] }
替换以下内容:
FRONTEND_COMPONENT_URI:前端组件 URI。例如projects/gcpdesigncenter/locations/us-central1/spaces/googlespace/applicationTemplates/gen-ai-rag-cloud-sql/components/frontend-service。RETRIEVAL_COMPONENT_URI:检索组件 URI。例如projects/gcpdesigncenter/locations/us-central1/spaces/googlespace/applicationTemplates/gen-ai-rag-cloud-sql/components/retrieval-service。DATABASE_COMPONENT_URI:数据库组件 URI。例如projects/gcpdesigncenter/locations/us-central1/spaces/googlespace/applicationTemplates/gen-ai-rag-cloud-sql/components/database-postgresqlSECRET_MANAGER_COMPONENT_URI:Secret Manager 组件 URI。例如projects/gcpdesigncenter/locations/us-central1/spaces/googlespace/applicationTemplates/gen-ai-rag-cloud-sql/components/secret-manager。VERTEX_AI_COMPONENT_URI:Vertex AI 组件 URI。例如projects/gcpdesigncenter/locations/us-central1/spaces/googlespace/applicationTemplates/gen-ai-rag-cloud-sql/components/vertex-ai。PROJECT:您的项目 ID。
使用 JSON 参数文件更新应用配置。
gcloud design-center spaces applications update quickstart-custom-gen-ai-rag-test \
  --space=SPACE \
  --location=LOCATION \
  --project=PROJECT \
  --component-parameters=./custom-frontend.json \
  --component-parameters=./custom-retrieval.json \
  --component-parameters=./custom-database.json \
  --component-parameters=./custom-secmanager.json \
  --component-parameters=./custom-vertex.json
部署应用
部署配置的应用。
设计画布
点击部署。
在选择服务账号区域中,执行以下操作:
选择创建新服务账号。
点击继续。
点击部署。
几分钟后,应用即会部署完成,资源也会创建完成。
gcloud CLI
预览部署并自动创建预览服务账号。
gcloud design-center spaces applications preview quickstart-custom-gen-ai-rag-test \
  --space=SPACE \
  --location=LOCATION \
  --project=PROJECT \
  --create-sa
部署应用并自动创建部署服务账号。
gcloud design-center spaces applications deploy quickstart-custom-gen-ai-rag-test \
  --space=SPACE \
  --location=LOCATION \
  --project=PROJECT \
  --create-sa \
  --async
复制操作 ID。
跟踪部署状态。
gcloud design-center operations describe operation-OPERATION_ID \
  --space=SPACE \
  --location=LOCATION \
  --project=PROJECT
替换以下内容:
OPERATION_ID:操作 ID。
可选:监控部署
部署应用后,您可以查看遥测数据并监控性能:
清理
为避免因本页面中使用的资源导致您的 Google Cloud 账号产生费用,请删除包含这些资源的 Google Cloud 项目。
删除已部署的应用
设计画布
在导航菜单中,点击应用。
点击快速入门自定义生成式 AI RAG 测试。
点击 操作,然后选择删除应用。
在删除字段中,输入
quickstart-custom-gen-ai-rag-test。点击删除。
gcloud CLI
使用 CLI 删除应用。
gcloud design-center spaces applications delete quickstart-custom-gen-ai-rag-test \
  --space=SPACE \
  --location=LOCATION \
  --project=PROJECT
可选:删除项目
- 在 Google Cloud 控制台中,前往管理资源页面。
- 在项目列表中,选择要删除的项目,然后点击删除。
- 在提示符处,输入项目 ID,然后点击关停。
后续步骤
- 通过应用设计中心概览了解核心概念和优势。
- 您可以基于 Google 模板进行构建,从而开始使用预配置的架构。
- 通过设计应用模板来定义您自己的配置。