
Administrators create standard application templates to help ensure that their preferred architecture is used by each development team. This lets you govern the resources and configurations that developers use in their application deployments. Once you create a standard template, others in your space can access it. You can also add a template to a catalog to share with other spaces.
Developers can use your template to create and deploy an application, or you can embed your template as part of a larger composite template. When developers create an application, they can configure each component from the template, but they can't add or remove any components. The template generates Terraform code, which developers can download or deploy from App Design Center.
This document helps you design, configure, and share a standard application template using App Design Center.
Before you begin
To perform the tasks in this document, ask your administrator to grant you the necessary roles on the app-enabled folder or management project, as listed in the following table:
| Task | Required roles |
|---|---|
| Create, design, and edit standard application templates | Application Design Center Admin (roles/designcenter.admin), orApplication Design Center User ( roles/designcenter.user) |
| Publish or share standard templates to a catalog | Application Design Center Admin (roles/designcenter.admin) |
For more information about roles, see Access control with IAM.
Create a standard application template
Create standard application templates to share your architecture design with development teams. You can add the following components to your template design:
Assets: High-level resources that help you control other resources, such as service accounts.
Services: Network or API interfaces that are consumed over the network, such as Cloud Storage and Vertex AI.
Workloads: Binary deployments that perform business functions, such as Cloud Run and Compute Engine.
You can select from the following components:
- Components designed by Google, incorporating Google Cloud best practices and default security configurations.
- Your own components that you import, based on your own Terraform modules.
As you design your template, App Design Center generates Terraform code to reflect the design and configuration details.
Specify template details
Template details help you categorize your template and help developers decide whether to use your template.
To enter details for your template, do the following:
Design canvas
From the navigation menu, click Templates.
Click Create Template.
The Template ID field is automatically populated. Alternatively, enter a unique identifier for the template. This field is required.
In the Template Name field, enter a human-readable identifier to display in the Google Cloud console.
If you don't provide a name, the Template ID is copied to this field.
In the Description field, enter a brief explanation of the application's purpose.
Click Create template. The design canvas is displayed.
gcloud CLI
Create a new application template.
gcloud design-center spaces application-templates create APPLICATION_TEMPLATE \
--project=PROJECT \
--location=LOCATION \
--space=SPACE \
--display-name=DISPLAY_NAME \
--description=DESCRIPTION
Replace the following:
APPLICATION_TEMPLATE: The template ID for the application template that you want to create.PROJECT: Your management project ID.LOCATION: The application template region.SPACE: Your space ID.DISPLAY_NAME: A name to display in the Google Cloud console.DESCRIPTION: A brief description.
For more information, see gcloud design-center spaces application-templates create.
Design your template
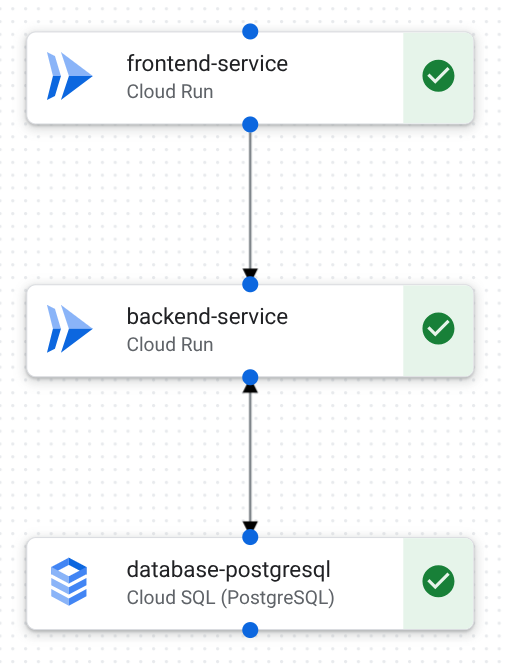
Design your template by adding and connecting components. The following example includes three connected components on the design canvas.
You can design your template by adding components to the following starting points:
- A blank canvas.
- A Google-provided template.
- A template that you generate with Gemini assistance.
To help developers configure an application based on your template, designate specific input and output variables. Variables help you define the following:
Specific inputs that developers must provide when they create an application based on your template. For example, you can provide distinct variable values for each environment when you deploy an application to development, production, and test environments. These variables are automatically exposed in the generated Terraform
variables.tfandoutputs.tffiles.Connections between two standard application templates that are embedded in a composite template. For example, to create a connection in a composite template, a database template might output a database name variable that is used as input for an application logic template.
To design your template, do the following:
Design canvas
From the design canvas, select Design to view the canvas.
Do one of the following to get started:
To start from scratch, from the Components area, click a component to add it to the canvas area.
To start from a Google-provided template, in the Get Started area on the canvas, click the template name.
To use natural language chat to generate a template, click Custom Application with Gemini.
To create a communication channel between components, do one of the following:
To connect two components on the canvas, drag from a blue dot on a component to a blue dot on another component.
To add to an existing component, click Add and select the component to add.
For connection details, see the configuration documentation for each supported resource.
To remove a component or connection, do the following:
In the canvas, click the component or connection.
In the Configuration area, click Delete.
In the field, enter delete.
Click Delete.
To specify input and output variables for your template, do the following:
Click Template details.
In the Template details panel, click the Variables tab.
In the Edit Variable area, do the following.
From the Component list, select the component that is the basis of your variable.
From the Variable type list, select one of the following:
Output: The component outputs a value that might be required for a connection. For example, a Cloud Run service might output an IP address.
Input: The component requires input from the developer or from another standard application template. For example, a data processing template might require a database name from a data storage template.
To create another variable, click Add variable and repeat these steps.
gcloud CLI
Identify the template revision URIs for the Google catalog components that you want to add to the template.
gcloud design-center spaces shared-templates list \
--google-catalog \
--location=us-central1
For more information, see gcloud design-center spaces shared-templates list.
Add a component to your application template.
gcloud design-center spaces application-templates components create COMPONENT \
--project=PROJECT \
--location=LOCATION \
--space=SPACE \
--application-template=APPLICATION_TEMPLATE \
--shared-template-revision-uri=SHARED_TEMPLATE_URI
Replace the following:
COMPONENT: The component ID for the component that you want to add to the template.PROJECT: Your management project ID.LOCATION: The application template region.SPACE: Your space ID.APPLICATION_TEMPLATE: The template ID for the application template where you're adding the component.SHARED_TEMPLATE_URI: The component shared template URI. For example,projects/my-project/locations/us-central1/spaces/my-space/sharedTemplates/my-shared-template/revisions/rev1.
For more information, see gcloud design-center spaces application-templates components create.
Add a second component to your template.
gcloud design-center spaces application-templates components create COMPONENT_2 \
--project=PROJECT \
--location=LOCATION \
--space=SPACE \
--application-template=APPLICATION_TEMPLATE \
--shared-template-revision-uri=SHARED_TEMPLATE_URI_2
Replace the following:
COMPONENT_2: The component ID for the second component that you want to add to the template.PROJECT: Your management project ID.LOCATION: The application template region.SPACE: Your space ID.APPLICATION_TEMPLATE: The template ID for the application template where you're adding the component.SHARED_TEMPLATE_URI_2: The second component shared template URI. For example,projects/my-project/locations/us-central1/spaces/my-space/sharedTemplates/my-shared-template/revisions/rev1.
For more information, see gcloud design-center spaces application-templates components create.
Create a connection between the two components.
gcloud design-center spaces application-templates components connections create CONNECTION \
--project=PROJECT \
--location=LOCATION \
--space=SPACE \
--application-template=APPLICATION_TEMPLATE \
--component=COMPONENT \
--destination-component-uri=COMPONENT_2
Replace the following:
CONNECTION: The connection ID for the connection that you want to add to the template.PROJECT: Your management project ID.LOCATION: The application template region.SPACE: Your space ID.APPLICATION_TEMPLATE: The template ID for the application template where you're adding the connection.COMPONENT: The source component ID.COMPONENT_2: The destination component ID.
For more information, see gcloud design-center spaces application-templates components connections create.
Add input and output variables to require developer input, or to connect to other components in composite templates.
gcloud design-center spaces application-templates update APPLICATION_TEMPLATE \
--project=PROJECT \
--location=LOCATION \
--space=SPACE \
--add-root-input-variables=componentUri=COMPONENT_URI,variable=VARIABLE \
--add-root-output-variables=componentUri=COMPONENT_URI,variable=VARIABLE
Replace the following:
APPLICATION_TEMPLATE: The template ID for the application template where you're adding variables.PROJECT: Your management project ID.LOCATION: The application template region.SPACE: Your space ID.COMPONENT_URI: The URI for the component that is the basis of your variable.VARIABLE: The component variable that you want to input or output. For example, a database component might have adatabase_namevariable that you might want to output or require input from developers.
For more information, see gcloud design-center spaces application-templates update.
Configure default values for components
For each component you add to a template, you can specify default configuration details, such as the resource's project and deployment location. Application Design Center applies these defaults when an application is created from this template.
Application developers can also modify connection details if the default configuration doesn't meet their requirements. For example, you might modify environment variable key names, change connection ports, or add additional roles to service accounts when you create an application.
Before developers deploy an application, they can view and modify the default values you configured in the template. Developers must configure the required details for each supported resource.
To configure components and connections, do the following:
Design canvas
From the design canvas, click a component.
In the Configuration area, from the Project ID list, select the project where you want to deploy the resource. Select a project with the following qualifications:
The project must be a descendant of the selected app-enabled folder.
The project must not be a management project.
Configure additional settings for the resource. For example, for Cloud SQL, you might configure the following:
- Region
- Backup configuration
- Database flags
- IP configuration
For links to configuration documentation for each component, see Supported resources.
When you connect components on the design canvas, default configuration values are used to create the connection. To add or modify connection details, do the following.
In the design canvas, click the connection between two components. The Connection panel opens and displays connection parameters.
Do one of the following:
To modify an existing connection parameter, click Edit.
To add a new connection parameter, click Add parameter.
Update the Key and Value fields. For example, you might want to modify the following details:
- The environment variable key names to align with your application requirements.
- The connection port value.
- The roles added to a service account.
Click Save.
gcloud CLI
Describe each component in the application template to view component parameters.
gcloud design-center spaces application-templates components describe COMPONENT \
--project=PROJECT \
--location=LOCATION \
--space=SPACE \
--application-template=APPLICATION_TEMPLATE
Replace the following:
COMPONENT: The component ID for the component that you want to describe.PROJECT: Your management project ID.LOCATION: The application template region.SPACE: Your space ID.APPLICATION_TEMPLATE: The template ID for the application template.
For more information, see gcloud design-center spaces application-templates components describe.
For each component you want to modify, create a JSON file in your home directory containing the parameter values.
For example, you might create the following file for a Cloud Run component:
  [
      {
        "key": "service_name",
        "value": "frontend-service"
      },
      {
        "key": "project_id",
        "value": "DEPLOYMENT_PROJECT"
      }
  ]
Update each component in the application template to configure the required parameters.
gcloud design-center spaces application-templates components update COMPONENT \
--project=PROJECT \
--location=LOCATION \
--space=SPACE \
--parameters=PARAMETERS_FILE_PATH \
--application-template=APPLICATION_TEMPLATE
Replace the following:
COMPONENT: The component ID for the component that you want to update.PROJECT: Your management project ID.LOCATION: The application template region.SPACE: Your space ID.PARAMETERS_FILE_PATH: A JSON file that includes component parameters.APPLICATION_TEMPLATE: The template ID for the application template.
For more information, see gcloud design-center spaces application-templates components update.
Describe the component connections.
gcloud design-center spaces application-templates components connections describe CONNECTION \
--component=COMPONENT \
--application-template=APPLICATION_TEMPLATE \
--project=PROJECT \
--location=LOCATION \
--space=SPACE
Replace the following:
CONNECTION: The connection ID.COMPONENT: The component ID.APPLICATION_TEMPLATE: The template ID.PROJECT: Your management project ID.LOCATION: The application template region.SPACE: Your space ID.
For more information, see gcloud design-center spaces application-templates components connections describe.
Edit component connection parameters.
gcloud design-center spaces application-templates components connections update CONNECTION \
--component=COMPONENT \
--application-template=APPLICATION_TEMPLATE \
--project=PROJECT \
--location=LOCATION \
--space=SPACE \
--source-component-parameters='[{"key": SOURCE_KEY, "value": SOURCE_VALUE}]'
Replace the following:
CONNECTION: The connection ID.COMPONENT: The component ID.APPLICATION_TEMPLATE: The template ID.PROJECT: Your management project ID.LOCATION: The application template region.SPACE: Your space ID.SOURCE_KEY: The new parameter key.SOURCE_VALUE: The new parameter value.
For more information, see gcloud design-center spaces application-templates components connections update.
Edit Terraform code
As you design your application template, App Design Center generates Terraform code to reflect the design and configuration details. You can edit the Terraform to specify component configuration details.
The system generates the following Terraform files:
main.tf: Infrastructure code that includes a module for each component in the template.outputs.tf: Exposes information about infrastructure components that are deployed.variables.tf: Declares name, type, and description for variables used in themain.tffile.input.tfvars: Defines values for variables used in themain.tffile.providers.tf: Defines labels that help Terraform interact with Google Cloud APIs and resources.
For background information, see Overview of Terraform on Google Cloud.
To edit the Terraform code, do the following:
From the design canvas, click Code. The system displays the generated Terraform files.
Click main.tf. The system displays the Terraform module for each component.
Edit configuration details. For more information, see the configuration documentation for each supported resource.
The system automatically validates your edits, and displays errors if your edits are invalid.
To highlight and compare your edits, do the following:
Click View diff.
To revert a change, in the margin, click Click to revert change.
Click View diff to close the comparison view.
To save your edits, click Save code changes.
To verify your changes, do the following.
- Click Design.
- Click a component and review its configuration details.
Verify your template
Before you share your template with developers, make sure that it functions as you intended. To verify your template, do the following:
- Create an application with
the following settings:
- From the Environment list, select TEST.
- From the Criticality list, select LOW.
- Deploy the application. For steps to deploy, see Deploy an application from the console.
- Test your infrastructure to make sure that it meets your requirements.
- To avoid recurring costs, delete the test deployment.
Share a template to a catalog
Once you have verified your template, you can publish the template to a catalog. The template can be used by application developers who have access to a space where the catalog is shared.
- From the design canvas, click Add to Catalog.
- To manage spaces where the catalog is shared, see Manage catalogs.
Revise and reshare your template
As you gain experience with your application and your business needs evolve, you might want to update your template. For example, you might decide to improve performance for a backend service by adding a Memorystore service for caching.
When you modify a template, you create a template revision. To apply your changes to existing applications, developers must deploy applications using the revision.
App Design Center doesn't automatically publish template revisions to catalogs. To share the latest revision, publish the template to the catalog again.
To create a new revision, do the following:
From the navigation menu, click Templates.
Select the application template that you want to revise. The canvas opens.
Modify the template to fit your new requirements. For example, add and configure a new component.
To share the latest revision with other spaces, add the template to your catalog again.
Delete a template
If you no longer need a template, you can delete it.
Design canvas
- From the design canvas, click Actions.
- Click Delete.
gcloud CLI
Delete an application template.
```sh
gcloud design-center spaces application-templates delete APPLICATION_TEMPLATE \
--project=PROJECT \
--location=LOCATION \
--space=SPACE
```
Replace the following:
APPLICATION_TEMPLATE: The template ID for the application template that you want to delete.PROJECT: Your management project ID.LOCATION: The application template region.SPACE: Your space ID.
For more information, see gcloud design-center spaces application-templates delete.
What's next
- Share your templates with other spaces by managing template catalogs.
- Use your own Terraform modules in your template designs by importing components.
- Learn how to update, scale, and delete your resources by managing applications.