
概览
Chrome 企业进阶版 是Google Cloud的零信任解决方案,可让组织的员工随时随地安全地访问 Web 应用,而无需使用 VPN,并有助于防止恶意软件、钓鱼式攻击和数据丢失。
借助 Google Chrome 的强大功能,Chrome 企业进阶版可让用户通过任何设备访问应用。Chrome 企业进阶版正在扩展其功能,以应对开发者环境中的一些关键安全挑战。通过为Google Cloud 控制台和 API 使用情境感知访问权限控制,Chrome 企业进阶版可为 Cloud Workstations API 提供额外的安全防护。
下表列出了 Chrome 企业进阶版 是否支持针对指定 Cloud Workstations 访问方法的情境感知访问权限控制。
- 对勾标记表示 Chrome 企业进阶版限制了此 Cloud Workstations 访问方法。
- “不支持”图标 表示 Chrome 企业进阶版 不会限制此 Cloud Workstations 访问方法。
目标
本文档介绍了管理员为 Cloud Workstations API 设置 Chrome Enterprise 进阶版访问权限控制,并提供有助于防止基于浏览器的 Cloud Workstations IDE 泄露源代码的其他机制的步骤。
费用
在本教程中,您可能需要让其他团队(负责结算或 IAM)参与进来,还需要测试访问权限控制,以证明 Chrome 企业进阶版安全防护措施已到位。在本文档中,您将使用 Google Cloud的以下收费组件:
如需根据您的预计使用情况来估算费用,请使用价格计算器。
完成本文档中描述的任务后,您可以通过删除所创建的资源来避免继续计费。如需了解详情,请参阅清理。
准备工作
- 登录您的 Google Cloud 账号。如果您是 Google Cloud新手,请 创建一个账号来评估我们的产品在实际场景中的表现。新客户还可获享 $300 赠金,用于运行、测试和部署工作负载。
-
In the Google Cloud console, on the project selector page, select or create a Google Cloud project.
Roles required to select or create a project
- Select a project: Selecting a project doesn't require a specific IAM role—you can select any project that you've been granted a role on.
-
Create a project: To create a project, you need the Project Creator role
(
roles/resourcemanager.projectCreator), which contains theresourcemanager.projects.createpermission. Learn how to grant roles.
-
Verify that billing is enabled for your Google Cloud project.
Enable the Workstations API.
Roles required to enable APIs
To enable APIs, you need the Service Usage Admin IAM role (
roles/serviceusage.serviceUsageAdmin), which contains theserviceusage.services.enablepermission. Learn how to grant roles.-
Make sure that you have the following role or roles on the project: Cloud Workstations > Cloud Workstations Admin.
Check for the roles
-
In the Google Cloud console, go to the IAM page.
Go to IAM - Select the project.
-
In the Principal column, find all rows that identify you or a group that you're included in. To learn which groups you're included in, contact your administrator.
- For all rows that specify or include you, check the Role column to see whether the list of roles includes the required roles.
Grant the roles
-
In the Google Cloud console, go to the IAM page.
Go to IAM - Select the project.
- Click Grant access.
-
In the New principals field, enter your user identifier. This is typically the email address for a Google Account.
- Click Select a role, then search for the role.
- To grant additional roles, click Add another role and add each additional role.
- Click Save.
-
-
确保您已为每位用户分配 Chrome 企业进阶版标准许可。只有拥有许可的用户才会受到访问权限控制的约束。如需了解详情,请参阅分配、移除和重新分配许可。
第 1 部分:为 Cloud Workstations 设置 Chrome 企业进阶版
本部分将引导您完成以下步骤,以帮助您确保对 Cloud Workstations API 的情境感知访问权限安全无虞:
- 设置 Cloud Workstations。
- 创建演示用户和演示群组。
- 在 Access Context Manager 中创建访问权限级别。
- 启用 Chrome 企业进阶版 CAA。
- 添加具有访问权限级别的必需 Google 群组。
- 测试开发者对 Cloud Workstations 的访问权限。
设置 Cloud Workstations
如需与 Chrome 企业进阶版集成,您的 Cloud Workstations 集群必须使用 Identity-Aware Proxy (IAP)。如果您已配置这些资源,请跳过此部分。
如需设置 Cloud Workstations,请执行以下操作:
- 创建具有自定义网域的工作站集群。
- 启用 IAP。
- 在集群中创建工作站配置。
如果您是刚接触 Cloud Workstations,请参阅概览和架构。
创建演示用户和演示群组
在 Google Workspace 管理控制台中,创建一个演示用户和一个新用户群组。启用后,Google Cloud 控制台的情境感知访问权限 (CAA) 会应用于所有用户和 Google 群组,因为这是一项全局设置。
使用您的管理员账号登录 Google Workspace 管理控制台: 菜单 > 目录 > 用户 > 添加新用户。
创建演示用户:
demo-user@<domain>。登录 Google Cloud 控制台,然后依次前往菜单 > IAM 和管理 > 群组。
为 Cloud Workstations 访问权限创建一个 IAM 群组,将其命名为
Cloud Workstations Users,然后分配之前创建的演示用户demo-user@<domain>。点击保存。
另创建一个 IAM 管理员群组,并将其命名为 Cloud Admin Users。将项目和组织管理员分配给此群组。
将演示用户
demo-user@<domain>添加到您创建的 Cloud Workstations 用户组:- 在 Google Cloud 控制台中,依次前往 Cloud Workstations > 工作站。
- 选择工作站,然后依次点击 more_vert更多 > 添加用户。
- 选择演示用户
demo-user@<domain>,然后选择Cloud Workstations User作为角色。 - 如需向演示用户授予工作站访问权限,请选择
demo-user@<domain>,选择Cloud Workstations Users作为角色,然后点击保存。
创建访问权限级别
返回 Google Cloud 控制台,在 Access Context Manager 中创建访问权限级别。
请按照以下说明测试访问权限:
在 Google Cloud 控制台中,依次前往安全性 > Access Context Manager,以配置公司管理的设备政策。
点击创建访问权限级别,然后填写以下字段:
- 在访问权限级别标题字段中,输入
corpManagedDevice。 - 选择基本 模式。
- 在条件下,选择正确以启用该条件。
- 点击 + 设备 政策以展开选项,然后选中需要公司自有设备。
- 点击保存以保存访问权限政策。
- 在访问权限级别标题字段中,输入
为 Google Cloud 控制台启用 Chrome 企业进阶版 CAA
如需为工作站分配情境感知访问权限控制 (CAA),请先为 Google Cloud 控制台启用 CAA:
在 Google Cloud 控制台中,依次前往安全性 > BeyondCorp Enterprise。
点击管理对 Google Cloud 控制台和 API 的访问权限。 您将来到 Chrome 企业进阶版组织级页面。
在安全 Google Cloud 控制台和 API 部分,点击启用。
添加具有访问权限级别的必需 Google 群组
添加所需的管理员群组,其中包含相关成员和正确的访问权限政策。
控制台
创建一个名为 CloudAdminAccess 的管理员访问权限政策,并将位置设置为管理员工作的区域。这样可确保即使有其他政策阻止管理员访问资源,管理员也能访问资源。
在 IAM 和管理 > 群组中,创建一个具有管理员访问权限的 IAM 群组。
- 选择组织。
- 创建一个群组,并将其命名为 Cloud Admin Users。
- 将您自己和任何其他管理员分配到此群组。
- 点击保存。
前往安全 > Chrome 企业进阶版。 点击管理访问权限,然后查看显示的群组和访问权限级别列表。
点击向 Google Cloud 控制台和 API 添加主账号。
- 对于 Google 群组,选择 Cloud Admin Users。这是您在上一步中选择的 Google 群组。
- 选择您为管理员访问权限创建的访问权限级别 CloudAdminAccess。
- 点击保存。
gcloud 和 API
如需启用模拟运行,请按照 Chrome 企业进阶版模拟运行教程操作。
为 Cloud Workstations 用户群组分配访问权限级别
如需向 Cloud Workstations 用户群组分配访问权限级别,请执行以下操作:
前往安全性 > Chrome 企业进阶版,然后点击管理访问权限。
查看显示的群组和访问权限级别列表。
点击向 Google Cloud 控制台和 API 添加主账号。
- 对于 Google 群组,选择 Cloud Workstations 用户。 这是您在上一步中选择的 Google 群组。
- 选择您之前创建的访问权限级别
corpManagedDevice。 - 点击保存。
测试开发者对 Cloud Workstations 的访问权限
测试开发者从多个入口点对 Cloud Workstations API 的访问权限。对于公司自有设备,请确保开发者可以访问工作站 API。
测试从非受管设备对工作站 API 的访问是否被阻止:
Chrome 企业进阶版会阻止尝试访问 Cloud Workstations API 的用户。当用户尝试登录时,系统会显示一条错误消息,提醒用户他们没有访问权限,或者应该检查网络连接和浏览器设置。
测试从公司自有设备访问工作站 API 的权限是否已启用:
拥有 Chrome Enterprise 进阶版和 Cloud Workstations 访问权限的开发者应该能够创建工作站,然后启动工作站。
第 2 部分:设置 Chrome 企业进阶版数据泄露防护功能
本部分包含利用 BeyondCorp Threat and Data Protection 集成数据泄露防护 (DLP) 功能的步骤。这有助于防止基于 Chrome 的 Cloud Workstations 基本编辑器(Cloud Workstations 的 Code OSS)中的源代码被渗漏。
请按照以下步骤设置 Chrome 企业进阶版数据泄露防护功能,以帮助防止下载源代码:
启用威胁防范和数据保护
如需通过 Google Workspace 管理控制台启用威胁和数据保护功能,请按以下步骤操作:
依次前往设备 > Chrome > 设置 > 用户和浏览器。
选择组织部门标识符 (OU ID) 后,点击用户和浏览器设置下的搜索或添加过滤条件,然后选择类别子类型。
在类别子类型中搜索 Chrome 企业版连接器。
在下载内容分析中,选择 Google BeyondCorp Enterprise。
展开其他设置。
- 选择分析结束后才能访问文件。
- 在检查敏感数据 > 模式中,选择默认为开启(下列网址格式除外)。
点击保存以保存配置。
创建 Chrome 企业进阶版数据泄露防护规则
如需创建 DLP 规则,请按以下步骤操作:
前往 Google Workspace 管理控制台,然后依次选择安全 > 访问权限和数据控制 > 数据保护 > 管理规则。
如需创建新规则,请依次点击添加规则和新建规则。 系统随即会打开名称和范围页面。
在名称部分中,输入名称和说明。例如,在名称字段中输入
CloudWorkstations-DLP-Rule1,在说明字段中输入Cloud Workstations Data Loss Prevention Rule 1。在范围部分中,配置以下内容:
- 选择组织部门和/或群组。
- 点击包含组织部门,然后选择您的组织。
- 点击继续。
在应用部分中,配置以下内容:
- 在 Chrome 选项中,选择文件已上传和文件已下载。
- 点击继续。
在条件页面中,配置以下内容:
- 点击添加条件以创建新条件。
- 选择所有内容。
- 选择与预定义的数据类型匹配(推荐)。
- 在选择数据类型部分,选择文档 - 源代码文件。
- 在可能性阈值字段中,选择高。
- 在不重复匹配数量下限字段中,输入 1。
- 在最低匹配计数字段中,输入 1。
- 点击继续。
在操作页面上,配置以下内容:
- 在操作选项中,依次选择 Chrome > 屏蔽内容。
- 在提醒选项中,配置以下内容:
- 对于严重程度,请选择中。
- 选择发送至提醒中心。
- 点击继续。
查看设置并创建规则
在检查页面上,检查您在之前页面中配置的设置:
- 确保设置正确无误。
- 如需继续,请点击创建。
- 在下一页上,确保选中有效。
- 如需完成规则的创建,请点击完成。
测试数据泄露防护规则
添加 DLP 规则后,您可以在 Chrome 中通过 Cloud Workstations 进行测试:
在新的 Chrome 标签页中,输入
chrome://policy,然后点击重新加载政策,确保 Chrome 政策已更新。向下滚动,确保您看到政策列表。如果您看到这些,则表示政策已成功拉取。在这种情况下,请查找 OnFileDownloadEnterpriseConnector 政策。
前往 Google Cloud 控制台,然后创建 Cloud Workstations 配置。
创建工作站配置时,请务必选择基础映像上的代码编辑器,然后选择基本编辑器(Cloud Workstations 的 Code OSS) 预配置的基础映像。
访问启动工作站并连接到端口 80 后显示的 Code OSS for Cloud Workstations 网址。
使用 IDE 中的 Clone Git Repository 选项克隆代码库。 克隆代码库后,尝试下载包含源代码的文件。
如需在 Code OSS for Cloud Workstations 浏览器视图中下载文件,请使用以下任一方法:
从“资源管理器”视图中拖动文件。
找到您要使用的文件和目录,右键点击,然后选择下载。
下载后,DLP 政策即会生效。看到一条下载被阻止的通知,其中指出不符合贵组织的政策:
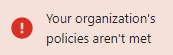
恭喜!您已成功帮助防止下载源代码文件。
清理
为避免因本教程中使用的资源导致您的 Google Cloud 账号产生费用,请删除包含这些资源的项目,或者保留该项目但删除各个资源。如需了解详情,请参阅删除资源。
后续步骤
- 如需详细了解 Chrome 企业进阶版,请参阅 Chrome 企业进阶版概览。
- 了解将 Chrome 企业进阶版应用到 Google Cloud 和本地资源的简要步骤。