
Cloud Workstations lets you create and use custom images for your workstations. After a custom image is in use it's useful to automate a rebuild of the custom image in order to pull in fixes and updates available in the base images.
In this tutorial you learn how to build an automated pipeline to help ensure that you include security updates and patches in your custom workstation images.
Objectives
By following this tutorial, you build an automated pipeline for your base image with these steps:
- Create an Artifact Registry repository to store and scan your custom image.
- Configure GitHub with Google Cloud to store your image configurations.
- Create a Cloud Build trigger to automate creation and deployment of custom images to Artifact Registry.
- Configure Cloud Scheduler to initiate builds on a regular basis.
- Review the results of the automated processes.
Costs
In this document, you use the following billable components of Google Cloud:
To generate a cost estimate based on your projected usage,
use the pricing calculator.
When you finish the tasks that are described in this document, you can avoid continued billing by deleting the resources that you created. For more information, see Clean up.
Before you begin
- Sign in to your Google Cloud account. If you're new to Google Cloud, create an account to evaluate how our products perform in real-world scenarios. New customers also get $300 in free credits to run, test, and deploy workloads.
-
In the Google Cloud console, on the project selector page, select or create a Google Cloud project.
Roles required to select or create a project
- Select a project: Selecting a project doesn't require a specific IAM role—you can select any project that you've been granted a role on.
-
Create a project: To create a project, you need the Project Creator role
(
roles/resourcemanager.projectCreator), which contains theresourcemanager.projects.createpermission. Learn how to grant roles.
-
Verify that billing is enabled for your Google Cloud project.
Enable the Artifact Registry, Container Scanning API, Cloud Build, and Cloud Scheduler APIs.
Roles required to enable APIs
To enable APIs, you need the
serviceusage.services.enablepermission. If you created the project, then you likely already have this permission through the Owner role (roles/owner). Otherwise, you can get this permission through the Service Usage Admin role (roles/serviceusage.serviceUsageAdmin). Learn how to grant roles.-
Install the Google Cloud CLI.
-
If you're using an external identity provider (IdP), you must first sign in to the
gcloudCLI with your federated identity. -
To initialize the
gcloudCLI, run the following command:gcloud init -
In the Google Cloud console, on the project selector page, select or create a Google Cloud project.
Roles required to select or create a project
- Select a project: Selecting a project doesn't require a specific IAM role—you can select any project that you've been granted a role on.
-
Create a project: To create a project, you need the Project Creator role
(
roles/resourcemanager.projectCreator), which contains theresourcemanager.projects.createpermission. Learn how to grant roles.
-
Verify that billing is enabled for your Google Cloud project.
Enable the Artifact Registry, Container Scanning API, Cloud Build, and Cloud Scheduler APIs.
Roles required to enable APIs
To enable APIs, you need the
serviceusage.services.enablepermission. If you created the project, then you likely already have this permission through the Owner role (roles/owner). Otherwise, you can get this permission through the Service Usage Admin role (roles/serviceusage.serviceUsageAdmin). Learn how to grant roles.-
Install the Google Cloud CLI.
-
If you're using an external identity provider (IdP), you must first sign in to the
gcloudCLI with your federated identity. -
To initialize the
gcloudCLI, run the following command:gcloud init
Prepare the environment
Before proceeding, be sure that you set the following environment variables.
Set the project ID for the cloud project you plan to use:
PROJECT_ID=$PROJECT_IDSet the GitHub username where you plan to store your repository:
GITHUB_USER=$GITHUB_IDSet the
PROJECT_NUMBERandREGIONvariables to use through the process:PROJECT_NUMBER=$(gcloud projects describe $PROJECT_ID \ --format='value(projectNumber)') REGION=$REGIONIn the prior example, replace $REGION with the region name that you plan to use—for example,
us-central1.For more information about available regions, see Cloud Workstations locations.
Create an Artifact Registry repository
In this tutorial you use Artifact Registry to store and scan your images.
Create a repository with the following command:
gcloud artifacts repositories create custom-images \
      --repository-format=docker \
      --location=$REGION \
      --description="Docker repository"
Replace $REGION with the region name that you plan to use.
Configure Docker to use your
gcloudCLI credentials when accessing Artifact Registry.gcloud auth configure-docker $REGION-docker.pkg.devTo turn off Artifact Analysis, run the following command:
gcloud services disable containerscanning.googleapis.com
Configure your GitHub repository
In practice, you keep the Dockerfile for your custom images in a Git repository. The automated process accesses that repository during the build process to pull the relevant configs and Dockerfile.
Fork the sample repository
To fork a sample repository that provides container definitions, follow these steps:
- Click this link to
Create a new fork.
of the
software-delivery-workshoprepository. - If prompted, sign in to GitHub.
- Select your GitHub username as the Owner. The Repository name appears as
software-delivery-workshop. - Click Create fork and wait a few seconds for the process to complete.
Connect Cloud Build to GitHub
Next, connect that repository to Cloud Build using the built-in GitHub connection capability. Click the link to the GitHub repository and follow the instructions describing how to complete the process. You don't need to create the trigger in the last step of the wizard, and you can skip the last steps because you can do that later from the command line.
If you use a different Git repository solution, you can also follow the instructions to connect Cloud Build to GitLab or Bitbucket.
Create a Cloud Build trigger
The sample repository contains a container definition and a Cloud Build
configuration used to build the container image. In this step you create a
Cloud Build trigger that runs the instructions in the
cloudbuild.yaml file that you can find in the
labs/cloudbuild-scheduled-jobs/code-oss-java
folder.
gcloud builds triggers create manual \
    --name=custom-image-trigger \
    --repo=$GITHUB_USER/software-delivery-workshop \
    --repo-type=GITHUB \
    --branch=main \
    --build-config=labs/cloudbuild-scheduled-jobs/code-oss-java/cloudbuild.yaml \
    --substitutions=_REGION=$REGION,_AR_REPO_NAME=custom-images,_AR_IMAGE_NAME=code-oss-java,_IMAGE_DIR=labs/cloudbuild-scheduled-jobs/code-oss-java

TRIGGER_ID=$(gcloud builds triggers list \
    --filter=name="custom-image-trigger" --format="value(id)")
This example configures the following:
- The
gcloudCLI command creates a manual trigger within Cloud Build namedcustom-image-triggeras indicated by thenameflag on the second line. - The next three lines contain flags related to the source GitHub repository:
- Path to the repository
- Type of the repository
- Git branch to build
- The
build-configflag indicates the path to the Cloud Build file in the Git repository. To make the job dynamic, use the
substitutionsflag. For this job, the command passes in the following variables:- Region,
$_REGION - Artifact Registry repository name,
$_AR_REPO_NAME - Container image name,
$_AR_IMAGE_NAME - Location of the Dockerfile to build,
$_IMAGE_DIR
View the cloudbuild.yaml file to see how these variables are used in the process.
- Region,
After the trigger is created, the unique name of the trigger is retrieved and stored in the
$TRIGGER_IDenvironment variable for later use.
Configure Cloud Scheduler
To help ensure that your images are up to date with the latest updates and patches, use Cloud Scheduler to execute the Cloud Build trigger on a set frequency. For this tutorial, the job runs every day. In practice, set this to a frequency aligned to your organizational needs to help ensure that the latest updates are always included.
Grant a required role to default service account to invoke Cloud Build trigger:
gcloud projects add-iam-policy-binding $PROJECT_ID \
    --member="serviceAccount:$PROJECT_NUMBER-compute@developer.gserviceaccount.com" \
    --role="roles/cloudbuild.builds.editor"
Grant a required role to Cloud Build service account to upload images to Artifact Registry:
gcloud projects add-iam-policy-binding $PROJECT_ID \
    --member=serviceAccount:$PROJECT_NUMBER@cloudbuild.gserviceaccount.com \
    --role="roles/artifactregistry.admin"
Create the Cloud Scheduler job with the following command:
gcloud scheduler jobs create http run-build \
    --schedule='0 1 * * *' \
    --uri=https://cloudbuild.googleapis.com/v1/projects/$PROJECT_ID/locations/global/triggers/$TRIGGER_ID:run \
    --location=us-central1 \
    --oauth-service-account-email=$PROJECT_NUMBER-compute@developer.gserviceaccount.com \
    --oauth-token-scope=https://www.googleapis.com/auth/cloud-platform
The job is set to execute one time every day; however, to test the feature immediately, run the job manually from the Cloud Scheduler:
- On the Cloud Scheduler page, find the entry you just created called run-build.
- In the Actions column, click the more_vertMore options menu for that row.
- Click Force a job run to test the system manually.
After the command successfully executes, switch to the Cloud Build history page to review the progress:
Review the results
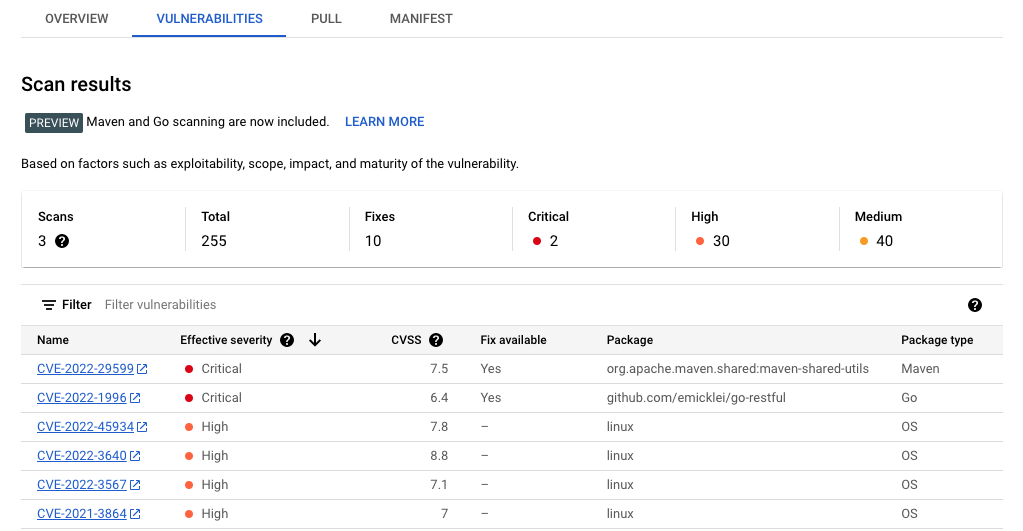
Because you enabled the Container Scanning API as part of the setup process, Artifact Registry automatically scans the images for security vulnerabilities.
To review the vulnerabilities:
Open the Artifact Registry Repositories page:
In the repositories list, click a repository.
Click an image name. Vulnerability totals for each image digest appear in the Vulnerabilities column.

To view the list of vulnerabilities for an image, click the link in the Vulnerabilities column. The vulnerability list shows the severity, availability of a fix, and the name of the package that contains the vulnerability.
Clean up
To avoid incurring charges to your Google Cloud account for the resources used in this tutorial, either delete the project that contains the resources, or keep the project and delete the individual resources.
To avoid incurring charges to your Google Cloud account for the resources used on this page, make sure that you remember to delete resources that you no longer need.
To delete a Google Cloud project from the Google Cloud console or from the
gcloud CLI:
Console
- In the Google Cloud console, go to the Manage resources page.
- In the project list, select the project that you want to delete, and then click Delete.
- In the dialog, type the project ID, and then click Shut down to delete the project.
gcloud
Delete a Google Cloud project:
gcloud projects delete PROJECT_ID
What's next
- Review the list of available preconfigured base images.
- Customize your container images.
- Review available machine types.
- Set up security best practices.
- Explore reference architectures, diagrams, and best practices about Google Cloud. Take a look at our Cloud Architecture Center.