
內部部署主機可以透過公開網際網路存取 Vertex AI 上的 Generative AI,也可以透過混合式網路架構,使用 Cloud VPN 或 Cloud Interconnect 上的 Private Service Connect (PSC) 私下存取。這兩種選項都提供 SSL/TLS 加密。不過,私有選項的效能好得多,因此建議用於重要應用程式。
在本教學課程中,您將使用高可用性 VPN (高可用性 VPN),透過 Cloud NAT 公開存取 Vertex AI 上的 Generative AI,並在兩個虛擬私有雲 (VPC) 網路之間私下存取,做為多雲和內部部署私人連線的基礎。
本教學課程適用於熟悉 Vertex AI、VPC、 Google Cloud 控制台和 Cloud Shell 的企業網路管理員、資料科學家和研究人員。熟悉 Vertex AI 生成式 AI 會有幫助,但非必要。
目標
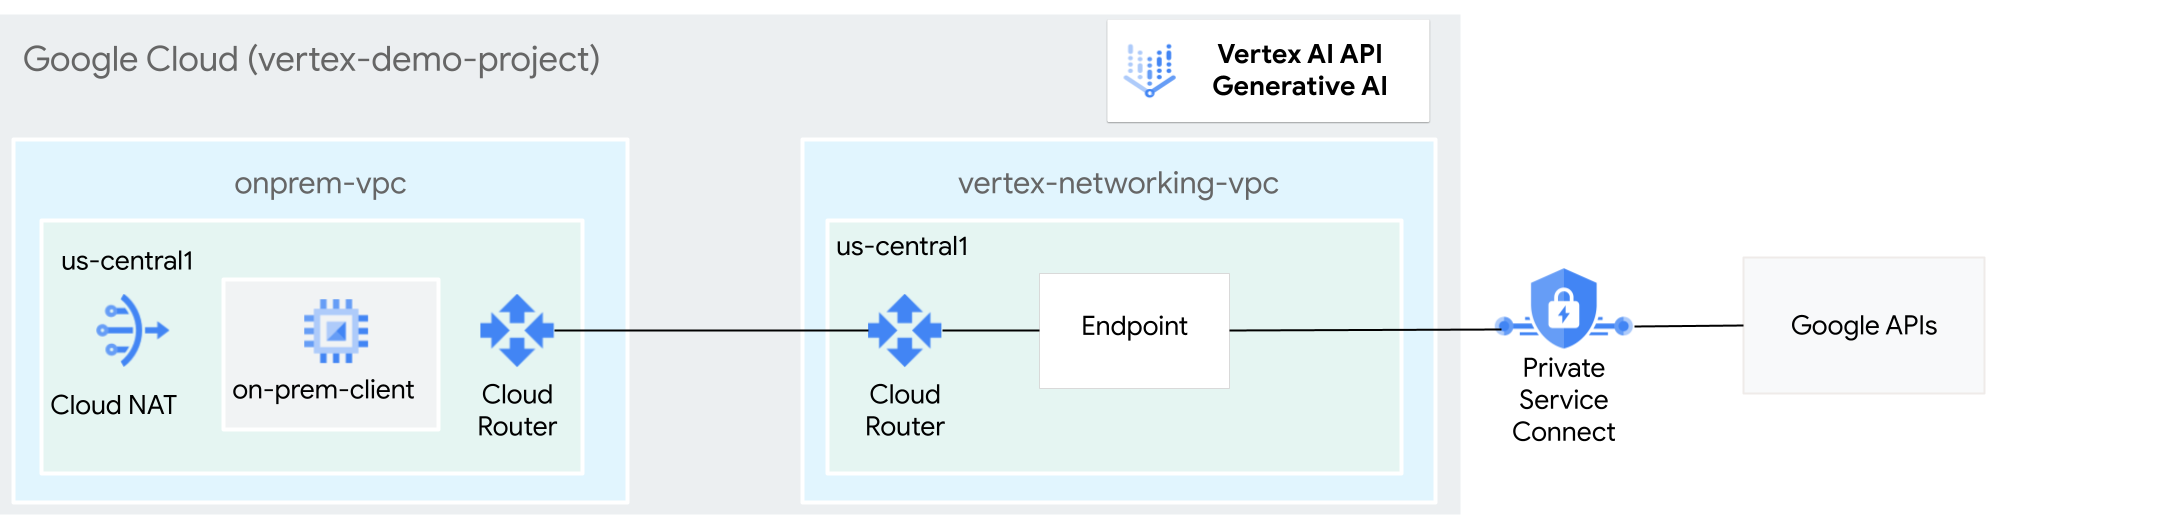
- 如上圖所示,建立兩個虛擬私有雲網路:
- 一 (
onprem-vpc) 代表地端部署網路。 - 另一個 (
vertex-networking-vpc) 則是用於存取 Vertex AI 生成式 AI 的 REST API。
- 一 (
- 部署高可用性 VPN 閘道、Cloud VPN 通道和 Cloud Router,連線
vertex-networking-vpc和onprem-vpc。 - 建立 Private Service Connect (PSC) 端點,將要求轉送至 GenAI REST API。
- 在
vertex-networking-vpc中設定 Cloud Router 自訂通告路徑,向onprem-vpc公告 Private Service Connect 端點的路徑。 - 在
onprem-vpc中建立 Compute Engine VM 執行個體,代表透過高可用性 VPN 將要求傳送至 GenAI REST API 的用戶端應用程式。
費用
在本文件中,您會使用下列 Google Cloud的計費元件:
您可以使用 Pricing Calculator,根據預測用量估算費用。
完成本文所述工作後,您可以刪除建立的資源,避免繼續計費,詳情請參閱「清除所用資源」。
事前準備
-
In the Google Cloud console, go to the project selector page.
-
Select or create a Google Cloud project.
Roles required to select or create a project
- Select a project: Selecting a project doesn't require a specific IAM role—you can select any project that you've been granted a role on.
-
Create a project: To create a project, you need the Project Creator role
(
roles/resourcemanager.projectCreator), which contains theresourcemanager.projects.createpermission. Learn how to grant roles.
-
Verify that billing is enabled for your Google Cloud project.
- 如果您不是專案擁有者,專案擁有者必須授予您
roles/resourcemanager.projectIamAdminIAM 角色。您必須具備這個角色,才能將 IAM 角色和權限授予自己和服務帳戶。 - 開啟 Cloud Shell,執行本教學課程中列出的指令。Cloud Shell 是一種互動式殼層環境,可讓您透過網路瀏覽器管理專案和資源。 Google Cloud
- 在 Cloud Shell 中,將目前的專案設為您的 Google Cloud 專案 ID,並將該專案 ID 儲存到
projectid殼層變數中:projectid="PROJECT_ID" gcloud config set project ${projectid} -
Make sure that you have the following role or roles on the project: roles/compute.instanceAdmin.v1, roles/compute.networkAdmin, roles/compute.securityAdmin, roles/dns.admin, roles/iap.tunnelResourceAccessor, roles/iam.serviceAccountCreator, roles/iam.serviceAccountUser, roles/iam.serviceAccountDeleter, roles/resourcemanager.projectIamAdmin, roles/servicedirectory.editor, roles/servicemanagement.quotaAdmin, roles/aiplatform.user
Check for the roles
-
In the Google Cloud console, go to the IAM page.
Go to IAM - Select the project.
-
In the Principal column, find all rows that identify you or a group that you're included in. To learn which groups you're included in, contact your administrator.
- For all rows that specify or include you, check the Role column to see whether the list of roles includes the required roles.
Grant the roles
-
In the Google Cloud console, go to the IAM page.
前往 IAM - 選取所需專案。
- 按一下「Grant access」(授予存取權)。
-
在「New principals」(新增主體) 欄位中,輸入您的使用者 ID。 這通常是指 Google 帳戶的電子郵件地址。
- 按一下「選取角色」,然後搜尋角色。
- 如要授予其他角色,請按一下「Add another role」(新增其他角色),然後新增其他角色。
- 按一下「Save」(儲存)。
Enable the DNS, IAM, Compute Engine, Service Usage, and Vertex AI APIs.
Roles required to enable APIs
To enable APIs, you need the Service Usage Admin IAM role (
roles/serviceusage.serviceUsageAdmin), which contains theserviceusage.services.enablepermission. Learn how to grant roles. -
建立兩個虛擬私有雲網路:vertex-networking-vpc 和 onprem-vpc
在本節中,您將建立兩個 VPC 網路:一個做為存取 Vertex AI 生成式 AI (也稱為 GenAI) API 的主要網路,另一個則模擬內部部署網路。
建立虛擬私有雲網路
建立用於存取 GenAI API 的 VPC 網路 (
vertex-networking-vpc):gcloud compute networks create vertex-networking-vpc --subnet-mode custom建立虛擬私有雲網路,模擬內部部署網路 (
onprem-vpc):gcloud compute networks create onprem-vpc --subnet-mode custom在
onprem-vpc網路中,建立名為onprem-vpc-subnet1的子網路,並將主要 IPv4 範圍設為172.16.10.0/24:gcloud compute networks subnets create onprem-vpc-subnet1 \ --range 172.16.10.0/24 \ --network onprem-vpc \ --region us-central1在 Google Cloud 控制台中,前往「VPC network」(虛擬私有雲網路) 頁面的「Networks in current project」(目前專案中的網路) 分頁。
在虛擬私有雲網路清單中,確認已建立兩個網路:
vertex-networking-vpc和onprem-vpc。在「VPC network」(虛擬私有雲網路) 頁面中,按一下「Subnets in current project」(目前專案中的子網路) 分頁標籤。
在虛擬私有雲子網路清單中,確認
onprem-vpc-subnet1子網路已在onprem-vpc網路中建立。
設定混合式連線
在本節中,您將建立兩個互相連線的高可用性 VPN 閘道。其中一個位於 vertex-networking-vpc 虛擬私有雲網路。另一個則位於 onprem-vpc 虛擬私有雲網路。每個閘道都包含 Cloud Router 和一對 VPN 通道。
建立高可用性 VPN 閘道
在 Cloud Shell 中,為
vertex-networking-vpc虛擬私有雲網路建立高可用性 VPN 閘道:gcloud compute vpn-gateways create vertex-networking-vpn-gw1 \ --network vertex-networking-vpc \ --region us-central1為
onprem-vpc虛擬私有雲網路建立高可用性 VPN 閘道:gcloud compute vpn-gateways create onprem-vpn-gw1 \ --network onprem-vpc \ --region us-central1前往 Google Cloud 控制台的「VPN」頁面,然後點選「Cloud VPN Gateways」(Cloud VPN 閘道) 分頁標籤。
在 VPN 閘道清單中,確認已建立兩個閘道 (
vertex-networking-vpn-gw1和onprem-vpn-gw1),且每個閘道都有兩個 IP 位址。
建立 Cloud Router
在 Cloud Shell 中,為
vertex-networking-vpc虛擬私有雲網路建立 Cloud Router:gcloud compute routers create vertex-networking-vpc-router1 \ --region us-central1\ --network vertex-networking-vpc \ --asn 65001為
onprem-vpcVPC 網路建立 Cloud Router:gcloud compute routers create onprem-vpc-router1 \ --region us-central1\ --network onprem-vpc\ --asn 65002
在 onprem-vpc 虛擬私有雲網路中新增 Cloud NAT 閘道
在這個步驟中,您會為 onprem-vpc 虛擬私有雲網路的 Cloud Router 新增 Cloud NAT 閘道。Cloud NAT 閘道可為沒有外部 IP 位址的 Compute Engine 虛擬機器 (VM) 執行個體提供外送連線。
在 Cloud Shell 中,將 Cloud NAT 閘道新增至
onprem-vpc-router1Cloud Router:gcloud compute routers nats create us-central-cloudnat-onprem \ --router=onprem-vpc-router1 \ --auto-allocate-nat-external-ips \ --nat-all-subnet-ip-ranges \ --region us-central1前往 Google Cloud 控制台的「Cloud Router」頁面。
在 Cloud Router 清單中,確認已建立
vertex-networking-vpc-router1和onprem-vpc-router1。您可能需要重新整理 Google Cloud 控制台瀏覽器分頁,才能看到新值。在 Cloud Router 清單中,按一下
onprem-vpc-router1。在「路由器詳細資料」頁面中,確認已建立
us-central-cloudnat-onpremCloud NAT 閘道。
建立 VPN 通道
在
vertex-networking-vpc網路中,建立名為vertex-networking-vpc-tunnel0的 VPN 通道:gcloud compute vpn-tunnels create vertex-networking-vpc-tunnel0 \ --peer-gcp-gateway onprem-vpn-gw1 \ --region us-central1 \ --ike-version 2 \ --shared-secret [ZzTLxKL8fmRykwNDfCvEFIjmlYLhMucH] \ --router vertex-networking-vpc-router1 \ --vpn-gateway vertex-networking-vpn-gw1 \ --interface 0在
vertex-networking-vpc網路中,建立名為vertex-networking-vpc-tunnel1的 VPN 通道:gcloud compute vpn-tunnels create vertex-networking-vpc-tunnel1 \ --peer-gcp-gateway onprem-vpn-gw1 \ --region us-central1 \ --ike-version 2 \ --shared-secret [bcyPaboPl8fSkXRmvONGJzWTrc6tRqY5] \ --router vertex-networking-vpc-router1 \ --vpn-gateway vertex-networking-vpn-gw1 \ --interface 1在
onprem-vpc網路中,建立名為onprem-vpc-tunnel0的 VPN 通道:gcloud compute vpn-tunnels create onprem-vpc-tunnel0 \ --peer-gcp-gateway vertex-networking-vpn-gw1 \ --region us-central1\ --ike-version 2 \ --shared-secret [ZzTLxKL8fmRykwNDfCvEFIjmlYLhMucH] \ --router onprem-vpc-router1 \ --vpn-gateway onprem-vpn-gw1 \ --interface 0在
onprem-vpc網路中,建立名為onprem-vpc-tunnel1的 VPN 通道:gcloud compute vpn-tunnels create onprem-vpc-tunnel1 \ --peer-gcp-gateway vertex-networking-vpn-gw1 \ --region us-central1\ --ike-version 2 \ --shared-secret [bcyPaboPl8fSkXRmvONGJzWTrc6tRqY5] \ --router onprem-vpc-router1 \ --vpn-gateway onprem-vpn-gw1 \ --interface 1前往 Google Cloud 控制台的「VPN」VPN頁面。
在 VPN 通道清單中,確認已建立四個 VPN 通道。
建立 BGP 工作階段
Cloud Router 會透過邊界閘道通訊協定 (BGP),在 VPC 網路 (本例中為 vertex-networking-vpc) 與地端部署網路 (以 onprem-vpc 表示) 之間交換路徑。在 Cloud Router 上,您會為地端部署路由器設定介面和 BGP 對等互連。這個介面和 BGP 對等點設定組合起來,就會形成 BGP 工作階段。在本節中,您將為 vertex-networking-vpc 建立兩個 BGP 工作階段,並為 onprem-vpc 建立兩個 BGP 工作階段。
設定路由器之間的介面和 BGP 對等互連後,路由器就會自動開始交換路徑。
為「vertex-networking-vpc」建立 BGP 工作階段
在 Cloud Shell 中,於
vertex-networking-vpc網路中為vertex-networking-vpc-tunnel0建立 BGP 介面:gcloud compute routers add-interface vertex-networking-vpc-router1 \ --interface-name if-tunnel0-to-onprem \ --ip-address 169.254.0.1 \ --mask-length 30 \ --vpn-tunnel vertex-networking-vpc-tunnel0 \ --region us-central1在
vertex-networking-vpc網路中,為bgp-onprem-tunnel0建立 BGP 對等點:gcloud compute routers add-bgp-peer vertex-networking-vpc-router1 \ --peer-name bgp-onprem-tunnel0 \ --interface if-tunnel0-to-onprem \ --peer-ip-address 169.254.0.2 \ --peer-asn 65002 \ --region us-central1在
vertex-networking-vpc網路中,為vertex-networking-vpc-tunnel1建立 BGP 介面:gcloud compute routers add-interface vertex-networking-vpc-router1 \ --interface-name if-tunnel1-to-onprem \ --ip-address 169.254.1.1 \ --mask-length 30 \ --vpn-tunnel vertex-networking-vpc-tunnel1 \ --region us-central1在
vertex-networking-vpc網路中,為bgp-onprem-tunnel1建立 BGP 對等點:gcloud compute routers add-bgp-peer vertex-networking-vpc-router1 \ --peer-name bgp-onprem-tunnel1 \ --interface if-tunnel1-to-onprem \ --peer-ip-address 169.254.1.2 \ --peer-asn 65002 \ --region us-central1
為「onprem-vpc」建立 BGP 工作階段
在
onprem-vpc網路中,為onprem-vpc-tunnel0建立 BGP 介面:gcloud compute routers add-interface onprem-vpc-router1 \ --interface-name if-tunnel0-to-vertex-networking-vpc \ --ip-address 169.254.0.2 \ --mask-length 30 \ --vpn-tunnel onprem-vpc-tunnel0 \ --region us-central1在
onprem-vpc網路中,為bgp-vertex-networking-vpc-tunnel0建立 BGP 對等點:gcloud compute routers add-bgp-peer onprem-vpc-router1 \ --peer-name bgp-vertex-networking-vpc-tunnel0 \ --interface if-tunnel0-to-vertex-networking-vpc \ --peer-ip-address 169.254.0.1 \ --peer-asn 65001 \ --region us-central1在
onprem-vpc網路中,為onprem-vpc-tunnel1建立 BGP 介面:gcloud compute routers add-interface onprem-vpc-router1 \ --interface-name if-tunnel1-to-vertex-networking-vpc \ --ip-address 169.254.1.2 \ --mask-length 30 \ --vpn-tunnel onprem-vpc-tunnel1 \ --region us-central1在
onprem-vpc網路中,為bgp-vertex-networking-vpc-tunnel1建立 BGP 對等點:gcloud compute routers add-bgp-peer onprem-vpc-router1 \ --peer-name bgp-vertex-networking-vpc-tunnel1 \ --interface if-tunnel1-to-vertex-networking-vpc \ --peer-ip-address 169.254.1.1 \ --peer-asn 65001 \ --region us-central1
驗證 BGP 工作階段建立作業
前往 Google Cloud 控制台的「VPN」VPN頁面。
在 VPN 通道清單中,確認每個通道的「BGP 工作階段狀態」欄值已從「設定 BGP 工作階段」變更為「已建立 BGP」。您可能需要重新整理 Google Cloud 控制台瀏覽器分頁,才能看到新值。
建立 Private Service Connect (PSC) 端點
在本節中,您將為 Google API 建立 Private Service Connect (PSC) 端點,onprem-vpc 網路中的 VM 執行個體會使用這個端點,從 onprem-vpc 網路存取 GenAI API。
Private Service Connect (PSC) 端點是 onprem-vpc 網路中的內部 IP 位址,該網路中的用戶端可以直接存取。部署轉送規則後,系統會建立這個端點,將符合 PSC 端點 IP 位址的網路流量導向一組 Google API,也就是 all-apis 套件。
稍後,vertex-networking-vpc-router Cloud Router 會將 PSC 端點的 IP 位址 (192.168.0.1) 做為自訂通告路由,通告至 onprem-vpc 網路。
預留全域內部 IP 位址,指派給端點:
gcloud compute addresses create psc-googleapi-ip \
   --global \
   --purpose=PRIVATE_SERVICE_CONNECT \
   --addresses=192.168.0.1 \
   --network=vertex-networking-vpc
建立端點,以及將端點連線至 Google API 和服務的轉送規則:
gcloud compute forwarding-rules create pscvertex \
   --global \
   --network=vertex-networking-vpc\
   --address=psc-googleapi-ip \
   --target-google-apis-bundle=all-apis
列出已設定的 PSC 端點,並確認已建立
pscvertex端點:gcloud compute forwarding-rules list \ --filter target="(all-apis OR vpc-sc)" --global取得已設定的 PSC 端點詳細資料,並確認 IP 位址為
192.168.0.1:gcloud compute forwarding-rules describe \ pscvertex --global
為「vertex-networking-vpc」建立自訂路徑通告
在本節中,您將為 vertex-networking-vpc-router1 (vertex-networking-vpc 的 Cloud Router) 建立自訂通告路由,將 PSC 端點的 IP 位址通告至 onprem-vpc 網路。
前往 Google Cloud 控制台的「Cloud Router」頁面。
在 Cloud Router 清單中,按一下
vertex-networking-vpc-router1。在「路由器詳細資料」頁面中,按一下「編輯」。
在「公告路徑」部分,選取「路徑」的「建立自訂路徑」。
選取「公告向 Cloud Router 公開的所有子網路」核取方塊,繼續公告 Cloud Router 可用的子網路。啟用這個選項後,即可模擬預設通告模式下的 Cloud Router 行為。
按一下「新增自訂路徑」。
在「來源」中選取「自訂 IP 範圍」。
在「IP address range」(IP 位址範圍) 中,輸入下列 IP 位址:
192.168.0.1在「說明」中輸入下列文字:
Custom route to advertise Private Service Connect endpoint IP address依序按一下 [完成] 及 [儲存]。
確認 onprem-vpc 已瞭解公告路徑
前往 Google Cloud 控制台的「Routes」(路徑) 頁面。
在「有效路徑」分頁中,執行下列操作:
- 在「Network」(網路) 中選擇
onprem-vpc。 - 在「區域」部分,選擇
us-central1 (Iowa)。 - 點按「查看」。
在路徑清單中,確認是否有名稱開頭為
onprem-vpc-router1-bgp-vertex-networking-vpc-tunnel0和onprem-vpc-router1-bgp-vfertex-networking-vpc-tunnel1的項目,且兩者的目的地 IP 範圍皆為192.168.0.1/32。(192.168.0.1是 PSC 端點的 IP 位址)。如果這些項目沒有立即顯示,請稍候幾分鐘,然後重新整理 Google Cloud 控制台瀏覽器分頁。
- 在「Network」(網路) 中選擇
在內部部署網路中設定 VM 執行個體
在本節中,您會在 onprem-vpc 虛擬私有雲網路中建立 Compute Engine VM 執行個體。這個 VM 執行個體會模擬連線至 PSC 端點的內部部署用戶端,並存取 GenAI API。
建立使用者代管的服務帳戶
在本教學課程中,您將按照 Compute Engine 和 IAM 最佳做法,建立使用者管理的服務帳戶。
在 Cloud Shell 中執行下列指令,並將 PROJECT_ID 替換為您的專案 ID:
projectid=PROJECT_ID
gcloud config set project ${projectid}
建立服務帳戶:
gcloud iam service-accounts create user-managed-sa將Vertex AI 使用者 (
roles/aiplatform.user) 身分與存取權管理角色指派給服務帳戶:gcloud projects add-iam-policy-binding $projectid \ --member="serviceAccount:user-managed-sa@$projectid.iam.gserviceaccount.com" \ --role="roles/aiplatform.user"
建立 on-prem-client VM 執行個體
在這個步驟中,您會建立 VM 執行個體,該執行個體會使用 Private Service Connect IP 位址 (192.168.0.1),透過高可用性 VPN 存取 Google API。
如要允許 Identity-Aware Proxy (IAP) 連線至您的 VM 執行個體,請根據以下條件建立防火牆規則:
- 套用至所有您希望透過 IAP 存取的 VM 執行個體。(在本例中,只有
on-prem-client)。 - 允許來自 IP 範圍「
35.235.240.0/20」的 TCP 流量通過通訊埠 22。這個範圍包含 IAP 用於 TCP 轉送的所有 IP 位址。
建立
on-prem-clientVM 執行個體。下列指令也會安裝tcpdump和dnsutils套件,其中包含tcpdump和dig公用程式,您稍後會使用這些公用程式驗證 API 要求:gcloud compute instances create on-prem-client \ --zone=us-central1-a \ --image-family=debian-11 \ --image-project=debian-cloud \ --subnet=onprem-vpc-subnet1 \ --scopes=https://www.googleapis.com/auth/cloud-platform \ --no-address \ --shielded-secure-boot \ --service-account=user-managed-sa@$projectid.iam.gserviceaccount.com \ --metadata startup-script="#! /bin/bash sudo apt-get update sudo apt-get install tcpdump dnsutils -y"建立名為
ssh-iap-on-prem-vpc的 IAP 防火牆規則:gcloud compute firewall-rules create ssh-iap-on-prem-vpc \ --network onprem-vpc \ --allow tcp:22 \ --source-ranges=35.235.240.0/20
驗證是否可透過公用網際網路存取 Vertex AI 生成式 AI
在本節中,您將使用 Identity-Aware Proxy 登入 on-prem-client VM 執行個體,然後對公開 Vertex AI 網域 (us-central1-aiplatform.googleapis.com) 執行 dig 指令,驗證與 Vertex AI API (包括 GenAI) 的公開連線。
在 Cloud Shell (第一個分頁) 中執行下列指令,並將 PROJECT_ID 替換為您的專案 ID:
projectid=PROJECT_ID
gcloud config set project ${projectid}
使用 IAP 登入
on-prem-clientVM 執行個體:gcloud compute ssh on-prem-client --project=$projectid --zone=us-central1-a --tunnel-through-iap執行
dig指令:dig us-central1-aiplatform.googleapis.com您應該會看到類似以下的
dig輸出內容,其中「answer」區段中的 IP 位址是公用 IP 位址:; <<>> DiG 9.16.44-Debian <<>> us-central1.aiplatfom.googleapis.com ;; global options: +cmd ;; Got answer: ;; ->>HEADER<<- opcode: QUERY, status: NOERROR, id: 42506 ;; flags: qr rd ra; QUERY: 1, ANSWER: 16, AUTHORITY: 0, ADDITIONAL: 1 ;; OPT PSEUDOSECTION: ; EDNS: version: 0, flags:; udp: 512 ;; QUESTION SECTION: ;us-central1.aiplatfom.googleapis.com. IN A ;; ANSWER SECTION: us-central1.aiplatfom.googleapis.com. 300 IN A 173.194.192.95 us-central1.aiplatfom.googleapis.com. 300 IN A 142.250.152.95 us-central1.aiplatfom.googleapis.com. 300 IN A 172.217.219.95 us-central1.aiplatfom.googleapis.com. 300 IN A 209.85.146.95 us-central1.aiplatfom.googleapis.com. 300 IN A 209.85.147.95 us-central1.aiplatfom.googleapis.com. 300 IN A 142.250.125.95 us-central1.aiplatfom.googleapis.com. 300 IN A 142.250.136.95 us-central1.aiplatfom.googleapis.com. 300 IN A 142.250.148.95 us-central1.aiplatfom.googleapis.com. 300 IN A 209.85.200.95 us-central1.aiplatfom.googleapis.com. 300 IN A 209.85.234.95 us-central1.aiplatfom.googleapis.com. 300 IN A 142.251.171.95 us-central1.aiplatfom.googleapis.com. 300 IN A 108.177.112.95 us-central1.aiplatfom.googleapis.com. 300 IN A 142.250.128.95 us-central1.aiplatfom.googleapis.com. 300 IN A 142.251.6.95 us-central1.aiplatfom.googleapis.com. 300 IN A 172.217.212.95 us-central1.aiplatfom.googleapis.com. 300 IN A 74.125.124.95 ;; Query time: 8 msec ;; SERVER: 169.254.169.254#53(169.254.169.254) ;; WHEN: Wed Sep 27 04:10:16 UTC 2023 ;; MSG SIZE rcvd: 321
設定及驗證 Vertex AI 生成式 AI 的私有存取權
在本節中,您將設定 Vertex AI 中生成式 AI 的私有存取權,這樣一來,當您將要求傳送至公開服務端點 (us-central1-aiplatform.googleapis.com) 時,系統會將要求重新導向至您的 PSC 端點。PSC 端點會將要求轉送至
更新 /etc/hosts 檔案,指向 PSC 端點
在本步驟中,您會在 /etc/hosts 檔案中新增一行,讓傳送至公開服務端點 (us-central1-aiplatform.googleapis.com) 的要求重新導向至 PSC 端點 (192.168.0.1)。
在
on-prem-clientVM 執行個體 (第一個分頁) 中,使用vim或nano等文字編輯器開啟/etc/hosts檔案:sudo vim /etc/hosts在檔案中新增下列這行文字:
192.168.0.1 us-central1-aiplatform.googleapis.com這行會將 PSC 端點的 IP 位址 (
192.168.0.1) 指派給 Vertex AI Google API 的完整網域名稱 (us-central1-aiplatform.googleapis.com)。編輯後的檔案應如下所示:
127.0.0.1       localhost
::1             localhost ip6-localhost ip6-loopback
ff02::1         ip6-allnodes
ff02::2         ip6-allrouters

192.168.0.1 us-central1-aiplatform.googleapis.com  # Added by you
172.16.10.6 on-prem-client.us-central1-a.c.vertex-genai-400103.internal on-prem-client  # Added by Google
169.254.169.254 metadata.google.internal  # Added by Google
按照下列方式儲存檔案:
- 如果使用
vim,請按下Esc鍵,然後輸入:wq儲存檔案並結束。 - 如果使用
nano,請輸入Control+O並按下Enter鍵儲存檔案,然後輸入Control+X即可退出。
- 如果使用
按照下列方式 Ping Vertex AI 端點:
ping us-central1-aiplatform.googleapis.comping指令應傳回下列輸出內容。192.168.0.1是 PSC 端點 IP 位址:PING us-central1-aiplatform.googleapis.com (192.168.0.1) 56(84) bytes of data.輸入
Control+C即可退出ping。執行下列
tcpdump指令,在您將線上預測要求傳送至端點時,驗證 DNS 解析和 IP 資料路徑:sudo tcpdump -i any port 53 -n or host 192.168.0.1
建立私密要求
在本步驟中,您會建立名為 request.json 的文字檔,其中包含要傳送至 GenAI REST API 的範例 curl 要求酬載。如要進一步瞭解樣品申請,請參閱樣品申請。
讓「
tcpdump」指令在第一個分頁中持續執行,然後在 Cloud Shell 中點按「開啟新分頁」圖示,開啟新的 Cloud Shell 工作階段 (第二個分頁)。在新的 Cloud Shell 工作階段 (分頁 2) 中執行下列指令,並將 PROJECT_ID 替換為專案 ID:
projectid=PROJECT_ID
gcloud config set project ${projectid}
使用 IAP 登入
on-prem-clientVM 執行個體:gcloud compute ssh on-prem-client --project=$projectid --zone=us-central1-a --tunnel-through-iap執行下列指令,並將 PROJECT_ID 替換為您的專案 ID:
projectid=PROJECT_ID
gcloud config set project ${projectid}
使用
vim或nano等文字編輯器建立名為request.json的新檔案,並在其中加入下列文字:{ "instances": [ { "prompt": "Give me ten interview questions for the role of program manager."} ], "parameters": { "temperature": 0.2, "maxOutputTokens": 256, "topK": 40, "topP": 0.95 } }執行下列指令,將要求傳送至 PSC 端點,該端點會將要求轉送至 GenAI API。端點收到回應後,會將回應轉送回
on-prem-clientVM:curl -X POST \ -H "Authorization: Bearer $(gcloud auth print-access-token)" \ -H "Content-Type: application/json; charset=utf-8" \ -d @request.json \ "https://us-central1-aiplatform.googleapis.com/v1/projects/$projectid/locations/us-central1/publishers/google/models/text-bison:predict"畫面會顯示類似以下的回覆:
{
   "predictions": [
      {
      "content": " 1. **What is your experience in managing programs?**\n2. **What are your strengths and weaknesses as a program manager?**\n3. **What is your approach to managing a program?**\n4. **How do you handle risks and challenges in a program?**\n5. **How do you communicate with stakeholders in a program?**\n6. **How do you measure the success of a program?**\n7. **What is your experience in working with cross-functional teams?**\n8. **What is your experience in managing budgets and resources?**\n9. **What is your experience in managing change in a program?**\n10. **What are your career goals as a program manager?**",
      "citationMetadata": {
         "citations": []
      },
      "safetyAttributes": {
         "categories": [
         "Finance",
         "Health"
         ],
         "blocked": false,
         "scores": [
            0.6,
            0.1
         ]
      }
      }
   ],
   "metadata": {
      "tokenMetadata": {
         "outputTokenCount": {
            "totalBillableCharacters": 505,
            "totalTokens": 153
         },
         "inputTokenCount": {
            "totalBillableCharacters": 54,
            "totalTokens": 12
         }
      }
   }
}
在第一個分頁中,確認 PSC 端點 IP 位址 (
192.168.0.1) 用於從on-prem-clientVM 執行個體 (子網路172.16.10.0/28) 存取 Vertex AI API。在 Cloud Shell Tab One 的
tcpdump終端機中,您會發現不需要對us-central1-aiplatform.googleapis.com進行 DNS 查詢,因為您新增至/etc/hosts檔案的行具有優先權,且資料路徑中會使用 PSC 端點的 IP 位址 (192.168.0.1)。您應該會看到類似以下的
tcpdump輸出內容:23:48:49.938797 ens4 Out IP 172.16.10.9.38578 > 192.168.0.1.443: Flags [P.], seq 2054:2093, ack 6264, win 501, options [nop,nop,TS val 2943864305 ecr 2340789954], length 39 23:48:49.938947 ens4 Out IP 172.16.10.9.38578 > 192.168.0.1.443: Flags [P.], seq 2093:2117, ack 6264, win 501, options [nop,nop,TS val 2943864305 ecr 2340789954], length 24 23:48:49.939839 ens4 Out IP 172.16.10.9.38578 > 192.168.0.1.443: Flags [F.], seq 2117, ack 6264, win 501, options [nop,nop,TS val 2943864306 ecr 2340789954], length 0 23:48:49.940292 ens4 In IP 192.168.0.1.443 > 172.16.10.9.38578: Flags [.], ack 2117, win 272, options [nop,nop,TS val 2340789958 ecr 2943864305], length 0 23:48:49.940437 ens4 In IP 192.168.0.1.443 > 172.16.10.9.38578: Flags [F.], seq 6264, ack 2117, win 272, options [nop,nop,TS val 2340789958 ecr 2943864305], length 0 23:48:49.940442 ens4 Out IP 172.16.10.9.38578 > 192.168.0.1.443: Flags [.], ack 6265, win 501, options [nop,nop,TS val 2943864307 ecr 2340789958], length 0 23:48:49.941193 ens4 In IP 192.168.0.1.443 > 172.16.10.9.38578: Flags [.], ack 2118, win 272, options [nop,nop,TS val 2340789959 ecr 2943864306], length 0
清除所用資源
如要避免系統向您的 Google Cloud 帳戶收取本教學課程所用資源的費用,請刪除含有相關資源的專案,或者保留專案但刪除個別資源。
您可以在 Cloud Shell 中執行下列指令,刪除專案中的個別資源:
   projectid=PROJECT_ID
   gcloud config set project ${projectid}
gcloud compute firewall-rules delete ssh-iap-on-prem-vpc --quiet
gcloud compute instances delete on-prem-client --zone=us-central1-a --quiet
gcloud iam service-accounts delete user-managed-sa@$projectid.iam.gserviceaccount.com --quiet
gcloud compute forwarding-rules delete pscvertex --global --quiet
gcloud compute addresses delete psc-googleapi-ip --global --quiet
gcloud compute vpn-tunnels delete vertex-networking-vpc-tunnel0 vertex-networking-vpc-tunnel1 onprem-vpc-tunnel0 onprem-vpc-tunnel1 --region=us-central1 --quiet
gcloud compute routers nats delete us-central-cloudnat-onprem --router=onprem-vpc-router1 --region=us-central1 --quiet
gcloud compute routers delete vertex-networking-vpc-router1 onprem-vpc-router1 --region=us-central1 --quiet
gcloud compute vpn-gateways delete vertex-networking-vpn-gw1 onprem-vpn-gw1 --region=us-central1 --quiet
gcloud compute networks subnets delete onprem-vpc-subnet1 --region=us-central1 --quiet
gcloud compute networks delete onprem-vpc --quiet
gcloud compute networks delete vertex-networking-vpc --quiet
後續步驟
- 瞭解存取 Vertex AI 端點和服務的企業網路選項
- 瞭解如何透過端點存取已發布的服務。
- 瞭解 Private Service Connect 的運作方式,以及這項服務為何能大幅提升效能。
- 進一步瞭解如何透過端點存取 Google API。
- 瞭解如何及為何使用 DNS 轉送區域,而非在大型和正式環境中更新
/etc/hosts檔案。 - 進一步瞭解自訂 advertise 路由。