
יצירה של מילוני מונחים ושימוש בהם (מתקדם)
מילון מונחים הוא מילון מותאם אישית ש-Cloud Translation API משתמש בו כדי לתרגם באופן עקבי את המינוח הספציפי לתחום של הלקוח. בדרך כלל צריך לציין איך לתרגם ישות בעלת שם.
אפשר להשתמש במילון מונחים במקרים הבאים:
- שמות מוצרים: לדוגמה, Google Home חייב להיות מתורגם ל-Google Home.
- מילים עם משמעויות שונות: לדוגמה, המילה "bat" יכולה להתייחס לציוד ספורט או לבעל חיים. אם אתם יודעים שאתם מתרגמים מילים שקשורות לספורט, כדאי להשתמש במילון מונחים כדי להזין ל-Cloud Translation API את התרגום של המילה bat בהקשר של ספורט, ולא את התרגום של המילה בהקשר של בעל חיים.
- מילים שאולות: לדוגמה, המילה bouillabaisse בצרפתית מתורגמת ל-bouillabaisse באנגלית. השפה האנגלית שאלה את המילה bouillabaisse מהצרפתית במאה ה-19. אדם דובר אנגלית שלא מכיר את ההקשר התרבותי הצרפתי לא ידע שמרק בויאבז הוא מנת תבשיל דגים. אפשר להשתמש במילוני מונחים כדי לשנות תרגום. לדוגמה, אפשר להגדיר שתרגום המילה bouillabaisse מצרפתית לאנגלית יהיה 'fish stew'.
לפני שמתחילים
לפני שמתחילים להשתמש ב-Cloud Translation API, צריך להשלים את השלבים שמפורטים בדף הגדרת Cloud Translation, כולל יצירת פרויקט, הפעלת Cloud Translation API והגדרת אימות. בדף ההגדרה יש גם הוראות להתקנת ספריות לקוח לשפות תכנות נפוצות, אבל זה לא חובה.
ההרשאות הנדרשות
כדי לעבוד עם מילוני מונחים, לחשבון השירות שלכם נדרשות הרשאות ספציפיות למילון המונחים. אפשר להקצות לחשבון השירות תפקיד באמצעות אחד מהתפקידים המוגדרים מראש ב-IAM, כמו Cloud Translation API Editor (roles/cloudtranslate.editor), או ליצור תפקיד בהתאמה אישית שמעניק את ההרשאות הנדרשות. אפשר לראות את כל ההרשאות של Cloud Translation API בהפניה להרשאות IAM.
ההרשאות של Cloud Translation מתחילות ב-cloudtranslate.
כדי ליצור מילונים, אתם צריכים גם הרשאות לקריאת אובייקטים בקטגוריה של Cloud Storage שבה נמצא קובץ המילון. אפשר להקצות תפקיד לחשבון השירות באמצעות אחד מתפקידי ה-IAM המוגדרים מראש, כמו 'צפייה באובייקט אחסון' (roles/storage.objectViewer), או ליצור תפקיד בהתאמה אישית שמעניק הרשאות לקריאת אובייקטים.
במאמר הענקה, שינוי וביטול גישה למשאבים מוסבר איך מוסיפים חשבון לתפקיד.
יצירת מילון מונחים
המונחים במילון יכולים להיות טוקנים בודדים (מילים) או ביטויים קצרים (בדרך כלל פחות מחמש מילים). השלבים העיקריים לשימוש במילון מונחים הם:
- יצירת קובץ מילון מונחים
- יצירת משאב מילון המונחים באמצעות Cloud Translation API
- מציינים באיזה מילון מונחים רוצים להשתמש כשמבקשים תרגום
פרויקט יכול לכלול כמה מילוני מונחים. אפשר לקבל רשימה של המילונים הזמינים וגם למחוק מילונים שכבר לא צריך.
מילות מעצור
Cloud Translation מתעלם מחלק מהמונחים שמופיעים במילון המונחים. המונחים האלה נקראים מילות קישור. כשמתרגמים מילות עצירה, Cloud Translation מתעלם מכל הערכים התואמים במילון המונחים. רשימה של כל מילות העזר מופיעה במאמר מילות עזר במילון המונחים.
יצירת קובץ מילון מונחים
בעיקרון, מילון מונחים הוא קובץ טקסט שבו כל שורה מכילה מונחים מקבילים בשפות שונות. Cloud Translation API תומך במילוני מונחים חד-כיווניים, שמציינים את התרגום הרצוי לזוג אחד של שפת מקור ושפת יעד, ובקבוצות של מונחים מקבילים, שמזהים את המונחים המקבילים בכמה שפות.
המספר הכולל של מונחים בקובץ קלט של מילון מונחים לא יכול להיות יותר מ-10.4 מיליון (10,485,760) בייטים בקידוד UTF-8 לכל המונחים בכל השפות יחד. כל מונח במילון המונחים צריך להיות קטן מ-1,024 בייטים בקידוד UTF-8. המערכת מתעלמת ממונחים שאורכם גדול מ-1,024 בייט.
כברירת מחדל, ההתאמות למילון המונחים הן תלויות אותיות רישיות. כשמחילים מילון מונחים, אפשר להתעלם מהשימוש באותיות רישיות בכל הערכים. אם יש לכם מונחים שהם תלויי אותיות רישיות ומונחים שהם לא תלויי אותיות רישיות, כדאי להשתמש בהתנהגות ברירת המחדל, ולכלול במילון המונחים את שתי הצורות של המונחים שהם לא תלויי אותיות רישיות.
מילוני מונחים חד-כיווניים
Cloud Translation API מקבל קובצי TSV, CSV או TMX.
TSV ו-CSV
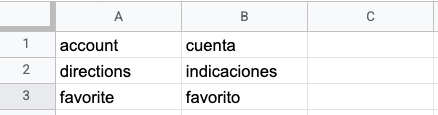
בפורמטים של ערכים מופרדים בטאבים (TSV) וערכים מופרדים בפסיקים (CSV), כל שורה
מכילה זוג מונחים שמופרדים בטאב (\t) או בפסיק (,). העמודה הראשונה
כוללת את המונח בשפת המקור והעמודה השנייה כוללת את המונח בשפת היעד, כמו שמוצג בדוגמה הבאה:
Translation Memory eXchange (TMX)
Translation Memory eXchange (TMX) הוא פורמט XML סטנדרטי שמשמש לציון תרגומים של מקור ויעד. Cloud Translation API תומך בקובצי קלט בפורמט שמבוסס על TMX גרסה 1.4. בדוגמה הזו אפשר לראות את המבנה הנדרש:
<?xml version='1.0' encoding='utf-8'?>
<!DOCTYPE tmx SYSTEM "tmx14.dtd">
<tmx version="1.4">
  <header segtype="sentence" o-tmf="UTF-8"
  adminlang="en" srclang="en" datatype="PlainText"/>
  <body>
    <tu>
      <tuv xml:lang="en">
        <seg>account</seg>
      </tuv>
      <tuv xml:lang="es">
        <seg>cuenta</seg>
      </tuv>
    </tu>
    <tu>
      <tuv xml:lang="en">
        <seg>directions</seg>
      </tuv>
      <tuv xml:lang="es">
        <seg>indicaciones</seg>
      </tuv>
    </tu>
  </body>
</tmx>
אלמנט <header> בקובץ TMX תקין חייב לזהות את שפת המקור באמצעות המאפיין srclang, וכל אלמנט <tuv> חייב לזהות את השפה של הטקסט שכלול בו באמצעות המאפיין xml:lang. מציינים את שפות המקור והיעד באמצעות קודי ISO-639 שלהן.
כל הרכיבים <tu> חייבים להכיל זוג רכיבים <tuv> עם אותן שפות מקור ויעד. אם רכיב <tu> מכיל יותר משני רכיבי <tuv>, Cloud Translation API מעבד רק את רכיב <tuv> הראשון שתואם לשפת המקור ואת רכיב <tuv> הראשון שתואם לשפת היעד, ומתעלם מהשאר.
אם לרכיב <tu> אין זוג תואם של רכיבי <tuv>, Cloud Translation API מדלג על רכיב <tu> הלא תקין.
Cloud Translation API מסיר את תגי העיצוב מסביב לרכיב <seg> לפני העיבוד שלו. אם רכיב <tuv> מכיל יותר מרכיב <seg> אחד, Cloud Translation API משרשר את הטקסט שלהם לרכיב אחד עם רווח ביניהם.
אם הקובץ מכיל תגי XML שונים מאלה שמוצגים למעלה, Cloud Translation API מתעלם מהם.
אם הקובץ לא תואם לפורמט XML ו-TMX תקין – למשל, אם חסר תג סיום או רכיב <tmx> – Cloud Translation API מפסיק את העיבוד שלו. בנוסף, Cloud Translation API מפסיק את העיבוד אם הוא מדלג על יותר מ-1,024 רכיבי <tu> לא תקינים.
קבוצות מונחים מקבילות (CSV)
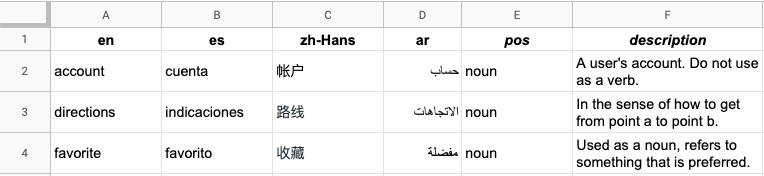
במקרה של קבוצות מונחים מקבילות, Cloud Translation API מקבל רק קבצים בפורמט CSV. כדי להגדיר קבוצות של מונחים מקבילים, יוצרים קובץ CSV עם כמה עמודות, שבו כל שורה מציגה מונח אחד במילון המונחים בכמה שפות.
השורה הראשונה בקובץ היא שורת כותרת שמציינת את השפה של כל עמודה באמצעות קוד השפה ISO-639 או BCP-47. אפשר גם לכלול עמודות אופציונליות של חלק הדיבור (pos) ותיאור (description). האלגוריתם לא משתמש כרגע במידע על pos, וערכים ספציפיים של pos לא מאומתים.
כל שורה שמתקבלת מכילה מונחי מילון מונחים מקבילים בשפות שצוינו בכותרת. אפשר להשאיר עמודות ריקות אם המונח לא זמין בכל השפות.
יצירת משאב מילון מונחים
אחרי שמזהים את המונחים המקבילים במילון המונחים, יוצרים משאב של מילון מונחים כדי להפוך את קובץ מילון המונחים לזמין ל-Cloud Translation API.
מילון מונחים חד-כיווני
כשיוצרים מילון מונחים חד-כיווני, צריך לציין את צמד השפות (language_pair) על ידי הגדרת שפת המקור (source_language_code) ושפת היעד (target_language_code). בדוגמה הבאה נעשה שימוש ב-API בארכיטקטורת REST ובשורת הפקודה, אבל אפשר גם להשתמש בספריות הלקוח כדי ליצור מילון מונחים חד-כיווני.
REST
כשיוצרים מילון מונחים חדש, צריך לציין מזהה מילון מונחים (שם משאב). לדוגמה:
projects/my-project/locations/us-central1/glossaries/my-en-to-ru-glossary
my-project הוא PROJECT_NUMBER_OR_ID, ו-my-en-ru-glossary הוא מזהה המילון שסיפקתם.
לפני שמשתמשים בנתוני הבקשה, צריך להחליף את הנתונים הבאים:
- PROJECT_NUMBER_OR_ID: המזהה המספרי או האלפאנומרי של פרויקט Google Cloud
- glossary-id: מזהה המילון שלכם, לדוגמה: my_en_ru_glossary
- bucket-name: שם הקטגוריה שבה נמצא קובץ המילון
- glossary-filename: שם הקובץ של מילון המונחים
ה-method של ה-HTTP וכתובת ה-URL:
POST https://translation.googleapis.com/v3/projects/PROJECT_NUMBER_OR_ID/locations/us-central1/glossaries
תוכן בקשת JSON:
{
  "name":"projects/PROJECT_NUMBER_OR_ID/locations/us-central1/glossaries/glossary-id",
  "languagePair": {
    "sourceLanguageCode": "en",
    "targetLanguageCode": "ru"
    },
  "inputConfig": {
    "gcsSource": {
      "inputUri": "gs://bucket-name/glossary-filename"
    }
  }
}
כדי לשלוח את הבקשה צריך להרחיב אחת מהאפשרויות הבאות:
אתם אמורים לקבל תגובת JSON שדומה לזו:
{
  "name": "projects/project-number/locations/us-central1/operations/operation-id",
  "metadata": {
    "@type": "type.googleapis.com/google.cloud.translation.v3beta1.CreateGlossaryMetadata",
    "name": "projects/project-number/locations/us-central1/glossaries/glossary-id",
    "state": "RUNNING",
    "submitTime": "2019-11-19T19:05:10.650047636Z"
  }
}
מילון מונחים של קבוצות מונחים מקבילות
אחרי שמזהים את המונחים במילון המונחים במערכת המונחים המקבילים, צריך ליצור משאב של מילון מונחים כדי להפוך את קובץ מילון המונחים לזמין ל-Cloud Translation API.
REST
לפני שמשתמשים בנתוני הבקשה, צריך להחליף את הנתונים הבאים:
- PROJECT_NUMBER_OR_ID: המזהה המספרי או האלפאנומרי של פרויקט Google Cloud
- glossary-id: מזהה המילון שלכם
- bucket-name: שם הקטגוריה שבה נמצא קובץ המילון
- glossary-filename: שם הקובץ של מילון המונחים
ה-method של ה-HTTP וכתובת ה-URL:
POST https://translation.googleapis.com/v3/projects/PROJECT_NUMBER_OR_ID/locations/us-central1/glossaries
תוכן בקשת JSON:
{
  "name":"projects/PROJECT_NUMBER_OR_ID/locations/us-central1/glossaries/glossary-id",
  "languageCodesSet": {
    "languageCodes": ["en", "en-GB", "ru", "fr", "pt-BR", "pt-PT", "es"]
  },
  "inputConfig": {
    "gcsSource": {
"inputUri": "gs://bucket-name/glossary-file-name"
    }
  }
}
כדי לשלוח את הבקשה צריך להרחיב אחת מהאפשרויות הבאות:
אתם אמורים לקבל תגובת JSON שדומה לזו:
{
  "name": "projects/project-number/locations/us-central1/operations/20191103-09061569945989-5d937985-0000-21ac-816d-f4f5e80782d4",
  "metadata": {
    "@type": "type.googleapis.com/google.cloud.translation.v3beta1.CreateGlossaryMetadata",
    "name": "projects/project-number/locations/us-central1/glossaries/glossary-id",
    "state": "RUNNING",
    "submitTime": "2019-11-03T16:06:29.134496675Z"
  }
}
Go
לפני שמנסים את הדוגמה הזו, צריך לפעול לפי Goהוראות ההגדרה במדריך למתחילים בנושא Cloud Translation באמצעות ספריות לקוח. מידע נוסף מופיע במאמרי העזרה של Cloud Translation Go API.
כדי לבצע אימות ב-Cloud Translation, צריך להגדיר את Application Default Credentials. מידע נוסף זמין במאמר הגדרת אימות לסביבת פיתוח מקומית.
Java
לפני שמנסים את הדוגמה הזו, צריך לפעול לפי Javaהוראות ההגדרה במדריך למתחילים בנושא Cloud Translation באמצעות ספריות לקוח. מידע נוסף מופיע במאמרי העזרה של Cloud Translation Java API.
כדי לבצע אימות ב-Cloud Translation, צריך להגדיר את Application Default Credentials. מידע נוסף זמין במאמר הגדרת אימות לסביבת פיתוח מקומית.
Node.js
לפני שמנסים את הדוגמה הזו, צריך לפעול לפי Node.jsהוראות ההגדרה במדריך למתחילים בנושא Cloud Translation באמצעות ספריות לקוח. מידע נוסף מופיע במאמרי העזרה של Cloud Translation Node.js API.
כדי לבצע אימות ב-Cloud Translation, צריך להגדיר את Application Default Credentials. מידע נוסף זמין במאמר הגדרת אימות לסביבת פיתוח מקומית.
Python
לפני שמנסים את הדוגמה הזו, צריך לפעול לפי Pythonהוראות ההגדרה במדריך למתחילים בנושא Cloud Translation באמצעות ספריות לקוח. מידע נוסף מופיע במאמרי העזרה של Cloud Translation Python API.
כדי לבצע אימות ב-Cloud Translation, צריך להגדיר את Application Default Credentials. מידע נוסף זמין במאמר הגדרת אימות לסביבת פיתוח מקומית.
שפות נוספות
C#: פועלים לפי הוראות ההגדרה של C# בדף של ספריות הלקוח ואז עוברים אל מאמרי העזרה של Cloud Translation ל- .NET.
PHP: פועלים לפי הוראות ההגדרה של PHP בדף של ספריות הלקוח ואז עוברים אל מסמכי העזר של Cloud Translation ל-PHP.
Ruby: פועלים לפי הוראות ההגדרה של Ruby בדף של ספריות הלקוח, ואז עוברים אל מאמרי העזרה של Cloud Translation בנושא Ruby.
סטטוס הפעילות
יצירת משאב מילון מונחים היא פעולה ממושכת, ולכן היא עשויה להימשך זמן רב. אפשר לדגום את הסטטוס של הפעולה הזו כדי לראות אם היא הושלמה, או לבטל את הפעולה.
מידע נוסף זמין במאמר בנושא פעולות ממושכות.
שימוש במילוני מונחים
תרגום טקסט באמצעות מילון מונחים
ב-Cloud Translation – Advanced, אתם מציינים במפורש באיזה מודל תרגום להשתמש כדי לתרגם את הטקסט. אפשר להפעיל את מודל ה-LLM לתרגום, את NMT ואת מודלי NMT מותאמים אישית בשילוב עם מילון מונחים, אבל רק מודל ה-LLM לתרגום תומך בשיפור האיכות העדכני באמצעות מילון מונחים הקשרי. כדי להשתמש בתכונה הזו, צריך להגדיר את הערך של BOOLEAN_CONTEXTUAL: ל-TRUE. אפשר גם להגדיר מילון מונחים לשימוש בטרמינולוגיה ספציפית לתחום.
REST
בדוגמה הזו מתורגם טקסט באמצעות מודל ברירת המחדל של NMT ומילון מונחים.
לפני שמשתמשים בנתוני הבקשה, צריך להחליף את הנתונים הבאים:
- PROJECT_NUMBER_OR_ID: המזהה המספרי או האלפאנומרי של הפרויקט ב- Google Cloud .
- GLOSSARY_ID: מזהה מילון המונחים, למשל
my-en-ru-glossary. - BOOLEAN: האם ההתאמות הן לא תלויות-רישיות. ערך ברירת המחדל הוא
false. - BOOLEAN_CONTEXTUAL: האם המערכת מתחשבת בהקשר בתרגום המונחים במילון. ערך ברירת המחדל הוא
false.
ה-method של ה-HTTP וכתובת ה-URL:
POST https://translation.googleapis.com/v3/projects/PROJECT_NUMBER_OR_ID/locations/us-central1:translateText
תוכן בקשת JSON:
{
  "sourceLanguageCode": "en",
  "targetLanguageCode": "ru",
  "contents": "Dr. Watson, please discard your trash. You've shared unsolicited email with me. Let's talk about spam and importance ranking in a confidential mode.",
  "glossaryConfig": {
    "glossary": "projects/project-number/locations/us-central1/glossaries/GLOSSARY_ID",
    "ignoreCase": BOOLEAN,
    "contextual_translation_enabled": BOOLEAN_CONTEXTUAL
  }
}
כדי לשלוח את הבקשה צריך להרחיב אחת מהאפשרויות הבאות:
אתם אמורים לקבל תגובת JSON שדומה לזו:
{
  "glossaryTranslations": {
    "translatedText": "Доктор Ватсон, пожалуйста, откажитесь от своего мусора. Вы поделились нежелательной электронной почтой со я . Давайте поговорим о спаме и важности рейтинга в конфиденциальном режиме.",
    "glossaryConfig": {
      "glossary": "projects/project-number/locations/us-central1/glossaries/GLOSSARY_ID",
      "ignoreCase": BOOLEAN,
      "contextual_translation_enabled": BOOLEAN_CONTEXTUAL
    }
  },
  "translations": {
    "translatedText": "Доктор Ватсон, пожалуйста, откажитесь от своего мусора. Вы поделились нежелательной электронной почтой со мной. Давайте поговорим о спаме и важности рейтинга в конфиденциальном режиме.",
  }
}
השדה translations מכיל את התרגום האוטומטי הרגיל לפני החלת המילון;
השדה glossaryTranslations מכיל את התרגום אחרי החלת המילון.
כשמגדירים את השדה contextual_translation_enabled לערך true, התגובה תכיל רק את השדה glossaryTranslations ולא את השדה translations.
Go
לפני שמנסים את הדוגמה הזו, צריך לפעול לפי Goהוראות ההגדרה במדריך למתחילים בנושא Cloud Translation באמצעות ספריות לקוח. מידע נוסף מופיע במאמרי העזרה של Cloud Translation Go API.
כדי לבצע אימות ב-Cloud Translation, צריך להגדיר את Application Default Credentials. מידע נוסף זמין במאמר הגדרת אימות לסביבת פיתוח מקומית.
Java
לפני שמנסים את הדוגמה הזו, צריך לפעול לפי Javaהוראות ההגדרה במדריך למתחילים בנושא Cloud Translation באמצעות ספריות לקוח. מידע נוסף מופיע במאמרי העזרה של Cloud Translation Java API.
כדי לבצע אימות ב-Cloud Translation, צריך להגדיר את Application Default Credentials. מידע נוסף זמין במאמר הגדרת אימות לסביבת פיתוח מקומית.
Node.js
לפני שמנסים את הדוגמה הזו, צריך לפעול לפי Node.jsהוראות ההגדרה במדריך למתחילים בנושא Cloud Translation באמצעות ספריות לקוח. מידע נוסף מופיע במאמרי העזרה של Cloud Translation Node.js API.
כדי לבצע אימות ב-Cloud Translation, צריך להגדיר את Application Default Credentials. מידע נוסף זמין במאמר הגדרת אימות לסביבת פיתוח מקומית.
Python
לפני שמנסים את הדוגמה הזו, צריך לפעול לפי Pythonהוראות ההגדרה במדריך למתחילים בנושא Cloud Translation באמצעות ספריות לקוח. מידע נוסף מופיע במאמרי העזרה של Cloud Translation Python API.
כדי לבצע אימות ב-Cloud Translation, צריך להגדיר את Application Default Credentials. מידע נוסף זמין במאמר הגדרת אימות לסביבת פיתוח מקומית.
שפות נוספות
C#: פועלים לפי הוראות ההגדרה של C# בדף של ספריות הלקוח ואז עוברים אל מאמרי העזרה של Cloud Translation ל- .NET.
PHP: פועלים לפי הוראות ההגדרה של PHP בדף של ספריות הלקוח ואז עוברים אל מסמכי העזר של Cloud Translation ל-PHP.
Ruby: פועלים לפי הוראות ההגדרה של Ruby בדף של ספריות הלקוח, ואז עוברים אל מאמרי העזרה של Cloud Translation בנושא Ruby.
תרגומים מותאמים עם מילון מונחים
כדי להשתמש במילון מונחים עם בקשת תרגום דינמי, צריך לכלול בהגדרות הבקשה את מילון המונחים.
REST
לפני שמשתמשים בנתוני הבקשה, צריך להחליף את הנתונים הבאים:
- PROJECT_NUMBER_OR_ID: המזהה המספרי או האלפאנומרי של Google Cloud הפרויקט
- LOCATION: האזור שבו נמצא מערך הנתונים של המקור, לדוגמה
us-central1. - DATASET_NAME: השם של מערך הנתונים שבו Cloud Translation משתמש כדי להתאים אישית את התרגומים, בפורמט
projects/PROJECT_ID/locations/LOCATION/adaptiveMtDatasets/DATASET_ID. כדי לקבל את השמות של מערכי הנתונים, אפשר להציג רשימה של כל מערכי הנתונים בפרויקט. - SOURCE_TEXT: הטקסט לתרגום.
- MIME_TYPE (אופציונלי): הפורמט של טקסט המקור, כמו
text/htmlאוtext/plain. כברירת מחדל, סוג ה-MIME מוגדר כ-text/plain. - GLOSSARY_ID: מזהה מילון המונחים, למשל
my-en-ru-glossary. - BOOLEAN (אופציונלי): האם ההתאמות הן לא תלויות-רישיות. ערך ברירת המחדל הוא
false. - BOOLEAN_CONTEXTUAL (אופציונלי): האם לקחת בחשבון את ההקשר בתרגום המונחים במילון. ערך ברירת המחדל הוא
false.
ה-method של ה-HTTP וכתובת ה-URL:
POST https://translation.googleapis.com/v3/projects/PROJECT_ID/locations/LOCATION:adaptiveMtTranslate
תוכן בקשת JSON:
{
  "dataset": "DATASET_NAME",
  "content": ["SOURCE_TEXT"],
  "mimeType": "MIME_TYPE",
  "glossaryConfig": {
    "glossary": "projects/project-number/locations/LOCATION/glossaries/GLOSSARY_ID",
    "ignoreCase": BOOLEAN,
    "contextual_translation_enabled": BOOLEAN_CONTEXTUAL
  }
}
כדי לשלוח את הבקשה צריך להרחיב אחת מהאפשרויות הבאות:
אתם אמורים לקבל תגובת JSON שדומה לזו:
{
  "translations": [
    {
      "translatedText": "TRANSLATED_TEXT"
    }
  ],
  "languageCode": "TARGET_LANGUAGE",
  "glossaryTranslations": {
    "translatedText": "TRANSLATED_TEXT",
    "glossaryConfig": {
      "glossary": "projects/project-number/locations/LOCATION/glossaries/GLOSSARY_ID",
      "ignoreCase": BOOLEAN,
      "contextual_translation_enabled": BOOLEAN_CONTEXTUAL
    }
  },
}
Java
לפני שמנסים את הדוגמה הזו, צריך לפעול לפי Javaהוראות ההגדרה במדריך למתחילים בנושא Cloud Translation באמצעות ספריות לקוח. מידע נוסף מופיע במאמרי העזרה של Cloud Translation Java API.
כדי לבצע אימות ב-Cloud Translation, צריך להגדיר את Application Default Credentials. מידע נוסף זמין במאמר הגדרת אימות לסביבת פיתוח מקומית.
  {% setvar launch_stage %}preview{% endsetvar %}
{% setvar launch_type %}feature{% endsetvar %}
{% include "cloud/_shared/_info_launch_stage_disclaimer.html" %}

/** Translates using AdaptiveMt. */
private static void adaptiveMtTranslate(
    TranslationServiceClient translationServiceClient, String projectId, String datasetId) {
  String adaptiveMtDatasetName =
      String.format(
          "projects/%s/locations/LOCATION/adaptiveMtDatasets/%s", projectId, datasetId);
  String glossaryId = "your-glossary-display-name";
  GlossaryName glossaryName = GlossaryName.of(projectId, location, glossaryId);
  GlossaryConfig glossaryConfig =
      GlossaryConfig.newBuilder().setGlossary(glossaryName.toString()).build();

  AdaptiveMtTranslateRequest request =
      AdaptiveMtTranslateRequest.newBuilder()
          .setParent(LocationName.of(projectId, "us-central1").toString())
          .setDataset(adaptiveMtDatasetName)
          .addContent("Sample translation text")
          .setGlossaryConfig(glossaryConfig)
          .build();
  AdaptiveMtTranslateResponse response = translationServiceClient.adaptiveMtTranslate(request);

  System.out.println("Translating using AdaptiveMt");
  System.out.println(response);
}
Node.js
לפני שמנסים את הדוגמה הזו, צריך לפעול לפי Node.jsהוראות ההגדרה במדריך למתחילים בנושא Cloud Translation באמצעות ספריות לקוח. מידע נוסף מופיע במאמרי העזרה של Cloud Translation Node.js API.
כדי לבצע אימות ב-Cloud Translation, צריך להגדיר את Application Default Credentials. מידע נוסף זמין במאמר הגדרת אימות לסביבת פיתוח מקומית.
  async function translate() {
  /**
  * TODO(developer): Uncomment these variables before running the sample.
  */
  // const projectId = 'YOUR_PROJECT_ID';
  // const location = 'global';
  // const glossaryId = 'YOUR_GLOSSARY_ID';

  const glossaryConfig = {
    glossary: `projects/${projectId}/locations/${location}/glossaries/${glossaryId}`,
  };
  const request = {
    parent: `projects/${projectId}/locations/${location}`,
    dataset: `projects/${projectId}/locations/${location}/adaptiveMtDatasets/${
        adaptiveMtDatasetName}`,
    content: ['Sample translate query'],
    glossaryConfig: glossaryConfig,
  } const [response] = await translationClient.adaptiveMtTranslate(request)
  console.log('Translating')
  console.log(response)
}
Python
לפני שמנסים את הדוגמה הזו, צריך לפעול לפי Pythonהוראות ההגדרה במדריך למתחילים בנושא Cloud Translation באמצעות ספריות לקוח. מידע נוסף מופיע במאמרי העזרה של Cloud Translation Python API.
כדי לבצע אימות ב-Cloud Translation, צריך להגדיר את Application Default Credentials. מידע נוסף זמין במאמר הגדרת אימות לסביבת פיתוח מקומית.
  def adaptive_mt_translate(
    project_id: str = "YOUR_PROJECT_ID",
    glossary_id: str = "YOUR_GLOSSARY_ID"):
    # Create a client
    client = translate.TranslationServiceClient()
    # Create a glossary
    glossary = client.glossary_path(
        project_id, "us-central1", glossary_id  # The location of the glossary
    )

    glossary_config = translate.GlossaryConfig(glossary=glossary)
    # Initialize the request
    request = translate.AdaptiveMtTranslateRequest(
        parent="projects/PROJECT_ID/locations/LOCATION",
        dataset="projects/PROJECT_ID/locations/LOCATION/adaptiveMtDatasets/DATASET_ID",
        content=["Sample translation request"]
        glossary_config=glossary_config,
    )
    # Make the request
    response = client.adaptive_mt_translate(request)
    # Handle the response
    print(response)
קבלת מידע על מילון מונחים
REST
לפני שמשתמשים בנתוני הבקשה, צריך להחליף את הנתונים הבאים:
- PROJECT_NUMBER_OR_ID: המזהה המספרי או האלפאנומרי של פרויקט Google Cloud
- glossary-id: מזהה המילון שלכם, לדוגמה, my-en-to-ru-glossary
ה-method של ה-HTTP וכתובת ה-URL:
GET https://translation.googleapis.com/v3/projects/PROJECT_NUMBER_OR_ID/locations/us-central1/glossaries/glossary-id
כדי לשלוח את הבקשה צריך להרחיב אחת מהאפשרויות הבאות:
אתם אמורים לקבל תגובת JSON שדומה לזו:
{
  "name": "projects/project-number/locations/us-central1/glossaries/glossary-id",
  "languagePair": {
    "sourceLanguageCode": "en",
    "targetLanguageCode": "ru"
  },
  "inputConfig": {
    "gcsSource": {
  "inputUri": "gs://bucket-name/glossary-file-name"
    }
  },
  "entryCount": 9603
}
Go
לפני שמנסים את הדוגמה הזו, צריך לפעול לפי Goהוראות ההגדרה במדריך למתחילים בנושא Cloud Translation באמצעות ספריות לקוח. מידע נוסף מופיע במאמרי העזרה של Cloud Translation Go API.
כדי לבצע אימות ב-Cloud Translation, צריך להגדיר את Application Default Credentials. מידע נוסף זמין במאמר הגדרת אימות לסביבת פיתוח מקומית.
Java
לפני שמנסים את הדוגמה הזו, צריך לפעול לפי Javaהוראות ההגדרה במדריך למתחילים בנושא Cloud Translation באמצעות ספריות לקוח. מידע נוסף מופיע במאמרי העזרה של Cloud Translation Java API.
כדי לבצע אימות ב-Cloud Translation, צריך להגדיר את Application Default Credentials. מידע נוסף זמין במאמר הגדרת אימות לסביבת פיתוח מקומית.
Node.js
לפני שמנסים את הדוגמה הזו, צריך לפעול לפי Node.jsהוראות ההגדרה במדריך למתחילים בנושא Cloud Translation באמצעות ספריות לקוח. מידע נוסף מופיע במאמרי העזרה של Cloud Translation Node.js API.
כדי לבצע אימות ב-Cloud Translation, צריך להגדיר את Application Default Credentials. מידע נוסף זמין במאמר הגדרת אימות לסביבת פיתוח מקומית.
Python
לפני שמנסים את הדוגמה הזו, צריך לפעול לפי Pythonהוראות ההגדרה במדריך למתחילים בנושא Cloud Translation באמצעות ספריות לקוח. מידע נוסף מופיע במאמרי העזרה של Cloud Translation Python API.
כדי לבצע אימות ב-Cloud Translation, צריך להגדיר את Application Default Credentials. מידע נוסף זמין במאמר הגדרת אימות לסביבת פיתוח מקומית.
שפות נוספות
C#: פועלים לפי הוראות ההגדרה של C# בדף של ספריות הלקוח ואז עוברים אל מאמרי העזרה של Cloud Translation ל- .NET.
PHP: פועלים לפי הוראות ההגדרה של PHP בדף של ספריות הלקוח ואז עוברים אל מסמכי העזר של Cloud Translation ל-PHP.
Ruby: פועלים לפי הוראות ההגדרה של Ruby בדף של ספריות הלקוח, ואז עוברים אל מאמרי העזרה של Cloud Translation בנושא Ruby.
הצגת רשימה של מילוני מונחים
פרויקט יכול לכלול מספר רב של מילוני מונחים. בקטע הזה מוסבר איך מאחזרים רשימה של מילוני המונחים שזמינים לפרויקט מסוים.
REST
בדוגמה הזו מפורטים כל המילונים שמשויכים לפרויקט שצוין.
לפני שמשתמשים בנתוני הבקשה, צריך להחליף את הנתונים הבאים:
- PROJECT_NUMBER_OR_ID: המזהה המספרי או האלפאנומרי של פרויקט Google Cloud
ה-method של ה-HTTP וכתובת ה-URL:
GET https://translation.googleapis.com/v3/projects/PROJECT_NUMBER_OR_ID/locations/us-central1/glossaries
כדי לשלוח את הבקשה צריך להרחיב אחת מהאפשרויות הבאות:
אתם אמורים לקבל תגובת JSON שדומה לזו:
{
  "glossaries": [
    {
      "name": "projects/project-number/locations/us-central1/glossaries/glossary-id",
      "languagePair": {
        "sourceLanguageCode": "en",
        "targetLanguageCode": "ru"
      },
      "inputConfig": {
        "gcsSource": {
          "inputUri": "gs://bucket-name/glossary-file-name"
        }
      },
      "entryCount": 9603
    },
    ...
  ]
}
Go
לפני שמנסים את הדוגמה הזו, צריך לפעול לפי Goהוראות ההגדרה במדריך למתחילים בנושא Cloud Translation באמצעות ספריות לקוח. מידע נוסף מופיע במאמרי העזרה של Cloud Translation Go API.
כדי לבצע אימות ב-Cloud Translation, צריך להגדיר את Application Default Credentials. מידע נוסף זמין במאמר הגדרת אימות לסביבת פיתוח מקומית.
Java
לפני שמנסים את הדוגמה הזו, צריך לפעול לפי Javaהוראות ההגדרה במדריך למתחילים בנושא Cloud Translation באמצעות ספריות לקוח. מידע נוסף מופיע במאמרי העזרה של Cloud Translation Java API.
כדי לבצע אימות ב-Cloud Translation, צריך להגדיר את Application Default Credentials. מידע נוסף זמין במאמר הגדרת אימות לסביבת פיתוח מקומית.
Node.js
לפני שמנסים את הדוגמה הזו, צריך לפעול לפי Node.jsהוראות ההגדרה במדריך למתחילים בנושא Cloud Translation באמצעות ספריות לקוח. מידע נוסף מופיע במאמרי העזרה של Cloud Translation Node.js API.
כדי לבצע אימות ב-Cloud Translation, צריך להגדיר את Application Default Credentials. מידע נוסף זמין במאמר הגדרת אימות לסביבת פיתוח מקומית.
Python
לפני שמנסים את הדוגמה הזו, צריך לפעול לפי Pythonהוראות ההגדרה במדריך למתחילים בנושא Cloud Translation באמצעות ספריות לקוח. מידע נוסף מופיע במאמרי העזרה של Cloud Translation Python API.
כדי לבצע אימות ב-Cloud Translation, צריך להגדיר את Application Default Credentials. מידע נוסף זמין במאמר הגדרת אימות לסביבת פיתוח מקומית.
שפות נוספות
C#: פועלים לפי הוראות ההגדרה של C# בדף של ספריות הלקוח ואז עוברים אל מאמרי העזרה של Cloud Translation ל- .NET.
PHP: פועלים לפי הוראות ההגדרה של PHP בדף של ספריות הלקוח ואז עוברים אל מסמכי העזר של Cloud Translation ל-PHP.
Ruby: פועלים לפי הוראות ההגדרה של Ruby בדף של ספריות הלקוח, ואז עוברים אל מאמרי העזרה של Cloud Translation בנושא Ruby.
עדכון מילון מונחים
אפשר לעדכן מילון מונחים כדי לשנות את השם שלו או להחליף את כל הערכים שלו בקובץ קלט חדש של מילון מונחים. אם אתם צריכים לבטל שינויים בערכים במילון המונחים, אתם צריכים להשתמש בקובץ המילון המקורי כדי להחליף את מילון המונחים ששונה.
REST
כדי לעדכן מילון מונחים, שולחים בקשת PATCH באמצעות ה-method glossary.patch. בדוגמה הבאה מעדכנים מילון מונחים של קבוצת מונחים מקבילה. משתמשים ב-method list כדי למצוא את המזהה של מילון מונחים מסוים.
פרמטר השאילתה update_mask מציין אם מעדכנים את קובץ הקלט של המילון, את השם המוצג של המילון או את שניהם. צריך לציין לפחות פרמטר אחד של מסיכת עדכון.
לפני שמשתמשים בנתוני הבקשה, צריך להחליף את הנתונים הבאים:
- PROJECT_NUMBER_OR_ID: המזהה המספרי או האלפאנומרי של הפרויקט ב- Google Cloud .
- LOCATION: האזור שבו נמצא מילון המונחים שרוצים לעדכן, למשל
us-central1. - GLOSSARY_ID: המזהה של מילון מונחים קיים.
- LANGUAGE_CODE: קוד השפה שמציין את השפות של מילון המונחים הזה של קבוצת מונחים מקבילים.
- GLOSSARY_FILE_PATH: המיקום ושם הקובץ של קובץ הקלט של המילון.
ה-method של ה-HTTP וכתובת ה-URL:
PATCH https://translation.googleapis.com/v3/projects/PROJECT_NUMBER_OR_ID/locations/LOCATION/glossaries/GLOSSARY_ID?update_mask=input_config&update_mask=display_name
תוכן בקשת JSON:
{
  "name":"projects/PROJECT_NUMBER_OR_ID/locations/LOCATION/glossaries/GLOSSARY_ID",
  "languageCodesSet": {
    "languageCodes": ["LANGUAGE_CODE", ...]
  },
  "inputConfig": {
    "gcsSource": {
      "inputUri": "gs://GLOSSARY_FILE_PATH"
    }
  }
}
כדי לשלוח את הבקשה צריך להרחיב אחת מהאפשרויות הבאות:
אתם אמורים לקבל תגובת JSON שדומה לזו:
{
  "name": "projects/PROJECT_NUMBER/locations/LOCATION/operations/OPERATION_ID",
  "metadata": {
    "@type": "type.googleapis.com/google.cloud.translation.v3.UpdateGlossaryMetadata",
    "glossary": {
      "name": "projects/PROJECT_NUMBER/locations/LOCATION/glossaries/GLOSSARY_ID",
      "languageCodesSet": {
        "languageCodes": ["LANGUAGE_CODE", ...]
      },
      "inputConfig": {
        "gcsSource": {
        "inputUri": "gs://GLOSSARY_FILE_PATH"
        }
      },
      "entryCount": NUMBER_OF_ENTRIES,
      "submitTime": "2022-04-22T23:16:30.628806944Z",
      "endTime": "2022-04-22T23:41:15.115797Z",
      "displayName": "GLOSSARY_ID"
    },
    "state": "RUNNING",
    "submitTime": "2022-04-22T23:50:24.337964527Z"
  }
}
שפות נוספות
C#: פועלים לפי הוראות ההגדרה של C# בדף של ספריות הלקוח ואז עוברים אל מאמרי העזרה של Cloud Translation ל- .NET.
PHP: פועלים לפי הוראות ההגדרה של PHP בדף של ספריות הלקוח ואז עוברים אל מסמכי העזר של Cloud Translation ל-PHP.
Ruby: פועלים לפי הוראות ההגדרה של Ruby בדף של ספריות הלקוח, ואז עוברים אל מאמרי העזרה של Cloud Translation בנושא Ruby.
מחיקת מילון מונחים
בדוגמה הבאה מוצג איך מוחקים מילון מונחים.
REST
לפני שמשתמשים בנתוני הבקשה, צריך להחליף את הנתונים הבאים:
- PROJECT_NUMBER_OR_ID: המזהה המספרי או האלפאנומרי של פרויקט Google Cloud
- glossary-id: מזהה המילון שלכם
ה-method של ה-HTTP וכתובת ה-URL:
DELETE https://translation.googleapis.com/v3/projects/PROJECT_NUMBER_OR_ID/locations/us-central1/glossaries/glossary-id
כדי לשלוח את הבקשה צריך להרחיב אחת מהאפשרויות הבאות:
אמורים לקבל קוד סטטוס של הצלחה (2xx) ותגובה ריקה.
Go
לפני שמנסים את הדוגמה הזו, צריך לפעול לפי Goהוראות ההגדרה במדריך למתחילים בנושא Cloud Translation באמצעות ספריות לקוח. מידע נוסף מופיע במאמרי העזרה של Cloud Translation Go API.
כדי לבצע אימות ב-Cloud Translation, צריך להגדיר את Application Default Credentials. מידע נוסף זמין במאמר הגדרת אימות לסביבת פיתוח מקומית.
Java
לפני שמנסים את הדוגמה הזו, צריך לפעול לפי Javaהוראות ההגדרה במדריך למתחילים בנושא Cloud Translation באמצעות ספריות לקוח. מידע נוסף מופיע במאמרי העזרה של Cloud Translation Java API.
כדי לבצע אימות ב-Cloud Translation, צריך להגדיר את Application Default Credentials. מידע נוסף זמין במאמר הגדרת אימות לסביבת פיתוח מקומית.
Node.js
לפני שמנסים את הדוגמה הזו, צריך לפעול לפי Node.jsהוראות ההגדרה במדריך למתחילים בנושא Cloud Translation באמצעות ספריות לקוח. מידע נוסף מופיע במאמרי העזרה של Cloud Translation Node.js API.
כדי לבצע אימות ב-Cloud Translation, צריך להגדיר את Application Default Credentials. מידע נוסף זמין במאמר הגדרת אימות לסביבת פיתוח מקומית.
Python
לפני שמנסים את הדוגמה הזו, צריך לפעול לפי Pythonהוראות ההגדרה במדריך למתחילים בנושא Cloud Translation באמצעות ספריות לקוח. מידע נוסף מופיע במאמרי העזרה של Cloud Translation Python API.
כדי לבצע אימות ב-Cloud Translation, צריך להגדיר את Application Default Credentials. מידע נוסף זמין במאמר הגדרת אימות לסביבת פיתוח מקומית.
שפות נוספות
C#: פועלים לפי הוראות ההגדרה של C# בדף של ספריות הלקוח ואז עוברים אל מאמרי העזרה של Cloud Translation ל- .NET.
PHP: פועלים לפי הוראות ההגדרה של PHP בדף של ספריות הלקוח ואז עוברים אל מסמכי העזר של Cloud Translation ל-PHP.
Ruby: פועלים לפי הוראות ההגדרה של Ruby בדף של ספריות הלקוח, ואז עוברים אל מאמרי העזרה של Cloud Translation בנושא Ruby.
ניהול ערכים במילון המונחים
ערך במילון מונחים ממפה מונח בשפה אחת למונח בשפה אחרת. אפשר להוסיף רשומות חדשות למילון מונחים, להציג את כל הרשומות במילון מונחים קיים או לשנות רשומות קיימות.
יצירת רשומות חדשות
כדי להוסיף מונחים למילון מונחים קיים, יוצרים רשומות חדשות. במילוני מונחים חד-כיווניים, צריך לספק צמד מונחים, כאשר מונח אחד הוא בשפת המקור והמונח השני הוא בשפת היעד. במילוני מונחים של קבוצות מונחים מקבילות, צריך לספק קבוצת מונחים שבה כל פריט מציין מונח ואת קוד השפה שלו.
REST
בדוגמה הבאה נוצרת רשומה למילון מונחים של קבוצת מונחים מקבילה. אפשר ליצור רק ערך אחד לכל בקשה. מידע נוסף זמין במאמר בנושא השיטה glossaryEntries.create.
לפני שמשתמשים בנתוני הבקשה, צריך להחליף את הנתונים הבאים:
- PROJECT_NUMBER_OR_ID: המזהה המספרי או האלפאנומרי של הפרויקט ב- Google Cloud .
- LOCATION: האזור שבו נמצא מילון המונחים שרוצים לעדכן, למשל
us-central1. - GLOSSARY_ID: המזהה של מילון מונחים קיים.
- LANGUAGE_CODE: קוד השפה שבה מוגדר המונח.
- TERM: המונח שרוצים להוסיף למילון המונחים.
- DESCRIPTION: מידע על הערך במילון המונחים.
ה-method של ה-HTTP וכתובת ה-URL:
POST https://translation.googleapis.com/v3/projects/PROJECT_NUMBER_OR_ID/locations/LOCATION/glossaries/GLOSSARY_ID/glossaryEntries
תוכן בקשת JSON:
{
  termsSet: {
   terms: {
     languageCode: "LANGUAGE_CODE",
     text: "TERM"
    },
    ...
  },
  description: "DESCRIPTION"
}
כדי לשלוח את הבקשה צריך להרחיב אחת מהאפשרויות הבאות:
אתם אמורים לקבל תגובת JSON שדומה לזו:
{
  "name": "projects/PROJECT_NUMBER/locations/LOCATION/glossaries/GLOSSARY_ID/glossaryEntries/GLOSSARY_ENTRY_ID",
  "termsSet": {
    "terms": [
      {
        "languageCode": "LANGUAGE_CODE",
        "text": "TERM"
      },
      ...
    ]
  },
  "description": "DESCRIPTION"
}
שפות נוספות
C#: פועלים לפי הוראות ההגדרה של C# בדף של ספריות הלקוח ואז עוברים אל מאמרי העזרה של Cloud Translation ל- .NET.
PHP: פועלים לפי הוראות ההגדרה של PHP בדף של ספריות הלקוח ואז עוברים אל מסמכי העזר של Cloud Translation ל-PHP.
Ruby: פועלים לפי הוראות ההגדרה של Ruby בדף של ספריות הלקוח, ואז עוברים אל מאמרי העזרה של Cloud Translation בנושא Ruby.
רשימת מונחים במילון
הצגת רשימה של כל הערכים במילון מונחים קיים. האפשרות הזו שימושית אם, לדוגמה, אתם רוצים לבדוק אילו מונחים ואילו שפות מופיעים במילון מונחים מסוים.
REST
כדי להציג רשימה של כל הערכים במילון המונחים, שולחים בקשת GET באמצעות השיטה glossaryEntries.list.
לפני שמשתמשים בנתוני הבקשה, צריך להחליף את הנתונים הבאים:
- PROJECT_NUMBER_OR_ID: המזהה המספרי או האלפאנומרי של הפרויקט ב- Google Cloud .
- LOCATION: האזור שבו נמצא מילון המונחים שרוצים לעדכן, למשל
us-central1. - GLOSSARY_ID: המזהה של מילון מונחים קיים.
ה-method של ה-HTTP וכתובת ה-URL:
GET https://translation.googleapis.com/v3/projects/PROJECT_NUMBER_OR_ID/locations/LOCATION/glossaries/GLOSSARY_ID/glossaryEntries
כדי לשלוח את הבקשה צריך להרחיב אחת מהאפשרויות הבאות:
אתם אמורים לקבל תגובת JSON שדומה לזו:
{
  "glossaryEntries": [
    {
      "name": "projects/PROJECT_NUMBER/locations/LOCATION/glossaries/GLOSSARY_ID/glossaryEntries/GLOSSARY_ENTRY_ID",
      "termsSet": {
        "terms": [
          {
            "languageCode": "LANGUAGE_CODE",
            "text": "TERM"
          },
        ...
        ]
      },
      "description": "DESCRIPTION"
    },
    ...
  ]
}
שפות נוספות
C#: פועלים לפי הוראות ההגדרה של C# בדף של ספריות הלקוח ואז עוברים אל מאמרי העזרה של Cloud Translation ל- .NET.
PHP: פועלים לפי הוראות ההגדרה של PHP בדף של ספריות הלקוח ואז עוברים אל מסמכי העזר של Cloud Translation ל-PHP.
Ruby: פועלים לפי הוראות ההגדרה של Ruby בדף של ספריות הלקוח, ואז עוברים אל מאמרי העזרה של Cloud Translation בנושא Ruby.
קבלת ערך במילון מונחים
בוחרים ערך כדי לראות את הפרטים שלו.
REST
כדי לקבל רשומה אחת במילון המונחים, שולחים בקשת GET עם השיטה glossaryEntries.get. משתמשים בשיטת הרשימה כדי למצוא את המזהה של רשומה מסוימת.
לפני שמשתמשים בנתוני הבקשה, צריך להחליף את הנתונים הבאים:
- PROJECT_NUMBER_OR_ID: המזהה המספרי או האלפאנומרי של הפרויקט ב- Google Cloud .
- LOCATION: האזור שבו נמצא מילון המונחים שרוצים לעדכן, למשל
us-central1. - GLOSSARY_ID: המזהה של מילון מונחים קיים.
- GLOSSARY_ENTRY_ID: המזהה של רשומה קיימת במילון המונחים.
ה-method של ה-HTTP וכתובת ה-URL:
GET https://translation.googleapis.com/v3/projects/PROJECT_NUMBER_OR_ID/locations/LOCATION/glossaries/GLOSSARY_ID/glossaryEntries/GLOSSARY_ENTRY_ID
כדי לשלוח את הבקשה צריך להרחיב אחת מהאפשרויות הבאות:
אתם אמורים לקבל תגובת JSON שדומה לזו:
{
  "name": "projects/PROJECT_NUMBER/locations/LOCATION/glossaries/GLOSSARY_ID/glossaryEntries/GLOSSARY_ENTRY_ID",
  "termsSet": {
    "terms": [
      {
        "languageCode": "LANGUAGE_CODE",
        "text": "TERM"
      },
      ...
    ]
  },
  "description": "DESCRIPTION"
}
שפות נוספות
C#: פועלים לפי הוראות ההגדרה של C# בדף של ספריות הלקוח ואז עוברים אל מאמרי העזרה של Cloud Translation ל- .NET.
PHP: פועלים לפי הוראות ההגדרה של PHP בדף של ספריות הלקוח ואז עוברים אל מסמכי העזר של Cloud Translation ל-PHP.
Ruby: פועלים לפי הוראות ההגדרה של Ruby בדף של ספריות הלקוח, ואז עוברים אל מאמרי העזרה של Cloud Translation בנושא Ruby.
עדכון של ערכים במילון המונחים
אפשר לעדכן ערך אחד או להחליף את כל הערכים במילון מונחים. כדי להחליף את כל הערכים, אפשר לעיין במאמר בנושא עדכון מילון מונחים.
כדי לשנות רשומה במילון מונחים חד-כיווני, צריך לספק צמד מונחים, שבו מונח אחד הוא בשפת המקור והמונח השני הוא בשפת היעד. כדי ליצור מילוני מונחים של מונחים מקבילים, צריך לספק קבוצת מונחים שבה כל פריט מציין מונח ואת קוד השפה שלו.
REST
בדוגמאות הבאות מוצג עדכון של רשומה במילון מונחים של קבוצת מונחים מקבילה. למידע נוסף, אפשר לעיין בשיטה glossaryEntries.patch.
לפני שמשתמשים בנתוני הבקשה, צריך להחליף את הנתונים הבאים:
- PROJECT_NUMBER_OR_ID: המזהה המספרי או האלפאנומרי של הפרויקט ב- Google Cloud .
- LOCATION: האזור שבו נמצא מילון המונחים שרוצים לעדכן, למשל
us-central1. - GLOSSARY_ID: המזהה של מילון מונחים קיים שמכיל את הערך שרוצים לעדכן.
- GLOSSARY_ENTRY_ID: המזהה של הערך במילון המונחים שרוצים לעדכן.
- LANGUAGE_CODE: קוד השפה שבה מוגדר המונח.
- TERM: המונח לעדכון.
- DESCRIPTION: מידע על הערך במילון המונחים.
ה-method של ה-HTTP וכתובת ה-URL:
PATCH https://translation.googleapis.com/v3/projects/PROJECT_NUMBER_OR_ID/locations/LOCATION/glossaries/GLOSSARY_ID/glossaryEntries/GLOSSARY_ENTRY_ID
תוכן בקשת JSON:
{
  termsSet: {
   terms: {
     languageCode: "LANGUAGE_CODE",
     text: "TERM"
    },
    ...
  },
  description: "DESCRIPTION"
}
כדי לשלוח את הבקשה צריך להרחיב אחת מהאפשרויות הבאות:
אתם אמורים לקבל תגובת JSON שדומה לזו:
{
  "name": "projects/PROJECT_NUMBER/locations/LOCATION/glossaries/GLOSSARY_ID/glossaryEntries/GLOSSARY_ENTRY_ID",
  "termsSet": {
    "terms": [
      {
        "languageCode": "LANGUAGE_CODE",
        "text": "TERM"
      },
      ...
    ]
  },
  "description": "DESCRIPTION"
}
שפות נוספות
C#: פועלים לפי הוראות ההגדרה של C# בדף של ספריות הלקוח ואז עוברים אל מאמרי העזרה של Cloud Translation ל- .NET.
PHP: פועלים לפי הוראות ההגדרה של PHP בדף של ספריות הלקוח ואז עוברים אל מסמכי העזר של Cloud Translation ל-PHP.
Ruby: פועלים לפי הוראות ההגדרה של Ruby בדף של ספריות הלקוח, ואז עוברים אל מאמרי העזרה של Cloud Translation בנושא Ruby.
מחיקת רשומה במילון המונחים
הסרת ערך יחיד במילון המונחים.
REST
כדי למחוק רשומה ספציפית במילון המונחים, שולחים בקשת DELETE באמצעות השיטה glossaryEntries.delete. משתמשים בשיטת הרשימה כדי למצוא את המזהה של רשומה מסוימת.
לפני שמשתמשים בנתוני הבקשה, צריך להחליף את הנתונים הבאים:
- PROJECT_NUMBER_OR_ID: המזהה המספרי או האלפאנומרי של הפרויקט ב- Google Cloud .
- LOCATION: האזור שבו נמצא מילון המונחים שרוצים לעדכן, למשל
us-central1. - GLOSSARY_ID: המזהה של מילון מונחים קיים שמכיל את הערך שרוצים למחוק.
- GLOSSARY_ENTRY_ID: המזהה של הערך במילון המונחים שרוצים למחוק.
ה-method של ה-HTTP וכתובת ה-URL:
DELETE https://translation.googleapis.com/v3/projects/PROJECT_NUMBER_OR_ID/locations/LOCATION/glossaries/GLOSSARY_ID/glossaryEntries/GLOSSARY_ENTRY_ID
כדי לשלוח את הבקשה צריך להרחיב אחת מהאפשרויות הבאות:
אמורים לקבל קוד סטטוס של הצלחה (2xx) ותגובה ריקה.
שפות נוספות
C#: פועלים לפי הוראות ההגדרה של C# בדף של ספריות הלקוח ואז עוברים אל מאמרי העזרה של Cloud Translation ל- .NET.
PHP: פועלים לפי הוראות ההגדרה של PHP בדף של ספריות הלקוח ואז עוברים אל מסמכי העזר של Cloud Translation ל-PHP.
Ruby: פועלים לפי הוראות ההגדרה של Ruby בדף של ספריות הלקוח, ואז עוברים אל מאמרי העזרה של Cloud Translation בנושא Ruby.
מקורות מידע נוספים
- לקבלת עזרה בפתרון בעיות או שגיאות נפוצות, אפשר לעיין בדף פתרון בעיות.