


本教學課程說明如何將在 Heroku 上執行的 Node.js 網頁應用程式遷移至 Google Cloud上的 Cloud Run。本教學課程適合想將應用程式從 Heroku 遷移至 Google Cloud代管服務的架構師和產品擁有者。
Cloud Run 是代管運算平台,可讓您執行可透過 HTTP 要求叫用的無狀態容器。這項服務是以開放原始碼 Knative 建構而成,可跨平台遷移,並支援容器工作流程和持續推送軟體更新標準。Cloud Run 平台與 Google Cloud 產品套件完美整合,可讓您更輕鬆地設計及開發可攜、可擴充且有韌性的應用程式。
在本教學課程中,您將瞭解如何將應用程式遷移至 Google Cloud ,該應用程式是以 Node.js 編寫,並使用 Heroku Postgres 做為 Heroku 的後端服務。網頁應用程式會容器化並託管於 Cloud Run,並使用 PostgreSQL 適用的 Cloud SQL 做為其持續性層。
在本教學課程中,您將使用名為 Tasks 的簡易應用程式,查看及建立工作。這些工作會儲存在 Heroku Postgres 中,位於 Heroku 上目前的應用程式部署作業。
本教學課程假設您熟悉 Heroku 的基本功能,且擁有 Heroku 帳戶 (或可存取該帳戶)。此外,也假設您熟悉 Cloud Run、Cloud SQL、Docker 和 Node.js。
目標
- 建構 Docker 映像檔,將應用程式部署至 Cloud Run。
- 建立 PostgreSQL 適用的 Cloud SQL 執行個體,做為遷移至 Google Cloud後的後端。
- 查看 Node.js 程式碼,瞭解 Cloud Run 如何連線至 Cloud SQL,並查看從 Heroku 遷移至 Cloud Run 所需的程式碼變更 (如有)。
- 將資料從 Heroku Postgres 遷移至 PostgreSQL 適用的 Cloud SQL。
- 將應用程式部署至 Cloud Run。
- 測試已部署的應用程式。
費用
在本文件中,您會使用下列 Google Cloud計費元件:
您可以使用 Pricing Calculator,根據預測用量估算費用。
此外,您可能也需要支付在 Heroku 使用資源的費用。
事前準備
- 登入 Google Cloud 帳戶。如果您未曾使用過 Google Cloud,歡迎 建立帳戶,親自體驗實際使用我們產品的成效。新客戶還能獲得價值 $300 美元的免費抵免額,用於執行、測試及部署工作負載。
-
In the Google Cloud console, on the project selector page, select or create a Google Cloud project.
Roles required to select or create a project
- Select a project: Selecting a project doesn't require a specific IAM role—you can select any project that you've been granted a role on.
-
Create a project: To create a project, you need the Project Creator role
(
roles/resourcemanager.projectCreator), which contains theresourcemanager.projects.createpermission. Learn how to grant roles.
-
Verify that billing is enabled for your Google Cloud project.
Enable the Cloud SQL, Cloud Build, Cloud Run, Container Registry, Service Networking, Serverless VPC Access APIs, if any are not already enabled.
Roles required to enable APIs
To enable APIs, you need the
serviceusage.services.enablepermission. If you created the project, then you likely already have this permission through the Owner role (roles/owner). Otherwise, you can get this permission through the Service Usage Admin role (roles/serviceusage.serviceUsageAdmin). Learn how to grant roles.-
Make sure that you have the following role or roles on the project: Cloud Run > Cloud Run Admin, Cloud Storage > Storage Admin, Cloud SQL > Cloud SQL Admin, Compute Engine > Compute Network Admin, Resource Manager > Project IAM Admin, Cloud Build > Cloud Build Editor, Serverless VPC Access > Serverless VPC Access Admin, Logging > Logs Viewer, Service Accounts > Service Account Admin, Service Accounts > Service Account User, and Service Usage > Service Usage Consumer
Check for the roles
-
In the Google Cloud console, go to the IAM page.
Go to IAM - Select the project.
-
In the Principal column, find all rows that identify you or a group that you're included in. To learn which groups you're included in, contact your administrator.
- For all rows that specify or include you, check the Role column to see whether the list of roles includes the required roles.
Grant the roles
-
In the Google Cloud console, go to the IAM page.
Go to IAM - Select the project.
- Click Grant access.
-
In the New principals field, enter your user identifier. This is typically the email address for a Google Account.
- Click Select a role, then search for the role.
- To grant additional roles, click Add another role and add each additional role.
- Click Save.
-
-
In the Google Cloud console, on the project selector page, select or create a Google Cloud project.
Roles required to select or create a project
- Select a project: Selecting a project doesn't require a specific IAM role—you can select any project that you've been granted a role on.
-
Create a project: To create a project, you need the Project Creator role
(
roles/resourcemanager.projectCreator), which contains theresourcemanager.projects.createpermission. Learn how to grant roles.
-
Verify that billing is enabled for your Google Cloud project.
Enable the Cloud SQL, Cloud Build, Cloud Run, Container Registry, Service Networking, Serverless VPC Access APIs, if any are not already enabled.
Roles required to enable APIs
To enable APIs, you need the
serviceusage.services.enablepermission. If you created the project, then you likely already have this permission through the Owner role (roles/owner). Otherwise, you can get this permission through the Service Usage Admin role (roles/serviceusage.serviceUsageAdmin). Learn how to grant roles.-
Make sure that you have the following role or roles on the project: Cloud Run > Cloud Run Admin, Cloud Storage > Storage Admin, Cloud SQL > Cloud SQL Admin, Compute Engine > Compute Network Admin, Resource Manager > Project IAM Admin, Cloud Build > Cloud Build Editor, Serverless VPC Access > Serverless VPC Access Admin, Logging > Logs Viewer, Service Accounts > Service Account Admin, Service Accounts > Service Account User, and Service Usage > Service Usage Consumer
Check for the roles
-
In the Google Cloud console, go to the IAM page.
Go to IAM - Select the project.
-
In the Principal column, find all rows that identify you or a group that you're included in. To learn which groups you're included in, contact your administrator.
- For all rows that specify or include you, check the Role column to see whether the list of roles includes the required roles.
Grant the roles
-
In the Google Cloud console, go to the IAM page.
Go to IAM - Select the project.
- Click Grant access.
-
In the New principals field, enter your user identifier. This is typically the email address for a Google Account.
- Click Select a role, then search for the role.
- To grant additional roles, click Add another role and add each additional role.
- Click Save.
-
設定環境
開啟 Cloud Shell。
在 Cloud Shell 中,設定本教學課程使用的 Google Cloud CLI 環境變數和預設值。
gcloud config set project PROJECT_ID
gcloud config set run/region us-central1
將
PROJECT_ID替換為專案 ID。
架構
下圖概述 Heroku 上的網頁應用程式架構 (現狀),以及 Google Cloud 上的架構版面配置(您將建構)。

目前部署在 Heroku 的 Tasks 應用程式包含一或多個網頁 dyno。Web dyno 能夠接收及回應 HTTP 流量,而 worker dyno 則更適合用於背景工作和定時任務。應用程式會使用 Node.js 的 Mustache 範本程式庫,提供索引頁面,顯示儲存在 Postgres 資料庫中的工作。
您可以透過 HTTPS 網址存取應用程式。該網址的 /tasks 路由可讓您建立新工作。
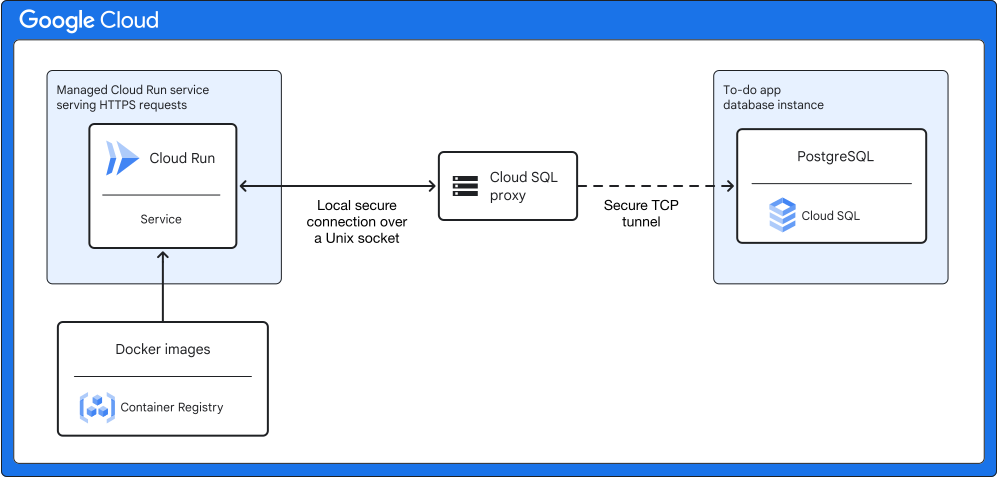
在 Google Cloud,Cloud Run 是用於部署 Tasks 應用程式的無伺服器平台。Cloud Run 專為執行無狀態、要求導向的容器而設計。如果代管服務需要支援容器化應用程式,且應用程式會自動調度資源,並在未提供流量時將資源調度率降至零,則適合使用這項服務。
將 Heroku 中使用的元件對應至 Google Cloud
下表列出 Heroku 平台中的元件與 Google Cloud的對應關係。這項對應關係可協助您將本教學課程中概述的架構從 Heroku 轉譯為 Google Cloud。
| 元件 | Heroku 平台 | Google Cloud |
|---|---|---|
| 容器 | Dynos:Heroku 使用容器模型建構及擴充 Heroku 應用程式。這些 Linux 容器稱為 dyno,可擴充至您指定的數量,以支援 Heroku 應用程式的資源需求。您可以根據應用程式的記憶體和 CPU 需求,從一系列 dyno 類型中進行選擇。 | Cloud Run 容器: Google Cloud 支援在無狀態容器中執行容器化工作負載,這些容器可在全代管環境或 Google Kubernetes Engine (GKE) 叢集中執行。 |
| 網頁應用程式 | Heroku 應用程式:Dyno 是 Heroku 應用程式的基本建構模塊。應用程式通常由一或多個 dyno 類型組成,通常是網頁和 worker dyno 的組合。 | Cloud Run 服務:網頁應用程式可以模擬為 Cloud Run 服務。每項服務都有專屬的 HTTPS 端點,並可根據服務端點的流量,自動擴充或縮減資源 (從 0 到 N)。 |
| 資料庫 | Heroku Postgres 是 Heroku 以 PostgreSQL 為基礎的資料庫即服務 (DaaS)。 | Cloud SQL 是 Google Cloud關聯式資料庫的代管資料庫服務。 |
將 Tasks 範例網頁應用程式部署至 Heroku
接下來幾節將說明如何設定 Heroku 的指令列介面 (CLI)、複製 GitHub 來源存放區,以及將應用程式部署至 Heroku。
設定 Heroku 的指令列介面
本教學課程會在 Cloud Shell 中執行 Heroku CLI,且必須使用 Heroku API 金鑰進行驗證。在 Cloud Shell 中執行時,Heroku CLI 無法使用密碼或網頁式驗證進行驗證。
或者,如果您在本機終端機上執行範例,則可使用任何 Heroku CLI 驗證方式。在本機終端機執行教學課程時,您也必須安裝 Google Cloud CLI、git 和 Docker。
登入 Heroku 網頁控制台,然後從帳戶設定頁面複製 API 金鑰的值。
在 Cloud Shell 中安裝 Heroku CLI
在 Cloud Shell 驗證 Heroku CLI。系統提示您輸入密碼時,請輸入從 Heroku 控制台複製的 API 金鑰值,而非登入控制台時使用的密碼。
heroku login --interactive
複製來源存放區
在 Cloud Shell 中,複製 Tasks 範例應用程式的 GitHub 存放區:
git clone https://github.com/GoogleCloudPlatform/migrate-webapp-heroku-to-cloudrun-node.git
將目錄變更為複製存放區時建立的目錄:
cd migrate-webapp-heroku-to-cloudrun-node
該目錄包含下列檔案:
- 名為
index.js的 Node.js 指令碼,其中包含網頁應用程式提供的路徑程式碼。 package.json和package-lock.json檔案,概述網頁應用程式的依附元件。您必須安裝這些依附元件,應用程式才能執行。Procfile檔案,用於指定應用程式在啟動時執行的指令。您需要建立Procfile檔案,才能將應用程式部署至 Heroku。views目錄,其中包含網頁應用程式在「/」路徑上提供的 HTML 內容。.gitignore檔案。
- 名為
將應用程式部署至 Heroku
在 Cloud Shell 建立 Heroku 應用程式:
heroku create
記下為應用程式建立的名稱。您在下一個步驟中需要這個值。
為 Heroku 應用程式名稱建立環境變數:
export APP_NAME=APP_NAME
將
APP_NAME替換為heroku create指令傳回的應用程式名稱。新增 Heroku Postgres 外掛程式,佈建 PostgreSQL 資料庫:
heroku addons:create heroku-postgresql:mini
確認外掛程式已成功新增:
heroku addons
如果成功新增 Postgres 外掛程式,您會看到類似下方的訊息:
Add-on               Plan     Price       State
-----------------    -----    --------    -----
heroku-postgresql    mini     5$/month    created
將應用程式部署至 Heroku:
git push heroku master
執行下列指令,確認 DATABASE_URL 的值。
heroku config
記下擷取的 DATABASE_URL 值。下一個步驟會用到這個值。
執行 Docker 容器。
docker run -it --rm postgres psql "DATABASE_URL"
將
DATABASE_URL替換為您在上一個步驟中記下的 Heroku Postgres 網址。在 Docker 容器中,使用下列指令建立
TASKS資料表:CREATE TABLE TASKS (DESCRIPTION TEXT NOT NULL);
退出容器:
exit在 Cloud Shell 執行下列指令,取得 Heroku 應用程式的網址:
heroku info
在瀏覽器視窗中開啟網址。應用程式看起來會像下方的螢幕截圖 (不過您的版本不會列出工作):
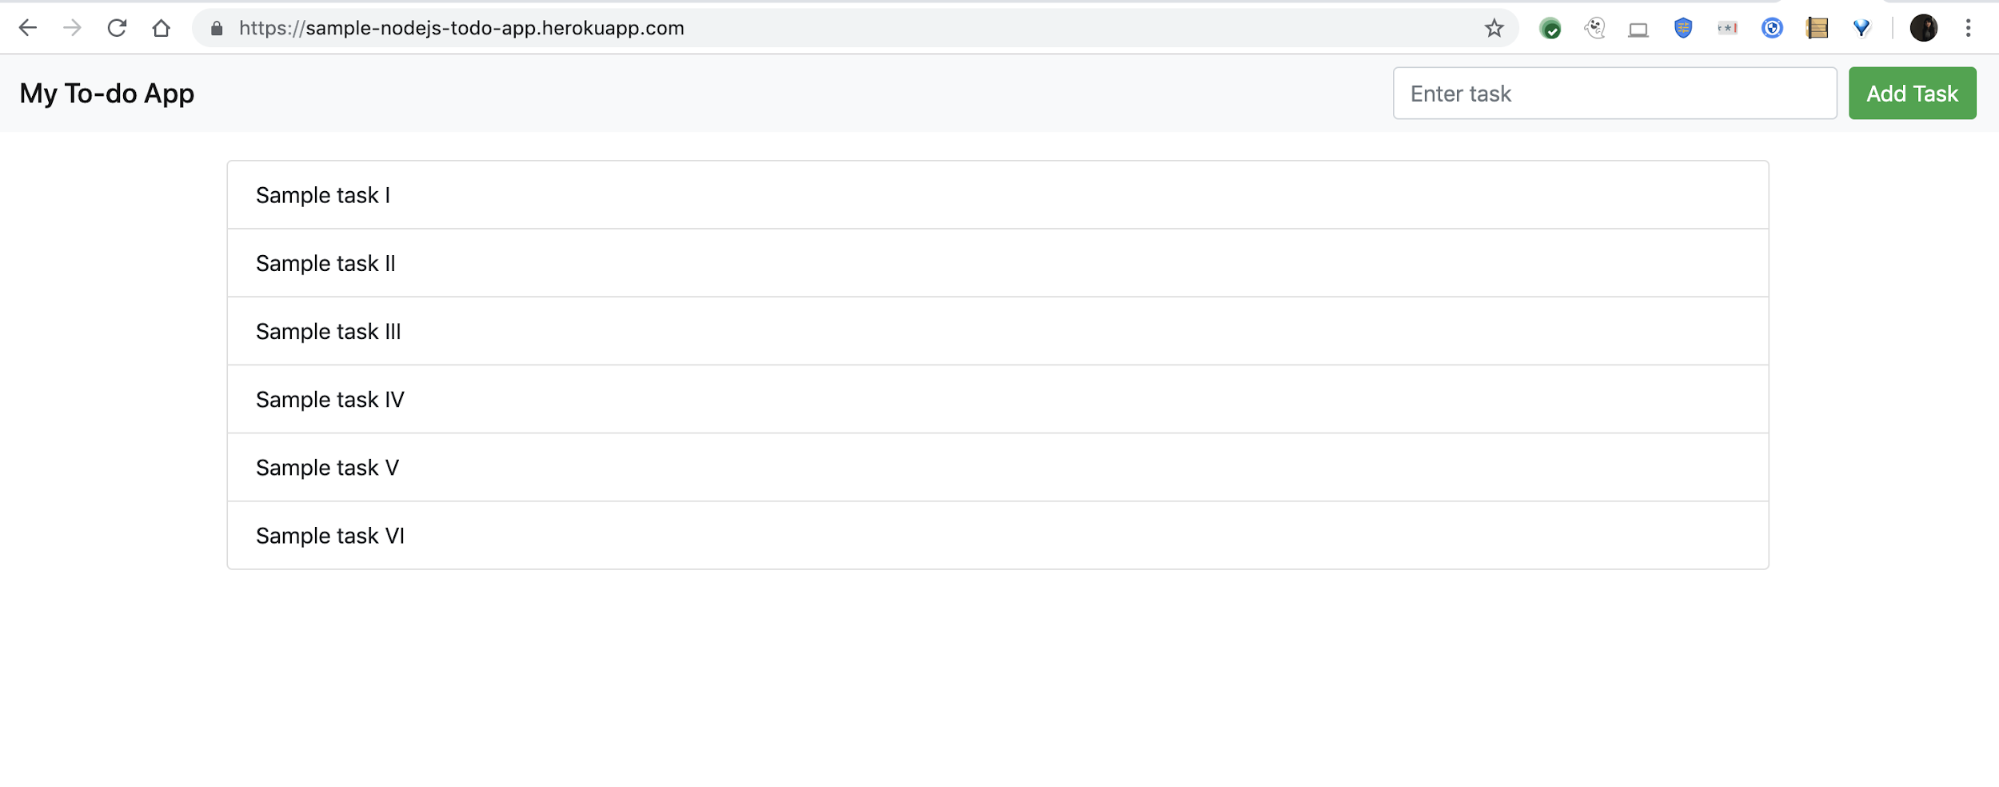
在瀏覽器中建立應用程式範例工作。確認工作已從資料庫擷取,並顯示在 UI 中。
準備網頁應用程式程式碼,以便遷移至 Cloud Run
本節將詳細說明準備網頁應用程式,以便部署至 Cloud Run 的必要步驟。
建構 Docker 容器並發布至 Container Registry
您需要 Docker 映像檔來建構應用程式容器,才能在 Cloud Run 中執行。您可以手動建構容器,也可以使用 Buildpacks。
手動建構容器
在 Cloud Shell 中,於複製本教學課程存放區時建立的目錄中,建立 Dockerfile:
cat <<"EOF" > Dockerfile
# Use the official Node image.
# https://hub.docker.com/_/node
FROM node:10-alpine

# Create and change to the app directory.
WORKDIR /app

# Copying this separately prevents re-running npm install on every code change.
COPY package*.json ./
RUN npm install

# Copy local code to the container image.
COPY . /app

# Configure and document the service HTTP port.
ENV PORT 8080
EXPOSE $PORT

# Run the web service on container startup.
CMD ["npm", "start"]
EOF
使用 Cloud Build 建構容器,並將映像檔發布至 Container Registry:
gcloud builds submit --tag gcr.io/PROJECT_ID/APP_NAME:1 \
  --gcs-log-dir=gs://PROJECT_ID_cloudbuild
建立環境變數,用於存放您建立的 Docker 映像檔名稱:
export IMAGE_NAME="gcr.io/PROJECT_ID/APP_NAME:1"
使用 Buildpacks 建構容器
在 Cloud Shell 中安裝 pack CLI。
將 pack CLI 設為預設使用 Heroku 建構工具:
pack config default-builder heroku/buildpacks:22
建立環境變數,用於存放 Docker 映像檔名稱:
export IMAGE_NAME=gcr.io/PROJECT_ID/APP_NAME:1
使用
pack指令建構映像檔,並將映像檔推送或發布至 Container Registry:pack build --publish $IMAGE_NAME
建立 PostgreSQL 適用的 Cloud SQL 執行個體
您會建立 PostgreSQL 適用的 Cloud SQL 執行個體,做為網頁應用程式的後端。在本教學課程中,PostgreSQL 最適合做為部署在 Heroku 上的範例應用程式,該應用程式使用 Postgres 資料庫做為後端。就這個應用程式而言,從代管 Postgres 服務遷移至 PostgreSQL 適用的 Cloud SQL 時,不需要變更結構定義。
為 Cloud SQL 準備網路,並使用私人 IP 位址。
gcloud compute addresses create google-managed-services-default \
  --global \
  --purpose=VPC_PEERING \
  --prefix-length=16 \
  --description="peering range for CloudSQL Private Service Access" \
  --network=default

gcloud services vpc-peerings connect \
  --service=servicenetworking.googleapis.com \
  --ranges=google-managed-services-default \
  --network=default \
  --project=PROJECT_ID
建立名為
CLOUDSQL_DB_NAME的環境變數,用於儲存您在下一個步驟中建立的資料庫執行個體名稱:export CLOUDSQL_DB_NAME=tasks-db
建立資料庫:
gcloud sql instances create $CLOUDSQL_DB_NAME \
--cpu=1 \
--memory=4352Mib \
--database-version=POSTGRES_15 \
--region=us-central1 \
--network default \
--no-assign-ip
執行個體可能需要幾分鐘才能初始化。
設定 Postgres 使用者的密碼:
gcloud sql users set-password postgres \
    --instance=$CLOUDSQL_DB_NAME  \
    --password=POSTGRES_PASSWORD
將
POSTGRES_PASSWORD替換為要用於 Postgres 資料庫的密碼。
從 Heroku Postgres 將資料匯入 Cloud SQL
您可以透過多種遷移模式,將資料遷移至 Cloud SQL。一般來說,最理想的做法是將 Cloud SQL 設為要遷移的資料庫副本,並在遷移後將 Cloud SQL 設為主要執行個體,這樣幾乎或完全不需要停機。Heroku Postgres 不支援外部副本 (追蹤者),因此在本教學課程中,您會使用開放原始碼工具遷移應用程式的結構定義。
在本教學課程中,您將使用 pg_dump 公用程式,將 Tasks 應用程式的資料從 Heroku Postgres 匯出至 Cloud Storage bucket,然後匯入 Cloud SQL。這項公用程式可在同質版本之間移轉資料,或在目的地資料庫版本比來源資料庫新時移轉資料。
在 Cloud Shell 中,取得附加至範例應用程式的 Heroku Postgres 資料庫憑證。您在下一個步驟中會需要這些憑證。
heroku pg:credentials:url
這個指令會傳回應用程式的連線資訊字串和連線網址。連線資訊字串的格式如下:
"dbname=DATABASE_NAME host=FQDN port=5432 user=USER_NAME password=PASSWORD_STRING sslmode=require"
在下一個步驟中,您需要使用連線字串中顯示的值。
如需連線資訊字串中 FQDN (完整網域名稱) 值的範例,請參閱 Heroku 說明文件。
設定環境變數,保留後續步驟中使用的 Heroku 值:
export HEROKU_PG_DBNAME=DATABASE_NAME
export HEROKU_PG_HOST=FQDN
export HEROKU_PG_USER=USER_NAME
export HEROKU_PG_PASSWORD=PASSWORD_STRING
更改下列內容:
DATABASE_NAME:資訊字串中顯示的資料庫名稱。FQDN:資訊字串中顯示的 FQDN。USER_NAME:資訊字串中顯示的使用者名稱。PASSWORD_STRING:資訊字串中顯示的密碼字串。
建立 Heroku Postgres 資料庫的 SQL 格式備份:
docker run \
  -it --rm \
  -e PGPASSWORD=$HEROKU_PG_PASSWORD \
  -v $(pwd):/tmp \
  --entrypoint "pg_dump" \
  postgres \
  -Fp \
  --no-acl \
  --no-owner \
  -h $HEROKU_PG_HOST \
  -U $HEROKU_PG_USER \
  $HEROKU_PG_DBNAME > herokudump.sql
建立環境變數,用於保存 Cloud Storage bucket 的名稱:
export PG_BACKUP_BUCKET=gs://PROJECT_ID-pg-backup-bucket
建立 Cloud Storage bucket:
gcloud storage buckets create $PG_BACKUP_BUCKET \
  --location=us-central1 \
  --public-access-prevention \
  --uniform-bucket-level-access
將 SQL 檔案上傳至這個 bucket:
gcloud storage cp herokudump.sql $PG_BACKUP_BUCKET/herokudump.sql
為 Cloud SQL 執行個體授予必要角色,以便從 Cloud Storage bucket 匯入 SQL 檔案:
gcloud projects add-iam-policy-binding PROJECT_ID \
  --member=serviceAccount:$(gcloud sql instances describe $CLOUDSQL_DB_NAME --format='get("serviceAccountEmailAddress")') \
  --role=roles/storage.objectAdmin

gcloud projects add-iam-policy-binding PROJECT_ID \
  --member=serviceAccount:$(gcloud sql instances describe $CLOUDSQL_DB_NAME --format='get("serviceAccountEmailAddress")') \
  --role=roles/cloudsql.editor
將 SQL 檔案匯入 Cloud SQL 執行個體:
gcloud sql import sql $CLOUDSQL_DB_NAME $PG_BACKUP_BUCKET/herokudump.sql \
  --database=postgres \
  --user=postgres
出現
do you want to continue (y/n)提示時,請輸入「y」。
Cloud Run 如何存取 Cloud SQL 資料庫
就像部署至 Heroku 的網頁應用程式需要連線至 Heroku Postgres 的代管執行個體一樣,Cloud Run 也需要存取 Cloud SQL,才能讀取及寫入資料。
Cloud Run 會使用 Cloud SQL Proxy 與 Cloud SQL 通訊,當您將容器部署至 Cloud Run 時,系統會自動啟用及設定該 Proxy。資料庫不需要核准外部 IP 位址,因為收到的所有通訊都來自使用安全 TCP 的 Proxy。
程式碼必須透過 UNIX 通訊端叫用 Proxy,才能叫用資料庫作業 (例如從資料庫擷取資料或寫入資料庫)。
由於這個網頁應用程式是以 Node.js 編寫,因此您可以使用 pg-connection-string 程式庫剖析資料庫網址,並建立 config 物件。這種做法的優點是,可讓 Heroku 和 Cloud Run 順暢連線至後端資料庫。
在下一個步驟中,您會在部署網頁應用程式時,將資料庫網址做為環境變數傳遞。
將範例應用程式部署至 Cloud Run
在 Cloud Shell 中設定無伺服器 VPC 存取權,允許私人流量從 Cloud Run 傳送至 Cloud SQL:
gcloud compute networks subnets create serverless-connector-subnet \
--network=default \
--range=10.0.0.0/28 \
--region=us-central1

gcloud compute networks vpc-access connectors create serverless-connector \
--region=us-central1 \
--subnet=serverless-connector-subnet
在 Cloud Shell 中建立環境變數,用於保存您建立的 Cloud SQL 執行個體連線名稱:
export DB_CONN_NAME=$(gcloud sql instances describe $CLOUDSQL_DB_NAME --format='value(connectionName)')
建立名為
DATABASE_URL的環境變數,用於保存連線字串,以便透過 UNIX 通訊埠連線至 Cloud SQL Proxy。export DATABASE_URL="socket:/cloudsql/${DB_CONN_NAME}?db=postgres&user=postgres&password=POSTGRES_PASSWORD"為 Cloud Run 建立服務帳戶,並授予 IAM 角色,以便連線至資料庫:
gcloud iam service-accounts create sa-run-db-client

gcloud projects add-iam-policy-binding PROJECT_ID \
    --member=serviceAccount:sa-run-db-client@PROJECT_ID.iam.gserviceaccount.com \
    --role=roles/cloudsql.client
將網頁應用程式部署至 Cloud Run:
gcloud run deploy tasksapp-PROJECT_ID \
    --image=$IMAGE_NAME \
    --service-account=sa-run-db-client@PROJECT_ID.iam.gserviceaccount.com \
    --set-env-vars=DATABASE_URL=$DATABASE_URL \
    --add-cloudsql-instances $DB_CONN_NAME \
    --vpc-connector serverless-connector \
    --allow-unauthenticated
上述指令也會將 Cloud Run 容器連結至您建立的 Cloud SQL 資料庫執行個體。這個指令會為 Cloud Run 設定環境變數,指向您在上一個步驟中建立的
DATABASE_URL字串。
測試應用程式
在 Cloud Shell 中,取得 Cloud Run 提供流量的網址:
gcloud run services list
您也可以在Google Cloud 控制台查看 Cloud Run 服務。
前往 Cloud Run 服務網址,確認網頁應用程式接受 HTTP 要求。
當 HTTP 要求傳送至服務端點,且容器尚未執行時,Cloud Run 會建立或啟動新的容器。這表示導致新容器啟動的要求可能需要較長的時間才能完成。考量到這段額外時間,請考量應用程式可支援的並行要求數量,以及可能有的任何特定記憶體需求。
這個應用程式會使用預設並行設定,允許 Cloud Run 服務從單一容器同時處理 80 個要求。
清除所用資源
如要避免系統向您的 Google Cloud 帳戶收取這個教學課程所用資源的費用,您可能也想刪除在 Heroku 中為本教學課程建立的資源。
刪除 Google Cloud 專案
- 前往 Google Cloud 控制台的「Manage resources」(管理資源) 頁面。
- 在專案清單中選取要刪除的專案,然後點選「Delete」(刪除)。
- 在對話方塊中輸入專案 ID,然後按一下 [Shut down] (關閉) 以刪除專案。
刪除 Heroku 應用程式
如要刪除部署至 Heroku 的範例應用程式和相關聯的 PostgreSQL 外掛程式,請執行下列指令:
heroku apps:destroy -a APP_NAME
後續步驟
- 瞭解如何將資料匯入 Cloud SQL。
- 探索 Cloud Run 說明文件。