
本文說明如何在 Google Kubernetes Engine (GKE) 上,使用 Run:ai Model Streamer 和 vLLM 推論伺服器,加速從 Cloud Storage 載入大型 AI 模型權重。
本文中的解決方案假設您已將 safetensors 格式的 AI 模型和權重載入 Cloud Storage bucket。
在 vLLM 部署作業中加入 --load-format=runai_streamer 旗標,即可使用 Run:ai Model Streamer,提升 GKE 上 AI 工作負載的模型下載效率。
本文件適用於下列使用者:
- 需要盡快將大型 AI 模型從物件儲存空間載入 GPU/TPU 節點的機器學習 (ML) 工程師。
- 平台管理員和營運人員,負責自動化及最佳化 GKE 上的模型服務基礎架構。
- 評估 AI/機器學習工作負載專用資料載入工具的雲端架構師。
如要進一步瞭解 Google Cloud 內容中提及的常見角色和範例工作,請參閱「常見的 GKE 使用者角色和工作」。
總覽
本文所述解決方案使用三個核心元件 (Run:ai Model Streamer、vLLM 和 safetensors 檔案格式),加快將模型權重從 Cloud Storage 載入 GPU 節點的程序。
執行 Run:ai Model Streamer
Run:ai Model Streamer 是開放原始碼 Python SDK,可加快將大型 AI 模型載入 GPU 的速度。這項功能會將模型權重直接從 Cloud Storage bucket 等儲存空間串流至 GPU 的記憶體。模型串流器特別適合存取 Cloud Storage 中的 safetensors 檔案。
safetensors
safetensors 是一種檔案格式,可儲存張量 (AI 模型中的核心資料結構),同時提升安全性和速度。safetensors 的設計是為了取代 Python 的 Pickle 格式,並透過零複製方法加快載入速度。採用這種方法後,張量就能直接從來源存取,不必先將整個檔案載入本機記憶體。
vLLM
vLLM 是開放原始碼程式庫,用於 LLM 推論和服務。這款高效能推論伺服器經過最佳化,可快速載入大型 AI 模型。在本文件中,vLLM 是在 GKE 上執行 AI 模型並處理傳入推論要求的核心引擎。如要使用 Run:ai Model Streamer 的內建 Cloud Storage 驗證支援功能,必須使用 vLLM 0.11.1 以上版本。
Run:ai Model Streamer 如何加快模型載入速度
啟動以 LLM 為基礎的 AI 應用程式進行推論時,模型通常需要一段時間才能準備就緒,這段延遲時間稱為「冷啟動」,這是因為系統必須從儲存位置 (例如 Cloud Storage bucket) 將整個數十億位元組的模型檔案下載到電腦的本機磁碟。接著,系統會將檔案載入 GPU 的記憶體。在載入期間,昂貴的 GPU 會處於閒置狀態,效率不彰且成本高昂。
模型串流器會直接將模型從 Cloud Storage 串流至 GPU 的記憶體,而不是先下載再載入。串流器會使用高效能後端,平行讀取模型的各個部分 (稱為「張量」)。並行讀取張量比循序載入檔案快得多。
架構總覽
Run:ai Model Streamer 會與 GKE 上的 vLLM 整合,直接將模型權重從 Cloud Storage 串流至 GPU 記憶體,略過本機磁碟,加快模型載入速度。
下圖顯示相關架構:
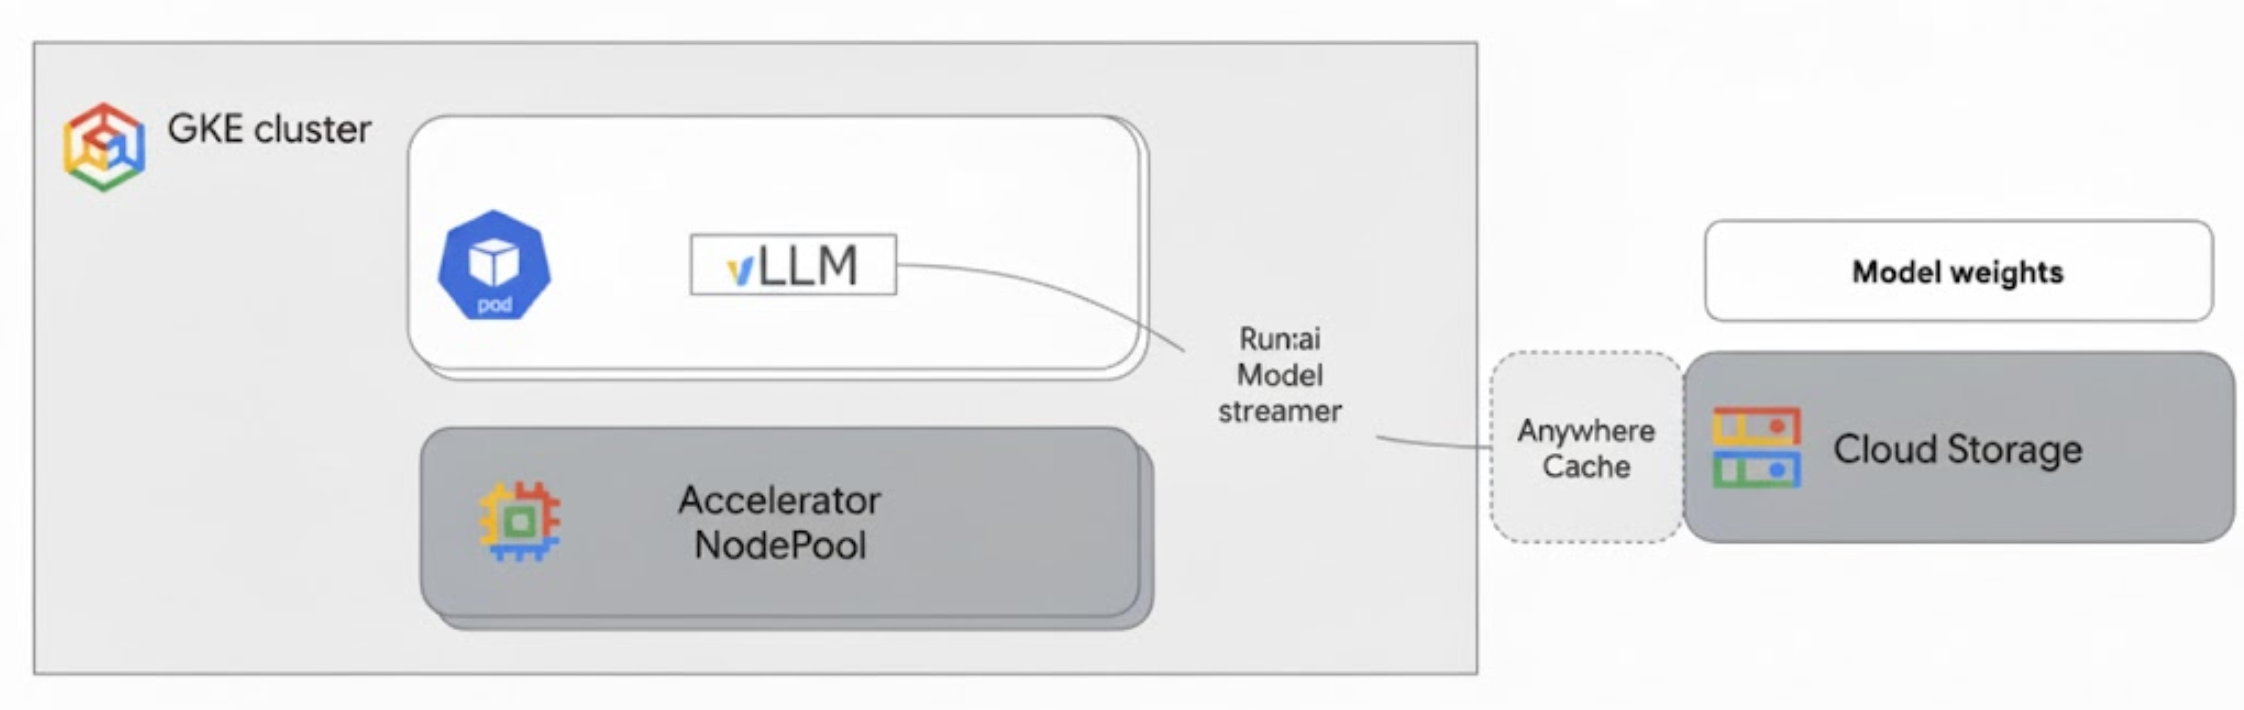
此架構包含下列元件和工作流程:
- Cloud Storage 值區:以
safetensors格式儲存 AI 模型權重。 - 搭載 GPU 的 GKE Pod:執行 vLLM 推論伺服器。
- vLLM 推論伺服器:使用
--load-format=runai_streamer旗標設定,可啟用模型串流功能。 - 執行:ai 模型串流器:vLLM 啟動時,模型串流器會從 Cloud Storage bucket 中指定的
gs://路徑讀取模型權重。這項功能會將張量資料直接串流至 GKE Pod 的 GPU 記憶體,供 vLLM 立即用於推論,不必下載檔案至磁碟。 - Cloud Storage Anywhere Cache (選用):啟用後,Anywhere Cache 會將 bucket 資料快取至與 GKE 節點相同的區域,進一步加快串流器存取資料的速度。
優點
- 縮短冷啟動時間:模型串流器可大幅縮短模型啟動時間。與傳統方法相比,載入模型權重的速度最多可快六倍。詳情請參閱「執行:ai Model Streamer 基準測試」。
- 提升 GPU 使用率:減少模型載入延遲時間,讓 GPU 將更多時間用於實際推論工作,進而提升整體效率和處理能力。
- 簡化工作流程:本文所述解決方案與 GKE 整合,可讓 vLLM 或 SGLang 等推論伺服器直接存取 Cloud Storage bucket 中的模型。
事前準備
請務必完成下列必要條件。
選取或建立專案,然後啟用 API
In the Google Cloud console, on the project selector page, select or create a Google Cloud project.
Roles required to select or create a project
- Select a project: Selecting a project doesn't require a specific IAM role—you can select any project that you've been granted a role on.
-
Create a project: To create a project, you need the Project Creator role
(
roles/resourcemanager.projectCreator), which contains theresourcemanager.projects.createpermission. Learn how to grant roles.
Verify that billing is enabled for your Google Cloud project.
Enable the Kubernetes Engine, Cloud Storage, Compute Engine, IAM APIs.
Roles required to enable APIs
To enable APIs, you need the Service Usage Admin IAM
role (roles/serviceusage.serviceUsageAdmin), which
contains the serviceusage.services.enable permission. Learn how to grant
roles.
設定 Cloud Shell
本文使用 Google Cloud CLI 和 kubectl 指令,建立及管理這項解決方案所需的資源。如要在 Cloud Shell 中執行這些指令,請按一下 Google Cloud 控制台頂端的「啟用 Cloud Shell」。
In the Google Cloud console, activate Cloud Shell.
或者,您也可以在本地殼層環境中安裝並初始化 gcloud CLI,然後執行指令。如要使用本機殼層終端機,請執行 gcloud auth login 指令,透過 Google Cloud進行驗證。
授予 IAM 角色
確認您的 Google Cloud 帳戶在專案中具有下列 IAM 角色,以便建立 GKE 叢集及管理 Cloud Storage:
roles/container.adminroles/storage.admin
如要授予這些角色,請執行下列指令:
gcloud projects add-iam-policy-binding PROJECT_ID \
    --member="user:$(gcloud config get-value account)" \
    --role="roles/container.admin"
gcloud projects add-iam-policy-binding PROJECT_ID \
    --member="user:$(gcloud config get-value account)" \
    --role="roles/storage.admin"
將 PROJECT_ID 替換為專案 ID。
準備環境
本節將逐步說明如何設定 GKE 叢集,以及設定存取 Cloud Storage 中模型的權限。
建立具有 GPU 的 GKE 叢集
Run:ai Model Streamer 可搭配 GKE Autopilot 和 Standard 叢集使用。選擇最符合需求的叢集模式。
設定專案和叢集名稱的變數:
export PROJECT_ID=PROJECT_ID
export CLUSTER_NAME=CLUSTER_NAME
更改下列內容:
PROJECT_ID:您的 Google Cloud 專案 ID。您可以執行gcloud config get-value project指令來找出專案 ID。CLUSTER_NAME:叢集名稱。例如:run-ai-test。
建立 Autopilot 或 Standard 叢集:
Autopilot
請按照下列步驟建立 GKE Autopilot 叢集:
設定叢集的區域:
export REGION=REGION將
REGION替換為您要在其中建立叢集的區域。為獲得最佳效能,請使用與 Cloud Storage bucket 相同的區域。建立叢集:
gcloud container clusters create-auto $CLUSTER_NAME \
    --project=$PROJECT_ID \
    --location=$REGION
Autopilot 叢集會根據工作負載需求自動佈建節點。在後續步驟中部署 vLLM 伺服器時,Autopilot 會視需要佈建 GPU 節點。詳情請參閱「關於節點集區自動建立功能」。
標準
請按照下列步驟建立 GKE Standard 叢集:
設定叢集的可用區:
export ZONE=ZONE將
ZONE替換為您要在其中建立叢集的區域。如要獲得最佳效能,請使用與 Cloud Storage bucket 相同的區域。建立叢集:
gcloud container clusters create $CLUSTER_NAME \ --project=$PROJECT_ID \ --zone=$ZONE \ --workload-pool=$PROJECT_ID.svc.id.goog \ --num-nodes=1建立節點集區,其中包含一部 G2 機器 (NVIDIA L4 GPU):
gcloud container node-pools create g2-gpu-pool \
    --cluster=$CLUSTER_NAME \
    --zone=$ZONE \
    --machine-type=g2-standard-16 \
    --num-nodes=1 \
    --accelerator=type=nvidia-l4
設定 Workload Identity Federation for GKE
設定 GKE 適用的工作負載身分聯盟,允許 GKE 工作負載安全地存取 Cloud Storage 值區中的模型。
為 Kubernetes 服務帳戶和命名空間設定變數:
export KSA_NAME=KSA_NAME
export NAMESPACE=NAMESPACE
更改下列內容:
NAMESPACE:您要工作負載執行的命名空間。請務必使用相同的命名空間,建立本文件中所有資源。KSA_NAME:Pod 可用來向 Google Cloud API 進行驗證的 Kubernetes 服務帳戶名稱。
建立 Kubernetes 命名空間:
kubectl create namespace $NAMESPACE建立 Kubernetes 服務帳戶 (KSA):
kubectl create serviceaccount $KSA_NAME \ --namespace=$NAMESPACE授予 KSA 必要權限:
設定環境變數:
export BUCKET_NAME=BUCKET_NAME
export PROJECT_ID=PROJECT_ID
export PROJECT_NUMBER=$(gcloud projects describe $PROJECT_ID \
    --format 'get(projectNumber)')
更改下列內容:
BUCKET_NAME:包含safetensors檔案的 Cloud Storage bucket 名稱。PROJECT_ID:您的 Google Cloud 專案 ID。
在後續步驟中,系統會使用
PROJECT_NUMBER、PROJECT_ID、NAMESPACE和KSA_NAME,為專案建構 Workload Identity Federation for GKE 主體 ID。將
roles/storage.bucketViewer角色授予 KSA,即可查看 Cloud Storage bucket 中的物件:gcloud storage buckets add-iam-policy-binding gs://$BUCKET_NAME \ --member="principal://iam.googleapis.com/projects/$PROJECT_NUMBER/locations/global/workloadIdentityPools/$PROJECT_ID.svc.id.goog/subject/ns/$NAMESPACE/sa/$KSA_NAME" \ --role="roles/storage.bucketViewer"將
roles/storage.objectUser角色授予 KSA,以便讀取、寫入及刪除 Cloud Storage bucket 中的物件:gcloud storage buckets add-iam-policy-binding gs://$BUCKET_NAME \ --member="principal://iam.googleapis.com/projects/$PROJECT_NUMBER/locations/global/workloadIdentityPools/$PROJECT_ID.svc.id.goog/subject/ns/$NAMESPACE/sa/$KSA_NAME" \ --role="roles/storage.objectUser"
您已設定含 GPU 的 GKE 叢集,並為 GKE 設定 Workload Identity 聯盟,授予 Kubernetes 服務帳戶存取 Cloud Storage 中 AI 模型的必要權限。設定好叢集和權限後,即可部署 vLLM 推論伺服器,該伺服器會使用這個服務帳戶,透過 Run:ai Model Streamer 串流傳輸模型權重。
使用 Run:ai Model Streamer 部署 vLLM
部署執行 vLLM OpenAI 相容伺服器的 Pod,並使用 --load-format=runai_streamer 旗標設定,以使用 Run:ai Model Streamer。vLLM 版本必須為 0.11.1 以上。
下列範例資訊清單顯示 vLLM 設定,其中已啟用模型串流器,適用於使用單一 NVIDIA L4 GPU 的小型模型 (例如 gemma-2-9b-it)。
- 如果您使用的大型模型需要多個 GPU,請將
--tensor-parallel-size值增加至所需的 GPU 數量。 --model-loader-extra-config={"distributed":true}標記可啟用模型權重的分散式載入功能,建議您使用這項設定,提升從物件儲存空間載入模型的效能。
將下列資訊清單儲存為
vllm-deployment.yaml。資訊清單的設計宗旨是為 Autopilot 和 Standard 叢集提供彈性。apiVersion: apps/v1 kind: Deployment metadata: name: vllm-streamer-deployment namespace: NAMESPACE spec: replicas: 1 selector: matchLabels: app: vllm-streamer template: metadata: labels: app: vllm-streamer spec: serviceAccountName: KSA_NAME containers: - name: vllm-container image: vllm/vllm-openai:v0.11.1 command: - python3 - -m - vllm.entrypoints.openai.api_server args: - --model=gs://BUCKET_NAME/PATH_TO_MODEL - --load-format=runai_streamer - --model-loader-extra-config={"distributed":true} - --host=0.0.0.0 - --port=8000 - --disable-log-requests - --tensor-parallel-size=1 ports: - containerPort: 8000 name: api # startupProbe allows for longer startup times for large models startupProbe: httpGet: path: /health port: 8000 failureThreshold: 60 # 60 * 10s = 10 minutes timeout periodSeconds: 10 initialDelaySeconds: 30 readinessProbe: httpGet: path: /health port: 8000 failureThreshold: 3 periodSeconds: 10 resources: limits: nvidia.com/gpu: "1" requests: nvidia.com/gpu: "1" volumeMounts: - mountPath: /dev/shm name: dshm nodeSelector: cloud.google.com/gke-accelerator: nvidia-l4 volumes: - emptyDir: medium: Memory name: dshm更改下列內容:
NAMESPACE:您的 Kubernetes 命名空間。KSA_NAME:Kubernetes 服務帳戶名稱。BUCKET_NAME:Cloud Storage bucket 名稱。PATH_TO_MODEL:bucket 中模型目錄的路徑,例如models/my-llama。
套用資訊清單來建立 Deployment:
kubectl create -f vllm-deployment.yaml
您可以使用 GKE Inference Quickstart 工具產生更多 vLLM 資訊清單。
驗證部署作業
檢查部署作業的狀態:
kubectl get deployments -n NAMESPACE取得 Pod 名稱:
kubectl get pods -n NAMESPACE | grep vllm-streamer請注意開頭為
vllm-streamer-deployment的 Pod 名稱。如要檢查模型串流器是否下載模型和權重,請查看 Pod 記錄:
kubectl logs -f POD_NAME -n NAMESPACE將
POD_NAME替換為上一步的 Pod 名稱。成功串流的記錄類似如下:[RunAI Streamer] Overall time to stream 15.0 GiB of all files: 13.4s, 1.1 GiB/s
選用:透過 Anywhere Cache 提升效能
Cloud Storage Anywhere Cache 可將資料快取至離 GKE 節點較近的位置,進一步加快模型載入速度。在同一個區域中擴充多個節點時,快取特別有幫助。
您可以在特定 Google Cloud 區域中,為特定 Cloud Storage 值區啟用 Anywhere Cache。為提升效能,快取區必須與 GKE 推論 Pod 執行的區域相符。具體做法取決於 Pod 是否在可預測的區域中執行。
如果是 GKE Standard 可用區叢集,且您知道 Pod 會在哪個可用區中執行,請為該特定可用區啟用 Anywhere Cache。
對於可跨多個區域排定 Pod 的區域 GKE 叢集 (Autopilot 和 Standard 叢集),您有下列選項:
- 在所有區域中啟用快取:在叢集所在區域的每個區域中啟用 Anywhere Cache。這樣一來,無論 GKE 在何處排定 Pod,都能確保快取可用。請注意,啟用快取功能的每個區域都會產生費用。詳情請參閱「Anywhere Cache 定價」。
- 將 Pod 放置在特定可用區:在工作負載資訊清單中使用
nodeSelector或nodeAffinity規則,將 Pod 限制在單一可用區。然後只在該可用區啟用 Anywhere Cache。如果工作負載可容許僅限於單一可用區,這種做法的成本效益較高。
如要為 GKE 叢集所在的區域啟用 Anywhere Cache,請執行下列指令:
# Enable the cache
gcloud storage buckets anywhere-caches create gs://$BUCKET_NAME $ZONE

# Check the status of the cache
gcloud storage buckets anywhere-caches describe $BUCKET_NAME/$ZONE
清除所用資源
如要避免系統向您的 Google Cloud 帳戶收取本文件所用資源的費用,請刪除含有相關資源的專案,或者保留專案但刪除個別資源。
如要刪除個別資源,請按照下列步驟操作:
刪除 GKE 叢集。這項操作會移除所有節點和工作負載。
gcloud container clusters delete CLUSTER_NAME --location=ZONE_OR_REGION更改下列內容:
CLUSTER_NAME:叢集名稱。ZONE_OR_REGION:叢集的可用區或區域。
如果已啟用 Anywhere Cache,請停用這項功能,以免持續產生費用。詳情請參閱「停用快取」。
後續步驟
- 瞭解如何將 Hugging Face 模型載入 Cloud Storage (實驗功能)
- 瞭解如何透過 GPU 在 GKE 上提供 LLM。
- 進一步瞭解 GKE 支援的 GPU。
- 閱讀 GKE 儲存空間總覽。
- 瞭解如何設定 Workload Identity Federation。