

This page describes how to set up and configure a third-party configuration before creating the ServiceNow data store.
Prerequisites
To complete this setup, you need a [ServiceNow site for _Personal Developer Instance (PDI)]. This instance provides a dedicated environment to configure OAuth and permissions.
- Instance URL: You must have a specific URL for your environment. For example,
https://your-instance.service-now.com - Credentials: You must have administrator access to the instance.
Create ServiceNow account
If you don't already have an account or a PDI, follow these steps to set them up:
To create a ServiceNow account in Developer Site:
- Go to the ServiceNow developer portal and click Sign in.
- Select New user? Get a ServiceNow ID.
- Enter your information, and click Sign Up. Use your email and verify your account using the confirmation link sent to your email inbox.
To create a Personal Developer Instance (PDI):
- Sign in to the ServiceNow developer portal account using your account credentials.
- After signing in, follow the portal prompts to Request an instance. After provisioning, a confirmation dialog states: "Your instance is ready!".
- Save your credentials: When the instance is ready, the portal provides your Instance URL, Admin username, and Admin password. Save these for the next configuration steps.
- To access your new environment, click the Start Building button on the Developer Site header. This opens your instance in a new tab.

Configuration setup
To connect Gemini Enterprise to ServiceNow, you must configure an OAuth 2.0 application in your ServiceNow instance. The configuration steps depend on whether you are using an Ingestion connector or a Federated connector. For more information about the differences, see Connector types.
To view the configuration steps for your connector, select it from the following menu:
Set up OAuth for federated connector
To perform federated search and Actions, you only need to set up the OAuth Authorization Code grant flow. This provides the client secret required for real-time discovery and task performance. The required steps depend on your ServiceNow interface.
New experience UI
In ServiceNow versions (Vancouver, Washington DC, and later), you use the New inbound integration experience.
- Navigate to All > System OAuth > Application registry.
- Click New > New inbound integration experience > New integration.
- Enter the mandatory fields:
- Integration name: Enter a unique name for the OAuth credential, like Gemini Enterprise OAuth Actions.
- Active: Select the checkbox.
- Grant type: Select OAuth authorization code.
- Redirect URL: Enter
https://vertexaisearch.cloud.google.com/console/oauth/default_oauth.html,https://vertexaisearch.cloud.google.com/oauth-redirect - Scope and API access policy: Ensure the Allow access only to APIs in selected scope checkbox is unchecked. Also, don't select any Auth scope. Leaving this blank ensures that the integration is Broadly scoped.
- Click Submit to create the credential.
- After submission, click the record name to view the Client ID and unmask the Client secret. Save these for later use.
Legacy UI
For older ServiceNow instances or users preferring the legacy interface, do the following to obtain credentials:
- Sign in to the PDI ServiceNow instance using the administrator credentials.
- Navigate to All > System OAuth > Application registry.
- Click New and then select [Deprecated UI] Create an OAuth API endpoint for external clients.
- Enter the following mandatory fields:
- Name: Enter a unique name.
- Active: Select the checkbox.
- Redirect URL: Enter
https://vertexaisearch.cloud.google.com/console/oauth/default_oauth.html,https://vertexaisearch.cloud.google.com/oauth-redirect. - Access control: Find the Scope restriction toggle and change the Securely scoped default setting to Broadly scoped.
- Click Submit to create the credential.
- Click the record name to view the Client ID and unmask the Client secret. Save these for later use.
Table API access requirements
For the LLM to successfully fetch results, end users must have the system role (typically snc_internal or a custom REST role) that allows them to access the Table API endpoints.
| Endpoint | ServiceNow Table | Data Retrieved |
|---|---|---|
/api/now/table/incident |
Incident | Tickets, status updates, and resolution details. |
/api/now/table/sc_catalog |
Catalog | Definitions and structures of available Service Catalogs. |
/api/now/table/sc_cat_item |
Catalog Item | Individual goods or services available for request. |
/api/now/table/sys_attachment |
Attachment | Metadata for files attached to records (filenames, sizes). |
/api/now/table/kb_knowledge |
Knowledge | Published articles, procedures, and troubleshooting guides. |
Security and data privacy: End-user authentication
The ServiceNow connector uses end-user credentials to perform queries using the Table API. Using end-user credentials ensures that the search experience maintains a strict 1:1 security parity with the ServiceNow UI.
Security model
When a query is posted to the ServiceNow Table API, the connector executes it within the security context of the authenticated user:
- Identity parity: Because the connector uses the user's credentials, the system treats the API request the same as a query in the ServiceNow global search bar.
- Inherited ACLs: ServiceNow evaluates all Access Control Lists (ACLs) at the database level. If a user doesn't have read permission for a record, the Table API returns an empty result or a 403 error for that record.
- User criteria enforcement: For Knowledge (
kb_knowledge) and Catalog items (sc_cat_item), ServiceNow applies user criteria. The API automatically filters out items where the user doesn't meet the "Available For" requirements.
Set up OAuth for ingestion connector
To synchronize and index your records using the ingestion connector, you must create OAuth credentials and configure roles. The required steps for authentication depend on your ServiceNow interface.
Obtain authentication credentials
New experience UI
In ServiceNow versions (Vancouver, Washington DC, and later), you use the New inbound integration experience. For an Ingestion connector using the new UI, you must create two sets of credentials:
- Ingestion credentials: Uses the OAuth Resource Owner Password Credentials grant type.
- Actions credentials: Uses the OAuth Authorization Code grant type.
1. Create ingestion credentials
- Sign in to the PDI ServiceNow instance using your administrator credentials.
- Navigate to All > System OAuth > Application registry.
- Click New.
- Click New inbound integration experience > New integration > OAuth resource owner password credential grant type.
- Enter the mandatory fields:
- Name: Enter a unique name.
- Provider name: Enter a provider name.
- Active: Select the checkbox.
- Scope & API security: Ensure that the Allow access only to APIs in the selected scope checkbox is unchecked.
- Click Submit.
- Click the record name to view the Client ID and unmask the Client secret. Save these for later use.
2. Create Actions credentials
- Navigate to All > System OAuth > Application registry and click New.
- Click New inbound integration experience > New integration.
- Enter the mandatory fields:
- Integration name: Enter a unique name for the OAuth credential, like Gemini Enterprise OAuth Actions.
- Active: Select the checkbox.
- Grant type: Select OAuth authorization code.
- Redirect URL: Enter
https://vertexaisearch.cloud.google.com/oauth-redirect. - Scope and API access policy: Ensure the checkbox is unchecked and don't select any Auth scope.
- Click Submit to create the credential.
- Click the record name to view the Client ID and unmask the Client secret. Save these for later use.
Legacy UI
For older ServiceNow instances or users preferring the legacy interface, do the following to obtain credentials for both Ingestion and Actions:
- Sign in to the PDI ServiceNow instance using the administrator credentials.
- Navigate to All > System OAuth > Application registry.
- Click New and then select \[Deprecated UI\] Create an OAuth API endpoint for external clients.
- Enter the following mandatory fields:
- Name: Enter a unique name.
- Active: Select the checkbox.
- Redirect URL: Enter the following redirect URLs, separated by a comma:
https://vertexaisearch.cloud.google.com/console/oauth/default_oauth.htmlhttps://vertexaisearch.cloud.google.com/oauth-redirect
- Access control: Find the Scope restriction toggle and change the Securely scoped default setting to Broadly scoped.
- Click Submit to create the credential.
- Click the record name to view the Client ID and unmask the Client secret. Save these for later use.
Set up user account and assign Admin permissions
You may use the default System Administrator account or create a new user and assign the administrator role to your user ID.
Assign the administrator role
To elevate your own role to security_admin:
- Sign in to your ServiceNow instance as a user with the Admin role.
- Click your profile icon and select Elevate role.
- Select security_admin and click Update.
To grant the security_admin to another user:
- Select All, and then select Users under User Administration.
- Locate and select the user for whom you need to elevate the role.
- From Roles tab, click Edit.
- Select security_admin from Collection and add it to the Roles List.
Note: The user with the security_admin role must then click their profile icon and select Elevate Role to use it.
Set up user roles and permissions
To create a ServiceNow data store in Gemini Enterprise, you need to grant the appropriate roles and permissions to users.
Choose one of the following options to set user roles and permissions for your ServiceNow instance:
- Create a custom role with ACL rules (Recommended)
- Use a custom role with entity administrators
- Use an administrator role
For more information about visibility and access control, see Incident visibility and access control.
Create a custom role with ACL rules (Recommended)
Create a custom role with the minimum set of permissions. This procedure provides the most secure and restrictive access to the incident entity. Users are only able to find incidents with which they are directly associated.
- Go to All > User administration > Roles.
- Click New, enter a name, and click Submit.
- Go to System security > Access control (ACL).
- Click New to create a new ACL rule.
- Repeat the following steps until you grant access to all required tables:
- Use
sys_user_roleas an example to see how table access is granted. - Click Submit and select the role.
- Use
Required table access
The connector needs access to these tables for each entity to run.| Table name | Description |
|---|---|
incident |
Show incidents in search results. |
sc_cat_item |
Show catalog items in search results. |
sc_cat_item_user_criteria_mtom |
Show users who can access catalog items based on user criteria. |
sc_cat_item_user_criteria_no_mtom |
Show users who can't access catalog items based on user criteria. |
sc_cat_item_user_mtom |
Show which users can access catalog items. |
sc_cat_item_user_no_mtom |
Show users who can't access catalog items. |
kb_knowledge |
The list of knowledge articles that can be shown in search results. |
kb_knowledge_base |
The list of knowledge bases that can be shown in search results. |
kb_uc_can_contribute_mtom |
Show who can contribute to knowledge bases based on user criteria. |
kb_uc_can_read_mtom |
Show who can read knowledge bases based on user criteria. |
kb_uc_cannot_read_mtom |
Show who can't read knowledge bases based on user criteria. |
sys_user_role |
List of roles that can be assigned to users. |
sys_user_has_role |
List of roles mapped to the users. |
sys_user_group |
List of user group segments. |
sys_user_grmember |
List of group members for groups. |
sys_user |
List of all users. |
core_company |
List of all company attributes. |
cmn_location |
List of all location attributes. |
cmn_department |
List of all department attributes. |
user_criteria |
List of user criteria records. |
sp_portal |
Link portal URI in search results. |
m2m_sp_portal_knowledge_base |
Link portal URI for knowledge articles in search results. |
m2m_sp_portal_catalog |
Link portal URI for catalog items in search results. |
Grant and verify ACL access
The connector requires ACL access to the catalog item fields of the sc_cat_item table.
To grant and verify access, do the following:
-
Grant explicit access by creating a new ACL rule and manually entering
sc_cat_item.*in the Name field of the form.
Enter sc_cat_item.* - Verify that the ACLs are updated.
- Go to
sys_security_acl_role_list.doin the search bar. - Set Role to the role that you want to verify.
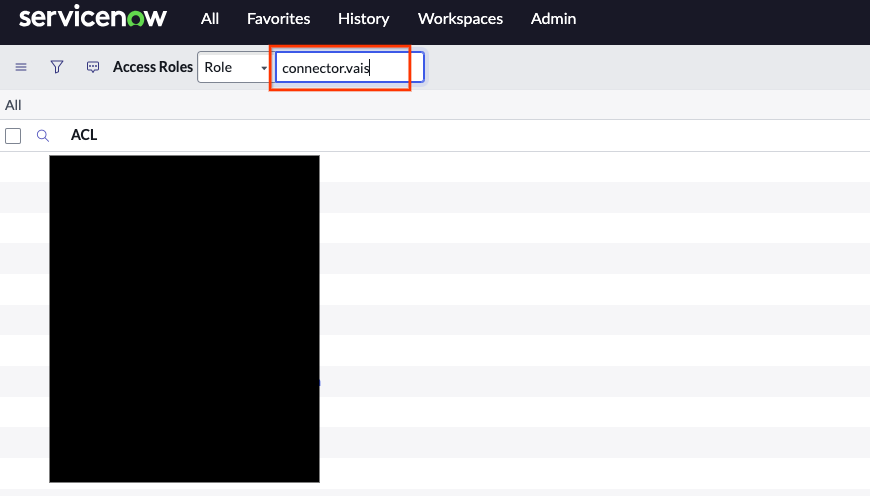
Select role to verify - Verify that the required ACLs are assigned to the role.
Use a custom role with entity administrators
Using the administrator role may not suit teams or organizations that want to avoid assigning overly powerful permissions. This option provides a role with three specific permissions that grant the required access.
- Go to All > System security > Users and groups > Roles.
- Select New and enter a name.
- Click Submit.
- Find the created role in the list.
- Navigate to Contains roles > Edit.
-
Add the following roles to the newly created role, and then click Save:
catalog_adminknowledge_adminincident_manager
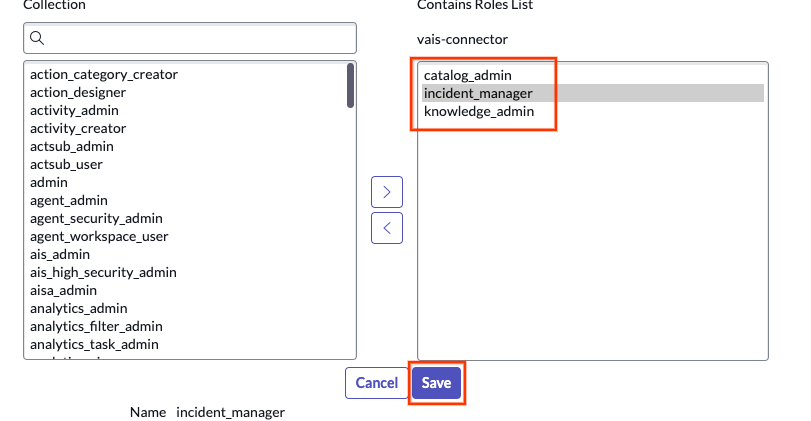
Add roles and click the Save button -
Confirm the updated roles.
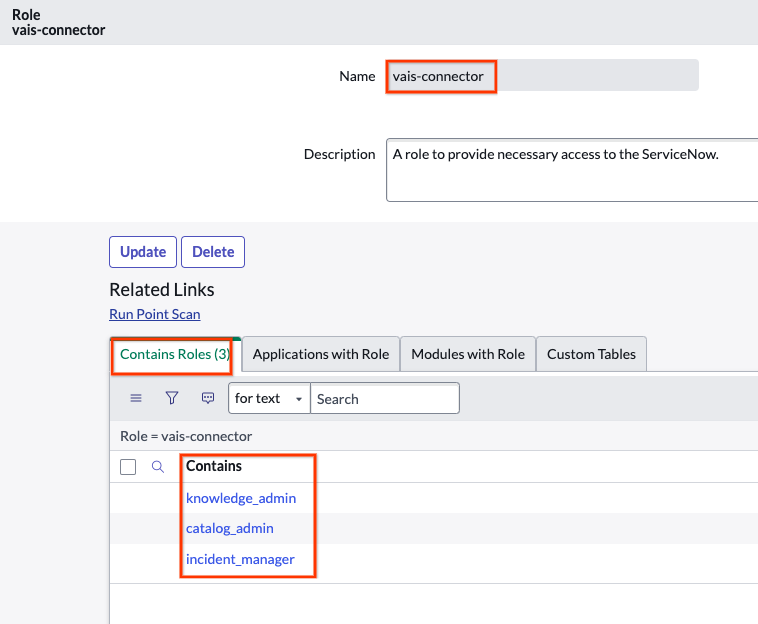
Confirm roles
Use an administrator role
You can use an administrator role to pull data. Use the default administrator role configured with the instance, or create a new user with an administrator role by doing the following:
- Go to All > User administration > Users.
- Create a new user.
-
Enable Web service access only. When you select Web service access only, you create a non-interactive user.
- Interactive users can log in to the ServiceNow UI and service portal using standard credentials or SSO, with full access to UI pages and API endpoints.
- Non-interactive users have restricted UI access and are limited to authorizing programmatic API connections for service-to-service integration.
- After user creation, select the user from the users list.
- Click Roles > Edit.
- Add Admin.
- Click Save to add a list of roles to the user.
- Click Set password, auto-generate it, and save it.
Grant role to a user
- Go to All > User administration > Users.
- Find or create a new user. If no user is available, go to System security > Users and groups > Users.
- Click New.
- Create a new service account in the user table. Make sure to click Web service access only.
- Scroll to Roles and click Edit.
- Grant the role you created and assign it to the user. Based on the type of role you created in the previous step, select the appropriate one and assign it to the user. Click Save.
- View the custom role with ACL.
- Obtain the username and password for the user and click Set password.
- Auto-generate a password and keep it for later use.
Incident visibility and access control
To enhance security and prevent unintentional data exposure, the ServiceNow connector uses restrictive access control for the incident entity. This ensures that end users can only view incidents with which they are directly associated.
As part of this restrictive approach, the connector doesn't honor broad, role-based permissions for incident visibility. Standard ServiceNow roles such as itil and sn_incident_read, which might grant a user visibility over all incidents in the ServiceNow UI, don't grant the same level of access in Gemini Enterprise.
Users with any of the following roles have global incident visibility and can view all incidents:
adminincident_managerchange_manager
All other users can only view an incident if they have opened, reopened, resolved, or closed the incident. They can also view an incident if they are:
- In the assignment group for the incident.
- A caller associated with the incident.
- An assignee.
- In a watch list.
- In a work notes list.
- In an additional assignee list.
This behavior prevents a user of Gemini Enterprise from finding an incident to which they don't have access. Because of the additional restrictions compared to the broader ServiceNow permissions, this behavior may occasionally prevent a user from finding an incident in Gemini Enterprise to which they have access in ServiceNow.