


CodeMender는 지속적 통합 및 지속적 배포 (CI/CD) 파이프라인에서 각 pull 요청을 스캔할 수 있습니다. CodeMender가 풀 요청에서 변경하는 코드에서 CRITICAL 또는 HIGH 심각도의 취약점을 발견하면 검사가 실패합니다. 풀 요청에서 변경하지 않은 코드의 결과는 보고서에 표시되지만 검사에는 실패하지 않습니다.
이 문서에서는 다음을 수행하는 방법을 보여줍니다.
- GitHub Actions로 pull 요청을 스캔하고 CodeMender가 수정사항이 포함된 pull 요청을 열도록 합니다.
- Cloud Build로 풀 요청을 스캔합니다.
- Git 커밋 전 후크를 사용하여 커밋하기 전에 변경사항을 검사합니다.
풀 요청 스캔 작동 방식
풀 요청을 스캔하려면 --diff 플래그와 풀 요청의 기본 브랜치를 사용하여 cm find를 실행합니다.
cm find . --diff=origin/main
이 명령어에 대한 응답으로 CodeMender는 다음을 실행합니다.
- 풀 요청 브랜치를 기본 브랜치와 비교하고 수정된 소스 파일과 호출자, 가져오기 도구 등 직접 종속된 파일을 검사합니다.
- 풀 요청에서 도입하거나 노출하는 새 취약점을
[LEGACY /
UNTOUCHED]
라벨이 지정된 기존 발견 항목과 구분합니다. CI 검사는 풀 요청으로 인해 발생한 취약성에 대해서만 차단됩니다. - 풀 요청으로 인해 발생한 발견 사항이
--fail-on의 심각도와 일치하면 상태 1로 종료됩니다. 기본값은CRITICAL,HIGH입니다.
--diff가 다른 스캔 모드와 어떻게 비교되는지 자세히 알아보려면 CodeMender 찾기 모드를 참고하세요.
시작하기 전에
CodeMender는 공개 미리보기로 일부 고객에게 제공됩니다. 액세스 권한을 얻으려면 영업팀에 문의하세요.
- Google Cloud 계정에 로그인합니다. Google Cloud를 처음 사용하는 경우 계정을 만들고 Google 제품의 실제 성능을 평가해 보세요. 신규 고객에게는 워크로드를 실행, 테스트, 배포하는 데 사용할 수 있는 $300의 무료 크레딧이 제공됩니다.
-
In the Google Cloud console, on the project selector page, select or create a Google Cloud project.
Roles required to select or create a project
- Select a project: Selecting a project doesn't require a specific IAM role—you can select any project that you've been granted a role on.
-
Create a project: To create a project, you need the Project Creator role
(
roles/resourcemanager.projectCreator), which contains theresourcemanager.projects.createpermission. Learn how to grant roles.
-
If you're using an existing project for this guide, verify that you have the permissions required to complete this guide. If you created a new project, then you already have the required permissions.
-
Verify that billing is enabled for your Google Cloud project.
Enable the Agent Platform API and Cloud Resource Manager API APIs, if any are not already enabled.
Roles required to enable APIs
To enable APIs, you need the
serviceusage.services.enablepermission. If you created the project, then you likely already have this permission through the Owner role (roles/owner). Otherwise, you can get this permission through the Service Usage Admin role (roles/serviceusage.serviceUsageAdmin). Learn how to grant roles.-
Install the Google Cloud CLI.
-
If you're using an external identity provider (IdP), you must first sign in to the gcloud CLI with your federated identity.
-
To initialize the gcloud CLI, run the following command:
gcloud init -
In the Google Cloud console, on the project selector page, select or create a Google Cloud project.
Roles required to select or create a project
- Select a project: Selecting a project doesn't require a specific IAM role—you can select any project that you've been granted a role on.
-
Create a project: To create a project, you need the Project Creator role
(
roles/resourcemanager.projectCreator), which contains theresourcemanager.projects.createpermission. Learn how to grant roles.
-
If you're using an existing project for this guide, verify that you have the permissions required to complete this guide. If you created a new project, then you already have the required permissions.
-
Verify that billing is enabled for your Google Cloud project.
Enable the Agent Platform API and Cloud Resource Manager API APIs, if any are not already enabled.
Roles required to enable APIs
To enable APIs, you need the
serviceusage.services.enablepermission. If you created the project, then you likely already have this permission through the Owner role (roles/owner). Otherwise, you can get this permission through the Service Usage Admin role (roles/serviceusage.serviceUsageAdmin). Learn how to grant roles.-
Install the Google Cloud CLI.
-
If you're using an external identity provider (IdP), you must first sign in to the gcloud CLI with your federated identity.
-
To initialize the gcloud CLI, run the following command:
gcloud init
CodeMender CLI 출시가 pull 요청 스캔을 지원하는지 확인합니다. 이 문서의 파이프라인은 실행될 때마다 최신 안정화 버전을 다운로드합니다. 로컬 설치를 확인하려면 cm find --help를 실행하고 --diff 플래그를 찾습니다. CLI를 업데이트하려면 cm update를 실행합니다. 자세한 내용은 CLI 설치 및 구성을 참고하세요.
필요한 역할
CodeMender의 CI/CD 통합을 설정하는 데 필요한 권한을 얻으려면 관리자에게 프로젝트에 대해 다음 IAM 역할을 부여해 달라고 요청하세요.
- 서비스 계정 관리자 (
roles/iam.serviceAccountAdmin) - 프로젝트 IAM 관리자 (
roles/resourcemanager.projectIamAdmin) -
GitHub Actions용 워크로드 아이덴티티 제휴 설정: 워크로드 아이덴티티 풀 관리자 (
roles/iam.workloadIdentityPoolAdmin) -
Cloud Build 트리거를 만듭니다.
- Cloud Build 편집자(
roles/cloudbuild.builds.editor) - 서비스 계정 사용자(
roles/iam.serviceAccountUser)
- Cloud Build 편집자(
-
Git 커밋 전 후크를 로컬에서 실행합니다.
Agent Platform 사용자 (
roles/aiplatform.user)
역할 부여에 대한 자세한 내용은 프로젝트, 폴더, 조직에 대한 액세스 관리를 참조하세요.
커스텀 역할이나 다른 사전 정의된 역할을 통해 필요한 권한을 얻을 수도 있습니다.
CI/CD 서비스 계정에 CI/CD 파이프라인에서 CodeMender를 실행하는 데 필요한 권한이 있는지 확인하려면 관리자에게 CI/CD 서비스 계정에 다음 IAM 역할을 부여해 달라고 요청하세요.
- 프로젝트의 Agent Platform 사용자 (
roles/aiplatform.user) -
Cloud Build 빌드 로그 작성: 프로젝트에 대한 로그 작성자 (
roles/logging.logWriter) -
Cloud Storage 버킷에 SARIF 보고서 저장: 버킷에 대한 스토리지 객체 사용자 (
roles/storage.objectUser)
역할 부여에 대한 자세한 내용은 프로젝트, 폴더, 조직에 대한 액세스 관리를 참조하세요.
관리자는 커스텀 역할이나 다른 사전 정의된 역할을 통해 CI/CD 서비스 계정에 필요한 권한을 부여할 수도 있습니다.
보안 고려사항
GitHub Actions 워크플로, Cloud Build 트리거 또는 Git 사전 커밋 후크에서 CodeMender를 실행하면 확인을 요청하지 않고 CodeMender가 실행됩니다. 이러한 통합을 설정하기 전에 다음 사항을 고려하세요.
- 확인 메시지:
--yes플래그는 에이전트의 명령어와 파일 쓰기를 확인하라는 메시지를 사용 중지합니다.--bypass-warning플래그는 에이전트가 시스템에서 파일을 수정하고 명령어를 실행할 수 있다는 경고를 건너뜁니다. 이러한 플래그를 사용하기 전에 이 문서의 시작 부분에 있는 미리보기 약관(인간 확인 사용 중지 관련 약관 포함)을 읽어보세요. - 샌드박스: 파이프라인은
--sandbox=false를 사용하여 CodeMender 샌드박스를 사용 중지합니다. 에이전트가 발견 사항을 수정할 때 실행하는 명령어(예: 빌드 및 테스트)는Google Cloud 사용자 인증 정보 및 네트워크 액세스를 비롯하여 작업과 동일한 액세스 권한을 갖습니다. Linux 샌드박스는 권한이 없는 컨테이너와 같은 일부 CI 환경에서 지원하지 않는 사용자 네임스페이스를 사용합니다. 격리된 일회용 환경에서만 샌드박스를 사용 중지하세요. CI 환경에서 샌드박스를 지원하는 경우--sandbox=false를 삭제합니다. - 러너: 새 가상 머신에서 각 작업을 실행하는
ubuntu-24.04와 같은 GitHub 호스팅 러너에서 GitHub Actions 워크플로를 실행합니다. 작업 간에 재사용되는 자체 호스팅 러너를 사용하지 마세요. - 신뢰할 수 없는 코드: pull 요청의 코드에는 에이전트를 조종하려는 텍스트가 포함될 수 있습니다. GitHub Actions 워크플로는 동일한 저장소의 브랜치에서 온 pull 요청만 검사하며, 쓰기 액세스 권한이 있는 사용자만 브랜치를 만들 수 있습니다. Cloud Build의 경우 소유자 또는 공동작업자가 다른 기여자의 풀 요청에 대한 빌드를 승인해야 하도록 댓글 제어를 사용합니다.
- 액세스: 각 서비스 계정에 파이프라인에 필요한 Identity and Access Management (IAM) 역할만 부여합니다.
GitHub Actions로 pull 요청 스캔
이 섹션의 워크플로는 GitHub.com의 저장소에서 각 pull 요청을 스캔합니다. CodeMender가 pull 요청의 변경사항에서 CRITICAL 또는 HIGH 심각도의 취약점을 발견하면 워크플로는 다음 작업을 실행합니다.
- CodeMender 스캔 확인에 실패합니다.
- 각 발견 항목에 대해
cm fix를 실행하고 수정사항이 포함된 pull 요청을 pull 요청의 브랜치에 엽니다.
또한 워크플로는 GitHub 코드 스캔에 결과를 업로드합니다.
워크로드 아이덴티티 제휴 설정
워크플로는 워크로드 아이덴티티 제휴를 사용하여 Google Cloud 에 인증하므로 GitHub에 서비스 계정 키를 저장하지 않습니다. Google Cloud CLI로 다음 명령어를 실행합니다.
프로젝트 및 저장소의 셸 변수를 설정합니다.
PROJECT_ID="PROJECT_ID"
GITHUB_ORG="GITHUB_ORG"
REPO="GITHUB_ORG/REPOSITORY"
다음을 바꿉니다.
PROJECT_ID: Google Cloud 프로젝트 ID입니다.GITHUB_ORG: GitHub 조직 이름 또는 개인 계정의 저장소에 대한 GitHub 사용자 이름입니다.REPOSITORY: GitHub 저장소의 이름입니다.
워크로드 아이덴티티 제휴에서 사용하는 API를 사용 설정합니다.
gcloud services enable iam.googleapis.com \
    cloudresourcemanager.googleapis.com iamcredentials.googleapis.com \
    sts.googleapis.com --project="${PROJECT_ID}"
워크플로의 서비스 계정을 만들고 에이전트 플랫폼 사용자 IAM 역할 (
roles/aiplatform.user)을 부여합니다.gcloud iam service-accounts create codemender-ci \ --project="${PROJECT_ID}" \ --display-name="CodeMender CI" gcloud projects add-iam-policy-binding "${PROJECT_ID}" \ --member="serviceAccount:codemender-ci@${PROJECT_ID}.iam.gserviceaccount.com" \ --role="roles/aiplatform.user"워크로드 아이덴티티 풀을 만듭니다. GitHub Actions용 풀이 이미 있는 경우 이 단계를 건너뛰고 다음 단계에서
github대신 풀의 ID를 사용하세요.gcloud iam workload-identity-pools create github \ --project="${PROJECT_ID}" \ --location="global" \ --display-name="GitHub Actions"풀에서 GitHub용 제공업체를 만듭니다. 속성 조건은
GITHUB_ORG가 소유한 저장소의 토큰만 허용합니다.gcloud iam workload-identity-pools providers create-oidc codemender \ --project="${PROJECT_ID}" \ --location="global" \ --workload-identity-pool="github" \ --display-name="CodeMender" \ --attribute-mapping="google.subject=assertion.sub,attribute.repository=assertion.repository,attribute.repository_owner=assertion.repository_owner" \ --attribute-condition="assertion.repository_owner == '${GITHUB_ORG}'" \ --issuer-uri="https://token.actions.githubusercontent.com"저장소의 워크플로에서 서비스 계정을 사용하도록 허용합니다.
POOL_ID=$(gcloud iam workload-identity-pools describe github \
    --project="${PROJECT_ID}" \
    --location="global" \
    --format="value(name)")

gcloud iam service-accounts add-iam-policy-binding \
    "codemender-ci@${PROJECT_ID}.iam.gserviceaccount.com" \
    --project="${PROJECT_ID}" \
    --role="roles/iam.workloadIdentityUser" \
    --member="principalSet://iam.googleapis.com/${POOL_ID}/attribute.repository/${REPO}"
공급업체의 전체 이름을 가져옵니다. 이 주소는 다음 섹션에서 필요합니다.
gcloud iam workload-identity-pools providers describe codemender \
    --project="${PROJECT_ID}" \
    --location="global" \
    --workload-identity-pool="github" \
    --format="value(name)"
출력은 다음과 같이 표시됩니다.
projects/123456789/locations/global/workloadIdentityPools/github/providers/codemender
워크로드 아이덴티티 제휴 및 IAM 변경사항이 적용되는 데 최대 5분이 걸릴 수 있습니다. 자세한 내용은 배포 파이프라인으로 워크로드 아이덴티티 제휴 구성을 참고하세요.
저장소 보안 비밀 추가
저장소에서 설정 > 보안 비밀 및 변수 > 작업으로 이동하여 다음 저장소 보안 비밀을 추가합니다.
| 보안 비밀 | 값 |
|---|---|
GCP_PROJECT_ID |
프로젝트 ID |
GCP_WIF_PROVIDER |
이전 섹션의 공급업체 전체 이름입니다. |
GCP_WIF_SERVICE_ACCOUNT |
codemender-ci@PROJECT_ID.iam.gserviceaccount.com: 여기서 PROJECT_ID은 프로젝트 ID입니다.
|
자세한 내용은 GitHub Actions에서 보안 비밀 사용을 참고하세요.
저장소 설정 구성
- 자동 수정 작업에서 풀 요청을 열 수 있도록 하려면 설정 > 작업 > 일반으로 이동합니다. 워크플로 권한에서 GitHub Actions에서 pull 요청을 생성하고 승인하도록 허용을 선택한 다음 저장을 클릭합니다. 조직의 저장소는 조직에서 이 설정을 상속합니다. 변경할 수 없는 경우 조직 소유자에게 문의하세요. 자동 수정 기능을 사용하지 않는 경우 이 단계를 건너뜁니다. 자세한 내용은 저장소의 GitHub Actions 설정 관리를 참고하세요.
- 저장소에서 GitHub 코드 스캔을 사용할 수 있는지 확인합니다. 비공개 및 내부 저장소의 경우 코드 스캔에 GitHub Code Security가 필요합니다. 코드 스캔을 사용할 수 없는 경우 스캔 작업에서 코드 스캔에 결과 업로드 단계와
security-events및actions권한을 삭제합니다. 그렇지 않으면 업로드가 실패하고 스캔 작업도 실패합니다. 자세한 내용은 GitHub에 SARIF 파일 업로드를 참고하세요.
워크플로 추가
다음 워크플로를 .github/workflows/codemender.yml로 저장소에 커밋합니다.
name: CodeMender

on:
  pull_request:

permissions: {}

defaults:
  run:
    shell: bash

env:
  CM_DOWNLOAD_URL: https://artifactregistry.googleapis.com/download/v1/projects/cmoc-prod/locations/us/repositories/codemender-cli-production/files/cm%3Astable%3Acm-linux-amd64.zip:download?alt=media

jobs:
  scan:
    name: CodeMender scan
    # Workflows for fork and Dependabot pull requests can't read this
    # repository's secrets, so they can't authenticate to Google Cloud.
    if: >-
      github.event.pull_request.head.repo.full_name == github.repository &&
      github.actor != 'dependabot[bot]'
    runs-on: ubuntu-24.04
    timeout-minutes: 15
    permissions:
      contents: read
      id-token: write         # Workload Identity Federation
      security-events: write  # Upload SARIF to code scanning
      actions: read           # Upload SARIF from a private repository
    outputs:
      findings: ${{ steps.scan.outputs.findings }}
    steps:
      - uses: actions/checkout@v7
        with:
          fetch-depth: 0  # cm needs the base branch history
          persist-credentials: false

      - uses: google-github-actions/auth@v3
        with:
          project_id: ${{ secrets.GCP_PROJECT_ID }}
          workload_identity_provider: ${{ secrets.GCP_WIF_PROVIDER }}
          service_account: ${{ secrets.GCP_WIF_SERVICE_ACCOUNT }}

      - name: Install the CodeMender CLI
        run: |
          curl -fsSL -o "$RUNNER_TEMP/cm.zip" "$CM_DOWNLOAD_URL"
          unzip -q -o "$RUNNER_TEMP/cm.zip" -d "$RUNNER_TEMP/cm"
          echo "$RUNNER_TEMP/cm" >> "$GITHUB_PATH"

      - name: Scan the pull request
        id: scan
        env:
          BASE_REF: ${{ github.base_ref }}
          FAIL_ON: CRITICAL,HIGH
        run: |
          cm init
          status=0
          cm find . \
            --diff="origin/$BASE_REF" \
            --diff-workers=16 \
            --fail-on="$FAIL_ON" \
            --format=sarif \
            --output=codemender.sarif \
            --sandbox=false \
            --yes \
            --bypass-warning || status=$?

          # Save the findings that failed the scan for the autofix job. Like the
          # CI gate, skip findings labeled [LEGACY / UNTOUCHED]: they're in code
          # that the pull request didn't change.
          echo '[]' > "$RUNNER_TEMP/codemender-findings.json"
          if [ "$status" -ne 0 ]; then
            cm report --format=json --status=OPEN \
              | jq --arg fail_on "$FAIL_ON" '
                  ($fail_on | ascii_upcase | split(",")) as $severities
                  | [.[]
                     | select(.title | startswith("[LEGACY / UNTOUCHED]") | not)
                     | select(.severity | ascii_upcase | IN($severities[]))]' \
              > "$RUNNER_TEMP/codemender-findings.json"
          fi
          echo "findings=$(jq length "$RUNNER_TEMP/codemender-findings.json")" >> "$GITHUB_OUTPUT"
          exit "$status"

      - name: Upload results to code scanning
        if: ${{ !cancelled() && hashFiles('codemender.sarif') != '' }}
        uses: github/codeql-action/upload-sarif@v4
        with:
          sarif_file: codemender.sarif
          category: codemender

      - name: Save findings for autofix
        if: ${{ !cancelled() && steps.scan.outputs.findings > 0 }}
        uses: actions/upload-artifact@v7
        with:
          name: codemender-findings
          path: ${{ runner.temp }}/codemender-findings.json
          retention-days: 1

  autofix:
    name: CodeMender autofix
    needs: scan
    if: ${{ !cancelled() && needs.scan.outputs.findings > 0 }}
    runs-on: ubuntu-24.04
    timeout-minutes: 60
    permissions:
      contents: write        # Push the fix branch
      pull-requests: write   # Open the fix pull request
      id-token: write        # Workload Identity Federation
    steps:
      - uses: actions/checkout@v7
        with:
          ref: ${{ github.head_ref }}
          persist-credentials: false

      - uses: google-github-actions/auth@v3
        with:
          project_id: ${{ secrets.GCP_PROJECT_ID }}
          workload_identity_provider: ${{ secrets.GCP_WIF_PROVIDER }}
          service_account: ${{ secrets.GCP_WIF_SERVICE_ACCOUNT }}

      - name: Install the CodeMender CLI
        run: |
          curl -fsSL -o "$RUNNER_TEMP/cm.zip" "$CM_DOWNLOAD_URL"
          unzip -q -o "$RUNNER_TEMP/cm.zip" -d "$RUNNER_TEMP/cm"
          echo "$RUNNER_TEMP/cm" >> "$GITHUB_PATH"

      - uses: actions/download-artifact@v8
        with:
          name: codemender-findings
          path: ${{ runner.temp }}/codemender

      - name: Fix findings
        run: |
          # Keep CodeMender state and the auth action's credentials file out of
          # the commits, and out of the `git clean` that cm fix runs.
          printf '%s\n' .cm_project 'gha-creds-*.json' >> .git/info/exclude

          cm init
          # Fix in the repository root instead of each file's directory.
          printf 'project_paths:\n  - "%s"\n' "$GITHUB_WORKSPACE" \
            >> ~/.codemender/config.yaml
          cm report import -f "$RUNNER_TEMP/codemender/codemender-findings.json"

          git config user.name "github-actions[bot]"
          git config user.email \
            "41898282+github-actions[bot]@users.noreply.github.com"

          cm report --format=json --status=OPEN \
            | jq -r '.[] | [.finding_id, .title] | @tsv' \
            > "$RUNNER_TEMP/findings.tsv"
          while IFS=$'\t' read -r id title; do
            # cm fix exits 0 when it makes no edits, so also check for changes.
            if cm fix "$id" \
                 --sandbox=false --yes --bypass-warning < /dev/null &&
               ! git diff --quiet; then
              git commit -q -a -m "Fix $title" -m "CodeMender finding $id"
            else
              echo "::warning::CodeMender didn't fix \"$title\" ($id)."
            fi
            # Discard files the fix agent created, such as test output.
            git reset -q --hard
            git clean -q -fd
          done < "$RUNNER_TEMP/findings.tsv"

      - uses: peter-evans/create-pull-request@v8
        with:
          branch: codemender/fix-pr-${{ github.event.pull_request.number }}
          base: ${{ github.head_ref }}
          title: "CodeMender fixes for #${{ github.event.pull_request.number }}"
          body: |
            CodeMender generated these fixes for findings in #${{ github.event.pull_request.number }}.
            Review each commit before you merge this pull request into `${{ github.head_ref }}`.
워크플로 세부정보
다음 다이어그램은 pull 요청 검사 및 자동 수정 작업이 상호작용하는 방식을 보여줍니다.
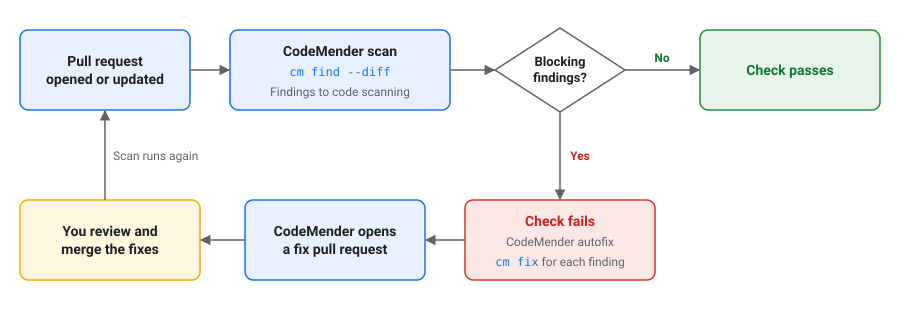
CodeMender 스캔 작업은 다음을 수행합니다.
- 전체 기록과 함께 pull 요청을 체크아웃합니다. pull 요청의 경우 GitHub는 pull 요청 브랜치의 병합 커밋을 기본 브랜치로 체크아웃합니다.
- Google Cloud 를 인증하고 CodeMender CLI의 최신 안정화 버전을 다운로드합니다.
- 베이스 브랜치에 대해
cm find --diff를 실행합니다. CodeMender가 풀 요청의 변경사항에서FAIL_ON에 나열된 심각도의 취약점을 발견하면 작업이 실패합니다. - 검사에서 작업을 실패한 경우에도 보고서를 GitHub 코드 검사에 업로드합니다. 보고서에는
[LEGACY / UNTOUCHED]라벨이 지정된 발견 사항이 포함됩니다. 코드 스캔은 모든 결과의 줄이 풀 요청의 차이에 있는 경우 풀 요청의 검사에도 결과를 표시합니다. - 자동 수정 작업의 작업에 실패한 발견 항목을 저장합니다.
포크 또는 Dependabot의 풀 요청에 대해서는 스캔 작업이 실행되지 않습니다. 이러한 풀 요청의 워크플로가 저장소의 보안 비밀을 읽을 수 없기 때문입니다.
GitHub는 건너뛴 작업을 성공으로 보고하므로 필수 검사로 설정하더라도 이러한 풀 요청이 차단되지 않습니다. 이 풀 요청을 직접 검토하거나 cm find --diff로 로컬에서 스캔하세요.
스캔 작업에서 발견 항목을 저장하면 CodeMender 자동 수정 작업이 실행됩니다. 이 메서드는 다음을 실행합니다.
- 풀 요청 브랜치를 체크아웃합니다.
- 각 발견 항목에 대해
cm fix를 실행하고 각 수정사항을 별도로 커밋합니다. CodeMender가 발견 항목을 수정하지 않으면 작업에서 경고를 로깅합니다. 이 작업은 저장소에 이미 있는 파일의 변경사항만 커밋하고 수정 에이전트가 생성한 파일(예: 테스트 출력)은 삭제합니다. codemender/fix-pr-NUMBER브랜치에서 pull 요청 브랜치로 pull 요청을 엽니다. 여기서NUMBER은 pull 요청 번호입니다. 수정 pull 요청이 이미 있는 경우 작업에서 이를 업데이트합니다. CodeMender가 발견 사항을 수정하지 않거나 작업이 60분 시간 제한에 도달하면 작업에서 pull 요청을 열지 않습니다.
수정사항 검토 및 병합
GitHub는 워크플로가 GITHUB_TOKEN로 만드는 pull 요청에 대해 워크플로를 자동으로 실행하지 않습니다. 수정 pull 요청을 검사하려면 저장소에 쓰기 액세스 권한이 있는 사용자가 수정 pull 요청에서 워크플로 실행 승인을 클릭합니다.
수정 pull 요청을 병합하면 pull 요청 브랜치가 변경되고 워크플로에서 원래 pull 요청을 다시 검사합니다.
워크플로 맞춤설정
다음과 같은 방법으로 워크플로를 맞춤설정할 수 있습니다.
- 검사를 통과하지 못하는 심각도를 변경하려면 pull 요청 스캔 단계에서
FAIL_ON를 공백이 없는 쉼표로 구분된 목록(예:CRITICAL,HIGH,MEDIUM)으로 설정합니다. 유효한 값은CRITICAL,HIGH,MEDIUM,LOW입니다. - 확인에 실패하지 않고 발견 항목을 보고하려면
FAIL_ON: ""를 설정하세요. 워크플로는 여전히 코드 스캔에 결과를 업로드하지만 자동 수정 작업을 실행하지는 않습니다. 일부 브랜치에만 풀 요청을 스캔하려면
pull_request트리거에branches필터를 추가합니다. 그런 다음 워크플로는 수정 풀 요청을 검사하지 않습니다. 기본값이 풀 요청 브랜치이기 때문입니다.on: pull_request: branches: [main]자동 수정을 사용 중지하려면
autofix작업과 자동 수정을 위한 결과 저장 단계를 삭제하세요.
Cloud Build로 풀 요청 스캔
이 섹션의 빌드는 Cloud Build에 연결된 GitHub 저장소의 각 pull 요청을 검사합니다. CodeMender가 풀 요청의 변경사항에서 CRITICAL 또는 HIGH 심각도의 취약점을 발견하면 빌드와 GitHub 검사가 실패합니다. 빌드에서 발견 항목을 수정하지 않습니다.
시작하기 전에 다음을 수행하세요.
- 저장소를 2세대 저장소로 Cloud Build에 연결합니다. 자세한 내용은 GitHub 저장소에 연결을 참고하세요.
CodeMender에 액세스할 수 있는 프로젝트에서 Cloud Build API와 IAM API를 사용 설정합니다. 빌드는 빌드를 실행하는 프로젝트에서 CodeMender를 사용합니다.
PROJECT_ID="PROJECT_ID" gcloud services enable cloudbuild.googleapis.com iam.googleapis.com \ --project="${PROJECT_ID}"PROJECT_ID를 Google Cloud프로젝트 ID로 바꿉니다.
서비스 계정 만들기
빌드의 서비스 계정을 만듭니다. CodeMender를 사용하려면 Agent Platform User IAM 역할 (roles/aiplatform.user)을 부여하고 빌드 로그를 작성하려면 Logs Writer 역할 (roles/logging.logWriter)을 부여합니다.
SA="codemender-build@${PROJECT_ID}.iam.gserviceaccount.com"

gcloud iam service-accounts create codemender-build \
    --project="${PROJECT_ID}" \
    --display-name="CodeMender Cloud Build"

gcloud projects add-iam-policy-binding "${PROJECT_ID}" \
    --member="serviceAccount:${SA}" \
    --role="roles/aiplatform.user"

gcloud projects add-iam-policy-binding "${PROJECT_ID}" \
    --member="serviceAccount:${SA}" \
    --role="roles/logging.logWriter"
Cloud Storage 버킷에 SARIF 보고서를 저장하려면 서비스 계정에 버킷 액세스 권한도 부여하세요.
BUCKET="BUCKET"

gcloud storage buckets add-iam-policy-binding "gs://${BUCKET}" \
    --member="serviceAccount:${SA}" \
    --role="roles/storage.objectUser"
BUCKET을 Cloud Storage 버킷의 이름으로 바꿉니다.
빌드 구성 추가
다음 빌드 구성을 저장소의 루트에 cloudbuild.yaml로 커밋합니다.
# Scans a pull request with CodeMender. The build fails when CodeMender finds
# a CRITICAL or HIGH vulnerability in the pull request's changes.
steps:
  - id: install-codemender
    name: gcr.io/google.com/cloudsdktool/google-cloud-cli:slim
    script: |
      #!/usr/bin/env bash
      set -euo pipefail
      curl -fsSL -o /tmp/cm.zip "$_CM_DOWNLOAD_URL"
      python3 -m zipfile -e /tmp/cm.zip /workspace/.codemender-cli
      chmod +x /workspace/.codemender-cli/cm

  - id: fetch-history
    name: gcr.io/google.com/cloudsdktool/google-cloud-cli:slim
    script: |
      #!/usr/bin/env bash
      set -euo pipefail
      : "${_BASE_BRANCH:?Run this build from a pull request trigger.}"
      # Triggers check out only the pull request's commit. CodeMender needs the
      # history back to where the pull request branched from the base branch.
      # Fetch from origin, or from GitHub if origin isn't configured.
      refspec="+refs/heads/$_BASE_BRANCH:refs/remotes/origin/$_BASE_BRANCH"
      git fetch --quiet --unshallow origin "$refspec" ||
        git fetch --quiet --unshallow \
          "https://github.com/$REPO_FULL_NAME.git" "$refspec"
      merge_base=$(git merge-base HEAD "origin/$_BASE_BRANCH")
      echo "Merge base with $_BASE_BRANCH: $merge_base"

  - id: scan
    name: gcr.io/google.com/cloudsdktool/google-cloud-cli:slim
    script: |
      #!/usr/bin/env bash
      set -uo pipefail
      export PATH="/workspace/.codemender-cli:$PATH"
      # The project that has access to CodeMender.
      export GOOGLE_CLOUD_PROJECT="$PROJECT_ID"
      cm init || exit 1
      status=0
      cm find . \
        --diff="origin/$_BASE_BRANCH" \
        --diff-workers=16 \
        --fail-on=CRITICAL,HIGH \
        --format=sarif \
        --output=codemender.sarif \
        --sandbox=false \
        --yes \
        --bypass-warning || status=$?

      # cm find writes the SARIF report when the scan completes.
      if [ -f codemender.sarif ]; then
        # cm find doesn't print finding details, so print them here.
        cm report --status=OPEN --format=md
        if [ -n "${_REPORT_BUCKET:-}" ]; then
          gcloud storage cp codemender.sarif \
            "gs://$_REPORT_BUCKET/codemender/$BUILD_ID.sarif" || status=1
        fi
      fi
      exit "$status"

substitutions:
  _CM_DOWNLOAD_URL: https://artifactregistry.googleapis.com/download/v1/projects/cmoc-prod/locations/us/repositories/codemender-cli-production/files/cm%3Astable%3Acm-linux-amd64.zip:download?alt=media
  _REPORT_BUCKET: ''  # Optional: a bucket to save the SARIF report in.

timeout: 1200s
options:
  automapSubstitutions: true
  logging: CLOUD_LOGGING_ONLY
트리거 만들기
main로의 각 pull 요청에 대해 빌드를 실행하는 트리거를 만듭니다.
REGION="REGION"
CONNECTION="CONNECTION"
REPOSITORY="REPOSITORY"

gcloud builds triggers create github \
    --project="${PROJECT_ID}" \
    --region="${REGION}" \
    --name="codemender-scan" \
    --repository="projects/${PROJECT_ID}/locations/${REGION}/connections/${CONNECTION}/repositories/${REPOSITORY}" \
    --pull-request-pattern='^main$' \
    --comment-control=COMMENTS_ENABLED_FOR_EXTERNAL_CONTRIBUTORS_ONLY \
    --build-config=cloudbuild.yaml \
    --service-account="projects/${PROJECT_ID}/serviceAccounts/${SA}"
다음을 바꿉니다.
REGION: Cloud Build 저장소 연결의 리전입니다.CONNECTION: Cloud Build 저장소 연결의 이름입니다.REPOSITORY: Cloud Build에 연결된 저장소의 이름입니다.
다음 옵션을 참고하세요.
--pull-request-pattern은 pull 요청의 기본 브랜치에 대한 정규 표현식입니다.^및$를 사용하여 전체 브랜치 이름을 일치시킵니다.--comment-control=COMMENTS_ENABLED_FOR_EXTERNAL_CONTRIBUTORS_ONLY를 사용하면 저장소 소유자 및 공동작업자의 pull 요청에 대해 빌드가 자동으로 실행됩니다. 다른 공동작업자의 pull 요청의 경우 소유자 또는 공동작업자가 pull 요청에/gcbrun댓글을 작성한 후에 빌드가 실행됩니다.- 버킷에 SARIF 보고서를 저장하려면
--substitutions=_REPORT_BUCKET="${BUCKET}"를 추가합니다.
Google Cloud 콘솔에서 트리거를 만들 수도 있습니다. 자세한 내용은 GitHub에서 저장소 빌드를 참고하세요.
GitHub에 빌드 로그를 표시하려면 트리거를 만들 때 --include-logs-with-status를 추가하고 서비스 계정에 로그 뷰어 역할(roles/logging.viewer)을 부여합니다. 그러면 GitHub에서 체크를 볼 수 있는 사용자는 누구나 결과 등 빌드 로그를 읽을 수 있습니다.
빌드 작동 방식
빌드에는 세 단계가 있습니다.
install-codemender는 CodeMender CLI의 최신 안정화 버전을 다운로드합니다.fetch-history는 CodeMender에 필요한 기본 브랜치와 기록을 가져옵니다. Cloud Build는 빌드를 시작한 커밋만 체크아웃합니다. 이 단계에서는origin원격에서 가져옵니다.origin이 구성되지 않은 경우 이 단계에서는 사용자 인증 정보 없이 GitHub에서 가져오며 이는 공개 저장소에서만 작동합니다. 이 경우 비공개 저장소에는 SSH 키와 같은 사용자 인증 정보가 필요합니다. 자세한 내용은 SSH 키를 사용하여 빌드에서 GitHub 액세스를 참고하세요.scan가 기본 브랜치에 대해cm find --diff를 실행합니다. 스캔이 완료되면 단계에서 빌드 로그에 모든 발견 항목을 출력합니다._REPORT_BUCKET를 설정하면 이 단계에서 SARIF 보고서를gs://BUCKET/codemender/BUILD_ID.sarif에도 복사합니다.
빌드를 실패시키는 심각도를 변경하려면 scan 단계에서 --fail-on을 수정하세요. pull 요청 트리거 없이 빌드를 실행하면 Run this build from a pull request trigger. 메시지와 함께 실패합니다.
커밋 전에 검사
Git 커밋 전 후크는 스테이징된 변경사항을 스캔하고 CodeMender가 CRITICAL 또는 HIGH 심각도의 취약점을 발견하면 커밋을 차단할 수 있습니다. 개발자는 후크를 건너뛸 수 있으므로 CI에서 스캔하는 대신이 아닌 스캔과 함께 사용하세요.
후크를 사용하는 각 개발자에게는 다음이 필요합니다.
- CLI 설치 및 구성에 설명된 대로 설치 및 설정된 CodeMender CLI(
gcloud auth application-default login및cm init포함) 후크에는PATH에cm이 필요합니다. - CodeMender에 액세스할 수 있는 프로젝트의 Agent Platform 사용자 역할 (
roles/aiplatform.user) CodeMender는GOOGLE_CLOUD_PROJECT환경 변수의 프로젝트를 사용합니다. 이 변수가 설정되지 않은 경우 CodeMender는 애플리케이션 기본 사용자 인증 정보 또는 gcloud CLI 기본 프로젝트의 프로젝트를 사용합니다.
후크를 추가하려면 다음 스크립트를 저장소에 .git/hooks/pre-commit로 저장합니다.
#!/bin/sh
# Scans staged changes with CodeMender before each commit.
if ! cm find . --diff --staged --fail-on=CRITICAL,HIGH \
    --yes --bypass-warning; then
  echo "CodeMender blocked this commit. To see the findings, run:" >&2
  echo "  cm report --status=OPEN" >&2
  echo "To commit anyway, run git commit --no-verify." >&2
  exit 1
fi
스크립트를 실행 가능하게 만든 다음 CodeMender가 저장소를 추적하기 위해 만드는 파일을 커밋하지 않도록 .gitignore 파일에 .cm_project을 추가합니다.
chmod +x .git/hooks/pre-commit
echo .cm_project >> .gitignore
git commit을 실행하면 후크가 스테이징된 변경사항이 있는 파일을 검사합니다. 스캔하는 데 몇 분 정도 걸릴 수 있습니다. 이 후크는 CodeMender 샌드박스를 사용 중지하지 않습니다.
스캔 없이 커밋하려면 git commit --no-verify를 실행합니다.
플래그 스캔
다음 cm find 플래그는 pull 요청 검사를 제어합니다. 모든 플래그에 대해 cm
find --help를 실행합니다.
| 플래그 | 기본값 | 설명 |
|---|---|---|
--diff[=REF] |
사용 안함 |
REF와 비교하여 변경사항을 검사합니다(예: origin/main). REF가 없으면 추적된 파일의 커밋되지 않은 변경사항을 검사합니다 (HEAD과 비교). --deep와 함께 사용할 수 없습니다.
|
--staged |
사용 안함 | --diff를 사용하면 스테이징된 변경사항만 검사합니다. |
--diff-depth DEPTH |
1 |
영향 분석의 순회 깊이 (1~3, 기본값: 1홉). |
--diff-workers COUNT |
4 |
동시에 스캔할 파일 수입니다(1~16). |
--diff-max-neighbors COUNT |
10 |
스캔할 종속 파일의 최대 수입니다. |
--fail-on SEVERITIES |
CRITICAL,HIGH |
--diff를 사용하면 cm find이(가) 상태 1로 종료되는 심각도가 있습니다. 값이 비어 있으면 발견 사항이 종료 상태에 영향을 미치지 않습니다.
|
--fail-on-truncation |
사용 안함 |
--diff를 사용하면 CodeMender가 --diff-max-neighbors에서 허용하는 것보다 더 많은 종속 파일을 찾은 경우 상태 1로 종료됩니다.
|
--format FORMAT |
table |
보고서 형식: table, json 또는 sarif
|
--output FILE |
표준 출력 | 보고서를 작성할 파일입니다. |
문제 해결
이 섹션에서는 CI/CD 파이프라인에서 CodeMender를 실행할 때 발생하는 일반적인 문제를 해결하는 방법을 설명합니다.
권한 거부됨
로그에 다음과 같은 줄이 표시됩니다.
[1/1] ❌ src/app.py: start session failed: StartSession failed with HTTP 403 Forbidden.
메시지에 Permission 'aiplatform.interactions.create'
denied를 포함할 수도 있습니다. 다음을 확인하세요.
- 프로젝트에 CodeMender 액세스 권한이 있습니다.
- 서비스 계정 또는 사용자에게 프로젝트의 Agent Platform 사용자 역할(
roles/aiplatform.user)이 있습니다. - 프로젝트에서 Agent Platform API가 사용 설정되어 있습니다.
- CodeMender가 올바른 프로젝트를 사용합니다. GitHub Actions에서
GCP_PROJECT_ID보안 비밀을 확인합니다. Cloud Build는 빌드를 실행하는 프로젝트를 사용합니다. 로컬에서GOOGLE_CLOUD_PROJECT환경 변수 또는 변수가 설정되지 않은 경우 기본 프로젝트를 확인합니다.
리소스 설정 진행 중
로그에 Resource setup has just started. Please try again shortly. 또는 Resource setup is in progress. Please try again shortly.이 표시되면 CodeMender가 프로젝트의 리소스를 설정하는 중이며, 이 작업은 일반적으로 몇 분 정도 걸립니다. 나중에 작업을 다시 실행합니다.
알 수 없는 플래그: --diff
cm find이 Error: unknown flag: --diff로 실패하면 CLI 출시가 pull 요청 스캔을 지원하지 않는 것입니다. cm update를 실행하거나 최신 버전을 다운로드합니다.
기본 브랜치를 찾을 수 없음
cm find가 다음과 같은 오류와 함께 실패하면 기본 브랜치가 체크아웃되지 않은 것입니다.
Error: retrieving VCS diff: git diff failed: exit status 128: fatal: ambiguous argument 'origin/main': unknown revision or path not in the working tree.
cm find를 실행하기 전에 기본 브랜치와 기록을 가져옵니다. GitHub Actions에서 actions/checkout에 fetch-depth: 0를 설정합니다.
파일이 스캔되지 않음
❌가 있는 줄(예: [1/1] ❌ src/app.py: start session failed)은 CodeMender가 해당 파일을 스캔할 수 없음을 의미합니다. 해당 줄의 오류를 확인한 후 작업을 다시 실행하세요.
수정 pull 요청 없음
워크플로에서 수정 pull 요청이 열리지 않으면 다음을 확인하세요.
- 자동 수정 작업이 pull 요청을 만들 때 실패하면 GitHub Actions에서 pull 요청을 만들고 승인하도록 허용을 사용 설정합니다. 자세한 내용은 저장소 설정 구성을 참고하세요.
- 풀 요청을 열지 않고 자동 수정 작업이 성공하면 CodeMender가 발견 항목을 수정하지 않은 것입니다. 작업 로그에는 CodeMender에서 수정하지 않은 각 발견 항목에 대한 경고가 표시됩니다.
코드 스캔 업로드 실패
GitHub Code Security or GitHub Advanced Security
must be enabled for this repository to use code scanning
로 업로드 단계가 실패하면 저장소에 GitHub 코드 보안을 사용 설정하거나 업로드 단계를 삭제합니다. 자세한 내용은 저장소 설정 구성을 참고하세요.
경고를 확인하지 않음
warning not acknowledged. Please run interactively once to
acknowledge or pass --bypass-warning
으로 인해 cm가 실패하는 경우 CodeMender는 비대화형 환경에서 요청할 수 없다는 확인이 필요합니다. 명령어에 --bypass-warning를 추가합니다. 그 전에 이 페이지 상단의 미리보기 약관을 읽어보세요.
도움이 더 필요하면 영업팀에 문의하세요.