


- 排定自動增加和減少「快速啟動集區大小」的時間。
- 定期自動啟動工作站。
本教學課程說明如何配合一般營業時間,增加及減少快速啟動集區大小。
目標
- 編寫及部署 Cloud Run 服務,更新工作站設定的快速啟動集區大小。
- 設定 Cloud Scheduler 工作,排定在週一至週五上午 9 點至下午 5 點 (太平洋標準時間營業時間) 執行步驟 1 建立的服務。
費用
在本文件中,您會使用下列 Google Cloud計費元件:
- Cloud Scheduler
- Cloud Run
您可以使用 Pricing Calculator,根據預測用量估算費用。
完成本文所述工作後,您可以刪除建立的資源,避免繼續計費,詳情請參閱「清除所用資源」。
事前準備
- 登入 Google Cloud 帳戶。如果您未曾使用過 Google Cloud,歡迎 建立帳戶,親自體驗實際使用我們產品的成效。新客戶還能獲得價值 $300 美元的免費抵免額,能用於執行、測試及部署工作負載。
-
In the Google Cloud console, on the project selector page, select or create a Google Cloud project.
Roles required to select or create a project
- Select a project: Selecting a project doesn't require a specific IAM role—you can select any project that you've been granted a role on.
-
Create a project: To create a project, you need the Project Creator role
(
roles/resourcemanager.projectCreator), which contains theresourcemanager.projects.createpermission. Learn how to grant roles.
-
Verify that billing is enabled for your Google Cloud project.
Enable the Cloud Run, Cloud Scheduler, Cloud Workstations APIs, if any are not already enabled.
Roles required to enable APIs
To enable APIs, you need the
serviceusage.services.enablepermission. If you created the project, then you likely already have this permission through the Owner role (roles/owner). Otherwise, you can get this permission through the Service Usage Admin role (roles/serviceusage.serviceUsageAdmin). Learn how to grant roles.-
Install the Google Cloud CLI.
-
If you're using an external identity provider (IdP), you must first sign in to the
gcloudCLI with your federated identity. -
To initialize the
gcloudCLI, run the following command:gcloud init -
In the Google Cloud console, on the project selector page, select or create a Google Cloud project.
Roles required to select or create a project
- Select a project: Selecting a project doesn't require a specific IAM role—you can select any project that you've been granted a role on.
-
Create a project: To create a project, you need the Project Creator role
(
roles/resourcemanager.projectCreator), which contains theresourcemanager.projects.createpermission. Learn how to grant roles.
-
Verify that billing is enabled for your Google Cloud project.
Enable the Cloud Run, Cloud Scheduler, Cloud Workstations APIs, if any are not already enabled.
Roles required to enable APIs
To enable APIs, you need the
serviceusage.services.enablepermission. If you created the project, then you likely already have this permission through the Owner role (roles/owner). Otherwise, you can get this permission through the Service Usage Admin role (roles/serviceusage.serviceUsageAdmin). Learn how to grant roles.-
Install the Google Cloud CLI.
-
If you're using an external identity provider (IdP), you must first sign in to the
gcloudCLI with your federated identity. -
To initialize the
gcloudCLI, run the following command:gcloud init
準備環境
設定下列環境變數,這些變數會用於稍後建立的自動化指令碼。
設定要使用的
PROJECT_ID和REGION變數:PROJECT_ID=$PROJECT_ID REGION=$REGION將 $REGION 替換成要使用的區域名稱,例如
us-central1。如要進一步瞭解可用的區域,請參閱「Cloud Workstations 位置」。
應用程式架構
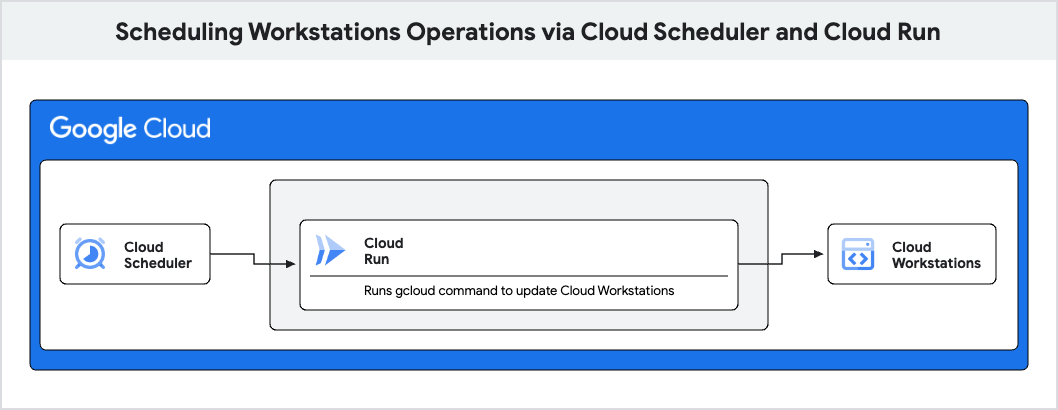
這項解決方案包含下列 Google Cloud 元件:
- Cloud Run:更新
WorkstationConfig的快速啟動集區大小。 - Cloud Scheduler 工作:按照設定的時間表發出呼叫,更新
WorkstationConfig。
建立 Cloud Run 服務
第一步是設定簡易的網路伺服器,監聽通訊埠 8080 收到的 HTTP 要求。由於應用程式已容器化,因此您可以使用任何語言編寫伺服器。
如要以 Python 編寫網路伺服器接聽應用程式,請按照下列步驟操作:
建立名為
workstation-config-updater的新目錄,然後切換至該目錄:mkdir workstation-config-updater cd workstation-config-updater建立名為
app.py的檔案,然後將下列程式碼貼入該檔案:import os, subprocess from flask import Flask, request, abort app = Flask(__name__) @app.route("/", methods=["POST"]) def update(): app.logger.info("Update request received.") data = request.json cluster = data["cluster"] region = data["region"] pool_size = data["pool-size"] path = os.path.join(app.root_path, "update_config.sh") o = subprocess.run( [path, cluster, region, pool_size], stdout=subprocess.PIPE, stderr=subprocess.STDOUT, text=True ) app.logger.info("Sending response:", o.stdout) return o.stdout if __name__ == "__main__": app.run(host="0.0.0.0", port=8080, debug=True)這段程式碼會建立基本的網路伺服器,用於監聽
PORT環境變數定義的通訊埠,並執行update_config.sh指令碼。建立名為
update_config.sh的檔案,然後將下列程式碼貼入該檔案:#!/bin/bash set -e if [ $# -ne 3 ] then echo "Usage: update_config.sh CLUSTER REGION POOL_SIZE" exit 1 fi CLUSTER=$1 REGION=$2 POOL_SIZE=$3 # list workstation configs echo "Attempting to list workstation configs in cluster $CLUSTER and region $REGION ..." for CONFIG in $(gcloud workstations configs list --cluster $CLUSTER --region $REGION --format="value(NAME)"); do echo "Attempting to update Quick Pool Size to $POOL_SIZE for config $CONFIG ..." # update the workstation config pool-size RET=$(gcloud workstations configs update $CONFIG --cluster $CLUSTER --region $REGION --pool-size=$POOL_SIZE) if [[ $RET -eq 0 ]]; then echo "Workstation config $CONFIG updated." else echo "Workstation config $CONFIG update failed." fi done這個指令碼會使用
gcloud指令,列出指定叢集中的所有WorkstationConfig,並將「快速入門集區大小」更新為POOL_SIZE。建立名為
Dockerfile的檔案,然後將下列程式碼貼入該檔案:FROM google/cloud-sdk RUN apt-get update && apt-get install -y python3-pip python3 # Copy local code to the container image. ENV APP_HOME /app WORKDIR $APP_HOME COPY . ./ RUN /bin/bash -c 'ls -la; chmod +x ./update_config.sh' # Install production dependencies. RUN pip3 install Flask gunicorn # Run the web service on container startup CMD exec gunicorn --bind :8080 --workers 1 --threads 8 app:app這段程式碼會將應用程式容器化,以便部署至 Cloud Run。
部署至 Cloud Run
執行下列指令,部署至 Cloud Run:
gcloud run deploy --source . --project $PROJECT_ID --region $REGION系統提示您輸入服務名稱時,請按下「Enter」鍵接受預設名稱
workstation-config-updater。如果系統提示您啟用 Artifact Registry API 或允許建立 Artifact Registry 存放區,請按下 y 鍵。
系統提示是否允許未經驗證的叫用要求時,請按下 n。
等待部署作業完成。
當服務網址以下列格式顯示時,請複製該網址:
SERVICE_URL=$SERVICE_URL
設定服務帳戶來叫用 Cloud Run
您部署的 workstation-config-updater 服務不允許未經驗證的叫用。
Cloud Scheduler 需要具備適當憑證的服務帳戶,才能呼叫 workstation-config-updater 服務。
設定服務帳戶
如果您還沒有要用於 Cloud Scheduler 工作的服務帳戶,請建立新的服務帳戶。
gcloud iam service-accounts create $SERVICE_ACCOUNT_NAME \
    --description="$DESCRIPTION" \
    --display-name="$DISPLAY_NAME"
新增必要的 IAM 角色繫結,允許服務帳戶叫用 Cloud Run。
gcloud run services add-iam-policy-binding workstation-config-updater \
    --member=serviceAccount:$SERVICE_ACCOUNT_NAME@$PROJECT_ID.iam.gserviceaccount.com \
    --region $REGION \
    --role=roles/run.invoker
建立含驗證的 Cloud Scheduler 設定
建立工作,並指定從「Deploy to Cloud Run」(部署至 Cloud Run) 複製的
URL:gcloud scheduler jobs create http workstation-pool-increaser-cron \ --http-method=POST \ --location=us-central1 \ --schedule="0 9 * * 1-5" \ --time-zone="America/Los_Angeles" \ --headers "Content-Type=application/json" \ --message-body='{"cluster":"$CLUSTER", "region":"$REGION", "pool-size": "2"}' \ --uri=$SERVICE_URL \ --oidc-service-account-email=$SERVICE_ACCOUNT_NAME@$PROJECT_ID.iam.gserviceaccount.com這個指令會排定一項工作,在週一至週五上午 9 點 (太平洋標準時間),將
WorkstationCluster$CLUSTER 中所有WorkstationConfigs的快速啟動集區大小增加至 2。詳情請參閱設定工作時間表一文。
同樣地,如要在工作日結束時將工作站設定的集區大小縮減為 0,請執行下列指令:
gcloud scheduler jobs create http workstation-pool-decreaser-cron \
    --http-method=POST \
    --location=$REGION \
    --schedule="0 17 * * 1-5" \
    --time-zone="America/Los_Angeles" \
    --headers "Content-Type=application/json" \
    --message-body='{"cluster":"$CLUSTER", "region":"$REGION", "pool-size": "0"}' \
    --uri=$SERVICE_URL \
    --oidc-service-account-email=$SERVICE-ACCOUNT@$PROJECT_ID.iam.gserviceaccount.com
選用:驗證作業
如要確保工作正常運作,可以驗證工作。
前往 Google Cloud 控制台的「Cloud Scheduler」頁面。
workstation-pool-increaser-cron應該會顯示在工作清單中。在
workstation-pool-increaser-cron工作的資料列中,依序按一下 「Actions」(動作) >「Force a job run」(強制執行工作)。在專案中建立的第一項工作可能需要幾分鐘才能執行。
如果在「Status of last execution」(上次執行狀態) 欄中看到
Success狀態,表示工作執行成功。
如要確認工作站設定已更新,請按照下列步驟操作:
清除所用資源
為避免因為本教學課程所用資源,導致系統向 Google Cloud 帳戶收取費用,請刪除含有相關資源的專案,或者保留專案但刪除個別資源。
移除測試專案
為避免系統向您的 Google Cloud 帳戶收取額外費用,請刪除您透過本快速入門導覽課程部署的所有資源。
刪除存放區
Cloud Run 不會針對未使用的已部署服務收費。不過,您可能仍須支付在 Artifact Registry 儲存容器映像檔的費用。如要刪除 Artifact Registry 存放區,請按照 Artifact Registry 說明文件中的「刪除存放區」一節操作。
刪除服務
Cloud Run 服務收到要求後才會產生費用。 如要刪除 Cloud Run 服務,請按照下列其中一個步驟操作:
控制台
如要刪除服務:
在 Google Cloud 控制台中,前往 Cloud Run 的「Services」(服務) 頁面:
在服務清單中找出您要刪除的服務,然後按一下核取方塊來選取。
按一下「Delete」(刪除)。這會刪除服務的所有修訂版本。
gcloud
如要刪除服務,請執行下列指令:
gcloud run services delete SERVICE --region REGION
更改下列內容:
- SERVICE:服務名稱。
- REGION:服務的 Google Cloud 區域。
刪除測試專案
刪除 Google Cloud 專案後,系統會停止對該專案中的所有資源計費。如要釋出專案中的所有 Google Cloud 資源,請按照下列步驟操作:
- 前往 Google Cloud 控制台的「Manage resources」(管理資源) 頁面。
- 在專案清單中選取要刪除的專案,然後點選「Delete」(刪除)。
- 在對話方塊中輸入專案 ID,然後按一下 [Shut down] (關閉) 以刪除專案。
刪除 Cloud Scheduler 工作
如要刪除個別 Cloud Scheduler 資源,
前往 Google Cloud 控制台的「Cloud Scheduler」頁面。
按一下工作旁邊的核取方塊。
按一下頁面頂端的 [Delete] (刪除) 按鈕,並確認您要刪除工作。
後續步驟
- 查看 Google Cloud 的參考架構、圖表和最佳做法。歡迎瀏覽我們的 Cloud Architecture Center。