

PyTorch on Cloud TPU
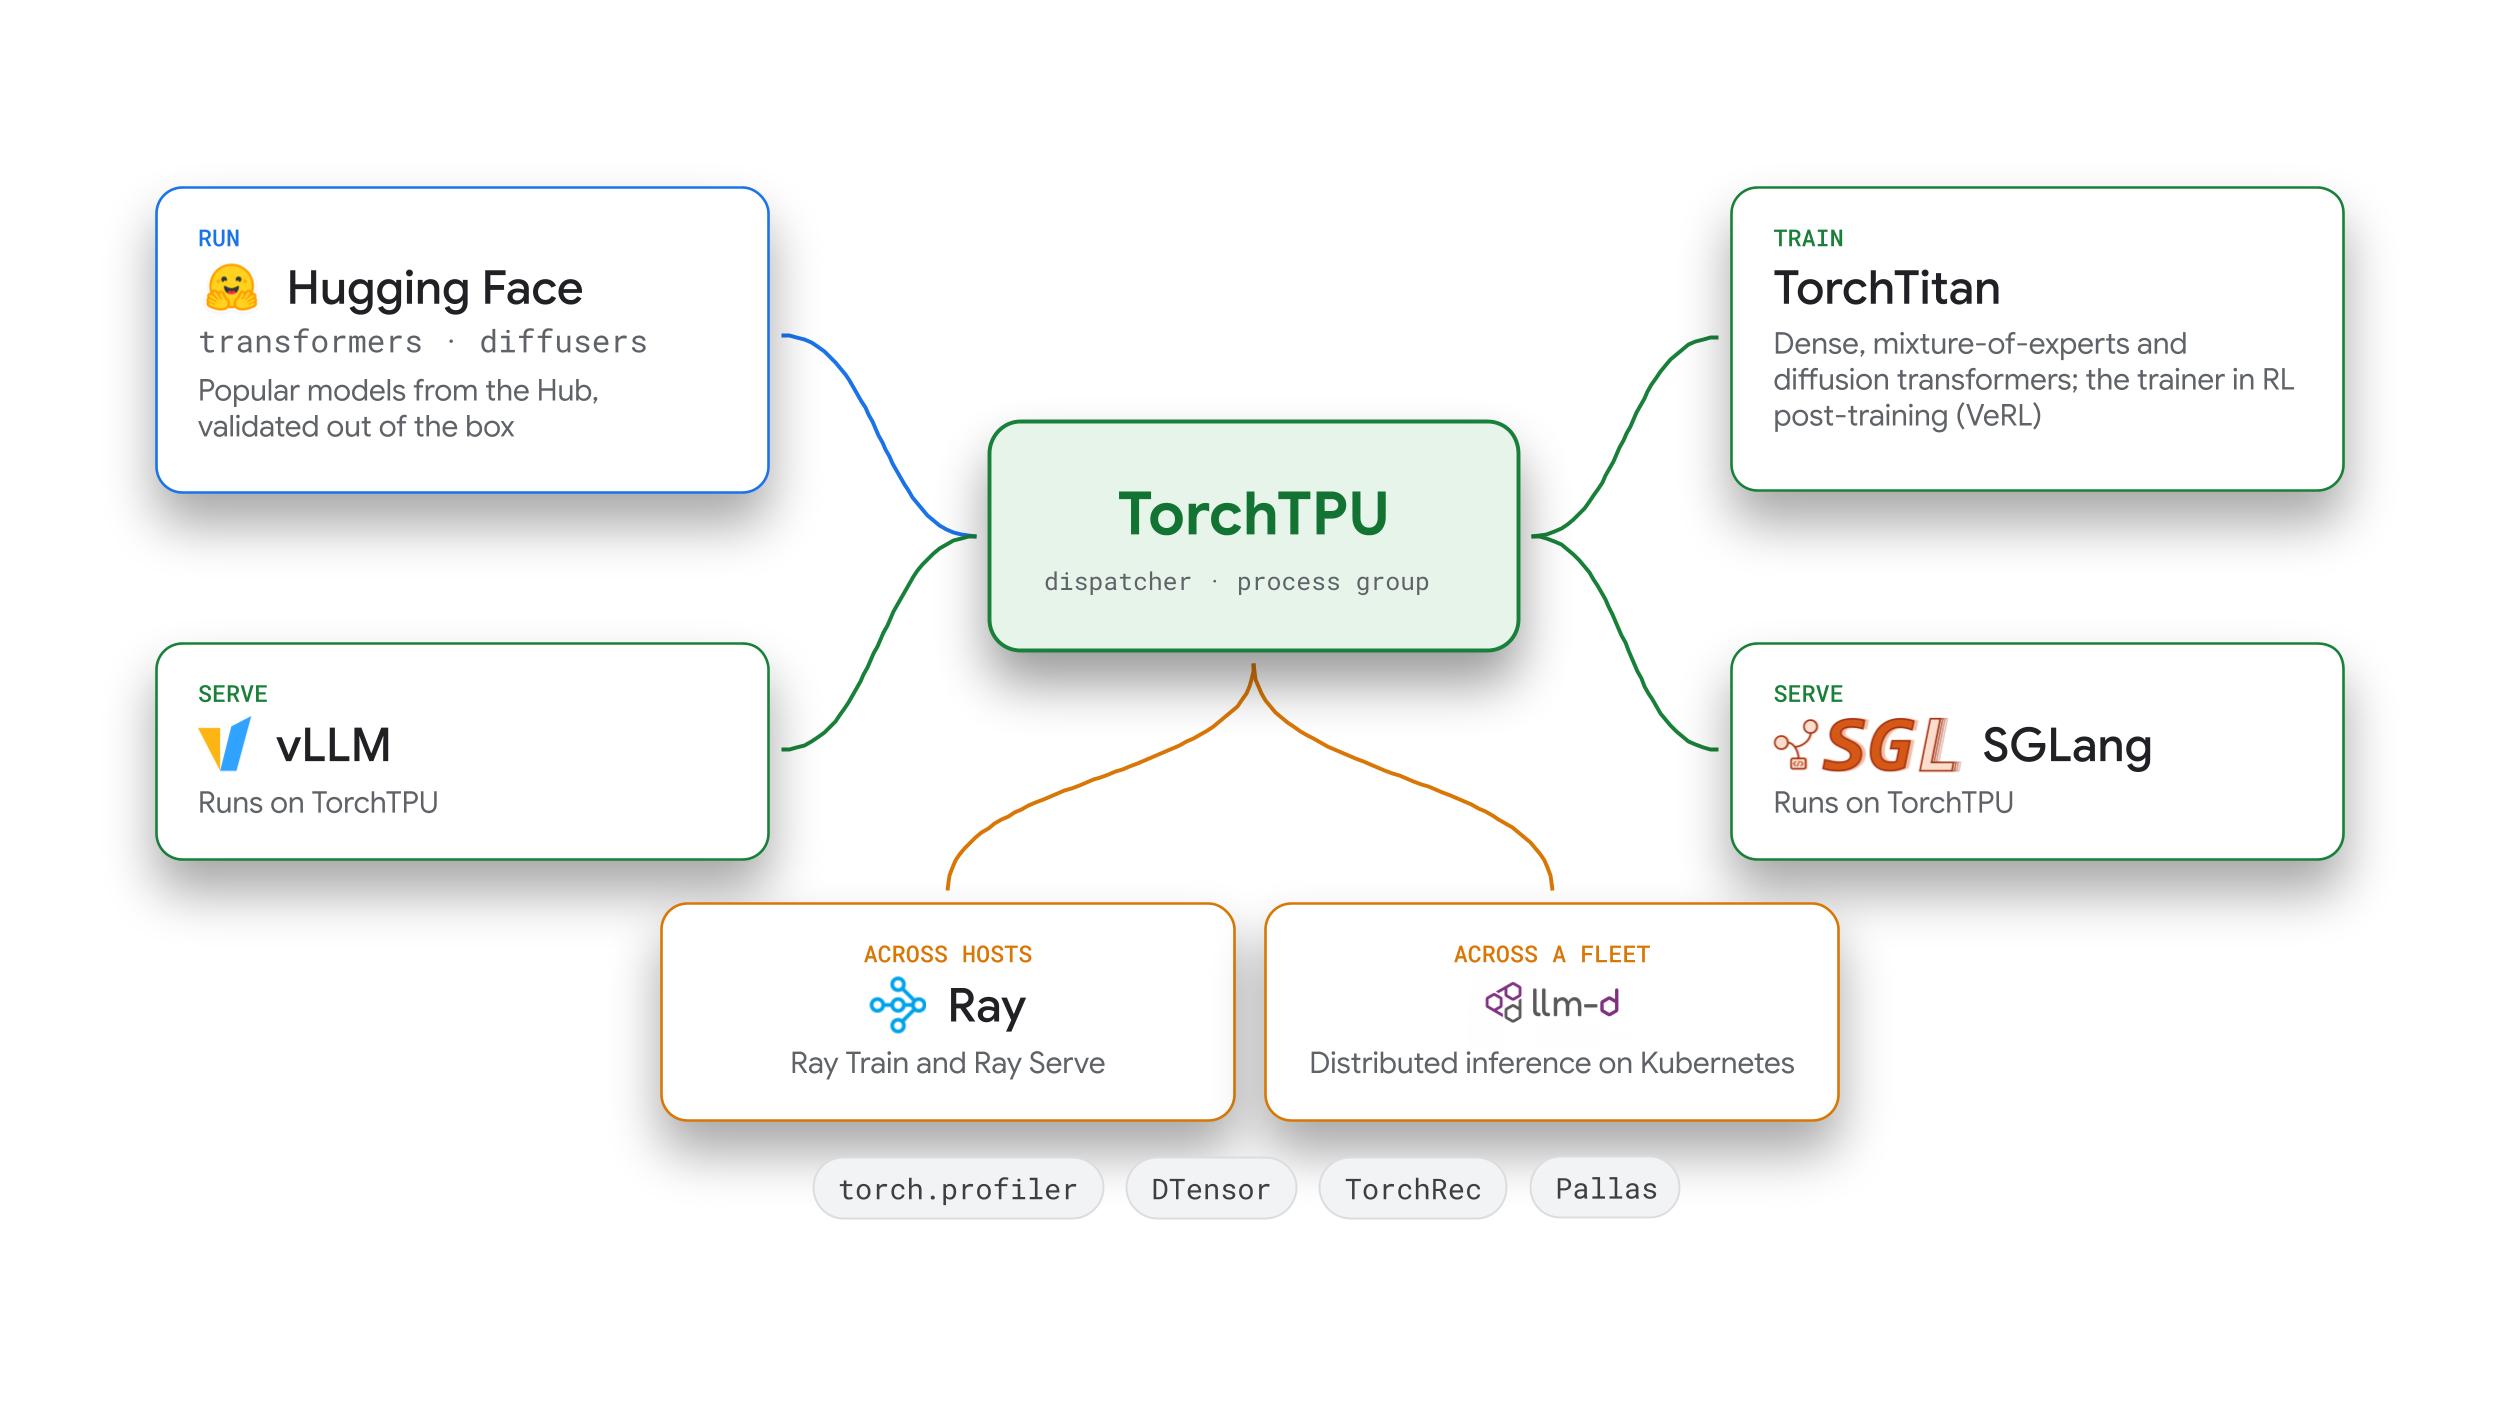
PyTorch on Cloud TPU lets you train, fine-tune, and serve open models on Cloud TPU hardware using standard PyTorch semantics and distributed APIs. It integrates with the ecosystem tools you already use, including Hugging Face, vLLM, SGLang, llm-d, TorchTitan, TorchRec, and Ray.
At the foundation of the stack is TorchTPU, an open-source, PyTorch-native backend co-developed with the PyTorch team at Meta. TorchTPU provides libraries, frameworks, and tools for every stage of the machine learning lifecycle, from core runtime execution and custom kernels to production inference, large-scale training, and cluster orchestration.
Get started
- Run PyTorch models on TPUs: start with TorchTPU and the TorchTPU documentation.
- Serve large language models (LLMs) and multimodal models: use vLLM-TorchTPU or SGLang-TorchTPU.
- Route requests across a Kubernetes fleet: use llm-d.
- Pre-train or fine-tune foundation models: use TorchTitan on TPU (or TorchRec for recommendation models).
- Scale data processing, training, reinforcement learning (RL), and serving pipelines: use Ray.
- Onboard, profile, and tune models with your coding assistant: use the TPU agent suite (Preview).
TorchTPU: PyTorch-native backend for Cloud TPU
TorchTPU provides the device
backend, graph compiler integration, and custom kernel APIs for PyTorch on
Cloud TPU. Built with the PyTorch team, TorchTPU lets you debug models
interactively in eager mode, compile model code with torch.compile, and scale
across slices with torch.distributed (tpu_dist).
To install TorchTPU, run the following command:
pip install torch_tpu
To run a tensor operation on a Cloud TPU, run the following Python code:
import torch

device = torch.device("tpu")

x = torch.randn((4, 4), device=device)
y = torch.ones((4, 4), device=device)
result = torch.matmul(x, y).cpu()

print(f"Executed on device: {x.device}")
print(f"Result shape on CPU: {result.shape}, sum: {result.sum():.4f}")
The following video gives you a brief overview of TorchTPU:
For more information, see TorchTPU is now open source: Run native PyTorch on TPUs, and see How TorchTPU works.
Motivation
Although Cloud TPUs have historically been paired with JAX and TensorFlow, running PyTorch on TPUs previously required lazy-tensor graph recording (PyTorch/XLA), which often meant adding code to mark compilable regions. TorchTPU runs operations eagerly by default using PyTorch's standard one-process-per-device execution model, so existing workloads and libraries run without structural rewrites.
Design
TorchTPU brings PyTorch-native TPU support to PyTorch around three design goals:
- Standard PyTorch semantics: runs one process per device and preserves PyTorch tensor views and in-place mutations without a JAX runtime dependency.
- Eager execution by default: runs standard PyTorch models immediately in eager mode for interactive debugging and step-by-step inspection.
- Compiler and kernel optimizations: provides operator fusion in eager mode
(in addition to operator-by-operator eager execution),
torch.compileintegration with dynamic shape bounds to reduce recompilations, and custom kernel APIs.
For graph compilation, torch.compile captures the PyTorch computation graph
with TorchDynamo and compiles it into TPU machine code through OpenXLA and
StableHLO. Collective operations run at the torch.distributed process group
level (tpu_dist).
Key strengths
- Operator, model, and Hugging Face support: TorchTPU supports standard
PyTorch (ATen) operators in forward and backward passes and is continuously
tested against popular Hugging Face models. You can deploy models in
Transformers v5 by passing
device_map="tpu", run Diffusers pipelines with eager mode,torch.compile, and tensor parallelism, and profile workloads withtorch.profilerin TensorBoard and XProf. - Single-chip to Multislice scaling: the
tpu_distbackend supportsDistributedDataParallel(DDP),FullyShardedDataParallel(FSDP2), andDTensor. In addition,torch.tpu.distributed.topology_aware_meshmaps parallelism dimensions onto the physical TPU interconnects. - Configurable eager execution modes: provides three eager execution modes:
Strict(default): dispatches operators individually and asynchronously, with standard imperative PyTorch semantics.Debug: runs synchronously with tensor bounds checking.DeferAndFuse: fuses sequences of eager operators to reduce high-bandwidth memory (HBM) traffic.
- Full-graph compilation and caching:
torch.compile(backend="tpu")compiles graphs into TPU executables and caches them across processes, hosts, and job restarts. - Custom TPU kernels: you can call custom Pallas kernels, including kernels that communicate directly between chips, as standard PyTorch functions. You can also use prebuilt kernels from the Tokamax library or author portable tile-based kernels with Helion.
For more information, see the TorchTPU documentation, ask questions in the PyTorch on TPU discussion forum, or report issues on the TorchTPU issue tracker.
Production inference and serving
For production deployment, PyTorch on Cloud TPU integrates with open-source inference engines and Kubernetes-native distributed serving infrastructure.
vLLM-TorchTPU and SGLang-TorchTPU: Inference engines
vLLM-TorchTPU and SGLang-TorchTPU are TorchTPU backends for the vLLM and SGLang inference engines. Both backends run open models such as Qwen, DeepSeek, GLM, Kimi, GPT-OSS, and Gemma 4.
For more information, see the vLLM-TorchTPU documentation and Announcing new vLLM and SGLang inference engines on TPU.
Motivation
Serving reasoning, multimodal, and tool-using workloads often requires custom model definitions, speculative decoding methods, and quantization schemes. Building the vLLM and SGLang backends on TorchTPU lets you customize and debug your serving stack directly in PyTorch.
Design
Both backends retain standard vLLM and SGLang schedulers, key-value (KV) cache managers, and API servers while using TorchTPU execution and custom Pallas operators underneath. Most models run their standard PyTorch model definitions, whereas compute-intensive blocks invoke Pallas kernels inside the compiled graph so hardware-specific kernels can be updated independently.
Key strengths
- Parallelism, quantization, and speculative decoding: supports tensor, data, expert, pipeline, and context parallelism across hosts, along with multimodal (image and video) and embedding inputs. Supported speculative decoding methods include multi-token prediction (MTP), EAGLE-3, DFlash, DSpark, and n-gram matching. Supported quantization formats include 8-bit (FP8) KV caches and 8-bit (FP8) and 4-bit (MXFP4 and NVFP4) floating-point model checkpoints.
- Two-tier prefix caching, tool calling, and structured output: automatic prefix caching retains active prefixes in HBM and offloads older prefixes to host memory to avoid recomputation on multi-turn requests. This caching supports hybrid attention and recurrent models, and tool calling and structured output are built in.
- Overlapped KV cache transfers with TPU Sync: supports disaggregated prefill and decode serving (separating prompt processing and token generation onto distinct worker pools) across hosts and host KV offloading using TPU Sync. TPU Sync is an open-source C++ library that reads PyTorch device buffers directly on background threads without copying data through host CPU memory.
For more information about vLLM-TorchTPU, see the vLLM-TorchTPU repository and the vLLM-TorchTPU recipes for TPU7x, ask questions in the vLLM Slack channel, or report issues on the vLLM-TorchTPU issue tracker.
For more information about SGLang-TorchTPU, see the SGLang-TorchTPU repository or report issues on the SGLang-TorchTPU issue tracker.
llm-d: Kubernetes-native distributed inference
llm-d is an open-source Cloud Native Computing Foundation (CNCF) sandbox framework for distributed LLM inference on Kubernetes. It is developed with Red Hat, IBM, Google Cloud, and a community of more than 500 contributors and 35 organizations.
Motivation
Although single-instance inference engines manage per-replica execution, production fleets must handle traffic spikes, multi-tenant priorities, fleet-wide context sharing, and zero-downtime rollouts. llm-d provides the cluster-level routing and operations layer to coordinate a fleet of inference servers.
Design
llm-d runs in front of model servers such as vLLM and SGLang on Kubernetes. llm-d provides the following:
- Routes requests based on prefix cache state and replica load.
- Coordinates disaggregated prefill and decode worker pools.
- Supports mixture-of-experts (MoE) sharding and asynchronous batch inference.
- Manages tiered KV cache offloading across device memory, host memory, and storage.
Key strengths
- Multi-turn session routing: routes multi-turn conversations to replicas that hold their cached context. Turn-priority scheduling and stateful Responses API support let agents reuse context across turns to reduce recomputation.
- Multi-tenant quality of service: priority and fairness flow control lets latency-sensitive requests and bursty agent workloads share a fleet without resource starvation.
- Fleet operations and rolling updates: provides a v1 configuration API, router high availability, and coordinated rolling updates that manage prefill and decode replicas as a single logical unit.
- Native TorchTPU serving on Google Kubernetes Engine (GKE): you can serve Cloud TPUs alongside other accelerators behind one llm-d endpoint and manage vLLM-TorchTPU and SGLang-TorchTPU replicas with standard Kubernetes tooling.
For more information, see llm-d Router in About GKE Inference Gateway and the llm-d GKE gateway guide, ask questions in the llm-d Slack channel, or report issues on the llm-d issue tracker.
Train, fine-tune, and domain libraries
To pre-train, fine-tune, and adapt large models, TorchTPU provides reference training recipes and domain-specific libraries tuned for TPU hardware.
TorchTitan on TPU: Large-scale training reference
TorchTitan on TPU extends TorchTitan, the PyTorch modular reference platform for generative AI training, with TPU sharding passes, custom kernels, and training recipes.
For more information, see Integrating TorchTPU into TorchTitan and Optimizing Models for TPU.
Motivation
Scaling training across multi-host TPU slices requires sharding parameters across the chip interconnect and overlapping communication with computation. Google and Meta co-developed TPU sharding and compilation passes inside TorchTitan so you don't need to design custom TPU sharding strategies or manually schedule communication.
Design
You write models in single-device PyTorch without accelerator-specific code. TorchTitan configures model layers from configuration files, letting you replace individual layers with custom Pallas kernels (such as Splash Attention) without editing the model definition or training loop.
TorchTitan's SimpleFSDP implementation places parameter sharding operations
directly inside the compiled graph so the XLA compiler can overlap device
communication with computation. In addition, whole-step graph compilation
captures the entire training step as a single XLA program. For
Multislice runs, hybrid sharding (HSDP) shards within each slice
over the inter-chip interconnect (ICI) and replicates across slices over the
data center network (DCN). This layout limits cross-slice traffic to a single
gradient reduction per step.
Key strengths
- Pre-training and RL post-training recipes: includes reference recipes for dense LLMs (Llama 3, Qwen 3, and MuseGlimmer 30B), MoE models (Qwen 3 235B, validated on up to 8,192 TPU7x chips), and diffusion transformers (FLUX.1). For RL post-training (such as group relative policy optimization, or GRPO), VeRL (Preview) delegates parameter updates to TorchTitan. It then pushes updated weights to serving engines to generate training trajectories (rollouts).
- Preconfigured compiler and parallelism settings: recipe configurations include preconfigured compiler and parallelism settings so you can tune model FLOPs utilization (MFU) through configuration files rather than code changes.
- Onboarding for new architectures: the Hugging Face Transformers modeling backend runs Hugging Face Hub model checkpoints (including MoE models without expert parallelism) through the TorchTitan trainer. For full model ports, TorchTitan includes a step-by-step onboarding skill for engineers and coding agents.
- Standalone component reuse: you can adopt TorchTitan end to end or import individual modules, custom operators, and compiler flags into an existing training codebase.
For more information, see the TorchTitan on TPU getting started guide and the TorchTitan Qwen3-8B training recipe for TPU7x, ask questions in the TorchTitan discussion forum, or report issues on the TorchTitan issue tracker.
TorchRec: Recommendation systems
TorchRec is a PyTorch domain library that provides distributed embedding tables and sharding primitives for recommendation models. On Cloud TPU, TorchRec offloads sparse embedding table lookups to dedicated TPU SparseCore processors while running dense matrix operations on the TPU TensorCores.
For more information about TorchRec, see the TorchRec documentation, ask questions in the PyTorch on TPU discussion forum, or report issues on the TorchRec issue tracker.
Cluster orchestration and developer tools
To scale multi-node pipelines and automate model onboarding, the TorchTPU ecosystem integrates with Ray and provides coding agent extensions with access to TPU documentation.
Ray: Distributed training, serving, and RL
Ray scales Python and AI workloads across clusters using Ray Train, Ray Serve, Ray Data, Ray Core, and RL frameworks such as VeRL (Preview). For more information, see Announcing Ray support for PyTorch on Google TPUs.
Motivation
Multislice training and multi-stage pipelines (such as RL
workflows that combine data preprocessing, training, and rollout generation)
require automated slice provisioning, topology discovery, and fault-tolerant
worker coordination. Standalone launch utilities such as torchrun don't
provision TPU slices or coordinate multi-stage actor pipelines, so Ray manages
cluster-wide scheduling and placement for TorchTPU workloads.
Design
When you submit a job specifying the TPU generation, topology, and worker count,
Ray's SlicePlacementGroup API reserves complete TPU slices so all workers in a
slice are gang-scheduled together over the inter-chip interconnect (ICI). Ray
isolates one logical TPU device per worker (TPU_VISIBLE_CHIPS) and configures
TorchTPU's slice-builder addresses and mesh topology. In Ray Train, setting
use_tpu=True in ScalingConfig with TorchTrainer initializes the tpu
device and tpu_dist process group automatically across workers.
Key strengths
- Topology-matched gang scheduling:
SlicePlacementGroupandTorchTrainermatch worker placement across hosts to the physical TPU generation and slice layout to prevent resource fragmentation. - Automated failure recovery: runs distributed DDP, FSDP2, and DTensor training jobs across TPU slices on GKE with automated recovery when a worker or slice fails.
- Direct-to-TPU data prefetching: Ray Data's
iter_torch_batchesmethod prefetches batches as PyTorch tensors directly into TPU device memory. - Multi-host inference orchestration: Ray Serve LLM (
LLMConfig) reserves aSlicePlacementGroupper replica and deploys OpenAI-compatible vLLM-TorchTPU endpoints across single-host and multi-host TPU slices.
To get started on GKE, see About Ray on GKE and the tutorials on how to Fine-tune models on multi-host TPUs with Ray and TorchTPU and Serve LLMs on multi-host TPUs with Ray and TorchTPU.
TPU agent suite: Coding agents for TPU (Preview)
The TPU agent suite is an open-source extension for coding assistants—including Claude Code and Google Antigravity—focused on transformer inference (dense LLMs and MoE models) on TPU v6e and TPU7x.
For more information, watch the open-source TPU agent suite overview:
Motivation
General-purpose coding assistants often lack current context on TPU hardware topologies, XLA compiler flags, XProf telemetry, and Pallas kernel constraints. The TPU agent suite gives your assistant access to official TPU documentation and structured workflows. This helps prevent invalid flag suggestions and automates iterative profiling and benchmarking.
Design
The suite adds a TPU knowledge base and four task-specific sub-agents to your
existing coding assistant. A router agent (tpu-agent) delegates each prompt
to the appropriate sub-agent without running commands itself. Any command
execution on your TPU VM or GKE cluster requires your approval,
and tuning loops run a bounded number of recorded attempts before returning
results.
Key strengths
- Model onboarding and accuracy verification: the
tpu-model-onboardingagent resolves unsupported operators and selects a serving path (vLLM-TorchTPU or standard PyTorch). It also compares layer-by-layer outputs against the CPU reference model to verify numerical accuracy. - Crash and bottleneck diagnostics: the
tpu-diagnosticsagent analyzes crash logs, inspects XProf profiles and XLA compiler traces, and isolates runtime bottlenecks. - Custom Pallas kernel development: the
tpu-kernel-developmentagent helps write and autotune custom Pallas TPU kernels within a bounded iteration budget. - Documentation lookup with citations: the
tpu-knowledge-baseagent answers technical questions with explicit citations to official TPU documentation and tutorials, and states when a topic isn't covered.
For more information, see the TPU agent suite documentation, share feedback and ask questions in TPU agent suite GitHub Discussions, or report issues on the TPU agent suite issue tracker.
What's next
- Get started with the TorchTPU documentation.
- Try the TorchTitan on TPU recipes.
- Deploy inference workloads with vLLM-TorchTPU and SGLang-TorchTPU.
- Ask questions in the PyTorch on TPU discussion forum.
- To discuss a specific use case with the Google product and engineering team, send an email to torchtpu-feedback@google.com.