


使用 Envoy 設定服務安全性
請按照本指南的操作說明,為使用 Cloud Service Mesh 和 Envoy Proxy 部署的服務設定驗證和授權。如要進一步瞭解 Cloud Service Mesh 服務安全性,請參閱「Cloud Service Mesh 服務安全性」。
需求條件
使用 Envoy 設定 Cloud Service Mesh 的服務安全性之前,請確認您的設定符合下列必要條件:
您可以滿足部署 Cloud Service Mesh 的所有需求。如要進一步瞭解這些需求條件,請參閱「準備使用 Envoy 和無 Proxy 工作負載設定服務路由 API」。
您具備足夠權限,可建立或更新 Cloud Service Mesh 和Google Cloud 服務網格資源,以便使用服務安全性,詳情請參閱「準備使用 Envoy 和無 Proxy 工作負載設定服務轉送 API」。
準備設定
下列各節說明設定 Cloud Service Mesh 安全性服務前,必須完成的工作。這些工作包括:
- 更新 Google Cloud CLI
- 設定變數
- 啟用 Cloud Service Mesh 搭配憑證授權單位服務所需的 API
更新 gcloud 指令列工具
如要更新 Google Cloud CLI,請在本機電腦上執行下列指令:
gcloud components update
設定變數
設定下列變數,以便在執行本文件中的範例時,複製及貼上具有一致值的程式碼。請使用下列值。
- PROJECT_ID:替換成您的專案 ID。
- CLUSTER_NAME:替換成要使用的叢集名稱,例如
secure-td-cluster。 - ZONE:替換成叢集所在的可用區。
- GKE_CLUSTER_URL:替代
https://container.googleapis.com/v1/projects/PROJECT_ID/locations/ZONE/clusters/CLUSTER_NAME - WORKLOAD_POOL:替代
PROJECT_ID.svc.id.goog - K8S_NAMESPACE:替換
default。 - DEMO_CLIENT_SERVICEACCOUNT:替換用戶端 Kubernetes ServiceAccount 的名稱。
- DEMO_SERVER_SERVICEACCOUNT:替換伺服器 Kubernetes ServiceAccount 的名稱。
PROJNUM:替換成專案編號,您可以從 Google Cloud 控制台或使用下列指令取得:
gcloud projects describe PROJECT_ID --format="value(projectNumber)"
SA_GKE:替代
service-PROJNUM@container-engine-robot.iam.gserviceaccount.comCLUSTER_VERSION:替換為可用的最新版本。詳情請參閱搶鮮版版本資訊。最低版本需求為 1.21.4-gke.1801。這是本範例中使用的 GKE 叢集版本。
請在這裡設定值:
# Substitute your project ID
PROJECT_ID=PROJECT_ID

# GKE cluster name and zone for this example.
CLUSTER_NAME=CLUSTER_NAME
ZONE=ZONE

# GKE cluster URL derived from the above
GKE_CLUSTER_URL="https://container.googleapis.com/v1/projects/PROJECT_ID/locations/ZONE/clusters/CLUSTER_NAME"

# Workload pool to be used with the GKE cluster
WORKLOAD_POOL="PROJECT_ID.svc.id.goog"

# Kubernetes namespace to run client and server demo.
K8S_NAMESPACE=K8S_NAMESPACE
DEMO_CLIENT_SERVICEACCOUNT=DEMO_CLIENT_SERVICEACCOUNT
DEMO_SERVER_SERVICEACCOUNT=DEMO_SERVER_SERVICEACCOUNT

# Compute other values
# Project number for your project
PROJNUM=PROJNUM

CLUSTER_VERSION=CLUSTER_VERSION
SA_GKE=service-PROJNUM@container-engine-robot.iam.gserviceaccount.com
啟用 API
使用 gcloud services enable 指令,啟用透過 憑證授權單位服務 設定 Cloud Service Mesh 安全性所需的所有 API。
gcloud services enable \
   container.googleapis.com \
   cloudresourcemanager.googleapis.com \
   compute.googleapis.com \
   trafficdirector.googleapis.com \
   networkservices.googleapis.com \
   networksecurity.googleapis.com \
   privateca.googleapis.com \
   gkehub.googleapis.com
建立或更新 GKE 叢集
Cloud Service Mesh 服務安全性取決於 CA 服務與 GKE 的整合。除了設定需求外,GKE 叢集還必須符合下列需求:
- 叢集版本至少須為 1.21.4-gke.1801。如果您需要後續版本的功能,可以從快速發布管道取得該版本。
- GKE 叢集必須啟用並設定網格憑證,如「建立憑證授權單位以核發憑證」所述。
建立使用 Workload Identity Federation for GKE 的新叢集。如果您要更新現有叢集,請跳到下一個步驟。您為
--tags指定的值,必須與「使用 Cloud Load Balancing 元件設定 Cloud Service Mesh」一節中,傳遞至firewall-rules create指令--target-tags旗標的名稱相符。# Create a GKE cluster with GKE managed mesh certificates. gcloud container clusters create CLUSTER_NAME \ --release-channel=rapid \ --scopes=cloud-platform \ --image-type=cos_containerd \ --machine-type=e2-standard-2 \ --zone=ZONE \ --workload-pool=PROJECT_ID.svc.id.goog \ --enable-mesh-certificates \ --cluster-version=CLUSTER_VERSION \ --enable-ip-alias \ --tags=allow-health-checks \ --workload-metadata=GKE_METADATA
叢集會在幾分鐘內建立完畢。
如果使用現有叢集,請啟用 Workload Identity Federation for GKE 和 GKE 網格憑證。請確認叢集是使用
--enable-ip-alias旗標建立,該旗標無法與update指令搭配使用。gcloud container clusters update CLUSTER_NAME \ --enable-mesh-certificates
執行下列指令,將
kubectl指令的預設叢集切換為新叢集:gcloud container clusters get-credentials CLUSTER_NAME \ --zone ZONE
在多叢集環境中部署
如果您是在多叢集環境中部署,請按照本節所述的一般程序操作。這些操作說明假設用戶端 Pod 在一個叢集中執行,而伺服器 Pod 在另一個叢集中執行。
按照上一節的操作說明建立或更新叢集。
使用下列指令,擷取各叢集的 Pod IP 位址範圍:
gcloud compute firewall-rules list \
  --filter="name~gke-{CLUSTER_NAME}-[0-9a-z]*-all" \
  --format="value(sourceRanges)"
舉例來說,如果叢集名稱為
cluster-a和cluster-b,指令會傳回類似下列的結果:cluster-a, pod CIDR: 10.4.0.0/14, node network tag: gke-cluster-a-9cd18751-node cluster-b, pod CIDR: 10.8.0.0/14, node network tag: gke-cluster-b-acd14479-node
建立虛擬私有雲防火牆規則,允許叢集彼此通訊。舉例來說,下列指令會建立防火牆規則,允許
cluster-aPod IP 位址與cluster-b節點通訊:gcloud compute firewall-rules create per-cluster-a-pods \ --allow="tcp,udp,icmp,esp,ah,sctp" \ --target-tags="gke-cluster-b-acd14479-node"
下列指令會建立防火牆規則,允許
cluster-bPod IP 位址與cluster-a節點通訊:gcloud compute firewall-rules create per-cluster-b-pods \ --allow="tcp,udp,icmp,esp,ah,sctp" \ --target-tags="gke-cluster-a-9cd18751-node"
向機群註冊叢集
將您在「建立 GKE 叢集」中建立或更新的叢集註冊至機群。註冊叢集後,您就能更輕鬆地設定多個專案的叢集。
請注意,每個步驟最多可能需要十分鐘才能完成。
向機群註冊叢集:
gcloud container fleet memberships register CLUSTER_NAME \
  --gke-cluster=ZONE/CLUSTER_NAME \
  --enable-workload-identity --install-connect-agent \
  --manifest-output-file=MANIFEST-FILE_NAME
請依下列方式替換變數:
- CLUSTER_NAME:叢集名稱。
- ZONE:叢集所在的可用區。
- MANIFEST-FILE_NAME:這些指令產生註冊資訊清單的路徑。
註冊程序成功後,您會看到類似下列的訊息:
Finished registering the cluster CLUSTER_NAME with the fleet.
將產生的資訊清單檔案套用至叢集:
kubectl apply -f MANIFEST-FILE_NAME
如果套用程序成功,您會看到類似下列的訊息:
namespace/gke-connect created
serviceaccount/connect-agent-sa created
podsecuritypolicy.policy/gkeconnect-psp created
role.rbac.authorization.k8s.io/gkeconnect-psp:role created
rolebinding.rbac.authorization.k8s.io/gkeconnect-psp:rolebinding created
role.rbac.authorization.k8s.io/agent-updater created
rolebinding.rbac.authorization.k8s.io/agent-updater created
role.rbac.authorization.k8s.io/gke-connect-agent-20210416-01-00 created
clusterrole.rbac.authorization.k8s.io/gke-connect-impersonation-20210416-01-00 created
clusterrolebinding.rbac.authorization.k8s.io/gke-connect-impersonation-20210416-01-00 created
clusterrolebinding.rbac.authorization.k8s.io/gke-connect-feature-authorizer-20210416-01-00 created
rolebinding.rbac.authorization.k8s.io/gke-connect-agent-20210416-01-00 created
role.rbac.authorization.k8s.io/gke-connect-namespace-getter created
rolebinding.rbac.authorization.k8s.io/gke-connect-namespace-getter created
secret/http-proxy created
deployment.apps/gke-connect-agent-20210416-01-00 created
service/gke-connect-monitoring created
secret/creds-gcp create
從叢集取得成員資格資源:
kubectl get memberships membership -o yaml
輸出內容應包含機群指派的 Workload Identity 集區,其中 PROJECT_ID 是您的專案 ID:
workload_identity_pool: PROJECT_ID.svc.id.goog
這表示叢集已成功註冊。
建立憑證授權單位來核發憑證
如要將憑證核發給 Pod,請建立 CA 服務集區和下列憑證授權單位 (CA):
- 根 CA。這是所有已核發網格憑證的信任根。您可以使用現有的根 CA (如有)。在
enterprise級別中建立根 CA,這個級別適用於長期、低量的憑證核發。 - 從屬 CA。這個 CA 會為工作負載核發憑證。在部署叢集的區域建立從屬 CA。在
devops級別中建立從屬 CA,這個級別適用於短期、大量核發憑證。
建立從屬 CA 為選用步驟,但強烈建議您建立,而非使用根 CA 核發 GKE 網格憑證。如果您決定使用根 CA 核發網格憑證,請務必保留預設的設定型核發模式。
從屬 CA 可以位於與叢集不同的區域,但強烈建議您在叢集所在的區域建立從屬 CA,以達到最佳效能。不過,您可以在不同區域建立根 CA 和從屬 CA,不會影響效能或可用性。
CA 服務支援下列區域:
| 區域名稱 | 地區說明 |
|---|---|
asia-east1 |
台灣 |
asia-east2 |
香港 |
asia-northeast1 |
東京 |
asia-northeast2 |
大阪 |
asia-northeast3 |
首爾 |
asia-south1 |
孟買 |
asia-south2 |
德里 |
asia-southeast1 |
新加坡 |
asia-southeast2 |
雅加達 |
australia-southeast1 |
雪梨 |
australia-southeast2 |
墨爾本 |
europe-central2 |
華沙 |
europe-north1 |
芬蘭 |
europe-southwest1 |
馬德里 |
europe-west1 |
比利時 |
europe-west2 |
倫敦 |
europe-west3 |
法蘭克福 |
europe-west4 |
荷蘭 |
europe-west6 |
蘇黎世 |
europe-west8 |
米蘭 |
europe-west9 |
巴黎 |
europe-west10 |
柏林 |
europe-west12 |
杜林 |
me-central1 |
杜哈 |
me-central2 |
達曼 |
me-west1 |
特拉維夫 |
northamerica-northeast1 |
蒙特婁 |
northamerica-northeast2 |
多倫多 |
southamerica-east1 |
聖保羅 |
southamerica-west1 |
聖地亞哥 |
us-central1 |
愛荷華州 |
us-east1 |
南卡羅來納州 |
us-east4 |
北維吉尼亞州 |
us-east5 |
哥倫布 |
us-south1 |
達拉斯 |
us-west1 |
奧勒岡州 |
us-west2 |
洛杉磯 |
us-west3 |
鹽湖城 |
us-west4 |
拉斯維加斯 |
您也可以執行下列指令,查看支援的位置清單:
gcloud privateca locations list
將 IAM
roles/privateca.caManager授予建立 CA 集區和 CA 的個人。請注意,MEMBER 的正確格式為user:userid@example.com。如果該使用者是目前的使用者,您可以使用殼層指令$(gcloud auth list --filter=status:ACTIVE --format="value(account)")取得目前的使用者 ID。gcloud projects add-iam-policy-binding PROJECT_ID \ --member=MEMBER \ --role=roles/privateca.caManager
將 CA 服務的
role/privateca.admin角色授予需要修改 IAM 政策的個人,其中MEMBER是需要這項存取權的個人,具體來說,就是執行後續步驟來授予privateca.auditor和privateca.certificateManager角色的任何個人:gcloud projects add-iam-policy-binding PROJECT_ID \ --member=MEMBER \ --role=roles/privateca.admin
建立根 CA 服務集區。
gcloud privateca pools create ROOT_CA_POOL_NAME \
  --location ROOT_CA_POOL_LOCATION \
  --tier enterprise
建立根憑證授權單位。
gcloud privateca roots create ROOT_CA_NAME --pool ROOT_CA_POOL_NAME \
  --subject "CN=ROOT_CA_NAME, O=ROOT_CA_ORGANIZATION" \
  --key-algorithm="ec-p256-sha256" \
  --max-chain-length=1 \
  --location ROOT_CA_POOL_LOCATION
在這個示範設定中,請為變數使用下列值:
- ROOT_CA_POOL_NAME=td_sec_pool
- ROOT_CA_NAME=pkcs2-ca
- ROOT_CA_POOL_LOCATION=us-east1
- ROOT_CA_ORGANIZATION="TestCorpLLC"
建立從屬集區和從屬 CA。確認預設的設定型核發模式仍處於允許狀態。
gcloud privateca pools create SUBORDINATE_CA_POOL_NAME \
  --location SUBORDINATE_CA_POOL_LOCATION \
  --tier devops
gcloud privateca subordinates create SUBORDINATE_CA_NAME \
  --pool SUBORDINATE_CA_POOL_NAME \
  --location SUBORDINATE_CA_POOL_LOCATION \
  --issuer-pool ROOT_CA_POOL_NAME \
  --issuer-location ROOT_CA_POOL_LOCATION \
  --subject "CN=SUBORDINATE_CA_NAME, O=SUBORDINATE_CA_ORGANIZATION" \
  --key-algorithm "ec-p256-sha256" \
  --use-preset-profile subordinate_mtls_pathlen_0
在這個示範設定中,請為變數使用下列值:
- SUBORDINATE_CA_POOL_NAME="td-ca-pool"
- SUBORDINATE_CA_POOL_LOCATION=us-east1
- SUBORDINATE_CA_NAME="td-ca"
- SUBORDINATE_CA_ORGANIZATION="TestCorpLLC"
- ROOT_CA_POOL_NAME=td_sec_pool
- ROOT_CA_POOL_LOCATION=us-east1
將根 CA 集區的 IAM
privateca.auditor角色授予 GKE 服務代理,允許其存取:gcloud privateca pools add-iam-policy-binding ROOT_CA_POOL_NAME \ --location ROOT_CA_POOL_LOCATION \ --role roles/privateca.auditor \ --member="serviceAccount:service-PROJNUM@container-engine-robot.iam.gserviceaccount.com"
為從屬 CA 集區授予 IAM
privateca.certificateManager角色,允許 GKE 服務代理存取:gcloud privateca pools add-iam-policy-binding SUBORDINATE_CA_POOL_NAME \ --location SUBORDINATE_CA_POOL_LOCATION \ --role roles/privateca.certificateManager \ --member="serviceAccount:service-PROJNUM@container-engine-robot.iam.gserviceaccount.com"
儲存下列
WorkloadCertificateConfigYAML 設定,指示叢集如何核發網格憑證:apiVersion: security.cloud.google.com/v1 kind: WorkloadCertificateConfig metadata: name: default spec: # Required. The CA service that issues your certificates. certificateAuthorityConfig: certificateAuthorityServiceConfig: endpointURI: ISSUING_CA_POOL_URI # Required. The key algorithm to use. Choice of RSA or ECDSA. # # To maximize compatibility with various TLS stacks, your workloads # should use keys of the same family as your root and subordinate CAs. # # To use RSA, specify configuration such as: # keyAlgorithm: # rsa: # modulusSize: 4096 # # Currently, the only supported ECDSA curves are "P256" and "P384", and the only # supported RSA modulus sizes are 2048, 3072 and 4096. keyAlgorithm: rsa: modulusSize: 4096 # Optional. Validity duration of issued certificates, in seconds. # # Defaults to 86400 (1 day) if not specified. validityDurationSeconds: 86400 # Optional. Try to start rotating the certificate once this # percentage of validityDurationSeconds is remaining. # # Defaults to 50 if not specified. rotationWindowPercentage: 50更改下列內容:
- 叢集執行所在專案的專案 ID:
PROJECT_ID
- 核發網格憑證 (ISSUING_CA_POOL_URI) 的 CA 完整 URI。這可以是從屬 CA (建議) 或根 CA。格式如下:
//privateca.googleapis.com/projects/PROJECT_ID/locations/SUBORDINATE_CA_POOL_LOCATION/caPools/SUBORDINATE_CA_POOL_NAME
- 叢集執行所在專案的專案 ID:
儲存下列
TrustConfigYAML 設定,指示叢集如何信任核發的憑證:apiVersion: security.cloud.google.com/v1 kind: TrustConfig metadata: name: default spec: # You must include a trustStores entry for the trust domain that # your cluster is enrolled in. trustStores: - trustDomain: PROJECT_ID.svc.id.goog # Trust identities in this trustDomain if they appear in a certificate # that chains up to this root CA. trustAnchors: - certificateAuthorityServiceURI: ROOT_CA_POOL_URI更改下列內容:
- 叢集執行所在專案的專案 ID:
PROJECT_ID
- 根 CA 集區 (ROOT_CA_POOL_URI) 的完整 URI,格式如下:
//privateca.googleapis.com/projects/PROJECT_ID/locations/ROOT_CA_POOL_LOCATION/caPools/ROOT_CA_POOL_NAME
- 叢集執行所在專案的專案 ID:
將設定套用至叢集:
kubectl apply -f WorkloadCertificateConfig.yaml
kubectl apply -f TrustConfig.yaml
設定身分與存取權管理
如要建立設定所需的資源,您必須具備 compute.NetworkAdmin 角色。這個角色具備所有必要權限,可建立、更新、刪除、列出及使用 (即在其他資源中參照) 必要資源。如果您是專案的擁有者/編輯者,就會自動取得這個角色。
請注意,在後端服務中參照這些資源時,系統不會強制執行 networksecurity.googleapis.com.clientTlsPolicies.use 和 networksecurity.googleapis.com.serverTlsPolicies.use。
如果日後強制執行這些權限,且您使用的是 compute.NetworkAdmin 角色,則在強制執行這項檢查時,您不會注意到任何問題。
如果您使用自訂角色,且日後強制執行這項檢查,請務必加入相應的 .use 權限。否則,您日後可能會發現自訂角色不具備必要權限,無法從後端服務或端點政策參照 clientTlsPolicy 或 serverTlsPolicy。
下列操作說明會建立 Kubernetes ServiceAccount,並授予 Cloud Service Mesh 安全性 API 的存取權:
為伺服器和用戶端部署作業建立 Kubernetes ServiceAccount:
kubectl create serviceaccount --namespace K8S_NAMESPACE DEMO_SERVER_SERVICEACCOUNT
kubectl create serviceaccount --namespace K8S_NAMESPACE DEMO_CLIENT_SERVICEACCOUNT
將
roles/trafficdirector.client角色授予 Kubernetes ServiceAccount:gcloud projects add-iam-policy-binding PROJECT_ID \ --member "principal://iam.googleapis.com/projects/PROJNUM/locations/global/workloadIdentityPools/PROJECT_ID.svc.id.goog/subject/ns/K8S_NAMESPACE/sa/DEMO_SERVER_SERVICEACCOUNT" \ --role roles/trafficdirector.client \ --condition=None gcloud projects add-iam-policy-binding PROJECT_ID \ --member "principal://iam.googleapis.com/projects/PROJNUM/locations/global/workloadIdentityPools/PROJECT_ID.svc.id.goog/subject/ns/K8S_NAMESPACE/sa/DEMO_CLIENT_SERVICEACCOUNT" \ --role roles/trafficdirector.client \ --condition=None
設定 Cloud Service Mesh
請按照下列操作說明安裝邊車容器加入器、設定測試服務,以及完成其他部署工作。
在叢集中安裝 Envoy 邊車容器加入器
請按照「為 GKE Pod 設定 Cloud Service Mesh 並自動插入 Envoy」一文中的下列兩個部分,在叢集中部署及啟用 Envoy 邊車容器插入功能:
- 設定專案資訊
- 安裝 MutatingWebhookConfigurations。請務必將網格名稱設為
sidecar_mesh,並將網路設為「」,即空字串。 - 啟用加入邊車容器功能
請務必完成這兩組操作說明,再設定測試服務。
設定測試服務
安裝 Envoy 邊車容器加入器後,請按照下列操作說明,為部署作業設定測試服務。
wget -q -O -  https://storage.googleapis.com/traffic-director/security/ga/service_sample.yaml | sed -e s/DEMO_SERVER_KSA_PLACEHOLDER/DEMO_SERVER_SERVICEACCOUNT/g > service_sample.yaml

kubectl apply -f service_sample.yaml
service_sample.yaml 檔案包含示範伺服器應用程式的 Podspec。有些註解是 Cloud Service Mesh 安全性專用。
Cloud Service Mesh Proxy 中繼資料
podspec 會指定 proxyMetadata 註解:
spec:
...
      annotations:
        cloud.google.com/proxyMetadata: '{"app": "payments"}'
...
Pod 初始化後,Sidecar Proxy 會擷取這個註解,並傳送至 Cloud Service Mesh。Cloud Service Mesh 接著可以使用這項資訊,傳回篩選過的設定:
- 在本指南後續部分,請注意端點政策會指定端點比對器。
- 端點比對器會指定只有標籤名稱為
app且值為payments的用戶端,才會收到篩選後的設定。
使用由 CA 服務簽署的網格憑證和金鑰
podspec 會指定 enableManagedCerts 註解:
spec:
...
      annotations:
        ...
        cloud.google.com/enableManagedCerts: "true"
...
Pod 初始化後,CA 服務簽署的憑證和金鑰會自動掛接至本機 Sidecar Proxy 檔案系統。
設定傳入流量攔截通訊埠
podspec 會指定 includeInboundPorts 註解:
spec:
...
      annotations:
        ...
        cloud.google.com/includeInboundPorts: "8000"
...
這是伺服器應用程式監聽連線的通訊埠。Pod 初始化後,Sidecar Proxy 會擷取這個註解,並傳送至 Cloud Service Mesh。Cloud Service Mesh 接著會使用這項資訊,傳回經過篩選的設定,攔截傳送至這個通訊埠的所有傳入流量,並套用安全性政策。
健康狀態檢查通訊埠不得與應用程式通訊埠相同。否則,系統會將相同的安全性政策套用至連入健康狀態檢查通訊埠的連線,這可能會導致連線遭拒,進而導致伺服器被誤標為健康狀態不良。
使用 NEG 設定 GKE 服務
GKE 服務必須透過網路端點群組 (NEG) 公開,才能設為 Cloud Service Mesh 後端服務的後端。本設定指南提供的 service_sample.yaml 套件,在下列註解中使用 NEG 名稱 service-test-neg:
...
metadata:
  annotations:
    cloud.google.com/neg: '{"exposed_ports": {"80":{"name": "service-test-neg"}}}'
spec:
  ports:
  - port: 80
    name: service-test
    protocol: TCP
    targetPort: 8000
您不需要變更 service_sample.yaml 檔案。
儲存 NEG 名稱
將 NEG 的名稱儲存在 NEG_NAME 變數中:
NEG_NAME="service-test-neg"
將用戶端應用程式部署至 GKE
執行下列指令,啟動示範用戶端,並將 Envoy Proxy 做為 sidecar,以便示範安全防護功能。
wget -q -O -  https://storage.googleapis.com/traffic-director/security/ga/client_sample.yaml | sed -e s/DEMO_CLIENT_KSA_PLACEHOLDER/DEMO_CLIENT_SERVICEACCOUNT/g > client_sample.yaml

kubectl apply -f client_sample.yaml
用戶端 Podspec 僅包含 enableManagedCerts 註解。必須啟用這項功能,才能為 GKE 代管網格憑證和金鑰掛接必要磁碟區,這些憑證和金鑰是由 CA 服務執行個體簽署。
設定健康狀態檢查、防火牆規則和後端服務資源
在本節中,您將為 Cloud Service Mesh 建立健康狀態檢查、防火牆規則和後端服務資源。
建立健康狀態檢查。
gcloud compute health-checks create http td-gke-health-check \
  --use-serving-port
建立防火牆規則,允許健康狀態檢查工具 IP 位址範圍。
gcloud compute firewall-rules create fw-allow-health-checks \
   --action ALLOW \
   --direction INGRESS \
   --source-ranges 35.191.0.0/16,130.211.0.0/22 \
  --rules tcp
建立後端服務,並將健康狀態檢查與後端服務建立關聯。
gcloud compute backend-services create td-gke-service \
  --global \
  --health-checks td-gke-health-check \
  --load-balancing-scheme INTERNAL_SELF_MANAGED
將先前建立的 NEG 新增至後端服務,做為後端。
gcloud compute backend-services add-backend td-gke-service \
  --global \
  --network-endpoint-group ${NEG_NAME} \
  --network-endpoint-group-zone ZONE \
  --balancing-mode RATE \
 --max-rate-per-endpoint 5
設定 Mesh 和 HTTPRoute 資源
在本節中,您將建立 Mesh 和 HTTPRoute 資源。
建立
Mesh資源規格,並儲存至名為mesh.yaml的檔案。name: sidecar-mesh interceptionPort: 15001
如果您未在
mesh.yaml檔案中指定攔截通訊埠,系統會預設為15001。使用 mesh.yaml 規格建立
Mesh資源。gcloud network-services meshes import sidecar-mesh \ --source=mesh.yaml \ --location=global
建立
HTTPRoute規格,並儲存至名為http_route.yaml的檔案。您可以使用
PROJECT_ID或PROJECT_NUMBER。name: helloworld-http-route hostnames: - service-test meshes: - projects/PROJNUM/locations/global/meshes/sidecar-mesh rules: - action: destinations: - serviceName: "projects/PROJNUM/locations/global/backendServices/td-gke-service"
使用
http_route.yaml檔案中的規格建立HTTPRoute資源。gcloud network-services http-routes import helloworld-http-route \ --source=http_route.yaml \ --location=global
Cloud Service Mesh 設定已完成,現在可以設定驗證和授權政策。
設定服務對服務安全性
請按照下列各節的操作說明,設定服務對服務安全性。
在網格中啟用 mTLS
如要在網格中設定 mTLS,您必須保護傳送至後端服務的外送流量,以及傳送至端點的傳入流量。
政策參考資料格式
請注意,參照伺服器 TLS、用戶端 TLS 和授權政策時,必須採用下列格式:
projects/PROJECT_ID/locations/global/[serverTlsPolicies|clientTlsPolicies|authorizationPolicies]/[server-tls-policy|client-mtls-policy|authz-policy]
例如:
projects/PROJECT_ID/locations/global/serverTlsPolicies/server-tls-policy
projects/PROJECT_ID/locations/global/clientTlsPolicies/client-mtls-policy
projects/PROJECT_ID/locations/global/authorizationPolicies/authz-policy
保護傳出至後端服務的流量
如要保護傳出流量,請先建立用戶端 TLS 政策,執行下列操作:
- 使用
google_cloud_private_spiffe做為clientCertificate的外掛程式,將 Envoy 程式化為使用 GKE 代管網格憑證做為用戶端身分。 - 使用
google_cloud_private_spiffe做為serverValidationCa的外掛程式,可對 Envoy 進行程式設計,以便使用 GKE 代管網格憑證進行伺服器驗證。
接著,將用戶端 TLS 政策附加至後端服務。這會執行下列操作:
- 將用戶端 TLS 政策中的驗證政策,套用至後端服務端點的傳出連線。
- SAN (主體別名) 會指示用戶端,確認所連線伺服器的確切身分。
在檔案
client-mtls-policy.yaml中建立用戶端 TLS 政策:name: "client-mtls-policy" clientCertificate: certificateProviderInstance: pluginInstance: google_cloud_private_spiffe serverValidationCa: - certificateProviderInstance: pluginInstance: google_cloud_private_spiffe匯入用戶端 TLS 政策:
gcloud network-security client-tls-policies import client-mtls-policy \
    --source=client-mtls-policy.yaml --location=global
將用戶端 TLS 政策附加至後端服務。這會對從用戶端傳送至這個後端服務的所有傳出要求,強制執行 mTLS 驗證。
gcloud compute backend-services export td-gke-service \
    --global --destination=demo-backend-service.yaml
在
demo-backend-service.yaml中附加下列程式碼:securitySettings: clientTlsPolicy: projects/PROJECT_ID/locations/global/clientTlsPolicies/client-mtls-policy subjectAltNames: - "spiffe://PROJECT_ID.svc.id.goog/ns/K8S_NAMESPACE/sa/DEMO_SERVER_SERVICEACCOUNT"匯入值:
gcloud compute backend-services import td-gke-service \
    --global --source=demo-backend-service.yaml
(選用) 執行下列指令,檢查要求是否失敗。這是預期的失敗,因為用戶端預期會從端點取得憑證,但端點並未設定安全性政策。
# Get the name of the Podrunning Busybox.
BUSYBOX_POD=$(kubectl get po -l run=client -o=jsonpath='{.items[0].metadata.name}')

# Command to execute that tests connectivity to the service service-test.
TEST_CMD="wget -q -O - service-test; echo"

# Execute the test command on the pod.
kubectl exec -it $BUSYBOX_POD -c busybox -- /bin/sh -c "$TEST_CMD"
輸出內容如下:
wget: server returned error: HTTP/1.1 503 Service Unavailable
保護傳入端點的流量
如要保護傳入流量,請先建立伺服器 TLS 政策,執行下列操作:
- 使用
google_cloud_private_spiffe做為serverCertificate的外掛程式,將 Envoy 程式設計為使用 GKE 代管網格憑證做為伺服器身分。 - 使用
google_cloud_private_spiffe做為clientValidationCa的外掛程式,可對 Envoy 進行程式設計,以便使用 GKE 代管網格憑證進行用戶端驗證。
將伺服器 TLS 政策值儲存至名為
server-mtls-policy.yaml的檔案。name: "server-mtls-policy" serverCertificate: certificateProviderInstance: pluginInstance: google_cloud_private_spiffe mtlsPolicy: clientValidationCa: - certificateProviderInstance: pluginInstance: google_cloud_private_spiffe建立伺服器 TLS 政策:
gcloud network-security server-tls-policies import server-mtls-policy \
    --source=server-mtls-policy.yaml --location=global
建立名為
ep_mtls.yaml的檔案,其中包含端點比對器,並附加伺服器 TLS 政策。endpointMatcher: metadataLabelMatcher: metadataLabelMatchCriteria: MATCH_ALL metadataLabels: - labelName: app labelValue: payments name: "ep" serverTlsPolicy: projects/PROJECT_ID/locations/global/serverTlsPolicies/server-mtls-policy type: SIDECAR_PROXY匯入端點比對器。
gcloud network-services endpoint-policies import ep \
    --source=ep_mtls.yaml --location=global
驗證設定
執行下列 curl 指令。如果要求順利完成,輸出內容會顯示 x-forwarded-client-cert。只有在連線為 mTLS 連線時,系統才會列印標頭。
# Get the name of the Podrunning Busybox.
BUSYBOX_POD=$(kubectl get po -l run=client -o=jsonpath='{.items[0].metadata.name}')

# Command to execute that tests connectivity to the service service-test.
TEST_CMD="wget -q -O - service-test; echo"

# Execute the test command on the pod.
kubectl exec -it $BUSYBOX_POD -c busybox -- /bin/sh -c "$TEST_CMD"
您會看到類似下方的輸出內容:
GET /get HTTP/1.1
Host: service-test
content-length: 0
x-envoy-internal: true
accept: */*
x-forwarded-for: 10.48.0.6
x-envoy-expected-rq-timeout-ms: 15000
user-agent: curl/7.35.0
x-forwarded-proto: http
x-request-id: redacted
x-forwarded-client-cert: By=spiffe://PROJECT_ID.svc.id.goog/ns/K8S_NAMESPACE/sa/DEMO_SERVER_SERVICEACCOUNT;Hash=Redacted;Subject="Redacted;URI=spiffe://PROJECT_ID.svc.id.goog/ns/K8S_NAMESPACE/sa/DEMO_CLIENT_SERVICEACCOUNT
請注意,x-forwarded-client-cert 標頭是由伺服器端 Envoy 插入,其中包含自己的身分 (伺服器) 和來源用戶端的身分。由於我們同時看到用戶端和伺服器身分,因此這是 mTLS 連線的信號。
使用授權政策設定服務層級存取權
這些操作說明會建立授權政策,允許由 DEMO_CLIENT_SERVICEACCOUNT 帳戶傳送的要求,其中主機名稱為 service-test、通訊埠為 8000,且 HTTP 方法為 GET。建立授權政策前,請詳閱「使用授權限制存取權」中的注意事項。
建立名為
authz-policy.yaml的檔案,建立授權政策。action: ALLOW name: authz-policy rules: - sources: - principals: - spiffe://PROJECT_ID.svc.id.goog/ns/K8S_NAMESPACE/sa/DEMO_CLIENT_SERVICEACCOUNT destinations: - hosts: - service-test ports: - 8000 methods: - GET匯入政策:
gcloud network-security authorization-policies import authz-policy \
  --source=authz-policy.yaml \
  --location=global
更新端點政策,在
ep_mtls.yaml檔案中附加下列內容,參照新的授權政策:authorizationPolicy: projects/PROJECT_ID/locations/global/authorizationPolicies/authz-policy
端點政策現在會指定,如果 Pod 的 Envoy sidecar Proxy 具有
app:payments標籤,則必須對傳入 Pod 的要求強制執行 mTLS 和授權政策。匯入政策:
gcloud network-services endpoint-policies import ep \
    --source=ep_mtls.yaml --location=global
驗證設定
執行下列指令,驗證設定。
# Get the name of the Podrunning Busybox.
BUSYBOX_POD=$(kubectl get po -l run=client -o=jsonpath='{.items[0].metadata.name}')

# Command to execute that tests connectivity to the service service-test.
# This is a valid request and will be allowed.
TEST_CMD="wget -q -O - service-test; echo"

# Execute the test command on the pod.
kubectl exec -it $BUSYBOX_POD -c busybox -- /bin/sh -c "$TEST_CMD"
預期的輸出內容大致如下:
GET /get HTTP/1.1
Host: service-test
content-length: 0
x-envoy-internal: true
accept: */*
x-forwarded-for: redacted
x-envoy-expected-rq-timeout-ms: 15000
user-agent: curl/7.35.0
x-forwarded-proto: http
x-request-id: redacted
x-forwarded-client-cert: By=spiffe://PROJECT_ID.svc.id.goog/ns/K8S_NAMESPACE/sa/DEMO_SERVER_SERVICEACCOUNT;Hash=Redacted;Subject="Redacted;URI=spiffe://PROJECT_ID.svc.id.goog/ns/K8S_NAMESPACE/sa/DEMO_CLIENT_SERVICEACCOUNT
執行下列指令,測試授權政策是否正確拒絕無效要求:
# Failure case
# Command to execute that tests connectivity to the service service-test.
# This is an invalid request and server will reject because the server
# authorization policy only allows GET requests.
TEST_CMD="wget -q -O - service-test --post-data='' ; echo"

# Execute the test command on the pod.
kubectl exec -it $BUSYBOX_POD -c busybox -- /bin/sh -c "$TEST_CMD"
預期的輸出內容大致如下:
<RBAC: access denied HTTP/1.1 403 Forbidden>
設定 ingress 閘道安全性
本節假設您已完成「服務對服務安全性」一節,包括使用 sidecar 自動插入器設定 GKE 叢集、建立憑證授權單位,以及建立端點政策。
在本節中,您會將 Envoy Proxy 部署為輸入閘道,終止 TLS 連線並授權叢集內部用戶端的要求。
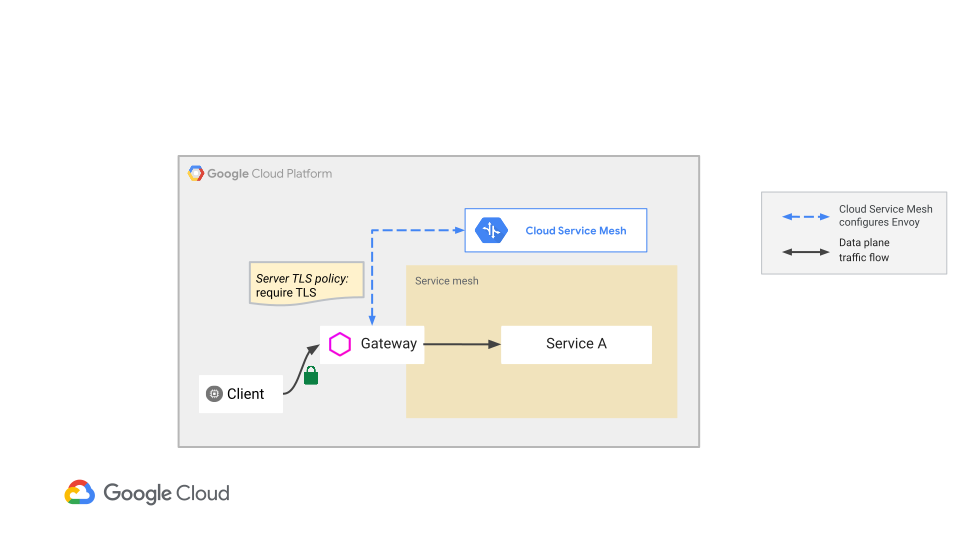
如要設定終止 TLS 的輸入閘道,請按照下列步驟操作:
- 部署可透過叢集內部 IP 位址存取的 Kubernetes Service。
- 部署作業包含獨立 Envoy Proxy,會公開為 Kubernetes 服務,並連線至 Cloud Service Mesh。
- 建立伺服器 TLS 政策,終止 TLS。
- 建立授權政策,授權傳入的要求。
將 ingress 閘道服務部署至 GKE
執行下列指令,在 GKE 上部署輸入閘道服務:
wget -q -O -  https://storage.googleapis.com/traffic-director/security/ga/gateway_sample_xdsv3.yaml | sed -e s/PROJECT_NUMBER_PLACEHOLDER/PROJNUM/g | sed -e s/NETWORK_PLACEHOLDER/default/g | sed -e s/DEMO_CLIENT_KSA_PLACEHOLDER/DEMO_CLIENT_SERVICEACCOUNT/g > gateway_sample.yaml

kubectl apply -f gateway_sample.yaml
gateway_sample.yaml 檔案是輸入閘道的規格。以下各節說明規格的一些新增內容。
停用 Cloud Service Mesh 加入邊車容器
gateway_sample.yaml 規格會部署 Envoy Proxy 做為唯一容器。在先前的步驟中,Envoy 已做為 sidecar 插入應用程式容器。如要避免多個 Envoy 處理要求,可以使用下列陳述式,停用這項 Kubernetes 服務的加入邊車容器功能:
sidecar.istio.io/inject: "false"
掛接正確的磁碟區
gateway_sample.yaml 規格會掛接磁碟區 gke-workload-certificates。這個磁碟區也會用於邊車容器部署作業,但邊車容器加入器會在看到 cloud.google.com/enableManagedCerts: "true" 註解時自動新增。gke-workload-certificates 磁碟區包含 GKE 代管的 SPIFFE 憑證和金鑰,這些憑證和金鑰是由您設定的 CA 服務執行個體簽署。
設定叢集的內部 IP 位址
使用 ClusterInternal 類型的服務設定輸入閘道。這會為 mesh-gateway 建立可內部解析的 DNS 主機名稱。當用戶端向 mesh-gateway:443 傳送要求時,Kubernetes 會立即將要求轉送至輸入閘道 Envoy 部署作業的通訊埠 8080。
在 Ingress 閘道上啟用 TLS
請按照下列操作說明,在輸入閘道上啟用 TLS。
建立伺服器 TLS 政策資源,終止 TLS 連線,並將值儲存在名為
server-tls-policy.yaml的檔案中:description: tls server policy name: server-tls-policy serverCertificate: certificateProviderInstance: pluginInstance: google_cloud_private_spiffe匯入伺服器 TLS 政策:
gcloud network-security server-tls-policies import server-tls-policy \
    --source=server-tls-policy.yaml --location=global
建立新的目標
Gateway,並儲存至檔案td-gke-gateway.yaml。這會附加伺服器 TLS 政策,並設定 Envoy Proxy 輸入閘道,終止傳入的 TLS 流量。name: td-gke-gateway scope: gateway-proxy ports: - 8080 type: OPEN_MESH serverTlsPolicy: projects/PROJECT_ID/locations/global/serverTlsPolicies/server-tls-policy
匯入閘道:
gcloud network-services gateways import td-gke-gateway \
  --source=td-gke-gateway.yaml \
  --location=global
建立並儲存名為
td-gke-route的新HTTPRoute,參照閘道並將所有要求轉送至td-gke-service。name: td-gke-route hostnames: - mesh-gateway gateways: - projects/PROJECT_NUMBER/locations/global/gateways/td-gke-gateway rules: - action: destinations: - serviceName: "projects/PROJECT_NUMBER/locations/global/backendServices/td-gke-service"匯入
HTTPRoute:gcloud network-services http-routes import td-gke-route \ --source=td-gke-route.yaml \ --location=global
您可以選擇更新後端的授權政策,在符合下列所有條件時允許要求:
DEMO_CLIENT_SERVICEACCOUNT傳送的要求。(ingress 閘道部署作業會使用DEMO_CLIENT_SERVICEACCOUNT服務帳戶)。- 主機為
mesh-gateway或service-test的要求 - 通訊埠:
8000
除非您為後端設定授權政策,否則不需要執行這些指令。如果端點沒有授權政策,或授權政策不含主機或來源主體比對,則系統會允許要求,不需執行這個步驟。將這些值新增至
authz-policy.yaml。action: ALLOW name: authz-policy rules: - sources: - principals: - spiffe://PROJECT_ID.svc.id.goog/ns/K8S_NAMESPACE/sa/DEMO_CLIENT_SERVICEACCOUNT destinations: - hosts: - service-test - mesh-gateway ports: - 8000 methods: - GET匯入政策:
gcloud network-security authorization-policies import authz-policy \
  --source=authz-policy.yaml \
  --location=global
驗證 ingress 閘道部署作業
您可以使用名為 debug 的新容器,將要求傳送至輸入閘道,藉此驗證部署作業。
在下列規格中,"sidecar.istio.io/inject":"false" 註解會防止 Cloud Service Mesh 邊車容器加入器自動插入 Sidecar Proxy。沒有 Sidecar 可協助 debug 容器轉送要求。容器必須連線至輸入閘道,才能進行轉送。
規格包含 --no-check-certificate 旗標,會忽略伺服器憑證驗證。debug 容器沒有必要的憑證授權單位驗證憑證,無法驗證由 CA 服務簽署的憑證,而這些憑證是輸入閘道用於終止 TLS 的憑證。
在正式環境中,建議您下載 CA 服務驗證憑證,並在用戶端上掛接或安裝。安裝驗證憑證後,請移除 wget 指令的 --no-check-certificate 選項。
執行下列指令:
kubectl run -i --tty --rm debug --image=busybox --restart=Never --overrides='{ "metadata": {"annotations": { "sidecar.istio.io/inject":"false" } } }' -- /bin/sh -c "wget --no-check-certificate -qS -O - https://mesh-gateway; echo"
您會看到與以下類似的輸出內容:
GET / HTTP/1.1
Host: 10.68.7.132
x-forwarded-client-cert: By=spiffe://PROJECT_ID.svc.id.goog/ns/K8S_NAMESPACE/sa/DEMO_SERVER_SERVICEACCOUNT;Hash=Redacted;Subject="Redacted;URI=spiffe://PROJECT_ID.svc.id.goog/ns/K8S_NAMESPACE/sa/DEMO_CLIENT_SERVICEACCOUNT
x-envoy-expected-rq-timeout-ms: 15000
x-envoy-internal: true
x-request-id: 5ae429e7-0e18-4bd9-bb79-4e4149cf8fef
x-forwarded-for: 10.64.0.53
x-forwarded-proto: https
content-length: 0
user-agent: Wget
執行下列負面測試指令:
# Negative test
# Expect this to fail because gateway expects TLS.
kubectl run -i --tty --rm debug --image=busybox --restart=Never  --overrides='{ "metadata": {"annotations": { "sidecar.istio.io/inject":"false" } } }'  -- /bin/sh -c "wget --no-check-certificate -qS -O - http://mesh-gateway:443/headers; echo"
畫面會顯示類似以下內容的輸出:
wget: error getting response: Connection reset by peer
執行下列負面測試指令:
# Negative test.
# AuthorizationPolicy applied on the endpoints expect a GET request. Otherwise
# the request is denied authorization.
kubectl run -i --tty --rm debug --image=busybox --restart=Never  --overrides='{ "metadata": {"annotations": { "sidecar.istio.io/inject":"false" } } }'  -- /bin/sh -c "wget --no-check-certificate -qS -O - https://mesh-gateway --post-data=''; echo"
畫面會顯示類似以下內容的輸出:
HTTP/1.1 403 Forbidden
wget: server returned error: HTTP/1.1 403 Forbidden
刪除部署作業
您可以視需要執行這些指令,刪除使用本指南建立的部署作業。
執行下列指令,即可刪除叢集:
gcloud container clusters delete CLUSTER_NAME --zone ZONE --quiet
如要刪除建立的資源,請執行下列指令:
gcloud compute backend-services delete td-gke-service --global --quiet
cloud compute network-endpoint-groups delete service-test-neg --zone ZONE --quiet
gcloud compute firewall-rules delete fw-allow-health-checks --quiet
gcloud compute health-checks delete td-gke-health-check --quiet
gcloud network-services endpoint-policies delete ep \
    --location=global --quiet
gcloud network-security authorization-policies delete authz-gateway-policy \
   --location=global --quiet
gcloud network-security authorization-policies delete authz-policy \
    --location=global --quiet
gcloud network-security client-tls-policies delete client-mtls-policy \
    --location=global --quiet
gcloud network-security server-tls-policies delete server-tls-policy \
    --location=global --quiet
gcloud network-security server-tls-policies delete server-mtls-policy \
    --location=global --quiet
限制
Cloud Service Mesh 服務安全性僅支援 GKE。無法使用 Compute Engine 部署服務安全性。
疑難排解
本節說明如何修正設定安全防護服務時遇到的問題。
連線失敗
如果連線失敗,並顯示 upstream connect 錯誤或 disconnect/reset
before headers 錯誤,請檢查 Envoy 記錄,您可能會看到下列其中一則記錄訊息:
gRPC config stream closed: 5, Requested entity was not found
gRPC config stream closed: 2, no credential token is found
如果您在 Envoy 記錄中看到這些錯誤,可能是服務帳戶權杖掛接不正確,或使用不同的 audience,或兩者皆是。
詳情請參閱「Envoy 記錄中的錯誤訊息指出設定問題」。
未建立 Pod
如要排解這個問題,請參閱「排解 GKE Pod 自動部署問題」。
Envoy 未向 Cloud Service Mesh 驗證
Envoy (envoy-proxy) 連線至 Cloud Service Mesh 擷取 xDS 設定時,會使用 Workload Identity Federation for GKE 和 Pod 的 Kubernetes ServiceAccount。如果驗證失敗,Envoy 就不會進入就緒狀態。
無法使用 --workload-identity-certificate-authority flag 建立叢集
如果看到這則錯誤訊息,請確認您執行的是最新版 Google Cloud CLI:
gcloud components update
Pod 仍處於待處理狀態
如果 Pod 在設定過程中一直處於待處理狀態,請在部署規格中增加 Pod 的 CPU 和記憶體資源。
無法使用 --enable-mesh-certificates 旗標建立叢集
確認您執行的是最新版 gcloud CLI:
gcloud components update
請注意,--enable-mesh-certificates 旗標僅適用於 gcloud beta。
Pod 無法啟動
如果憑證佈建失敗,使用 GKE 網格憑證的 Pod 可能無法啟動。這可能發生在以下情況:
WorkloadCertificateConfig或TrustConfig設定錯誤或遺漏。- CSR 未獲核准。
您可以查看 Pod 事件,確認憑證佈建是否失敗。
檢查 Pod 的狀態:
kubectl get pod -n POD_NAMESPACE POD_NAME更改下列內容:
POD_NAMESPACE:Pod 的命名空間。POD_NAME:Pod 的名稱。
查看 Pod 的近期事件:
kubectl describe pod -n POD_NAMESPACE POD_NAME如果憑證佈建失敗,您會看到包含
Type=Warning、Reason=FailedMount、From=kubelet和Message欄位的事件,且該欄位開頭為MountVolume.SetUp failed for volume "gke-workload-certificates"。Message欄位含有疑難排解資訊。Events: Type Reason Age From Message ---- ------ ---- ---- ------- Warning FailedMount 13s (x7 over 46s) kubelet MountVolume.SetUp failed for volume "gke-workload-certificates" : rpc error: code = Internal desc = unable to mount volume: store.CreateVolume, err: unable to create volume "csi-4d540ed59ef937fbb41a9bf5380a5a534edb3eedf037fe64be36bab0abf45c9c": caPEM is nil (check active WorkloadCertificateConfig)如果 Pod 無法啟動的原因是物件設定錯誤或 CSR 遭拒,請參閱下列疑難排解步驟。
WorkloadCertificateConfig 或 TrustConfig 設定有誤
請確認您已正確建立 WorkloadCertificateConfig 和 TrustConfig 物件。您可以使用 kubectl 診斷這兩種物件的設定錯誤。
擷取目前狀態。
針對
WorkloadCertificateConfig:kubectl get WorkloadCertificateConfig default -o yaml針對
TrustConfig:kubectl get TrustConfig default -o yaml檢查狀態輸出。有效的物件會包含
type: Ready和status: "True"條件。status: conditions: - lastTransitionTime: "2021-03-04T22:24:11Z" message: WorkloadCertificateConfig is ready observedGeneration: 1 reason: ConfigReady status: "True" type: Ready如果是無效物件,則會顯示
status: "False"。reason和message欄位包含其他疑難排解詳細資料。
CSR 未獲核准
如果 CSR 核准程序發生錯誤,您可以在 CSR 的 type: Approved 和 type: Issued 條件中查看錯誤詳細資料。
使用
kubectl列出相關 CSR:kubectl get csr \ --field-selector='spec.signerName=spiffe.gke.io/spiffe-leaf-signer'請選擇
Approved且非Issued的 CSR,或非Approved的 CSR。使用 kubectl 取得所選 CSR 的詳細資料:
kubectl get csr CSR_NAME -o yaml將
CSR_NAME替換為您選擇的 CSR 名稱。
有效的 CSR 包含 type: Approved 和 status: "True" 條件,且 status.certificate 欄位中有有效的憑證:
status:
  certificate: <base64-encoded data>
  conditions:
  - lastTransitionTime: "2021-03-04T21:58:46Z"
    lastUpdateTime: "2021-03-04T21:58:46Z"
    message: Approved CSR because it is a valid SPIFFE SVID for the correct identity.
    reason: AutoApproved
    status: "True"
    type: Approved
無效 CSR 的疑難排解資訊會顯示在 message 和 reason 欄位中。
應用程式無法使用核發的 mTLS 憑證
確認憑證尚未過期:
cat /var/run/secrets/workload-spiffe-credentials/certificates.pem | openssl x509 -text -noout | grep "Not After"確認應用程式支援您使用的金鑰類型。
cat /var/run/secrets/workload-spiffe-credentials/certificates.pem | openssl x509 -text -noout | grep "Public Key Algorithm" -A 3請確認核發 CA 使用的金鑰系列與憑證金鑰相同。
取得 CA 服務 (預先發布版) 執行個體的狀態:
gcloud privateca ISSUING_CA_TYPE describe ISSUING_CA_NAME \
  --location ISSUING_CA_LOCATION
更改下列內容:
ISSUING_CA_TYPE:核發 CA 類型,必須是subordinates或roots。ISSUING_CA_NAME:核發 CA 的名稱。ISSUING_CA_LOCATION:核發 CA 的區域。
檢查輸出內容中的
keySpec.algorithm是否與您在WorkloadCertificateConfigYAML 資訊清單中定義的金鑰演算法相同。輸出如下所示:config: ... subjectConfig: commonName: td-sub-ca subject: organization: TestOrgLLC subjectAltName: {} createTime: '2021-05-04T05:37:58.329293525Z' issuingOptions: includeCaCertUrl: true keySpec: algorithm: RSA_PKCS1_2048_SHA256 ...
憑證遭拒
- 確認對等互連應用程式使用相同的信任套件來驗證憑證。
確認憑證尚未過期:
cat /var/run/secrets/workload-spiffe-credentials/certificates.pem | openssl x509 -text -noout | grep "Not After"如果用戶端程式碼未使用 gRPC Go Credentials Reloading API,請確認該程式碼會定期從檔案系統重新整理憑證。
確認工作負載與 CA 位於相同的信任網域。GKE 網格憑證支援單一信任網域中工作負載之間的通訊。