


使用 Envoy 設定服務安全防護
請按照本指南中的操作說明,為透過 Cloud Service Mesh 和 Envoy Proxy 部署的服務設定驗證和授權。如要瞭解 Cloud Service Mesh 服務安全性的完整資訊,請參閱「Cloud Service Mesh 服務安全性」。
需求條件
使用 Envoy 設定 Cloud Service Mesh 的服務安全防護前,請確認設定符合下列必要條件:
您可以滿足部署 Cloud Service Mesh 的所有需求。如要瞭解這些規定的完整資訊,請參閱「準備透過 Envoy 和無 Proxy 工作負載設定服務路由 API」。
您有足夠的權限可建立或更新 Cloud Service Mesh 和Google Cloud 服務網格資源,以使用服務安全功能,詳情請參閱「準備透過 Envoy 和無 Proxy 工作負載設定服務路由 API」。
準備設定
以下各節說明設定 Cloud Service Mesh 安全性服務前必須完成的工作。這些工作包括:
- 更新 Google Cloud CLI
- 設定變數
- 啟用 Cloud Service Mesh 與 憑證授權單位服務 搭配運作時所需的 API
更新 gcloud 指令列工具
如要更新 Google Cloud CLI,請在本機執行下列指令:
gcloud components update
設定變數
請設定下列變數,以便在逐步完成本文範例時,複製及貼上具有一致值的程式碼。請使用下列值。
- PROJECT_ID:取代為專案 ID。
- CLUSTER_NAME:將叢集名稱替換為您要使用的名稱,例如
secure-td-cluster。 - ZONE:取代叢集所在的可用區。
- GKE_CLUSTER_URL:替代
https://container.googleapis.com/v1/projects/PROJECT_ID/locations/ZONE/clusters/CLUSTER_NAME - WORKLOAD_POOL:替代
PROJECT_ID.svc.id.goog - K8S_NAMESPACE:取代
default。 - DEMO_CLIENT_SERVICEACCOUNT:取代用戶端 Kubernetes ServiceAccount 的名稱。
- DEMO_SERVER_SERVICEACCOUNT:取代伺服器 Kubernetes ServiceAccount 的名稱。
PROJNUM:代入專案的專案編號,您可以從 Google Cloud 控制台或使用下列指令判斷:
gcloud projects describe PROJECT_ID --format="value(projectNumber)"
SA_GKE:替代
service-PROJNUM@container-engine-robot.iam.gserviceaccount.comCLUSTER_VERSION:替換為可用的最新版本。詳情請參閱搶鮮版版本資訊。 最低版本需求為 1.21.4-gke.1801。這是本範例中要使用的 GKE 叢集版本。
在此設定值:
# Substitute your project ID
PROJECT_ID=PROJECT_ID

# GKE cluster name and zone for this example.
CLUSTER_NAME=CLUSTER_NAME
ZONE=ZONE

# GKE cluster URL derived from the above
GKE_CLUSTER_URL="https://container.googleapis.com/v1/projects/PROJECT_ID/locations/ZONE/clusters/CLUSTER_NAME"

# Workload pool to be used with the GKE cluster
WORKLOAD_POOL="PROJECT_ID.svc.id.goog"

# Kubernetes namespace to run client and server demo.
K8S_NAMESPACE=K8S_NAMESPACE
DEMO_CLIENT_SERVICEACCOUNT=DEMO_CLIENT_SERVICEACCOUNT
DEMO_SERVER_SERVICEACCOUNT=DEMO_SERVER_SERVICEACCOUNT

# Compute other values
# Project number for your project
PROJNUM=PROJNUM

CLUSTER_VERSION=CLUSTER_VERSION
SA_GKE=service-PROJNUM@container-engine-robot.iam.gserviceaccount.com
啟用 API
使用 gcloud services enable 指令啟用所有 API,以便透過憑證授權單位服務設定 Cloud Service Mesh 安全性。
gcloud services enable \
   container.googleapis.com \
   cloudresourcemanager.googleapis.com \
   compute.googleapis.com \
   trafficdirector.googleapis.com \
   networkservices.googleapis.com \
   networksecurity.googleapis.com \
   privateca.googleapis.com \
   gkehub.googleapis.com
建立或更新 GKE 叢集
Cloud Service Mesh 服務安全取決於憑證授權單位服務與 GKE 的整合。除了設定需求外,GKE 叢集也必須符合下列需求:
- 叢集版本至少須為 1.21.4-gke.1801。如需後續版本的功能,可以透過快速發布管道取得該版本。
- GKE 叢集必須啟用,並設定網格憑證,如「建立憑證授權單位來核發憑證」一文所述。
建立使用 Workload Identity Federation for GKE 的新叢集。如要更新現有叢集,請跳至下一個步驟。您為
--tags提供的值,必須與使用 Cloud Load Balancing 元件設定 Cloud Service Mesh一節中,傳遞至firewall-rules create指令--target-tags旗標的名稱相符。# Create a GKE cluster with GKE managed mesh certificates. gcloud container clusters create CLUSTER_NAME \ --release-channel=rapid \ --scopes=cloud-platform \ --image-type=cos_containerd \ --machine-type=e2-standard-2 \ --zone=ZONE \ --workload-pool=PROJECT_ID.svc.id.goog \ --enable-mesh-certificates \ --cluster-version=CLUSTER_VERSION \ --enable-ip-alias \ --tags=allow-health-checks \ --workload-metadata=GKE_METADATA
叢集可能需要幾分鐘才會建立完成。
如果使用現有叢集,請開啟 GKE 適用的工作負載身分聯盟和 GKE 網格憑證。請確認叢集是使用
--enable-ip-alias旗標建立,這個旗標無法與update指令搭配使用。gcloud container clusters update CLUSTER_NAME \ --enable-mesh-certificates
執行下列指令,將新叢集設為
kubectl指令的預設叢集:gcloud container clusters get-credentials CLUSTER_NAME \ --zone ZONE
在多叢集環境中部署
如果您要在多叢集環境中部署,請按照本節所述的一般程序操作。這些操作說明假設用戶端 Pod 在一個叢集中執行,伺服器 Pod 則在另一個叢集中執行。
按照上一節的操作說明建立或更新叢集。
使用下列指令擷取每個叢集的 Pod IP 位址範圍:
gcloud compute firewall-rules list \
  --filter="name~gke-{CLUSTER_NAME}-[0-9a-z]*-all" \
  --format="value(sourceRanges)"
舉例來說,如果叢集名稱為
cluster-a和cluster-b,指令會傳回下列結果:cluster-a, pod CIDR: 10.4.0.0/14, node network tag: gke-cluster-a-9cd18751-node cluster-b, pod CIDR: 10.8.0.0/14, node network tag: gke-cluster-b-acd14479-node
建立虛擬私有雲防火牆規則,允許叢集彼此通訊。舉例來說,下列指令會建立防火牆規則,允許
cluster-aPod IP 位址與cluster-b節點通訊:gcloud compute firewall-rules create per-cluster-a-pods \ --allow="tcp,udp,icmp,esp,ah,sctp" \ --target-tags="gke-cluster-b-acd14479-node"
下列指令會建立防火牆規則,允許
cluster-bPod IP 位址與cluster-a節點通訊:gcloud compute firewall-rules create per-cluster-b-pods \ --allow="tcp,udp,icmp,esp,ah,sctp" \ --target-tags="gke-cluster-a-9cd18751-node"
向機群註冊叢集
在「建立 GKE 叢集」中建立或更新叢集後,請向機群註冊該叢集。註冊叢集後,您就能更輕鬆地設定多個專案中的叢集。
請注意,每個步驟最多可能需要十分鐘才能完成。
向機群註冊叢集:
gcloud container fleet memberships register CLUSTER_NAME \
  --gke-cluster=ZONE/CLUSTER_NAME \
  --enable-workload-identity --install-connect-agent \
  --manifest-output-file=MANIFEST-FILE_NAME
請依下列方式替換變數:
- CLUSTER_NAME:叢集名稱。
- ZONE:叢集所在的可用區。
- MANIFEST-FILE_NAME:這些指令產生註冊資訊清單的路徑。
註冊程序成功後,畫面會顯示類似下列的訊息:
Finished registering the cluster CLUSTER_NAME with the fleet.
將產生的資訊清單檔案套用至叢集:
kubectl apply -f MANIFEST-FILE_NAME
申請程序成功後,您會看到類似下列的訊息:
namespace/gke-connect created
serviceaccount/connect-agent-sa created
podsecuritypolicy.policy/gkeconnect-psp created
role.rbac.authorization.k8s.io/gkeconnect-psp:role created
rolebinding.rbac.authorization.k8s.io/gkeconnect-psp:rolebinding created
role.rbac.authorization.k8s.io/agent-updater created
rolebinding.rbac.authorization.k8s.io/agent-updater created
role.rbac.authorization.k8s.io/gke-connect-agent-20210416-01-00 created
clusterrole.rbac.authorization.k8s.io/gke-connect-impersonation-20210416-01-00 created
clusterrolebinding.rbac.authorization.k8s.io/gke-connect-impersonation-20210416-01-00 created
clusterrolebinding.rbac.authorization.k8s.io/gke-connect-feature-authorizer-20210416-01-00 created
rolebinding.rbac.authorization.k8s.io/gke-connect-agent-20210416-01-00 created
role.rbac.authorization.k8s.io/gke-connect-namespace-getter created
rolebinding.rbac.authorization.k8s.io/gke-connect-namespace-getter created
secret/http-proxy created
deployment.apps/gke-connect-agent-20210416-01-00 created
service/gke-connect-monitoring created
secret/creds-gcp create
從叢集取得成員資格資源:
kubectl get memberships membership -o yaml
輸出內容應包含車隊指派的 Workload Identity Pool,其中 PROJECT_ID 是您的專案 ID:
workload_identity_pool: PROJECT_ID.svc.id.goog
這表示叢集已成功註冊。
建立憑證授權單位來核發憑證
如要將憑證核發給 Pod,請建立 CA 服務集區和下列憑證授權單位 (CA):
- 根 CA。這是所有核發網格憑證的信任根。如果已有根 CA,可以直接使用。在
enterprise層級中建立根 CA,這個層級適用於長期、低用量的憑證核發作業。 - 從屬 CA。這個 CA 會為工作負載核發憑證。在叢集部署的區域中建立下層 CA。在
devops層級中建立從屬 CA,這個層級適用於短期大量核發憑證。
建立從屬 CA 為選用步驟,但我們強烈建議您建立從屬 CA,而非使用根 CA 核發 GKE Mesh 憑證。如果您決定使用根 CA 核發網格憑證,請確保預設的以設定為準的核發模式仍可使用。
從屬 CA 可以位於與叢集不同的區域,但我們強烈建議您在與叢集相同的區域中建立從屬 CA,以提升效能。不過,您可以在不同區域建立根 CA 和下層 CA,不會影響效能或可用性。
CA 服務支援下列區域:
| 區域名稱 | 區域說明 |
|---|---|
asia-east1 |
台灣 |
asia-east2 |
香港 |
asia-northeast1 |
東京 |
asia-northeast2 |
大阪 |
asia-northeast3 |
首爾 |
asia-south1 |
孟買 |
asia-south2 |
德里 |
asia-southeast1 |
新加坡 |
asia-southeast2 |
雅加達 |
australia-southeast1 |
雪梨 |
australia-southeast2 |
墨爾本 |
europe-central2 |
華沙 |
europe-north1 |
芬蘭 |
europe-southwest1 |
馬德里 |
europe-west1 |
比利時 |
europe-west2 |
倫敦 |
europe-west3 |
法蘭克福 |
europe-west4 |
荷蘭 |
europe-west6 |
蘇黎世 |
europe-west8 |
米蘭 |
europe-west9 |
巴黎 |
europe-west10 |
柏林 |
europe-west12 |
杜林 |
me-central1 |
杜哈 |
me-central2 |
達曼 |
me-west1 |
特拉維夫 |
northamerica-northeast1 |
蒙特婁 |
northamerica-northeast2 |
多倫多 |
southamerica-east1 |
聖保羅 |
southamerica-west1 |
聖地亞哥 |
us-central1 |
愛荷華州 |
us-east1 |
南卡羅來納州 |
us-east4 |
北維吉尼亞州 |
us-east5 |
哥倫布 |
us-south1 |
達拉斯 |
us-west1 |
奧勒岡州 |
us-west2 |
洛杉磯 |
us-west3 |
鹽湖城 |
us-west4 |
拉斯維加斯 |
您也可以執行下列指令,查看支援的地點清單:
gcloud privateca locations list
將 IAM
roles/privateca.caManager授予建立 CA 集區和 CA 的個人。請注意,MEMBER 的正確格式為user:userid@example.com。如果該使用者是目前的使用者,您可以使用殼層指令$(gcloud auth list --filter=status:ACTIVE --format="value(account)")取得目前的使用者 ID。gcloud projects add-iam-policy-binding PROJECT_ID \ --member=MEMBER \ --role=roles/privateca.caManager
將
role/privateca.admin角色授予需要修改 IAM 政策的個人,其中MEMBER是需要這項存取權的個人,具體來說,就是執行下列步驟授予privateca.auditor和privateca.certificateManager角色的任何個人:gcloud projects add-iam-policy-binding PROJECT_ID \ --member=MEMBER \ --role=roles/privateca.admin
建立根 CA 服務集區。
gcloud privateca pools create ROOT_CA_POOL_NAME \
  --location ROOT_CA_POOL_LOCATION \
  --tier enterprise
建立根 CA。
gcloud privateca roots create ROOT_CA_NAME --pool ROOT_CA_POOL_NAME \
  --subject "CN=ROOT_CA_NAME, O=ROOT_CA_ORGANIZATION" \
  --key-algorithm="ec-p256-sha256" \
  --max-chain-length=1 \
  --location ROOT_CA_POOL_LOCATION
在本示範設定中,請為變數使用下列值:
- ROOT_CA_POOL_NAME=td_sec_pool
- ROOT_CA_NAME=pkcs2-ca
- ROOT_CA_POOL_LOCATION=us-east1
- ROOT_CA_ORGANIZATION="TestCorpLLC"
建立從屬集區和從屬 CA。確認系統仍允許預設的以設定為準的核發模式。
gcloud privateca pools create SUBORDINATE_CA_POOL_NAME \
  --location SUBORDINATE_CA_POOL_LOCATION \
  --tier devops
gcloud privateca subordinates create SUBORDINATE_CA_NAME \
  --pool SUBORDINATE_CA_POOL_NAME \
  --location SUBORDINATE_CA_POOL_LOCATION \
  --issuer-pool ROOT_CA_POOL_NAME \
  --issuer-location ROOT_CA_POOL_LOCATION \
  --subject "CN=SUBORDINATE_CA_NAME, O=SUBORDINATE_CA_ORGANIZATION" \
  --key-algorithm "ec-p256-sha256" \
  --use-preset-profile subordinate_mtls_pathlen_0
在本示範設定中,請為變數使用下列值:
- SUBORDINATE_CA_POOL_NAME="td-ca-pool"
- SUBORDINATE_CA_POOL_LOCATION=us-east1
- SUBORDINATE_CA_NAME="td-ca"
- SUBORDINATE_CA_ORGANIZATION="TestCorpLLC"
- ROOT_CA_POOL_NAME=td_sec_pool
- ROOT_CA_POOL_LOCATION=us-east1
將根 CA 集區的 IAM
privateca.auditor角色授予 GKE 服務帳戶,允許該帳戶存取:gcloud privateca pools add-iam-policy-binding ROOT_CA_POOL_NAME \ --location ROOT_CA_POOL_LOCATION \ --role roles/privateca.auditor \ --member="serviceAccount:service-PROJNUM@container-engine-robot.iam.gserviceaccount.com"
授予下層 CA 集區的 IAM
privateca.certificateManager角色,允許 GKE 服務帳戶存取:gcloud privateca pools add-iam-policy-binding SUBORDINATE_CA_POOL_NAME \ --location SUBORDINATE_CA_POOL_LOCATION \ --role roles/privateca.certificateManager \ --member="serviceAccount:service-PROJNUM@container-engine-robot.iam.gserviceaccount.com"
儲存下列
WorkloadCertificateConfigYAML 設定,告知叢集如何核發網格憑證:apiVersion: security.cloud.google.com/v1 kind: WorkloadCertificateConfig metadata: name: default spec: # Required. The CA service that issues your certificates. certificateAuthorityConfig: certificateAuthorityServiceConfig: endpointURI: ISSUING_CA_POOL_URI # Required. The key algorithm to use. Choice of RSA or ECDSA. # # To maximize compatibility with various TLS stacks, your workloads # should use keys of the same family as your root and subordinate CAs. # # To use RSA, specify configuration such as: # keyAlgorithm: # rsa: # modulusSize: 4096 # # Currently, the only supported ECDSA curves are "P256" and "P384", and the only # supported RSA modulus sizes are 2048, 3072 and 4096. keyAlgorithm: rsa: modulusSize: 4096 # Optional. Validity duration of issued certificates, in seconds. # # Defaults to 86400 (1 day) if not specified. validityDurationSeconds: 86400 # Optional. Try to start rotating the certificate once this # percentage of validityDurationSeconds is remaining. # # Defaults to 50 if not specified. rotationWindowPercentage: 50更改下列內容:
- 叢集執行的專案 ID:
PROJECT_ID
- 核發網格憑證的 CA 的完整 URI (ISSUING_CA_POOL_URI)。這可以是從屬 CA (建議) 或根 CA。格式如下:
//privateca.googleapis.com/projects/PROJECT_ID/locations/SUBORDINATE_CA_POOL_LOCATION/caPools/SUBORDINATE_CA_POOL_NAME
- 叢集執行的專案 ID:
儲存下列
TrustConfigYAML 設定,告知叢集如何信任核發的憑證:apiVersion: security.cloud.google.com/v1 kind: TrustConfig metadata: name: default spec: # You must include a trustStores entry for the trust domain that # your cluster is enrolled in. trustStores: - trustDomain: PROJECT_ID.svc.id.goog # Trust identities in this trustDomain if they appear in a certificate # that chains up to this root CA. trustAnchors: - certificateAuthorityServiceURI: ROOT_CA_POOL_URI更改下列內容:
- 叢集執行的專案 ID:
PROJECT_ID
- 根 CA 集區的完整 URI (ROOT_CA_POOL_URI)。
格式如下:
//privateca.googleapis.com/projects/PROJECT_ID/locations/ROOT_CA_POOL_LOCATION/caPools/ROOT_CA_POOL_NAME
- 叢集執行的專案 ID:
將設定套用至叢集:
kubectl apply -f WorkloadCertificateConfig.yaml
kubectl apply -f TrustConfig.yaml
設定身分與存取權管理
如要建立設定所需的資源,您必須具備compute.NetworkAdmin角色。這個角色具備所有必要權限,可建立、更新、刪除、列出及使用 (即在其他資源中參照) 必要資源。如果您是專案的擁有者兼編輯者,就會自動獲得這項角色。
請注意,在後端服務中參照這些資源時,系統不會強制執行 networksecurity.googleapis.com.clientTlsPolicies.use 和 networksecurity.googleapis.com.serverTlsPolicies.use。
如果日後強制執行這些權限,而您使用的是「compute.NetworkAdmin」角色,系統強制執行這項檢查時,您不會發現任何問題。
如果您使用自訂角色,且日後強制執行這項檢查,請務必加入相應的 .use 權限。否則日後您可能會發現,自訂角色沒有必要的權限,無法從後端服務或端點政策參照 clientTlsPolicy 或 serverTlsPolicy。
下列操作說明會建立 Kubernetes ServiceAccount,並授予這些帳戶 Cloud Service Mesh 安全性 API 的存取權:
為伺服器和用戶端部署作業建立 Kubernetes ServiceAccount:
kubectl create serviceaccount --namespace K8S_NAMESPACE DEMO_SERVER_SERVICEACCOUNT
kubectl create serviceaccount --namespace K8S_NAMESPACE DEMO_CLIENT_SERVICEACCOUNT
將
roles/trafficdirector.client角色指派給 Kubernetes ServiceAccount:gcloud projects add-iam-policy-binding PROJECT_ID \ --member "principal://iam.googleapis.com/projects/PROJNUM/locations/global/workloadIdentityPools/PROJECT_ID.svc.id.goog/subject/ns/K8S_NAMESPACE/sa/DEMO_SERVER_SERVICEACCOUNT" \ --role roles/trafficdirector.client \ --condition=None gcloud projects add-iam-policy-binding PROJECT_ID \ --member "principal://iam.googleapis.com/projects/PROJNUM/locations/global/workloadIdentityPools/PROJECT_ID.svc.id.goog/subject/ns/K8S_NAMESPACE/sa/DEMO_CLIENT_SERVICEACCOUNT" \ --role roles/trafficdirector.client \ --condition=None
設定 Cloud Service Mesh
請按照下列操作說明安裝邊車容器加入器、設定測試服務,以及完成其他部署任務。
在叢集中安裝 Envoy 邊車容器加入器
請按照「Cloud Service Mesh setup for GKE Pods with automatic Envoy injection」(為 GKE Pod 設定 Cloud Service Mesh,並自動插入 Envoy) 中下列兩個部分的說明操作,在叢集中部署及啟用 Envoy Sidecar 插入功能:
- 設定專案資訊
- 安裝 MutatingWebhookConfigurations。
請務必將網格名稱設為
sidecar_mesh,並將網路設為「」,也就是空字串。 - 啟用邊車容器插入功能
請務必先完成兩組操作說明,再設定測試服務。
設定測試服務
安裝 Envoy 邊車容器加入器後,請按照這些操作說明,為部署作業設定測試服務。
wget -q -O -  https://storage.googleapis.com/traffic-director/security/ga/service_sample.yaml | sed -e s/DEMO_SERVER_KSA_PLACEHOLDER/DEMO_SERVER_SERVICEACCOUNT/g > service_sample.yaml

kubectl apply -f service_sample.yaml
檔案 service_sample.yaml 包含示範伺服器應用程式的 Podspec。部分註解專用於 Cloud Service Mesh 安全性。
Cloud Service Mesh Proxy 中繼資料
podspec 會指定 proxyMetadata 註解:
spec:
...
      annotations:
        cloud.google.com/proxyMetadata: '{"app": "payments"}'
...
Pod 初始化時,Sidecar Proxy 會擷取這項註解,並傳輸至 Cloud Service Mesh。Cloud Service Mesh 隨後會使用這項資訊,傳回經過篩選的設定:
- 本指南稍後會說明,端點政策會指定端點比對器。
- 端點比對器指定只有顯示名稱為
app且值為payments的標籤的用戶端,才會收到經過篩選的設定。
使用由 CA 服務簽署的網格憑證和金鑰
podspec 會指定 enableManagedCerts 註解:
spec:
...
      annotations:
        ...
        cloud.google.com/enableManagedCerts: "true"
...
Pod 初始化時,CA 服務簽署的憑證和金鑰會自動掛接至本機 Sidecar Proxy 檔案系統。
設定傳入流量攔截通訊埠
podspec 會指定 includeInboundPorts 註解:
spec:
...
      annotations:
        ...
        cloud.google.com/includeInboundPorts: "8000"
...
這是伺服器應用程式監聽連線的通訊埠。Pod 初始化時,Sidecar Proxy 會擷取這項註解,並傳輸至 Cloud Service Mesh。Cloud Service Mesh 隨後會使用這項資訊傳回經過篩選的設定,攔截傳入這個連接埠的所有流量,並套用安全性政策。
健康狀態檢查通訊埠不得與應用程式通訊埠相同。否則,相同的安全性政策會套用至健康檢查連接埠的連入連線,這可能會導致連線遭拒,進而導致伺服器遭到錯誤標示為不健全。
使用 NEG 設定 GKE 服務
GKE 服務必須透過網路端點群組 (NEG) 公開,才能將其設定為 Cloud Service Mesh 後端服務的後端。本設定指南提供的 service_sample.yaml 套件會在下列註解中使用 NEG 名稱 service-test-neg:
...
metadata:
  annotations:
    cloud.google.com/neg: '{"exposed_ports": {"80":{"name": "service-test-neg"}}}'
spec:
  ports:
  - port: 80
    name: service-test
    protocol: TCP
    targetPort: 8000
您不需要變更 service_sample.yaml 檔案。
儲存 NEG 名稱
將 NEG 名稱儲存在 NEG_NAME 變數中:
NEG_NAME="service-test-neg"
將用戶端應用程式部署至 GKE
執行下列指令,啟動附有 Envoy Proxy 的示範用戶端 (做為 Sidecar),您需要示範安全防護功能。
wget -q -O -  https://storage.googleapis.com/traffic-director/security/ga/client_sample.yaml | sed -e s/DEMO_CLIENT_KSA_PLACEHOLDER/DEMO_CLIENT_SERVICEACCOUNT/g > client_sample.yaml

kubectl apply -f client_sample.yaml
用戶端 podspec 只包含 enableManagedCerts 註解。您必須這麼做,才能掛接 GKE 管理的網格憑證和金鑰所需的磁碟區,這些憑證和金鑰是由 CA 服務執行個體簽署。
設定健康狀態檢查、防火牆規則和後端服務資源
在本節中,您將為 Cloud Service Mesh 建立健康狀態檢查、防火牆規則和後端服務資源。
建立健康狀態檢查。
gcloud compute health-checks create http td-gke-health-check \
  --use-serving-port
建立防火牆規則,允許健康狀態檢查工具 IP 位址範圍。
gcloud compute firewall-rules create fw-allow-health-checks \
   --action ALLOW \
   --direction INGRESS \
   --source-ranges 35.191.0.0/16,130.211.0.0/22 \
  --rules tcp
建立後端服務,並將健康狀態檢查與後端服務建立關聯。
gcloud compute backend-services create td-gke-service \
  --global \
  --health-checks td-gke-health-check \
  --load-balancing-scheme INTERNAL_SELF_MANAGED
將先前建立的 NEG 新增至後端服務並設為後端。
gcloud compute backend-services add-backend td-gke-service \
  --global \
  --network-endpoint-group ${NEG_NAME} \
  --network-endpoint-group-zone ZONE \
  --balancing-mode RATE \
 --max-rate-per-endpoint 5
設定 Mesh 和 HTTPRoute 資源
在本節中,您將建立 Mesh 和 HTTPRoute 資源。
建立
Mesh資源規格,並儲存至名為mesh.yaml的檔案。name: sidecar-mesh interceptionPort: 15001
如未在
mesh.yaml檔案中指定攔截通訊埠,系統會預設為15001。使用 mesh.yaml 規格建立
Mesh資源。gcloud network-services meshes import sidecar-mesh \ --source=mesh.yaml \ --location=global
建立
HTTPRoute規格,並儲存至名為http_route.yaml的檔案。您可以使用
PROJECT_ID或PROJECT_NUMBER。name: helloworld-http-route hostnames: - service-test meshes: - projects/PROJNUM/locations/global/meshes/sidecar-mesh rules: - action: destinations: - serviceName: "projects/PROJNUM/locations/global/backendServices/td-gke-service"
使用
http_route.yaml檔案中的規格建立HTTPRoute資源。gcloud network-services http-routes import helloworld-http-route \ --source=http_route.yaml \ --location=global
Cloud Service Mesh 設定完成,您現在可以設定驗證和授權政策。
設定服務對服務安全機制
請按照下列各節的說明,設定服務對服務安全機制。
在網格中啟用 mTLS
如要在網格中設定 mTLS,您必須確保後端服務的外送流量安全,以及端點的內送流量安全。
政策參考資料格式
請注意,參照伺服器 TLS、用戶端 TLS 和授權政策時,必須使用下列格式:
projects/PROJECT_ID/locations/global/[serverTlsPolicies|clientTlsPolicies|authorizationPolicies]/[server-tls-policy|client-mtls-policy|authz-policy]
例如:
projects/PROJECT_ID/locations/global/serverTlsPolicies/server-tls-policy
projects/PROJECT_ID/locations/global/clientTlsPolicies/client-mtls-policy
projects/PROJECT_ID/locations/global/authorizationPolicies/authz-policy
保護傳出至後端服務的流量
如要保護外送流量,請先建立用戶端 TLS 政策,執行下列操作:
- 使用
google_cloud_private_spiffe做為clientCertificate的外掛程式,程式化 Envoy,將 GKE 管理的網狀憑證做為用戶端身分。 - 使用
google_cloud_private_spiffe做為serverValidationCa的外掛程式,以程式設計 Envoy,使用 GKE 管理的網格憑證進行伺服器驗證。
接著,將用戶端 TLS 政策附加至後端服務。這項功能可執行下列操作:
- 將用戶端 TLS 政策中的驗證政策套用至後端服務端點的出站連線。
- SAN (主體別名) 會指示用戶端確認所連線伺服器的確切身分。
在檔案
client-mtls-policy.yaml中建立用戶端 TLS 政策:name: "client-mtls-policy" clientCertificate: certificateProviderInstance: pluginInstance: google_cloud_private_spiffe serverValidationCa: - certificateProviderInstance: pluginInstance: google_cloud_private_spiffe匯入用戶端 TLS 政策:
gcloud network-security client-tls-policies import client-mtls-policy \
    --source=client-mtls-policy.yaml --location=global
將用戶端 TLS 政策附加至後端服務。這會對從用戶端傳送至這個後端服務的所有連出要求,強制執行 mTLS 驗證。
gcloud compute backend-services export td-gke-service \
    --global --destination=demo-backend-service.yaml
在
demo-backend-service.yaml中附加下列程式碼:securitySettings: clientTlsPolicy: projects/PROJECT_ID/locations/global/clientTlsPolicies/client-mtls-policy subjectAltNames: - "spiffe://PROJECT_ID.svc.id.goog/ns/K8S_NAMESPACE/sa/DEMO_SERVER_SERVICEACCOUNT"匯入值:
gcloud compute backend-services import td-gke-service \
    --global --source=demo-backend-service.yaml
(選用) 執行下列指令,檢查要求是否失敗。 這是預期會發生的失敗,因為用戶端預期會從端點取得憑證,但端點並未設定安全政策。
# Get the name of the Podrunning Busybox.
BUSYBOX_POD=$(kubectl get po -l run=client -o=jsonpath='{.items[0].metadata.name}')

# Command to execute that tests connectivity to the service service-test.
TEST_CMD="wget -q -O - service-test; echo"

# Execute the test command on the pod.
kubectl exec -it $BUSYBOX_POD -c busybox -- /bin/sh -c "$TEST_CMD"
輸出內容如下:
wget: server returned error: HTTP/1.1 503 Service Unavailable
保護傳入端點的流量
如要保護傳入流量,請先建立伺服器 TLS 政策,執行下列操作:
- 使用
google_cloud_private_spiffe做為serverCertificate的外掛程式,可讓 Envoy 程式設計使用 GKE 管理的網格認證做為伺服器身分。 - 使用
google_cloud_private_spiffe做為clientValidationCa的外掛程式,程式化 Envoy,以便使用 GKE 管理的網格憑證進行用戶端驗證。
將伺服器 TLS 政策值儲存至名為
server-mtls-policy.yaml的檔案。name: "server-mtls-policy" serverCertificate: certificateProviderInstance: pluginInstance: google_cloud_private_spiffe mtlsPolicy: clientValidationCa: - certificateProviderInstance: pluginInstance: google_cloud_private_spiffe建立伺服器 TLS 政策:
gcloud network-security server-tls-policies import server-mtls-policy \
    --source=server-mtls-policy.yaml --location=global
建立名為
ep_mtls.yaml的檔案,其中包含端點比對器,並附加伺服器 TLS 政策。endpointMatcher: metadataLabelMatcher: metadataLabelMatchCriteria: MATCH_ALL metadataLabels: - labelName: app labelValue: payments name: "ep" serverTlsPolicy: projects/PROJECT_ID/locations/global/serverTlsPolicies/server-mtls-policy type: SIDECAR_PROXY匯入端點比對器。
gcloud network-services endpoint-policies import ep \
    --source=ep_mtls.yaml --location=global
驗證設定
執行下列 curl 指令。如果要求順利完成,輸出內容會顯示 x-forwarded-client-cert。只有在連線為 mTLS 連線時,才會列印標頭。
# Get the name of the Podrunning Busybox.
BUSYBOX_POD=$(kubectl get po -l run=client -o=jsonpath='{.items[0].metadata.name}')

# Command to execute that tests connectivity to the service service-test.
TEST_CMD="wget -q -O - service-test; echo"

# Execute the test command on the pod.
kubectl exec -it $BUSYBOX_POD -c busybox -- /bin/sh -c "$TEST_CMD"
您會看到類似下方的輸出內容:
GET /get HTTP/1.1
Host: service-test
content-length: 0
x-envoy-internal: true
accept: */*
x-forwarded-for: 10.48.0.6
x-envoy-expected-rq-timeout-ms: 15000
user-agent: curl/7.35.0
x-forwarded-proto: http
x-request-id: redacted
x-forwarded-client-cert: By=spiffe://PROJECT_ID.svc.id.goog/ns/K8S_NAMESPACE/sa/DEMO_SERVER_SERVICEACCOUNT;Hash=Redacted;Subject="Redacted;URI=spiffe://PROJECT_ID.svc.id.goog/ns/K8S_NAMESPACE/sa/DEMO_CLIENT_SERVICEACCOUNT
請注意,x-forwarded-client-cert 標頭是由伺服器端 Envoy 插入,其中包含自身的 ID (伺服器) 和來源用戶端的 ID。由於我們同時看到用戶端和伺服器身分,這就是 mTLS 連線的信號。
透過授權政策設定服務層級存取權
這些操作說明會建立授權政策,允許由主機名稱為 service-test、通訊埠為 8000 且 HTTP 方法為 GET 的 DEMO_CLIENT_SERVICEACCOUNT 帳戶傳送要求。建立授權政策前,請先閱讀「使用授權限制存取權」中的注意事項。
建立名為
authz-policy.yaml的檔案,藉此建立授權政策。action: ALLOW name: authz-policy rules: - sources: - principals: - spiffe://PROJECT_ID.svc.id.goog/ns/K8S_NAMESPACE/sa/DEMO_CLIENT_SERVICEACCOUNT destinations: - hosts: - service-test ports: - 8000 methods: - GET匯入政策:
gcloud network-security authorization-policies import authz-policy \
  --source=authz-policy.yaml \
  --location=global
更新端點政策,在檔案
ep_mtls.yaml中附加下列內容,參照新的授權政策:authorizationPolicy: projects/PROJECT_ID/locations/global/authorizationPolicies/authz-policy
端點政策現在會指定,對於 Envoy Sidecar Proxy 顯示標籤
app:payments的 Pod,傳入要求必須強制執行 mTLS 和授權政策。匯入政策:
gcloud network-services endpoint-policies import ep \
    --source=ep_mtls.yaml --location=global
驗證設定
執行下列指令來驗證設定。
# Get the name of the Podrunning Busybox.
BUSYBOX_POD=$(kubectl get po -l run=client -o=jsonpath='{.items[0].metadata.name}')

# Command to execute that tests connectivity to the service service-test.
# This is a valid request and will be allowed.
TEST_CMD="wget -q -O - service-test; echo"

# Execute the test command on the pod.
kubectl exec -it $BUSYBOX_POD -c busybox -- /bin/sh -c "$TEST_CMD"
預期的輸出內容如下所示:
GET /get HTTP/1.1
Host: service-test
content-length: 0
x-envoy-internal: true
accept: */*
x-forwarded-for: redacted
x-envoy-expected-rq-timeout-ms: 15000
user-agent: curl/7.35.0
x-forwarded-proto: http
x-request-id: redacted
x-forwarded-client-cert: By=spiffe://PROJECT_ID.svc.id.goog/ns/K8S_NAMESPACE/sa/DEMO_SERVER_SERVICEACCOUNT;Hash=Redacted;Subject="Redacted;URI=spiffe://PROJECT_ID.svc.id.goog/ns/K8S_NAMESPACE/sa/DEMO_CLIENT_SERVICEACCOUNT
執行下列指令,測試授權政策是否正確拒絕無效要求:
# Failure case
# Command to execute that tests connectivity to the service service-test.
# This is an invalid request and server will reject because the server
# authorization policy only allows GET requests.
TEST_CMD="wget -q -O - service-test --post-data='' ; echo"

# Execute the test command on the pod.
kubectl exec -it $BUSYBOX_POD -c busybox -- /bin/sh -c "$TEST_CMD"
預期的輸出內容如下所示:
<RBAC: access denied HTTP/1.1 403 Forbidden>
設定 Ingress 閘道安全防護機制
本節假設您已完成服務對服務安全防護一節,包括設定具備 Sidecar 自動注入器的 GKE 叢集、建立憑證授權單位,以及建立端點政策。
在本節中,您將部署 Envoy Proxy 做為輸入閘道,終止 TLS 連線,並授權叢集內部用戶端的要求。
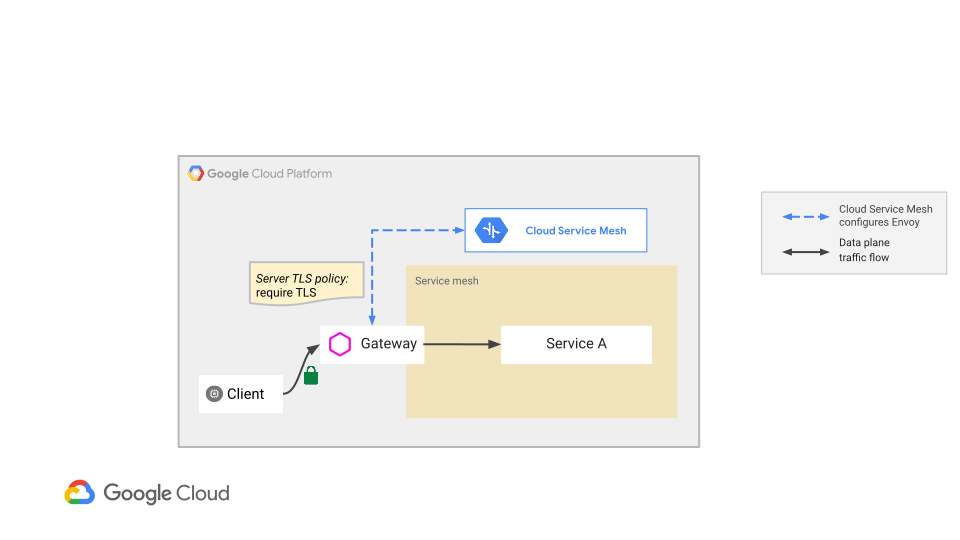
如要設定 Ingress 閘道來終止 TLS,請按照下列步驟操作:
- 部署可透過叢集內部 IP 位址存取的 Kubernetes Service。
- 部署作業包含獨立的 Envoy Proxy,該 Proxy 會以 Kubernetes 服務的形式公開,並連線至 Cloud Service Mesh。
- 建立伺服器 TLS 政策,終止 TLS。
- 建立授權政策,授權傳入要求。
將 Ingress 閘道服務部署至 GKE
執行下列指令,在 GKE 上部署 Ingress 閘道服務:
wget -q -O -  https://storage.googleapis.com/traffic-director/security/ga/gateway_sample_xdsv3.yaml | sed -e s/PROJECT_NUMBER_PLACEHOLDER/PROJNUM/g | sed -e s/NETWORK_PLACEHOLDER/default/g | sed -e s/DEMO_CLIENT_KSA_PLACEHOLDER/DEMO_CLIENT_SERVICEACCOUNT/g > gateway_sample.yaml

kubectl apply -f gateway_sample.yaml
檔案 gateway_sample.yaml 是 Ingress 閘道的規格。以下各節說明規格新增的部分。
停用 Cloud Service Mesh 邊車容器注入功能
gateway_sample.yaml 規格會將 Envoy 代理程式部署為唯一容器。在先前的步驟中,Envoy 已做為輔助容器插入應用程式容器。為避免多個 Envoy 處理要求,您可以使用下列陳述式,為這個 Kubernetes 服務停用加入邊車容器:
sidecar.istio.io/inject: "false"
掛接正確的磁碟區
gateway_sample.yaml 規格會掛接磁碟區 gke-workload-certificates。
這個磁碟區也會用於 Sidecar 部署作業,但邊車容器加入器看到 cloud.google.com/enableManagedCerts: "true" 註解時,會自動新增這個磁碟區。gke-workload-certificates 磁碟區包含 GKE 管理的 SPIFFE 憑證和金鑰,這些憑證和金鑰是由您設定的 CA 服務執行個體簽署。
設定叢集的內部 IP 位址
使用 ClusterInternal 類型的服務設定 Ingress 閘道。這會為 mesh-gateway 建立可內部解析的 DNS 主機名稱。當用戶端將要求傳送至 mesh-gateway:443 時,Kubernetes 會立即將要求路由至 Ingress Gateway Envoy 部署作業的 8080 連接埠。
在 Ingress 閘道上啟用 TLS
請按照這些操作說明,在 Ingress 閘道上啟用 TLS。
建立伺服器 TLS 政策資源,終止 TLS 連線,並使用名為
server-tls-policy.yaml的檔案中的值:description: tls server policy name: server-tls-policy serverCertificate: certificateProviderInstance: pluginInstance: google_cloud_private_spiffe匯入伺服器 TLS 政策:
gcloud network-security server-tls-policies import server-tls-policy \
    --source=server-tls-policy.yaml --location=global
建立新目標
Gateway,並儲存在td-gke-gateway.yaml檔案中。 這會附加伺服器 TLS 政策,並將 Envoy Proxy 進入閘道設為終止傳入的 TLS 流量。name: td-gke-gateway scope: gateway-proxy ports: - 8080 type: OPEN_MESH serverTlsPolicy: projects/PROJECT_ID/locations/global/serverTlsPolicies/server-tls-policy
匯入閘道:
gcloud network-services gateways import td-gke-gateway \
  --source=td-gke-gateway.yaml \
  --location=global
建立並儲存名為
td-gke-route的新HTTPRoute,該 會參照閘道,並將所有要求路由至td-gke-service。name: td-gke-route hostnames: - mesh-gateway gateways: - projects/PROJECT_NUMBER/locations/global/gateways/td-gke-gateway rules: - action: destinations: - serviceName: "projects/PROJECT_NUMBER/locations/global/backendServices/td-gke-service"匯入
HTTPRoute:gcloud network-services http-routes import td-gke-route \ --source=td-gke-route.yaml \ --location=global
您可以選擇更新後端的授權政策,在符合下列所有條件時允許要求:
DEMO_CLIENT_SERVICEACCOUNT傳送的要求。(Ingress 閘道部署作業會使用DEMO_CLIENT_SERVICEACCOUNT服務帳戶)。- 主機為
mesh-gateway或service-test的要求 - 通訊埠:
8000
除非您已為後端設定授權政策,否則不需要執行這些指令。如果端點上沒有授權政策,或授權政策中不含主機或來源主體相符項目,則系統會允許要求,不需執行這個步驟。將這些值新增至
authz-policy.yaml。action: ALLOW name: authz-policy rules: - sources: - principals: - spiffe://PROJECT_ID.svc.id.goog/ns/K8S_NAMESPACE/sa/DEMO_CLIENT_SERVICEACCOUNT destinations: - hosts: - service-test - mesh-gateway ports: - 8000 methods: - GET匯入政策:
gcloud network-security authorization-policies import authz-policy \
  --source=authz-policy.yaml \
  --location=global
驗證 Ingress 閘道部署作業
您可以使用名為 debug 的新容器,將要求傳送至 Ingress 閘道,驗證部署作業。
在下列規格中,註解 "sidecar.istio.io/inject":"false" 可防止 Cloud Service Mesh 邊車容器加入器自動注入 Sidecar Proxy。沒有 Sidecar 可協助 debug 容器進行要求路徑設定。
容器必須連線至 Ingress 閘道才能進行路由。
規格包含 --no-check-certificate 標記,可忽略伺服器憑證驗證。debug 容器沒有驗證憑證授權單位所需的憑證,因此無法驗證由 CA 服務簽署的憑證,而這些憑證會由 Ingress 閘道用來終止 TLS。
在正式環境中,建議您下載 CA 服務驗證憑證,並掛接或安裝在用戶端。安裝驗證憑證後,請移除 wget 指令的 --no-check-certificate 選項。
執行下列指令:
kubectl run -i --tty --rm debug --image=busybox --restart=Never --overrides='{ "metadata": {"annotations": { "sidecar.istio.io/inject":"false" } } }' -- /bin/sh -c "wget --no-check-certificate -qS -O - https://mesh-gateway; echo"
您會看到與以下類似的輸出內容:
GET / HTTP/1.1
Host: 10.68.7.132
x-forwarded-client-cert: By=spiffe://PROJECT_ID.svc.id.goog/ns/K8S_NAMESPACE/sa/DEMO_SERVER_SERVICEACCOUNT;Hash=Redacted;Subject="Redacted;URI=spiffe://PROJECT_ID.svc.id.goog/ns/K8S_NAMESPACE/sa/DEMO_CLIENT_SERVICEACCOUNT
x-envoy-expected-rq-timeout-ms: 15000
x-envoy-internal: true
x-request-id: 5ae429e7-0e18-4bd9-bb79-4e4149cf8fef
x-forwarded-for: 10.64.0.53
x-forwarded-proto: https
content-length: 0
user-agent: Wget
執行下列負面測試指令:
# Negative test
# Expect this to fail because gateway expects TLS.
kubectl run -i --tty --rm debug --image=busybox --restart=Never  --overrides='{ "metadata": {"annotations": { "sidecar.istio.io/inject":"false" } } }'  -- /bin/sh -c "wget --no-check-certificate -qS -O - http://mesh-gateway:443/headers; echo"
畫面會顯示類似以下內容的輸出:
wget: error getting response: Connection reset by peer
執行下列負面測試指令:
# Negative test.
# AuthorizationPolicy applied on the endpoints expect a GET request. Otherwise
# the request is denied authorization.
kubectl run -i --tty --rm debug --image=busybox --restart=Never  --overrides='{ "metadata": {"annotations": { "sidecar.istio.io/inject":"false" } } }'  -- /bin/sh -c "wget --no-check-certificate -qS -O - https://mesh-gateway --post-data=''; echo"
畫面會顯示類似以下內容的輸出:
HTTP/1.1 403 Forbidden
wget: server returned error: HTTP/1.1 403 Forbidden
刪除部署作業
您可以視需要執行這些指令,刪除使用本指南建立的部署作業。
如要刪除叢集,請執行下列指令:
gcloud container clusters delete CLUSTER_NAME --zone ZONE --quiet
如要刪除您建立的資源,請執行下列指令:
gcloud compute backend-services delete td-gke-service --global --quiet
cloud compute network-endpoint-groups delete service-test-neg --zone ZONE --quiet
gcloud compute firewall-rules delete fw-allow-health-checks --quiet
gcloud compute health-checks delete td-gke-health-check --quiet
gcloud network-services endpoint-policies delete ep \
    --location=global --quiet
gcloud network-security authorization-policies delete authz-gateway-policy \
   --location=global --quiet
gcloud network-security authorization-policies delete authz-policy \
    --location=global --quiet
gcloud network-security client-tls-policies delete client-mtls-policy \
    --location=global --quiet
gcloud network-security server-tls-policies delete server-tls-policy \
    --location=global --quiet
gcloud network-security server-tls-policies delete server-mtls-policy \
    --location=global --quiet
限制
只有 GKE 支援 Cloud Service Mesh 服務安全。您無法使用 Compute Engine 部署服務安全性。
疑難排解
本節說明如何修正設定安全服務時遇到的問題。
連線失敗
如果連線失敗並顯示 upstream connect 或 disconnect/reset
before headers 錯誤,請檢查 Envoy 記錄,您可能會看到下列其中一則記錄訊息:
gRPC config stream closed: 5, Requested entity was not found
gRPC config stream closed: 2, no credential token is found
如果在 Envoy 記錄中看到這些錯誤,可能是因為服務帳戶權杖的掛接方式有誤,或是使用不同的 audience,或兩者皆是。
詳情請參閱「Envoy 記錄中的錯誤訊息指出設定問題」。
未建立 Pod
如要排解這個問題,請參閱「排解 GKE Pod 自動部署問題」。
Envoy 未通過 Cloud Service Mesh 驗證
Envoy (envoy-proxy) 連線至 Cloud Service Mesh 以擷取 xDS 設定時,會使用 Workload Identity Federation for GKE 和 Pod 的 Kubernetes ServiceAccount。如果驗證失敗,Envoy 就不會進入就緒狀態。
無法使用 --workload-identity-certificate-authority flag 建立叢集
如果看到這則錯誤訊息,請確認您使用的是最新版 Google Cloud CLI:
gcloud components update
Pod 仍處於待處理狀態
如果在設定過程中,Pod 仍處於待處理狀態,請在部署規格中增加 Pod 的 CPU 和記憶體資源。
無法使用 --enable-mesh-certificates 旗標建立叢集
確認您使用的是最新版 gcloud CLI:
gcloud components update
請注意,--enable-mesh-certificates 旗標僅適用於 gcloud beta。
Pod 無法啟動
如果憑證佈建失敗,使用 GKE 網格憑證的 Pod 可能無法啟動。可能發生這種情況的原因如下:
WorkloadCertificateConfig或TrustConfig設定有誤或遺失。- CSR 未獲核准。
您可以檢查 Pod 事件,確認憑證佈建是否失敗。
檢查 Pod 的狀態:
kubectl get pod -n POD_NAMESPACE POD_NAME更改下列內容:
POD_NAMESPACE:Pod 的命名空間。POD_NAME:Pod 名稱。
查看 Pod 的近期活動:
kubectl describe pod -n POD_NAMESPACE POD_NAME如果憑證佈建失敗,您會看到含有
Type=Warning、Reason=FailedMount、From=kubelet和Message欄位的事件,且Message欄位開頭為MountVolume.SetUp failed for volume "gke-workload-certificates"。Message欄位包含疑難排解資訊。Events: Type Reason Age From Message ---- ------ ---- ---- ------- Warning FailedMount 13s (x7 over 46s) kubelet MountVolume.SetUp failed for volume "gke-workload-certificates" : rpc error: code = Internal desc = unable to mount volume: store.CreateVolume, err: unable to create volume "csi-4d540ed59ef937fbb41a9bf5380a5a534edb3eedf037fe64be36bab0abf45c9c": caPEM is nil (check active WorkloadCertificateConfig)如果 Pod 無法啟動的原因是物件設定錯誤或 CSR 遭拒,請參閱下列疑難排解步驟。
「WorkloadCertificateConfig」或「TrustConfig」設定有誤
請確認您已正確建立 WorkloadCertificateConfig 和 TrustConfig 物件。您可以使用 kubectl 診斷這兩個物件的設定錯誤。
擷取目前狀態。
針對
WorkloadCertificateConfig:kubectl get WorkloadCertificateConfig default -o yaml針對
TrustConfig:kubectl get TrustConfig default -o yaml檢查狀態輸出內容。有效物件的條件會包含
type: Ready和status: "True"。status: conditions: - lastTransitionTime: "2021-03-04T22:24:11Z" message: WorkloadCertificateConfig is ready observedGeneration: 1 reason: ConfigReady status: "True" type: Ready如果是無效物件,則會改為顯示
status: "False"。「reason」和「message」欄位包含其他疑難排解詳細資料。
CSR 未獲核准
如果 CSR 核准程序發生錯誤,您可以在 CSR 的 type: Approved 和 type: Issued 條件中查看錯誤詳細資料。
使用
kubectl列出相關 CSR:kubectl get csr \ --field-selector='spec.signerName=spiffe.gke.io/spiffe-leaf-signer'選擇
Approved且不是Issued的 CSR,或選擇不是Approved的 CSR。使用 kubectl 取得所選 CSR 的詳細資料:
kubectl get csr CSR_NAME -o yaml將
CSR_NAME替換為您選擇的 CSR 名稱。
有效的 CSR 具有 type: Approved 和 status: "True" 的條件,且 status.certificate 欄位中含有有效的憑證:
status:
  certificate: <base64-encoded data>
  conditions:
  - lastTransitionTime: "2021-03-04T21:58:46Z"
    lastUpdateTime: "2021-03-04T21:58:46Z"
    message: Approved CSR because it is a valid SPIFFE SVID for the correct identity.
    reason: AutoApproved
    status: "True"
    type: Approved
無效 CSR 的疑難排解資訊會顯示在 message 和 reason 欄位中。
應用程式無法使用核發的 mTLS 憑證
確認憑證尚未過期:
cat /var/run/secrets/workload-spiffe-credentials/certificates.pem | openssl x509 -text -noout | grep "Not After"確認應用程式支援您使用的金鑰類型。
cat /var/run/secrets/workload-spiffe-credentials/certificates.pem | openssl x509 -text -noout | grep "Public Key Algorithm" -A 3確認核發 CA 使用的金鑰系列與憑證金鑰相同。
取得 CA 服務 (預先發布版) 執行個體的狀態:
gcloud privateca ISSUING_CA_TYPE describe ISSUING_CA_NAME \
  --location ISSUING_CA_LOCATION
更改下列內容:
ISSUING_CA_TYPE:核發 CA 類型,必須是subordinates或roots。ISSUING_CA_NAME:核發 CA 的名稱。ISSUING_CA_LOCATION:核發 CA 的區域。
確認輸出內容中的
keySpec.algorithm與您在WorkloadCertificateConfigYAML 資訊清單中定義的金鑰演算法相同。 輸出如下所示:config: ... subjectConfig: commonName: td-sub-ca subject: organization: TestOrgLLC subjectAltName: {} createTime: '2021-05-04T05:37:58.329293525Z' issuingOptions: includeCaCertUrl: true keySpec: algorithm: RSA_PKCS1_2048_SHA256 ...
憑證遭拒
- 確認對等應用程式使用相同的信任套件來驗證憑證。
確認憑證尚未過期:
cat /var/run/secrets/workload-spiffe-credentials/certificates.pem | openssl x509 -text -noout | grep "Not After"如果未使用 gRPC Go 憑證重新載入 API,請確認用戶端程式碼會定期從檔案系統重新整理憑證。
確認工作負載與 CA 位於相同的信任網域。GKE Mesh 憑證支援單一信任網域內的工作負載間通訊。