
The Merchandising console is a tool designed for you to create and administer controls. It provides an approval flow so that every control can be proposed by all merchandisers and reviewed by approvers.
The Merchandising console helps create serving controls such as pinning, boost/bury, synonyms and facets. The Merchandising console brings you closer to a rules-as-a-service arrangement with AI Commerce Search. For example, instead of having to configure boost or bury manually, Merchandising console reduces the number of products that show up for specific queries.
Configure Identity and Access Management in the Merchandising console
In Google Cloud, to access the Merchandising console tab, you must have at a minimum these permissions:
Project viewer (Viewer) to access the project.
Retail editor to edit and save Merchandising console settings.
Access the console as a Creator
In the Merchandising console, Creators can:
- Define the goal.
- Select a control.
- Set rules and preview.
- Create a new control and save it as a draft for approval.
- Submit a new control for approval.
- View drafts they have created.
- View all controls on the Google Cloud.
A Creator cannot, however, edit published controls.

Access the console as an Approver
In the Merchandising console, Approvers can:
- Set approval flow.
- See the status of all request.
- Review and approve.
- View and edit all controls on the Google Cloud.

Click the arrows to expand the option that applies to you.
Use the console as an administrator
Before you start, you must be a Google Cloud administrator to onboard users to the Merchandising console. Then, proceed with these next administrator set up steps.
Set up administrator access to Merchandising console
You need these IAM roles to access, edit, and assign Creator or Approver roles to a Merchandising console user:
- To edit the Merchandising console, at least the Retail Editor role is required.
- To assign Creator or Approver roles to a user, a project-level IAM admin role is required.
For a complete layout of IAM project-level and AI Commerce Search permissions, refer to the [Predefined administrator roles](/retail/docs/iam#roles) section in this [AI Commerce Search product](/retail/docs/iam) documentation.
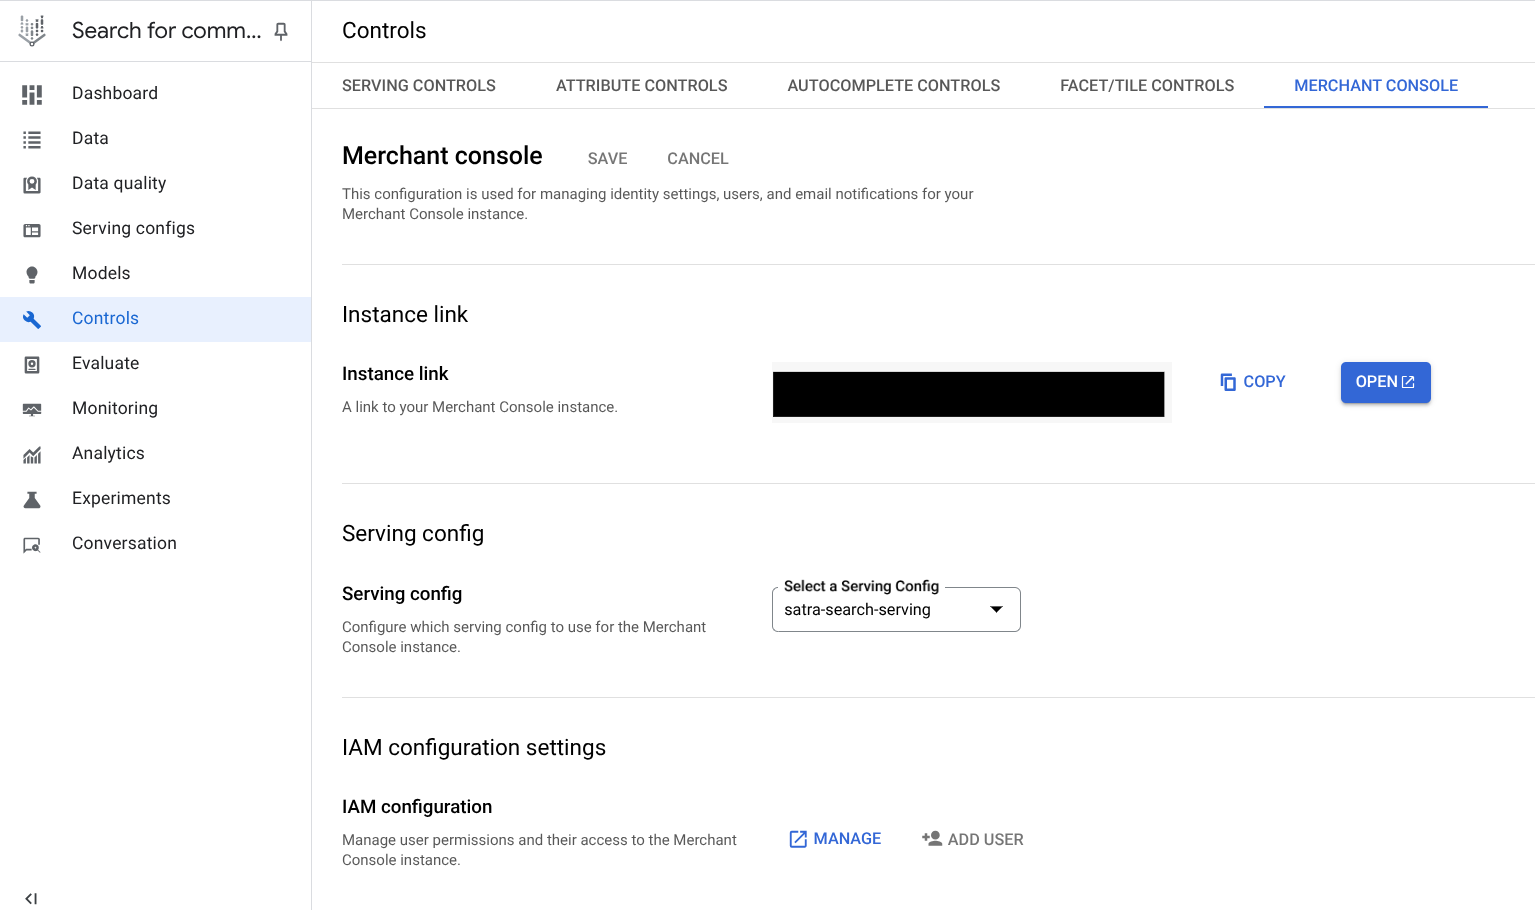
Access the Merchandising console tab
Access the Merchandising console by accessing the Merchandising console tab within the Google Cloud console:
- Navigate to AI Commerce Search in Gemini Enterprise for Customer Experience.
- Click Controls.
- Navigate to the Merchandising console tab.
Add Merchandising console users
If you're a Google Cloud console administrator, to give site merchandisers access to the Merchandising console and assign either a Creator or an Approver role to them:
-
Go to the Controls page in the AI Commerce Search in Gemini Enterprise for Customer Experience console.
Go to the Controls page - Navigate to the Merchandising console tab.
- You can see the unique URL to the Merchandising console associated with the current Google Cloud project. Copy the link or directly open it in the Google Cloud console.
- Select the default serving config merchandisers are to use to Preview and Attach approved controls.
- Give users either Approver or Creator roles.
- You can see the unique URL to the Merchandising console associated with the current Google Cloud project. Copy the link or directly open it in the Google Cloud console.
- Select the default serving config for Preview in the Merchandising console.
- (Optional) Edit access to the Merchandising console using these functions:
- Add users: Give users Approver or Creator access to the Merchandising console.
- Delete users: Revoke access to the Merchandising console by deleting Approvers or Creators.
- Add approver emails. For each control submitted by merchandisers, the approver receives an email to review and approve this control.
Access the console as a user
If you have been given access with the URL, you have the option of using the Merchandising console instead of the standard Google Cloud console. To create controls using the Merchandising console:
- Sign in using the credentials that your administrator provides you.
- Follow the Merchandising console documentation steps under each serving control section.
- After submission, you receive a notification email with the subject [Merchant Console] Proposed control awaiting review.
- As an Approver, you can accept, deny, or change the control request.
See information about other controls for admins only.
Use the console as a site merchandiser
Follow these steps to get started in the Merchandising console as a site merchandiser.
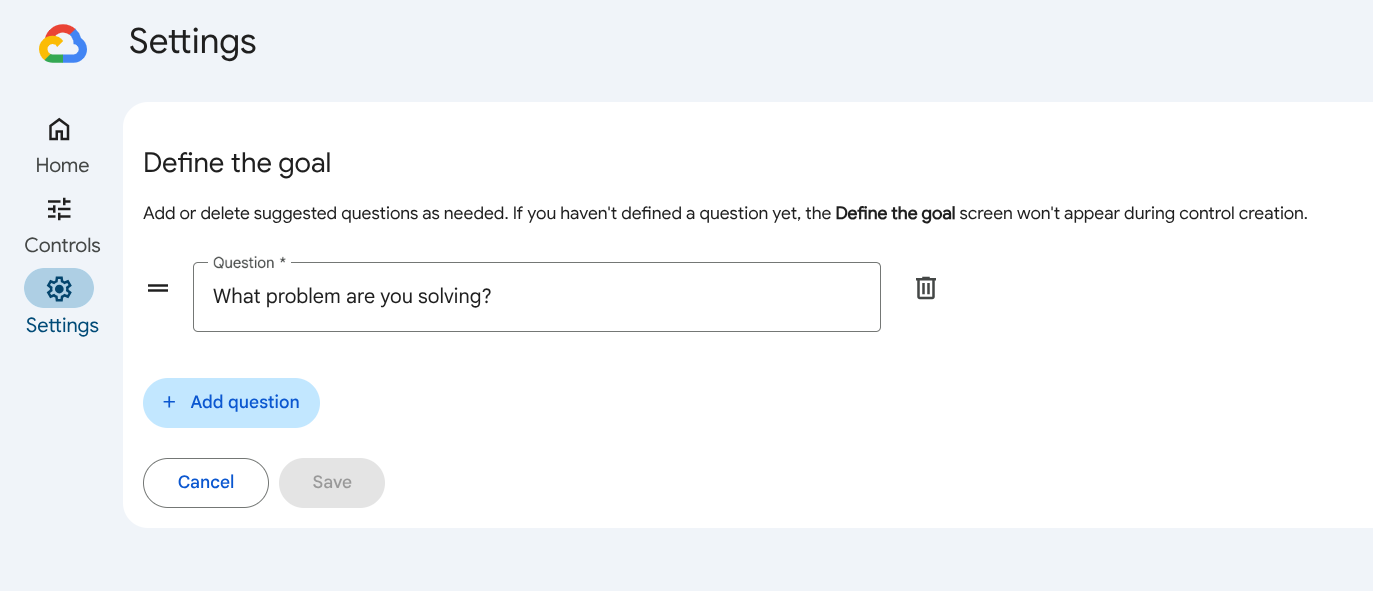
- Set approval flow for questions.
- Navigate to the settingsSettings part of the main menu.
- By default, a predefined list of questions are set in Define the goal screen.
- Add a question by clicking add_boxAdd question to help Approvers understand the purpose of the new controls.
- Click Save to save the questions.
- Create a control.
- Go to the Controls section.
- Click add_boxCreate control.
- Define the goal: All questions previously defined are required to be answered. If you haven't defined any questions yet, this screen won't appear.
- Select a control. Specify the control type and assign a name to the control.
- Set rules: For each rule, you can define triggers and actions.
- Define Triggers: The goal is to establish when to apply this control.
- Query terms: This rule can be triggered when your search query contains or exactly matches specific terms. You can define these query terms.
- Applicable time ranges: Time restrictions can be applied to confine the activation of this rule to specific time periods.
- Define actions: Depending on the type of control, you can define actions, such as Item ID and position for a pinning control.
- Preview a rule: A dynamic preview of the rule can be seen on the screen.
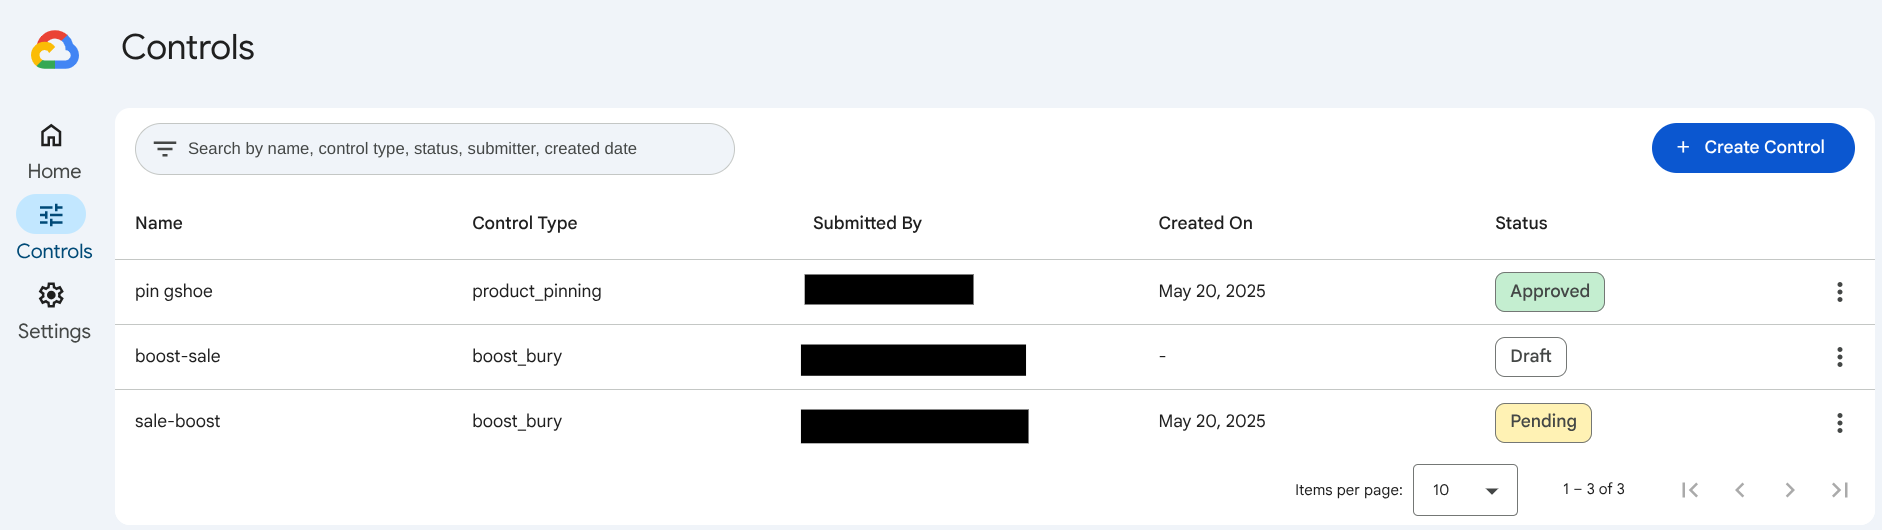
- Submit a rule: After you click Submit to submit the rule set by the merchandiser, you can view the control as Pending in the controls list.
- Approve a control
- To grant approval for a control, click the more_vertMore icon next to the control in the control list. Select Review.
- A screen is provided for the given control where you can Approve, Deny, or Approve with edits.
-
After approval, you are redirected to the controls list page that shows the control as Approved.
Merchandising console stages
Create and manage controls in Merchandising console
This section covers all ways you can create and manage controls for your search functions in Merchandising console.
The Merchandising console features a user-friendly interface that lets you efficiently create and manage controls. This tool also facilitates an approval process, allowing any merchandiser to propose controls and merchandiser approvers to review them.
Create serving controls in the Merchandising console


To create a serving control in Merchandising console, you must select an option for each configuration step in this order:
| 1. Control type | 2. Actions | 3. Triggers | 4. Serve |
|---|---|---|---|
| Search | Boost/bury | Query | Default search |
| Browse | Pinning | Page category | Clienteling (serving config example) |
| Filtering | Time ranges | Test A (serving config example) | |
| Synonyms | Test B (serving config example) | ||
| Redirect |
Click each action for how to configure the controls in the Merchandising console.
Configure a control in the Merchandising console
This section breaks down the components of control configurations in Merchandising console.
Control trigger
A control trigger, on the other hand, is the definition of when the control is applied. For example, according to a given time range or a query term.
Control service
A control is served according to configuration set in serving controls (rules), meaning the types of controls you can create, and in serving configs (set of rules) that determine where the controls are applied.
For more information, see Relationship between serving controls and configs.
Control actions
A control action is a classification of what the control does. This is the primary configuration for a control.
Scroll through the control action tabs for instructions on how to create, trigger and serve each control in the Merchandising console as a Creator. If you are an Approver, after reviewing the general instructions in your control action tab, refer to the special section for Additional approver steps.
Boost or bury
Click the URL provided by the administrator. Sign in.
This takes you to the Controls page in the Merchandising console.
Click add_boxCreate control.
Define the goals for your end users and timing required. All questions are required to be answered. Click Next.
Select a control. Enter the name for your control, select the Search product, then choose the control type Boost/Bury.
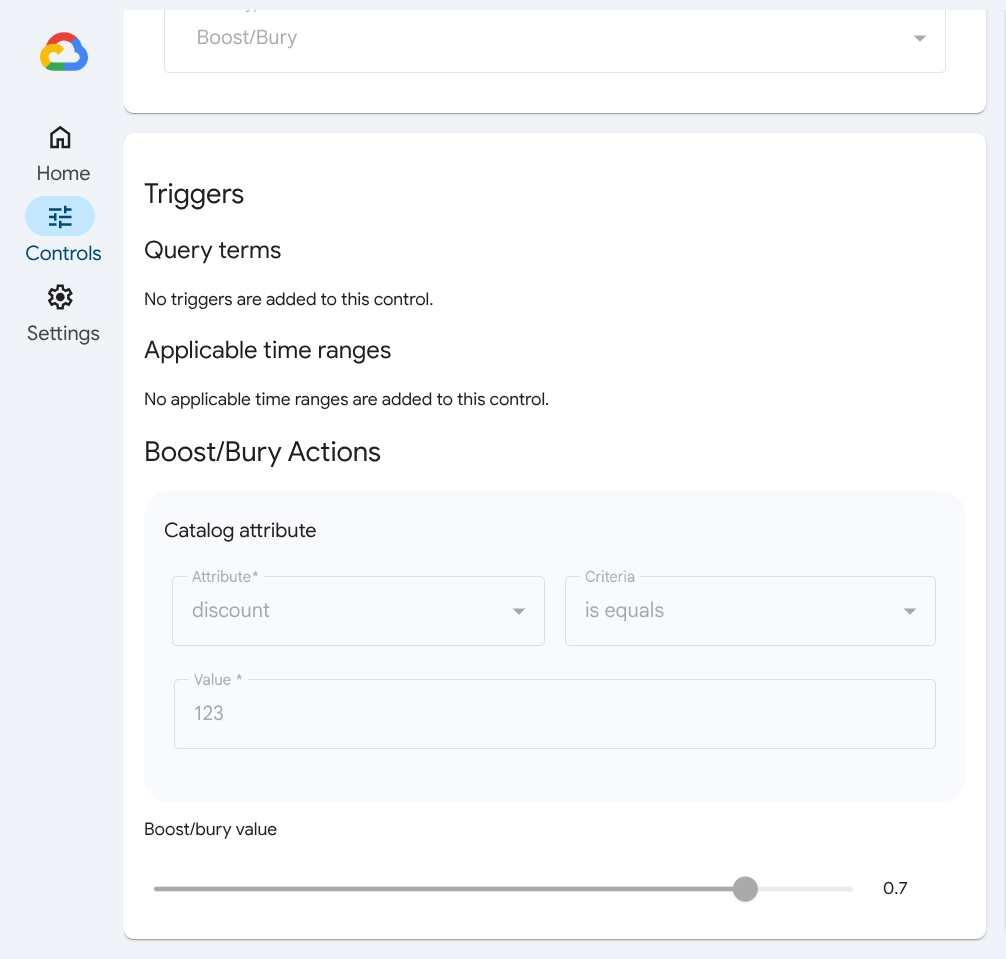
Configure your Boost/Bury control:
Under Triggers, define what catalog attribute triggers this control by giving criteria to a related search query, such as contains or not in range. If no catalog attribute has been configured, this control will always apply.
Define an Applicable time range by entering a Date range. If any of the specified time ranges are met, the catalog attribute will be matched with the query during any of the specified time ranges. Add a time range with add_boxAdd time range.
Define the Boost/Bury actions you want to trigger with this control. These actions are defined by a Catalog attribute such as colors, a Criteria such as contains, and Value such as red.
Click add_boxAdd attribute to add more attributes.
Use the slider to set your Boost/bury value. Negative numbers are bury, and positive numbers are boost.
Click Submit to submit your control request to an Approver. You will be able to see the status of submitted requests in the Merchandising Console. Alternatively, you can Save a control Draft for later. If you change your mind, you can delete your control request.
For more information, refer to Create boost/bury controls and their rules.
Filter
Click the URL provided by the administrator. Sign in.
This takes you to the Controls page in the Merchandising console.
Click add_boxCreate control.
Define the goals for your end users and timing required. All questions are required to be answered. Click Next.
Select a control. Enter the name for your control, select the Search or Browse product, then choose the control type Filter.
Configure your Filter control:
Under Triggers, define what catalog attribute triggers this control by giving criteria to a related search query or page category, such as contains or not in range. If no catalog attribute has been configured, this control will always apply.
Define an Applicable time range by entering a Date range. If any of the specified time ranges are met, the catalog attribute will be matched with the query during any of the specified time ranges. Add a time range with add_boxAdd time range.
Define the Filter actions you want to trigger with this control. These actions are defined by a Catalog attribute such as colors, a Criteria such as contains, and Value such as red.
Click add_boxAdd attribute to add more attributes.
Click Submit to submit your control request to an Approver. You will be able to see the status of submitted requests in the Merchandising Console. Alternatively, you can Save a control Draft for later. If you change your mind, you can delete your control request.
For more information, refer to Create filter controls and their rules.
Redirect
Click the URL provided by the administrator. Sign in.
This takes you to the Controls page in the Merchandising console.
Click add_boxCreate control.
Define the goals for your end users and timing required. All questions are required to be answered. Click Next.
Select a control. Enter the name for your control, select the Search product, then choose the control type Redirect.
Configure your Redirect control:
Under Triggers, define what catalog attribute triggers this control by giving criteria to a related search query, such as contains or not in range. If no catalog attribute has been configured, this control will always apply.
Define an Applicable time range by entering a Date range. If any of the specified time ranges are met, the catalog attribute will be matched with the query during any of the specified time ranges. Add a time range with add_boxAdd time range.
Define the Redirect actions you want to trigger with this control by entering the redirect URL.
Click Submit to submit your control request to an Approver. You will be able to see the status of submitted requests in the Merchandising Console. Alternatively, you can Save a control Draft for later. If you change your mind, you can delete your control request.
For more information, refer to Create redirect controls and their rules.
Don't associate
Click the URL provided by the administrator. Sign in.
This takes you to the Controls page in the Merchandising console.
Click add_boxCreate control.
Define the goals for your end users and timing required. All questions are required to be answered. Click Next.
Select a control. Enter the name for your control, select the Search product, then choose the control type Do not associate.
Configure your Do-not-associate control:
Under Triggers, define what catalog attribute triggers this control by giving criteria to a related search query, such as contains or not in range. If no catalog attribute has been configured, this control will always apply.
Define an Applicable time range by entering a Date range. If any of the specified time ranges are met, the catalog attribute will be matched with the query during any of the specified time ranges. Add a time range with add_boxAdd time range.
Under Do not associate actions, specify the terms that should not be associated with the query terms you entered in the previous Triggers section. Enter them into the query terms and disassociated terms fields, respectively.
Click Submit to send your control request to an Approver. You will be able to see the status of submitted requests in the Merchandising Console. Alternatively, you can Save a control Draft for later. If you change your mind, you can delete your control request.
For more information, refer to Create do-not-associate controls and their rules.
Ignore
Click the URL provided by the administrator. Sign in.
This takes you to the Controls page in the Merchandising console.
Click add_boxCreate control.
Define the goals for your end users and timing required. All questions are required to be answered. Click Next.
Select a control. Enter the name for your control, select the Search product, then choose the control type Ignore.
Configure your Ignore control:
Under Triggers, define what catalog attribute triggers this control by giving criteria to a related search query, such as contains or not in range. If no catalog attribute has been configured, this control will always apply.
Define an Applicable time range by entering a Date range. If any of the specified time ranges are met, the catalog attribute will be matched with the query during any of the specified time ranges. Add a time range with add_boxAdd time range.
Enter the terms you want to have ignored under Ignore actions.
Click Submit to submit your control request to an Approver. You will be able to see the status of submitted requests in the Merchandising Console. Alternatively, you can Save a control Draft for later. If you change your mind, you can delete your control request.
For more information, refer to Create ignore controls and their rules.
Replacement
Click the URL provided by the administrator. Sign in.
This takes you to the Controls page in the Merchandising console.
Click add_boxCreate control.
Define the goals for your end users and timing required. All questions are required to be answered. Click Next.
Select a control. Enter the name for your control, select the Search product, then choose the control type Replacement.
Configure your Replacement control:
Under Triggers, define what catalog attribute triggers this control by giving criteria to a related search query, such as contains or not in range. If no catalog attribute has been configured, this control will always apply.
Define an Applicable time range by entering a Date range. If any of the specified time ranges are met, the catalog attribute will be matched with the query during any of the specified time ranges. Add a time range with add_boxAdd time range.
Under Replacement actions, define the query terms you want replaced in the first field, and their substitutes in the second field.
Click Submit to send your control request to an Approver. You will be able to see the status of submitted requests in the Merchandising Console. Alternatively, you can Save a control Draft for later. If you change your mind, you can delete your control request.
For more information, refer to Create replacement controls and their rules.
Pinning
Click the URL provided by the administrator. Sign in.
This takes you to the Controls page in the Merchandising console.
Click add_boxCreate control.
Define the goals for your end users and timing required. All questions are required to be answered. Click Next.
Select a control. Enter the name for your control, select the Search product, then choose the control type Pinning.
Configure your Pinning control:
Under Triggers, define what catalog attribute triggers this control by giving criteria to a related search query, such as contains or not in range. If no catalog attribute has been configured, this control will always apply.
Define an Applicable time range by entering a Date range. If any of the specified time ranges are met, the catalog attribute will be matched with the query during any of the specified time ranges. Add a time range with add_boxAdd time range.
Define the Pinning actions you want to trigger with this control. These actions are defined by Product ID and the pin position, preferably a number less than 120 (the typical page size). You can click add_boxAdd product and add up to 10.
Click Submit to submit your control request to an Approver. You will be able to see the status of submitted requests in the Merchandising Console. Alternatively, you can Save a control Draft for later. If you change your mind, you can delete your control request.
For more information, refer to Create pinning controls and their rules.
Two-way synonym
Click the URL provided by the administrator. Sign in.
This takes you to the Controls page in the Merchandising console.
Click add_boxCreate control.
Define the goals for your end users and timing required. All questions are required to be answered. Click Next.
Select a control. Enter the name for your control, select the Search product, then choose the control type Synonyms.
Configure your Two-way synonym control:
Under Triggers, define what catalog attribute triggers this control by giving criteria to a related search query, such as contains or not in range. If no catalog attribute has been configured, this control will always apply.
Define an Applicable time range by entering a Date range. If any of the specified time ranges are met, the catalog attribute will be matched with the query during any of the specified time ranges. Add a time range with add_boxAdd time range.
Define the Synonym type you want to trigger with this control. Select Two-way. See the section on Synonyms for more information on synonym types.
Click Submit. This takes you to a detailed Two-way synonym configuration screen.
Enter the synonyms in the field under Two-way synonym actions. This action links terms together bidirectionally to be treated the same in search results, so that a red sofa query results in red maroon sofa but maroon sofa queries are expanded to include all types of red sofas, such as crimson or pink.
Submit again to send your control request to an Approver. You will be able to see the status of submitted requests in the Merchandising Console. Alternatively, you can Save a control Draft for later. If you change your mind, you can delete your control request.
For more information, refer to Create two-way synonym controls and their rules.
One-way synonym
Click the URL provided by the administrator. Sign in.
This takes you to the Controls page in the Merchandising console.
Click add_boxCreate control.
Define the goals for your end users and timing required. All questions are required to be answered. Click Next.
Select a control. Enter the name for your control, select the Search product, then choose the control type Synonyms.
Configure your One-way synonym control:
Under Triggers, define what catalog attribute triggers this control by giving criteria to a related search query, such as contains or not in range. If no catalog attribute has been configured, this control will always apply.
Define an Applicable time range by entering a Date range. If any of the specified time ranges are met, the catalog attribute will be matched with the query during any of the specified time ranges. Add a time range with add_boxAdd time range.
Define the Synonym type you want to trigger with this control. Select One-way. See the section on Synonyms for more information on synonym types.
Click Submit. This takes you to a detailed One-way synonym configuration screen.
Enter your synonyms in the field under One-way synonym actions. This action links terms together unidirectionally to be treated the same in search results, so that a red sofa query includes maroon sofas, but a maroon sofa query does not return other types of red sofas, restricting the results to only maroon sofas.
Click Submit again to send your control request to an Approver. You will be able to see the status of submitted requests in the Merchandising Console. Alternatively, you can Save a control Draft for later. If you change your mind, you can delete your control request.
For more information, refer to Create one-way synonym controls and their rules.
Additional approver steps
These additional steps are available to Approvers in the Merchandising console for managing controls:
Define the goal is optional for Approvers.
Approve, Deny, or Edit any requests made by Creators for a Boost/bury control.
The Submit step is optional. You can directly Publish a control.
You can also make a control inactive by removing all serving configs attached to it:
Click the control configuration page indicated by the slider icon on the left side of the Merchandising console.
Select the control you want to edit from the list.
Edit the control.
Navigate to the Serving configs section of the control Edit panel.
Deselect the serving config by unchecking it.
Save.
Recommendations boost or bury
Click the URL provided by the administrator. Sign in.
This takes you to the Controls page in the Merchandising console.
- Click add_boxCreate control.
- Define the goals for your end users and timing required. All questions are required to be answered. Click Next.
- Select a control. Enter the name for your control, select the Browse product, then choose the control type Boost/Bury.
- Configure your Boost/Bury control:
- Under Triggers, enter the page categories are to trigger the control. If no catalog attributes are configured, then this control is always in effect.
- Define an Applicable time range by entering a Date range. If any of the specified time ranges are met, the catalog attribute will be matched with the query during any of the specified time ranges. Add a time range with add_boxAdd time range.
- Define the Boost/Bury actions you want to trigger with this control. These actions are defined by a Catalog attribute such as colors, a Criteria such as contains, and Value such as red.
- Click add_boxAdd attribute to add more attributes.
- Use the slider to set your Boost/bury value. Negative numbers are bury, positive numbers are boost.
- Click Submit to submit your control request to an Approver. You will be able to see the status of submitted requests in the Merchandising Console. If you change your mind, you can delete your control request.
Approver steps
- Under Serving configs, assign your control to existing serving config.
- Approve the request for a Boost/bury control.
Deactivate a control in production

For more information on creating controls in the Google Cloud console, refer to the Create serving controls page.
Other controls (admin only)
| Attribute controls | Autocomplete controls | Facet/tile controls |
|---|---|---|
| Type | Auto-learning | |
| Indexable | Matching order | Ignore facet/tile values |
| Dynamic faceting and tiling | Minimum length to trigger | Replace facet/tile values |
| Searchable | Suggestion count | Set numerical intervals |
| Retrievable | Deny list | Remove facets and tiles |
| Exact match | Do-not-remove list | Force return facets (position) |
| Filterable | Suggested terms list (manual) |