
透過 Ops Agent,收集 Apache 網路伺服器指標
瞭解如何透過 Ops Agent,收集及監控安裝於 Compute Engine 虛擬機器 (VM) 執行個體的 Apache 網路伺服器的指標:
- 建立 Compute Engine VM 執行個體,並安裝 Ops Agent。
- 安裝 Apache 網路伺服器。
- 針對 Apache 網路伺服器設定 Ops Agent。
- 產生傳入 Apache 網路伺服器的流量。
- 在預先定義的 Apache 資訊主頁上查看指標。
- 建立警告政策。
- 測試警告政策。
- 清除所用資源。
如要直接在 Google Cloud 控制台中,按照這項工作的逐步指南操作,請按一下「Guide me」(逐步引導):
事前準備
-
貴機構定義的安全性限制,可能會導致您無法完成下列步驟。如需疑難排解資訊,請參閱「在受限的 Google Cloud 環境中開發應用程式」。
- 登入 Google Cloud 帳戶。如果您是 Google Cloud新手,歡迎 建立帳戶,親自評估產品在實際工作環境中的成效。新客戶還能獲得價值 $300 美元的免費抵免額,可用於執行、測試及部署工作負載。
-
In the Google Cloud console, on the project selector page, select or create a Google Cloud project.
Roles required to select or create a project
- Select a project: Selecting a project doesn't require a specific IAM role—you can select any project that you've been granted a role on.
-
Create a project: To create a project, you need the Project Creator role
(
roles/resourcemanager.projectCreator), which contains theresourcemanager.projects.createpermission. Learn how to grant roles.
-
If you're using an existing project for this guide, verify that you have the permissions required to complete this guide. If you created a new project, then you already have the required permissions.
-
Verify that billing is enabled for your Google Cloud project.
Enable the Compute Engine, Cloud Monitoring, Cloud Logging, and OS Config APIs.
Roles required to enable APIs
To enable APIs, you need the Service Usage Admin IAM role (
roles/serviceusage.serviceUsageAdmin), which contains theserviceusage.services.enablepermission. Learn how to grant roles.-
In the Google Cloud console, on the project selector page, select or create a Google Cloud project.
Roles required to select or create a project
- Select a project: Selecting a project doesn't require a specific IAM role—you can select any project that you've been granted a role on.
-
Create a project: To create a project, you need the Project Creator role
(
roles/resourcemanager.projectCreator), which contains theresourcemanager.projects.createpermission. Learn how to grant roles.
-
If you're using an existing project for this guide, verify that you have the permissions required to complete this guide. If you created a new project, then you already have the required permissions.
-
Verify that billing is enabled for your Google Cloud project.
Enable the Compute Engine, Cloud Monitoring, Cloud Logging, and OS Config APIs.
Roles required to enable APIs
To enable APIs, you need the Service Usage Admin IAM role (
roles/serviceusage.serviceUsageAdmin), which contains theserviceusage.services.enablepermission. Learn how to grant roles.
必要的角色
如要取得建立 Compute Engine 執行個體、安裝 Apache 及查看指標資料所需的權限,請要求管理員授予您專案的下列 IAM 角色:
- Compute 執行個體管理員 (v1) (
roles/compute.instanceAdmin.v1) - Monitoring 編輯者 (
roles/monitoring.editor) - OSPolicyAssignment 管理員 (
roles/osconfig.osPolicyAssignmentAdmin) - 服務帳戶使用者 (
roles/iam.serviceAccountUser) - 服務使用情形管理員 (
roles/serviceusage.serviceUsageAdmin)
如要進一步瞭解如何授予角色,請參閱「管理專案、資料夾和組織的存取權」。
建立 VM 執行個體
-
前往 Google Cloud 控制台的「VM instances」(VM 執行個體) 頁面:
如果您是使用搜尋列尋找這個頁面,請選取子標題為「Compute Engine」的結果。
- 點選「Create instance」(建立執行個體) 建立 VM。使用導覽選單中的選項,設定執行個體。
- 在「Machine configuration」(機器設定) 選項中,執行下列操作:
- 在「Name」(名稱) 欄位輸入描述性名稱。
- 在「Machine type」(機型) 預設下拉式選單,依序選取「Shared-core」(共用核心) >「e2-small」。
- 確認「OS and storage」(OS 與儲存空間) 選項顯示「Debian GNU/Linux」。如果沒有,請依序點選「OS and storage」(OS 與儲存空間) 和「Change」(變更)。在「Boot disk」(開機磁碟) 對話方塊中,將「Version」(版本) 設為「Debian GNU/Linux」。
- 在「Networking」(網路) 選項的「Firewall」(防火牆) 部分,選取「Allow HTTP traffic」(允許 HTTP 流量) 和「Allow HTTPS traffic」(允許 HTTPS 流量)。
- 確認「Observability」(觀測能力) 選項顯示「Install Ops Agent」(安裝 Ops Agent)。如果沒有,請按一下「Observability」(觀測能力) 選項,然後選取「Install Ops Agent for Monitoring and Logging」(安裝 Ops Agent 來處理監控和記錄工作)。
- 點選「建立」。
安裝 Apache 網路伺服器
如要在 Compute Engine VM 執行個體上安裝 Apache 網路伺服器,請執行下列操作:
在「VM instances」(VM 執行個體) 頁面上找到新的 VM,前往「Connect」(連線) 欄,然後點選「SSH」。
連線時發生問題嗎?請參閱安全殼層疑難排解。
如要更新套件清單,請將下列指令複製到剪貼簿,貼到 SSH 終端機,然後按下 Enter 鍵:
sudo apt-get update看到「Reading package lists... Done」(正在讀取套件清單... 完成) 訊息後,請在 SSH 終端機中執行下列指令,安裝 Apache2 網路伺服器:
sudo apt-get install apache2 php7.0系統詢問是否繼續安裝時,請輸入
Y。如果安裝指令失敗,請使用sudo apt-get install apache2 php。命令提示字元傳回後,請前往「VM instances」(VM 執行個體) 頁面,然後將 VM 的外部 IP 位址複製到下列網址:
http://EXTERNAL_IP如要連線至 Apache 網路伺服器,請開啟新的瀏覽器分頁,然後輸入上一步中的網址。
網路伺服器安裝成功後,瀏覽器分頁就會顯示 Apache2 Debian 預設頁面。

收集 Apache 網路伺服器記錄檔和指標
在這些步驟中,您將設定 Ops Agent,從 Apache 網路伺服器收集記錄和指標:前往 VM 執行個體的 SSH 終端機。如果尚未開啟終端機,請執行下列步驟:
-
前往 Google Cloud 控制台的「VM instances」(VM 執行個體) 頁面:
如果您是使用搜尋列尋找這個頁面,請選取子標題為「Compute Engine」的結果。
- 找到新的 VM,然後點選「SSH」SSH。
-
複製下列指令,貼到執行個體的終端機,然後按下 Enter 鍵:
先前的指令會建立設定,收集和擷取 Apache 網路伺服器中的記錄檔和指標。詳情請參閱「針對 Apache 網路伺服器設定 Ops Agent」一節。
- 重新啟動 Ops Agent:
- 如要重新啟動代理程式,請在執行個體上執行下列指令:
sudo systemctl restart google-cloud-ops-agent
- 如要確定代理程式已重新啟動,請執行下列指令,並驗證「指標代理程式」和「Logging 代理程式」元件是否已啟動:
sudo systemctl status "google-cloud-ops-agent*"
- 如要重新啟動代理程式,請在執行個體上執行下列指令:
產生流量
如要產生傳入 Apache 網路伺服器的流量,請執行下列操作:
前往 VM 執行個體的 SSH 終端機。 如果尚未開啟終端機,請執行下列步驟:
-
前往 Google Cloud 控制台的「VM instances」(VM 執行個體) 頁面:
如果您是使用搜尋列尋找這個頁面,請選取子標題為「Compute Engine」的結果。
- 找到新的 VM,然後點選「SSH」SSH。
-
在 SSH 終端機中執行下列指令,系統就會產生對 Apache 網路伺服器發出的要求:
timeout 120 bash -c -- 'while true; do curl localhost; sleep $((RANDOM % 4)) ; done'- 稍候兩分鐘,讓系統傳回命令提示字元或關閉終端機。指令執行時,終端機中會顯示 HTML 文字。
查看 Apache 指標
如要查看自動建立的「Apache Overview」(Apache 總覽) 資訊主頁,請按照下列步驟操作:
-
前往 Google Cloud 控制台的「Dashboards」(資訊主頁) 頁面:
如果您是使用搜尋列尋找這個頁面,請選取子標題為「Monitoring」的結果。
在「My Dashboards」(我的資訊主頁) 窗格,從清單選取「Apache Overview」(Apache 總覽) 資訊主頁。
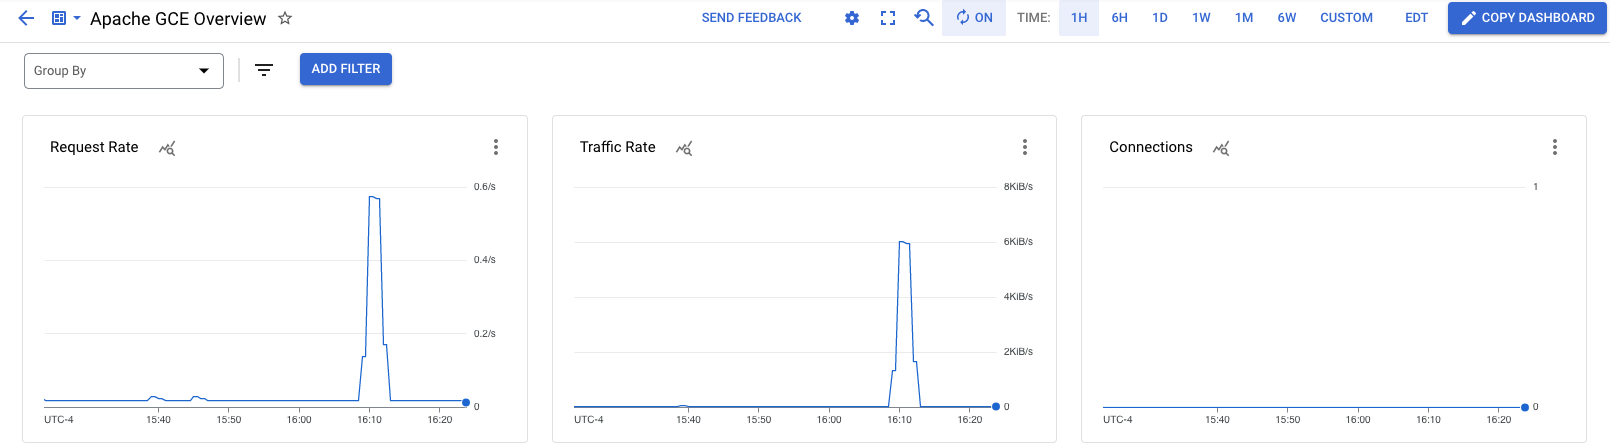
您已設定 Ops Agent,從 Apache 網路伺服器收集記錄和指標,並查看指標。接下來請建立警告政策,在 Apache 網路伺服器的負載超過門檻時收到通知。
建立電子郵件通知管道
建立警告政策前,請先設定要使用的通知管道。Cloud Monitoring 支援多種通知管道,包括電子郵件、Slack、PagerDuty 和 Pub/Sub。詳情請參閱「建立及管理通知管道」。如要透過電子郵件接收通知,請按照下列步驟操作:-
前往 Google Cloud 控制台的 notifications「Alerting」(警告) 頁面:
如果您是使用搜尋列尋找這個頁面,請選取子標題為「Monitoring」的結果。
- 點選工具列中的「Edit Notification Channels」(編輯通知管道)。
- 在「Notification channels」(通知管道) 頁面中,捲動至
「Email」(電子郵件) ,然後點選「Add new」(新增)。 - 輸入您的電子郵件地址和顯示名稱 (例如
My email),然後按一下「Save」(儲存)。
建立快訊政策
在本節中,您將建立警告政策,在 Apache 網路伺服器的流量超過定義的門檻時收到通知:
-
前往 Google Cloud 控制台的 notifications「Alerting」(警告) 頁面:
如果您是使用搜尋列尋找這個頁面,請選取子標題為「Monitoring」的結果。
- 按一下「建立政策」。
選取要監控的時間序列:
- 按一下「Select a metric」(選取指標),然後選取「VM instance」(VM 執行個體)。
- 在「Active metric categories」(使用中的指標類別) 清單中,選取「Apache」。
- 在「Active metrics」(使用中的指標) 清單中,選取「workload/apache.traffic」。
- 按一下「Apply」(套用)。
系統就會顯示 Apache 流量圖表。
前往「Configure trigger」(設定觸發條件) 欄位,然後將「Threshold value」(門檻值) 欄位設為
1500。圖表中會以虛線顯示門檻。請確定虛線遠低於尖峰流量。
前往「Notifications and name」(通知和名稱) 欄位,然後透過「Notification channels」(通知管道) 選單選取您的電子郵件地址。
輸入
Apache traffic above threshold做為政策名稱。前往「Review alert」(查看警告) 欄位,查看警告政策,然後按一下「Create policy」(建立政策)。
測試警告政策
如要測試警告政策,請產生超過門檻的流量:
前往 VM 執行個體的 SSH 終端機。 如果尚未開啟終端機,請執行下列步驟:
-
前往 Google Cloud 控制台的「VM instances」(VM 執行個體) 頁面:
如果您是使用搜尋列尋找這個頁面,請選取子標題為「Compute Engine」的結果。
- 找到新的 VM,然後點選「SSH」SSH。
-
在 SSH 終端機中執行下列指令,系統就會產生對 Apache 網路伺服器發出的要求:
timeout 120 bash -c -- 'while true; do curl localhost; sleep $((RANDOM % 4)) ; done'- 稍候兩分鐘,讓系統傳回命令提示字元或關閉終端機。指令執行時,終端機中會顯示 HTML 文字。
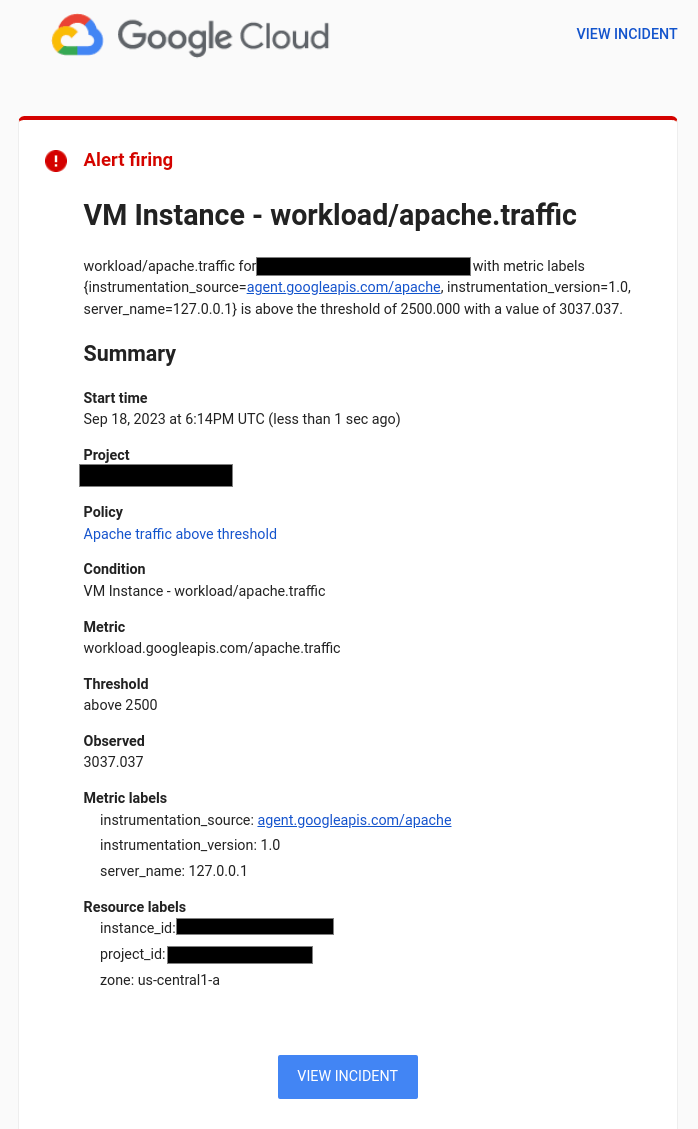
命令提示字元傳回後,請查看電子郵件信箱,找出主旨開頭為
[ALERT]的郵件。如果沒有看到電子郵件,請查看警告政策上的圖表,確認流量超過門檻。您可能需要再執行一次先前的指令,否則請稍候一兩分鐘,等待電子郵件送達。
通知會提供警告政策摘要和事件連結。每個事件都包含失敗記錄,通常有助於排解問題。
您已設定 Ops Agent,從 Apache 網路伺服器收集記錄和指標,但只查看了指標。如要瞭解如何查看 Apache 網路伺服器記錄檔,請參閱「查看 Apache 網路伺服器記錄檔」快速入門導覽課程。
清除所用資源
為了避免系統向您的 Google Cloud 帳戶收取本頁面所用資源的費用,請按照下列步驟操作。
如果您建立新專案,但現在已不再需要該專案,請刪除專案。
如果您使用現有專案,請按照下列步驟操作:
如果您已建立 VM,請刪除該 VM:
- 前往 Google Cloud 控制台的「VM instances」(VM 執行個體) 頁面。
- 選取要刪除的執行個體旁的核取方塊。
- 如要刪除執行個體,請依序點選 「More actions」(更多動作) 和「Delete」(刪除),然後按照指示操作。
刪除您建立的警告政策:
-
前往 Google Cloud 控制台的 notifications「Alerting」(警告) 頁面:
如果您是使用搜尋列尋找這個頁面,請選取子標題為「Monitoring」的結果。
- 選取您建立的警告政策,然後點選
「Delete」(刪除) 。
-
後續步驟
如要瞭解 Ops Agent 和支援的整合,請參閱:
如要瞭解如何測試網址是否會回應要求,以及如何模擬失敗,請參閱快速入門導覽課程「在應用程式停止回應時接收通知」。
如要查看 Apache 網路伺服器的記錄,請參閱「Compute Engine VM 適用的 Cloud Logging」快速入門導覽課程。
如要瞭解如何繪製及查看成效資料圖表,請參閱「資訊主頁總覽」。
如需 Google Cloud支援的指標清單,請參閱「指標清單」。
如要建立自己的 Monitoring 指標,請參閱「自訂指標」一文。