
개요
이 가이드에서는 여러 노드에서 그래픽 처리 장치(GPU)를 사용하여 Google Kubernetes Engine(GKE)에서 DeepSeek-R1 671B 또는 Llama 3.1 405B 같은 최신 대규모 언어 모델(LLM)을 제공하는 방법을 보여줍니다.
이 가이드에서는 휴대용 오픈소스 기술인 Kubernetes, vLLM, LeaderWorkerSet(LWS) API를 사용하여 GKE의 세밀한 제어, 확장성, 복원력, 휴대성, 비용 효율성을 활용하여 GKE에 AI/ML 워크로드를 배포하고 제공하는 방법을 보여줍니다.
이 페이지를 읽기 전 다음 내용을 숙지해야 합니다.
배경
이 섹션에서는 이 가이드에서 예로 사용되는 두 가지 LLM인 DeepSeek-R1 및 Llama 3.1 405B를 포함하여 이 가이드에서 사용되는 주요 기술을 설명합니다.
DeepSeek-R1
매개변수가 6710억 개 있는 DeepSeek의 대규모 언어 모델인 DeepSeek-R1은 다양한 텍스트 기반 태스크에서 논리적 추론, 수학적 추론, 실시간 문제 해결을 위해 설계되었습니다. GKE는 확장 가능한 리소스, 분산 컴퓨팅, 효율적인 네트워킹을 통해 DeepSeek-R1의 계산 요구를 처리하여 기능을 지원합니다.
자세한 내용은 DeepSeek 문서를 참조하세요.
Llama 3.1 405B
Llama 3.1 405B는 텍스트 생성, 번역, 질의 응답을 포함한 다양한 자연어 처리 태스크를 위해 설계된 Meta의 대규모 언어 모델입니다. GKE는 이러한 규모의 모델의 분산 학습 및 서빙 니즈를 지원하는 데 필요한 강력한 인프라를 제공합니다.
자세한 내용은 Llama 문서를 참조하세요.
GKE 관리형 Kubernetes 서비스
Google Cloud 는 AI/ML 워크로드를 배포 및 관리하는 데 적합한 GKE 등의 다양한 서비스를 제공합니다. GKE는 컨테이너화된 애플리케이션을 쉽게 배포, 확장, 관리할 수 있는 관리형 Kubernetes 서비스입니다. GKE는 확장 가능한 리소스, 분산 컴퓨팅, 효율적인 네트워킹을 포함하여 LLM의 계산 요구를 처리하는 데 필요한 인프라를 제공합니다.
주요 Kubernetes 개념에 대한 자세한 내용은Kubernetes 학습 시작을 참조하세요. GKE에 대한 정보 그리고 GKE가 Kubernetes를 확장, 자동화, 관리하는 데 어떻게 도움이 되는지 알아보려면 GKE 개요를 참조하세요.
GPU
그래픽 처리 장치(GPU)를 사용하면 머신러닝 및 데이터 처리와 같은 특정 워크로드를 가속화할 수 있습니다. GKE는 이러한 강력한 GPU가 장착된 노드를 제공하므로 머신러닝 및 데이터 처리 태스크에서 최적의 성능을 발휘하는 클러스터를 구성할 수 있습니다. GKE는 NVIDIA H100, L4, A100 GPU가 있는 머신 유형을 포함하여 노드 구성에 사용되는 다양한 머신 유형 옵션을 제공합니다.
자세한 내용은 GKE의 GPU 정보를 참고하세요.
LeaderWorkerSet(LWS)
LeaderWorkerSet(LWS)는 AI/ML 멀티노드 추론 워크로드의 일반적인 배포 패턴을 처리하는 Kubernetes 배포 API입니다. 멀티노드 제공은 각각 다른 노드에서 실행될 수 있는 여러 포드를 활용하여 분산 추론 워크로드를 처리합니다. LWS를 사용하면 여러 포드를 한 그룹으로 처리하여 분산 모델 서빙 관리를 간소화할 수 있습니다.
vLLM 및 멀티호스트 제공
컴퓨팅 집약적인 LLM을 제공하는 경우 vLLM을 사용하여 GPU에서 워크로드를 실행하는 것이 좋습니다.
vLLM은 GPU의 제공 처리량을 늘릴 수 있는 고도로 최적화된 오픈소스 LLM 제공 프레임워크로, 다음과 같은 기능을 제공합니다.
- PagedAttention으로 최적화된 Transformer 구현
- 전체 제공 처리량을 개선하기 위한 연속적인 작업 일괄 처리
- 여러 GPU에서 분산 제공
단일 GPU 노드에 맞지 않는 특히 컴퓨팅 집약적인 LLM의 경우 여러 GPU 노드를 사용하여 모델을 제공할 수 있습니다. vLLM을 사용하면 두 가지 전략으로 GPU에서 워크로드를 실행할 수 있습니다.
텐서 병렬 처리는 트랜스포머 레이어의 행렬 곱셈을 여러 GPU로 분할합니다. 그러나 GPU 간에 필요한 통신으로 인해 이 전략에는 빠른 네트워크가 필요하므로 노드 전반에서 워크로드를 실행하기에는 적합하지 않습니다.
파이프라인 병렬 처리는 레이어별로 또는 수직으로 모델을 분할합니다. 이 전략에는 GPU 간에 지속적인 통신이 필요하지 않으므로 노드 전반에서 모델을 실행할 때 적합한 옵션입니다.
멀티 노드 서빙에서 두 전략을 모두 사용할 수 있습니다. 예를 들어 H100 GPU가 각각 8개 있는 노드 2개를 사용하는 경우 두 전략 모두 사용할 수 있습니다.
- 두 노드에 걸쳐 모델을 샤딩하는 양방향 파이프라인 동시 로드
- 각 노드의 GPU 8개에 걸쳐 모델을 샤딩하는 8방향 텐서 동시 로드
자세한 내용은 vLLM 문서를 참조하세요.
목표
- Autopilot 또는 Standard 모드의 GKE 클러스터로 환경을 준비합니다.
- 클러스터의 여러 노드에 vLLM을 배포합니다.
- vLLM을 사용하여
curl을 통해 모델을 제공합니다.
시작하기 전에
- Google Cloud 계정에 로그인합니다. Google Cloud를 처음 사용하는 경우 계정을 만들고 Google 제품의 실제 성능을 평가해 보세요. 신규 고객에게는 워크로드를 실행, 테스트, 배포하는 데 사용할 수 있는 $300의 무료 크레딧이 제공됩니다.
-
In the Google Cloud console, on the project selector page, select or create a Google Cloud project.
Roles required to select or create a project
- Select a project: Selecting a project doesn't require a specific IAM role—you can select any project that you've been granted a role on.
-
Create a project: To create a project, you need the Project Creator role
(
roles/resourcemanager.projectCreator), which contains theresourcemanager.projects.createpermission. Learn how to grant roles.
-
Verify that billing is enabled for your Google Cloud project.
Enable the required API.
Roles required to enable APIs
To enable APIs, you need the Service Usage Admin IAM role (
roles/serviceusage.serviceUsageAdmin), which contains theserviceusage.services.enablepermission. Learn how to grant roles.-
프로젝트에 다음 역할이 있는지 확인합니다. roles/container.admin, roles/iam.serviceAccountAdmin, roles/iam.securityAdmin
역할 확인
-
Google Cloud 콘솔에서 IAM 페이지로 이동합니다.
IAM으로 이동 - 프로젝트를 선택합니다.
-
주 구성원 열에서 나 또는 내가 속한 그룹을 식별하는 모든 행을 찾습니다. 내가 속한 그룹을 알아보려면 관리자에게 문의하세요.
- 나를 지정하거나 포함하는 모든 행의 역할 열을 확인하여 역할 목록에 필요한 역할이 포함되어 있는지 확인합니다.
역할 부여
-
Google Cloud 콘솔에서 IAM 페이지로 이동합니다.
IAM으로 이동 - 프로젝트를 선택합니다.
- 액세스 권한 부여를 클릭합니다.
-
새 주 구성원 필드에 사용자 식별자를 입력합니다. 일반적으로 Google 계정의 이메일 주소입니다.
- 역할 선택을 클릭한 후 역할을 검색합니다.
- 역할을 추가로 부여하려면 다른 역할 추가를 클릭하고 각 역할을 추가합니다.
- 저장을 클릭합니다.
-
- Hugging Face 계정이 아직 없으면 이 계정을 만듭니다.
- 사용 가능한 GPU 모델 및 머신 유형을 검토하여 요구사항을 충족하는 머신 유형과 리전을 확인합니다.
- 프로젝트에
NVIDIA_H100_MEGA할당량이 충분한지 확인합니다. 이 튜토리얼에서는NVIDIA H100 80GB GPUs8개가 장착된a3-highgpu-8g머신 유형을 사용합니다. GPU 및 할당량 관리 방법에 대한 자세한 내용은 GPU 할당량 계획 및 GPU 할당량을 참고하세요.
모델 액세스 권한 얻기
Llama 3.1 405B 또는 DeepSeek-R1 모델을 사용할 수 있습니다.
DeepSeek-R1
액세스 토큰 생성
액세스 토큰이 아직 없으면 Hugging Face 토큰을 생성합니다.
- 내 프로필 > 설정 > 액세스 토큰을 클릭합니다.
- 새 토큰을 선택합니다.
- 원하는 이름과
Read이상의 역할을 지정합니다. - 토큰 생성을 선택합니다.
Llama 3.1 405B
액세스 토큰 생성
액세스 토큰이 아직 없으면 Hugging Face 토큰을 생성합니다.
- 내 프로필 > 설정 > 액세스 토큰을 클릭합니다.
- 새 토큰을 선택합니다.
- 원하는 이름과
Read이상의 역할을 지정합니다. - 토큰 생성을 선택합니다.
환경 준비
이 튜토리얼에서는 Cloud Shell을 사용하여Google Cloud에서 호스팅되는 리소스를 관리합니다. Cloud Shell에는 kubectl 및 gcloud CLI를 포함하여 이 튜토리얼에 필요한 소프트웨어가 사전 설치되어 있습니다.
Cloud Shell로 환경을 설정하려면 다음 단계를 따르세요.
Google Cloud 콘솔의 경우 Google Cloud 콘솔에서
 Cloud Shell 활성화를 클릭하여 Cloud Shell 세션을 시작합니다. 그러면 Google Cloud 콘솔 하단 창에서 세션이 실행됩니다.
기본 환경 변수를 설정합니다.
gcloud config set project PROJECT_ID
gcloud config set billing/quota_project PROJECT_ID
export PROJECT_ID=$(gcloud config get project)
export CLUSTER_NAME=CLUSTER_NAME
export REGION=REGION
export ZONE=ZONE
export HF_TOKEN=HUGGING_FACE_TOKEN
export CLUSTER_VERSION=CLUSTER_VERSION
다음 값을 바꿉니다.
- PROJECT_ID: Google Cloud 프로젝트 ID
- CLUSTER_NAME: GKE 클러스터의 이름입니다.
- CLUSTER_VERSION: GKE 버전 Autopilot 지원의 경우 1.33 이상을 사용하세요.
- REGION: GKE 클러스터의 리전입니다.
- ZONE: NVIDIA H100 Tensor Core GPU를 지원하는 영역
GKE 클러스터 만들기
GKE Autopilot 또는 Standard 클러스터의 여러 GPU 노드에서 vLLM을 사용하여 모델을 서빙할 수 있습니다. 완전 관리형 Kubernetes 환경을 위해서는 Autopilot을 사용하는 것이 좋습니다. 워크로드에 가장 적합한 GKE 작업 모드를 선택하려면 GKE 작업 모드 선택을 참조하세요.
Autopilot
Cloud Shell에서 다음 명령어를 실행합니다.
  gcloud container clusters create-auto ${CLUSTER_NAME} \
    --project=${PROJECT_ID} \
    --location=${REGION} \
    --cluster-version=${CLUSTER_VERSION}
Standard
CPU 노드가 2개인 GKE Standard 클러스터를 만듭니다.
gcloud container clusters create CLUSTER_NAME \
    --project=PROJECT_ID \
    --num-nodes=2 \
    --location=REGION \
    --machine-type=e2-standard-16
각각 H100이 8개인 노드 2개가 있는 A3 노드 풀을 만듭니다.
gcloud container node-pools create gpu-nodepool \
    --node-locations=ZONE \
    --num-nodes=2 \
    --machine-type=a3-highgpu-8g \
    --accelerator=type=nvidia-h100-80gb,count=8,gpu-driver-version=LATEST \
    --placement-type=COMPACT \
    --cluster=CLUSTER_NAME
    --location=${REGION}
클러스터와 통신하도록 kubectl을 구성합니다.
다음 명령어를 사용하여 클러스터와 통신하도록 kubectl을 구성합니다.
gcloud container clusters get-credentials CLUSTER_NAME --location=REGION
Hugging Face 사용자 인증 정보용 Kubernetes 보안 비밀 만들기
다음 명령어를 사용하여 Hugging Face 토큰이 포함된 Kubernetes 보안 비밀을 만듭니다.
kubectl create secret generic hf-secret \
  --from-literal=hf_api_token=${HF_TOKEN} \
  --dry-run=client -o yaml | kubectl apply -f -
LeaderWorkerSet 설치
LWS를 설치하려면 다음 명령어를 실행합니다.
kubectl apply --server-side -f https://github.com/kubernetes-sigs/lws/releases/latest/download/manifests.yaml
다음 명령어를 사용하여 LeaderWorkerSet 컨트롤러가 lws-system 네임스페이스에서 실행 중인지 확인합니다.
kubectl get pod -n lws-system
출력은 다음과 비슷합니다.
NAME                                     READY   STATUS    RESTARTS   AGE
lws-controller-manager-546585777-crkpt   1/1     Running   0          4d21h
lws-controller-manager-546585777-zbt2l   1/1     Running   0          4d21h
vLLM 모델 서버 배포
vLLM 모델 서버를 배포하려면 다음 단계를 수행합니다.
배포하려는 LLM에 따라 매니페스트를 적용합니다.
DeepSeek-R1
vllm-deepseek-r1-A3.yaml매니페스트를 검사합니다.다음 명령어를 실행하여 매니페스트를 적용합니다.
kubectl apply -f vllm-deepseek-r1-A3.yaml
Llama 3.1 405B
vllm-llama3-405b-A3.yaml매니페스트를 검사합니다.다음 명령어를 실행하여 매니페스트를 적용합니다.
kubectl apply -f vllm-llama3-405b-A3.yaml
모델 체크포인트의 다운로드가 완료될 때까지 기다립니다. 이 작업을 완료하는 데 몇 분이 소요될 수 있습니다.
다음 명령어를 사용하여 실행 중인 모델 서버에서 로그를 봅니다.
kubectl logs vllm-0 -c vllm-leader출력은 다음과 비슷하게 표시됩니다.
INFO 08-09 21:01:34 api_server.py:297] Route: /detokenize, Methods: POST
INFO 08-09 21:01:34 api_server.py:297] Route: /v1/models, Methods: GET
INFO 08-09 21:01:34 api_server.py:297] Route: /version, Methods: GET
INFO 08-09 21:01:34 api_server.py:297] Route: /v1/chat/completions, Methods: POST
INFO 08-09 21:01:34 api_server.py:297] Route: /v1/completions, Methods: POST
INFO 08-09 21:01:34 api_server.py:297] Route: /v1/embeddings, Methods: POST
INFO:     Started server process [7428]
INFO:     Waiting for application startup.
INFO:     Application startup complete.
INFO:     Uvicorn running on http://0.0.0.0:8080 (Press CTRL+C to quit)
모델 제공
다음 명령어를 실행하여 모델에 대한 포트 전달을 설정합니다.
kubectl port-forward svc/vllm-leader 8080:8080
curl을 사용하여 모델과 상호작용
curl을 사용하여 모델과 상호작용하려면 다음 안내를 따르세요.
DeepSeek-R1
새 터미널에서 요청을 서버에 보냅니다.
curl http://localhost:8080/v1/completions \
-H "Content-Type: application/json" \
-d '{
    "model": "deepseek-ai/DeepSeek-R1",
    "prompt": "I have four boxes. I put the red box on the bottom and put the blue box on top. Then I put the yellow box on top the blue. Then I take the blue box out and put it on top. And finally I put the green box on the top. Give me the final order of the boxes from bottom to top. Show your reasoning but be brief",
    "max_tokens": 1024,
    "temperature": 0
}'
출력은 다음과 비슷하게 표시됩니다.
{
"id": "cmpl-f2222b5589d947419f59f6e9fe24c5bd",
"object": "text_completion",
"created": 1738269669,
"model": "deepseek-ai/DeepSeek-R1",
"choices": [
  {
    "index": 0,
    "text": ".\n\nOkay, let's see. The user has four boxes and is moving them around. Let me try to visualize each step. \n\nFirst, the red box is placed on the bottom. So the stack starts with red. Then the blue box is put on top of red. Now the order is red (bottom), blue. Next, the yellow box is added on top of blue. So now it's red, blue, yellow. \n\nThen the user takes the blue box out. Wait, blue is in the middle. If they remove blue, the stack would be red and yellow. But where do they put the blue box? The instruction says to put it on top. So after removing blue, the stack is red, yellow. Then blue is placed on top, making it red, yellow, blue. \n\nFinally, the green box is added on the top. So the final order should be red (bottom), yellow, blue, green. Let me double-check each step to make sure I didn't mix up any steps. Starting with red, then blue, then yellow. Remove blue from the middle, so yellow is now on top of red. Then place blue on top of that, so red, yellow, blue. Then green on top. Yes, that seems right. The key step is removing the blue box from the middle, which leaves yellow on red, then blue goes back on top, followed by green. So the final order from bottom to top is red, yellow, blue, green.\n\n**Final Answer**\nThe final order from bottom to top is \\boxed{red}, \\boxed{yellow}, \\boxed{blue}, \\boxed{green}.\n</think>\n\n1. Start with the red box at the bottom.\n2. Place the blue box on top of the red box. Order: red (bottom), blue.\n3. Place the yellow box on top of the blue box. Order: red, blue, yellow.\n4. Remove the blue box (from the middle) and place it on top. Order: red, yellow, blue.\n5. Place the green box on top. Final order: red, yellow, blue, green.\n\n\\boxed{red}, \\boxed{yellow}, \\boxed{blue}, \\boxed{green}",
    "logprobs": null,
    "finish_reason": "stop",
    "stop_reason": null,
    "prompt_logprobs": null
  }
],
"usage": {
  "prompt_tokens": 76,
  "total_tokens": 544,
  "completion_tokens": 468,
  "prompt_tokens_details": null
}
}
Llama 3.1 405B
새 터미널에서 요청을 서버에 보냅니다.
curl http://localhost:8080/v1/completions \
-H "Content-Type: application/json" \
-d '{
    "model": "meta-llama/Meta-Llama-3.1-405B-Instruct",
    "prompt": "San Francisco is a",
    "max_tokens": 7,
    "temperature": 0
}'
출력은 다음과 비슷하게 표시됩니다.
{"id":"cmpl-0a2310f30ac3454aa7f2c5bb6a292e6c",
"object":"text_completion","created":1723238375,"model":"meta-llama/Llama-3.1-405B-Instruct","choices":[{"index":0,"text":" top destination for foodies, with","logprobs":null,"finish_reason":"length","stop_reason":null}],"usage":{"prompt_tokens":5,"total_tokens":12,"completion_tokens":7}}
커스텀 자동 확장 처리 설정
이 섹션에서는 커스텀 Prometheus 측정항목을 사용하도록 수평형 포드 자동 확장을 설정합니다. vLLM 서버의 Google Cloud Managed Service for Prometheus 측정항목을 사용합니다.
자세한 내용은 Google Cloud Managed Service for Prometheus를 참조하세요. 이는 GKE 클러스터에서 기본적으로 사용 설정되어야 합니다.
클러스터에서 커스텀 측정항목 Stackdriver 어댑터를 설정합니다.
kubectl apply -f https://raw.githubusercontent.com/GoogleCloudPlatform/k8s-stackdriver/master/custom-metrics-stackdriver-adapter/deploy/production/adapter_new_resource_model.yaml커스텀 측정항목 Stackdriver 어댑터가 사용하는 서비스 계정에 모니터링 뷰어 역할을 추가합니다.
gcloud projects add-iam-policy-binding projects/PROJECT_ID \ --role roles/monitoring.viewer \ --member=principal://iam.googleapis.com/projects/PROJECT_NUMBER/locations/global/workloadIdentityPools/PROJECT_ID.svc.id.goog/subject/ns/custom-metrics/sa/custom-metrics-stackdriver-adapter다음 매니페스트를
vllm_pod_monitor.yaml로 저장합니다.클러스터에 매니페스트를 적용합니다.
kubectl apply -f vllm_pod_monitor.yaml
vLLM 엔드포인트에 부하 만들기
GKE가 커스텀 vLLM 측정항목을 사용하여 자동 확장되는 방식을 테스트하기 위해 vLLM 서버에 부하를 만듭니다.
모델로의 포트 전달을 설정합니다.
kubectl port-forward svc/vllm-leader 8080:8080bash 스크립트(
load.sh)를 실행하여 vLLM 엔드포인트에N개의 동시 요청을 전송합니다.#!/bin/bash # Set the number of parallel processes to run. N=PARALLEL_PROCESSES # Get the external IP address of the vLLM load balancer service. export vllm_service=$(kubectl get service vllm-service -o jsonpath='{.status.loadBalancer.ingress[0].ip}') # Loop from 1 to N to start the parallel processes. for i in $(seq 1 $N); do # Start an infinite loop to continuously send requests. while true; do # Use curl to send a completion request to the vLLM service. curl http://$vllm_service:8000/v1/completions -H "Content-Type: application/json" -d '{"model": "meta-llama/Llama-3.1-70B", "prompt": "Write a story about san francisco", "max_tokens": 100, "temperature": 0}' done & # Run in the background done # Keep the script running until it is manually stopped. waitPARALLEL_PROCESSES을 실행하려는 병렬 프로세스 수로 바꿉니다.
bash 스크립트를 실행합니다.
nohup ./load.sh &
Google Cloud Managed Service for Prometheus가 측정항목을 수집하는지 확인
Google Cloud Managed Service for Prometheus가 측정항목을 스크래핑하고 vLLM 엔드포인트에 부하를 추가하면 Cloud Monitoring에서 측정항목을 볼 수 있습니다.
Google Cloud 콘솔에서 측정항목 탐색기 페이지로 이동합니다.
< > PromQL을 클릭합니다.
다음 쿼리를 입력하여 트래픽 측정항목을 관찰합니다.
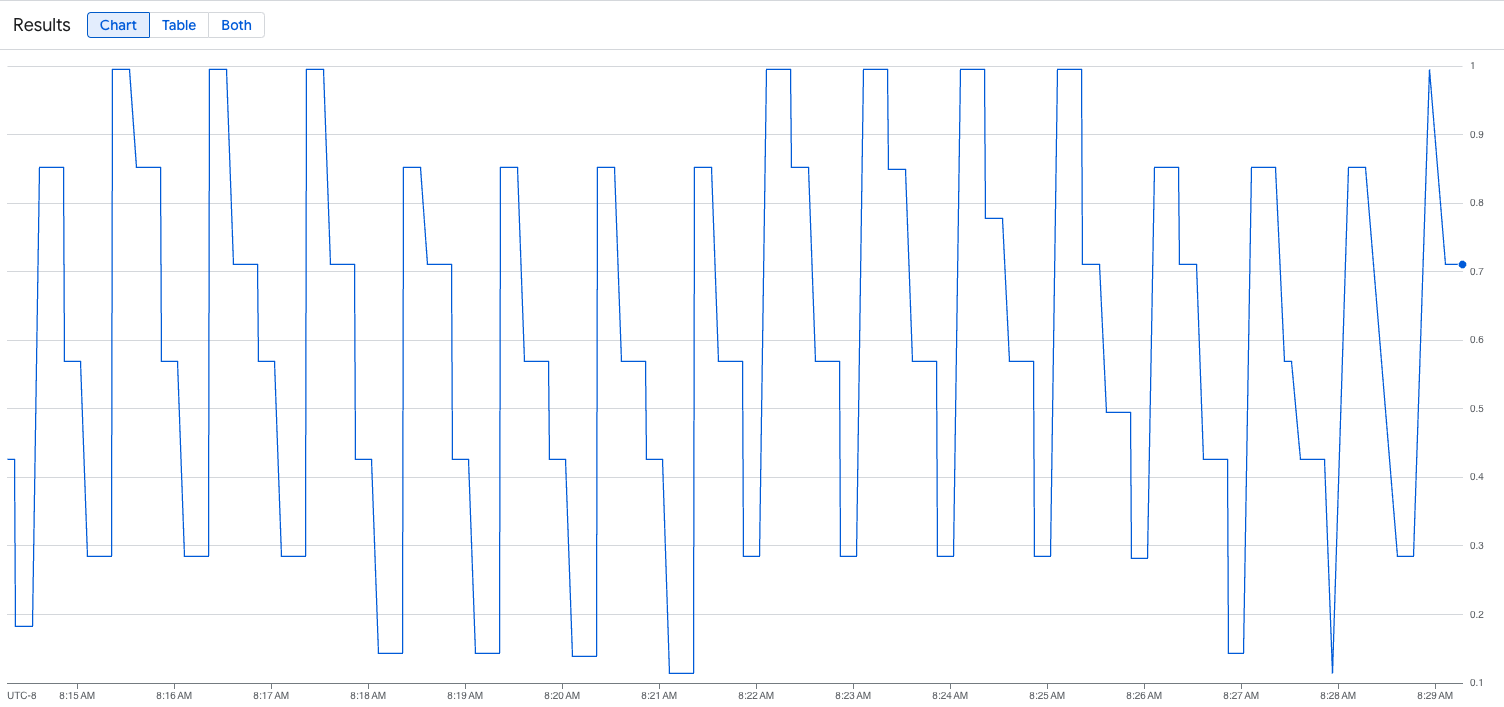
vllm:gpu_cache_usage_perc{cluster='CLUSTER_NAME'}
다음 이미지는 로드 스크립트 실행 후 그래프의 예입니다. 이 그래프는 vLLM 엔드포인트에 추가된 부하에 따라 Google Cloud Managed Service for Prometheus가 트래픽 측정항목을 수집하고 있음을 보여줍니다.
수평형 포드 자동 확장 처리 구성 배포
자동 확장할 측정항목을 결정할 때는 vLLM에 다음 측정항목을 사용하는 것이 좋습니다.
num_requests_waiting: 이 측정항목은 모델 서버의 큐에서 대기 중인 요청 수와 관련이 있습니다. 이 수는 kv 캐시가 가득 차면 눈에 띄게 증가하기 시작합니다.gpu_cache_usage_perc: 이 측정항목은 KV 캐시 사용률과 관련이 있으며, 이는 모델 서버에서 특정 추론 주기에 처리되는 요청 수와 직접적인 상관관계가 있습니다.
처리량과 비용을 최적화할 때와 모델 서버의 최대 처리량으로 지연 시간 목표를 달성할 수 있는 경우 num_requests_waiting을 사용하는 것이 좋습니다.
큐 기반 확장이 요구사항을 충족할 만큼 빠르지 않은 지연 시간에 민감한 워크로드가 있는 경우 gpu_cache_usage_perc를 사용하는 것이 좋습니다.
자세한 설명은 GPU를 사용하여 대규모 언어 모델 (LLM) 추론 워크로드를 자동 확장하기 위한 권장사항을 참고하세요.
HPA 구성의 averageValue 목표를 선택할 때는 실험적으로 자동 확장할 측정항목을 결정해야 합니다. 실험을 최적화하는 방법에 관한 추가 아이디어를 얻으려면 GPU 비용 절감: GKE 추론 워크로드의 더 스마트한 자동 확장 블로그 게시물을 참고하세요. 이 블로그 게시물에서 사용된 profile-generator는 vLLM에서도 작동합니다.
num_requests_waiting을 사용하여 수평형 포드 자동 확장 처리 구성을 배포하려면 다음 단계를 따르세요.
다음 매니페스트를
vllm-hpa.yaml로 저장합니다.Google Cloud Managed Service for Prometheus의 vLLM 측정항목은
vllm:metric_name형식을 따릅니다.권장사항: 처리량 확장에
num_requests_waiting을 사용합니다. 지연 시간에 민감한 GPU 사용 사례에는gpu_cache_usage_perc를 사용합니다.수평형 포드 자동 확장 처리 구성을 배포합니다.
kubectl apply -f vllm-hpa.yamlGKE는 배포할 다른 포드를 예약합니다. 그러면 두 번째 vLLM 복제본을 배포하기 전에 노드 풀 자동 확장 처리가 두 번째 노드를 추가합니다.
포드 자동 확장 진행 상황을 확인합니다.
kubectl get hpa --watch출력은 다음과 비슷합니다.
NAME      REFERENCE              TARGETS   MINPODS   MAXPODS   REPLICAS   AGE
lws-hpa   LeaderWorkerSet/vllm   0/1       1         2         1          6d1h
lws-hpa   LeaderWorkerSet/vllm   1/1       1         2         1          6d1h
lws-hpa   LeaderWorkerSet/vllm   0/1       1         2         1          6d1h
lws-hpa   LeaderWorkerSet/vllm   4/1       1         2         1          6d1h
lws-hpa   LeaderWorkerSet/vllm   0/1       1         2         2          6d1h
Google Cloud Hyperdisk ML로 모델 로드 시간 단축
이러한 유형의 LLM을 사용하면 vLLM이 각 새 복제본에서 다운로드, 로드, 워밍업하는 데 상당한 시간이 걸릴 수 있습니다. 예를 들어 Llama 3.1 405B를 사용하면 이 프로세스에 약 90분이 걸릴 수 있습니다. 모델을 Hyperdisk ML 볼륨에 직접 다운로드하고 이 볼륨을 각 포드에 마운트하여 이 시간을 줄일 수 있습니다 (Llama 3.1 405B의 경우 20분). 이 작업을 완료하기 위해 이 튜토리얼에서는 Hyperdisk ML 볼륨과 Kubernetes 작업을 사용합니다. Kubernetes의 작업 컨트롤러는 하나 이상의 포드를 만들고 특정 작업을 성공적으로 실행하도록 지원합니다.
모델 로드 시간을 단축하려면 다음 단계를 따르세요.
다음 예시 매니페스트를
producer-pvc.yaml로 저장합니다.kind: PersistentVolumeClaim apiVersion: v1 metadata: name: producer-pvc spec: # Specifies the StorageClass to use. Hyperdisk ML is optimized for ML workloads. storageClassName: hyperdisk-ml accessModes: - ReadWriteOnce resources: requests: storage: 800Gi다음 예시 매니페스트를
producer-job.yaml로 저장합니다.DeepSeek-R1
Llama 3.1 405B
이전 단계에서 만든 두 파일을 사용하여 Hyperdisk ML을 통한 AI/ML 데이터 로딩 가속화의 안내를 따릅니다.
이 단계를 마치면 모델 데이터로 Hyperdisk ML 볼륨을 만들고 채웠습니다.
새로 생성된 Hyperdisk ML 볼륨을 모델 데이터에 사용할 vLLM 다중 노드 GPU 서버 배포를 배포합니다.
DeepSeek-R1
Llama 3.1 405B
삭제
이 튜토리얼에서 사용된 리소스 비용이 Google Cloud 계정에 청구되지 않도록 하려면 리소스가 포함된 프로젝트를 삭제하거나 프로젝트를 유지하고 개별 리소스를 삭제하세요.
배포된 리소스 삭제
이 가이드에서 만든 리소스에 대해 Google Cloud 계정에 비용이 청구되지 않도록 하려면 다음 명령어를 실행합니다.
ps -ef | grep load.sh | awk '{print $2}' | xargs -n1 kill -9
gcloud container clusters delete CLUSTER_NAME \
  --location=ZONE
다음 단계
- GKE의 GPU 자세히 알아보기
- vLLM GitHub 저장소 및 문서 살펴보기
- LWS GitHub 저장소 살펴보기