ייבוא גרסת מפתח ל-Cloud KMS

במדריך הזה נסביר איך לייבא מפתח קריפטוגרפי ל-Cloud HSM או ל-Cloud Key Management Service כגרסה חדשה של מפתח.

מידע נוסף על ייבוא מפתחות, כולל מגבלות והגבלות, מופיע במאמר בנושא ייבוא מפתחות.

אפשר להשלים את השלבים במדריך הזה תוך 5 עד 10 דקות, לא כולל השלבים שבקטע לפני שמתחילים. הצפנת המפתח באופן ידני מוסיפה מורכבות למשימה.

לפני שמתחילים

כדי לבדוק את התכונה הזו, מומלץ ליצור פרויקט חדש. כך יהיה קל יותר לנקות את הפרויקט אחרי הבדיקה, ולוודא שיש לכם את ההרשאות המתאימות לניהול זהויות והרשאות גישה (IAM) כדי לייבא מפתח.

לפני שמייבאים מפתח, צריך להכין את הפרויקט, את המערכת המקומית ואת המפתח עצמו.

הכנת הפרויקט

  1. נכנסים לחשבון Google Cloud . אנחנו ממליצים למשתמשים חדשים ב- Google Cloud ליצור חשבון כדי שיוכלו להעריך את הביצועים של המוצרים שלנו בתרחישים מהעולם האמיתי. לקוחות חדשים מקבלים בחינם גם קרדיט בשווי 300$ להרצה, לבדיקה ולפריסה של עומסי העבודה.
  2. In the Google Cloud console, on the project selector page, select or create a Google Cloud project.

    Roles required to select or create a project

    • Select a project: Selecting a project doesn't require a specific IAM role—you can select any project that you've been granted a role on.
    • Create a project: To create a project, you need the Project Creator role (roles/resourcemanager.projectCreator), which contains the resourcemanager.projects.create permission. Learn how to grant roles.

    Go to project selector

  3. Verify that billing is enabled for your Google Cloud project.

  4. Enable the required API, if it is not already enabled.

    Roles required to enable APIs

    To enable APIs, you need the serviceusage.services.enable permission. If you created the project, then you likely already have this permission through the Owner role (roles/owner). Otherwise, you can get this permission through the Service Usage Admin role (roles/serviceusage.serviceUsageAdmin). Learn how to grant roles.

    Enable the API

  5. Install the Google Cloud CLI.

  6. If you're using an external identity provider (IdP), you must first sign in to the gcloud CLI with your federated identity.

  7. To initialize the gcloud CLI, run the following command:

    gcloud init
  8. In the Google Cloud console, on the project selector page, select or create a Google Cloud project.

    Roles required to select or create a project

    • Select a project: Selecting a project doesn't require a specific IAM role—you can select any project that you've been granted a role on.
    • Create a project: To create a project, you need the Project Creator role (roles/resourcemanager.projectCreator), which contains the resourcemanager.projects.create permission. Learn how to grant roles.

    Go to project selector

  9. Verify that billing is enabled for your Google Cloud project.

  10. Enable the required API, if it is not already enabled.

    Roles required to enable APIs

    To enable APIs, you need the serviceusage.services.enable permission. If you created the project, then you likely already have this permission through the Owner role (roles/owner). Otherwise, you can get this permission through the Service Usage Admin role (roles/serviceusage.serviceUsageAdmin). Learn how to grant roles.

    Enable the API

  11. Install the Google Cloud CLI.

  12. If you're using an external identity provider (IdP), you must first sign in to the gcloud CLI with your federated identity.

  13. To initialize the gcloud CLI, run the following command:

    gcloud init
  14. למשתמש שמבצע את הייבוא צריכות להיות ההרשאות הבאות ב-IAM כדי ליצור אוספי מפתחות, מפתחות ועבודות ייבוא. אם המשתמש לא מוגדר כ-Project Owner, אפשר להקצות לו את שני התפקידים המוגדרים מראש הבאים:

    • roles/editor
    • roles/cloudkms.importer

    מידע נוסף על ההרשאות והתפקידים הזמינים ב-IAM ל-Cloud KMS מופיע במאמר הרשאות ותפקידים.

הכנת המערכת המקומית

מכינים את המערכת המקומית על ידי בחירה באחת מהאפשרויות הבאות. מומלץ להשתמש בעטיפת מפתחות אוטומטית ברוב המקרים.

הכנת המפתח

מוודאים שהאלגוריתם והאורך של המפתח נתמכים. האלגוריתמים המותרים למפתח תלויים בשימוש במפתח להצפנה סימטרית, להצפנה אסימטרית או לחתימה אסימטרית, וגם אם המפתח מאוחסן בתוכנה או ב-HSM. מציינים את האלגוריתם של המפתח כחלק מבקשת הייבוא.

בנוסף, צריך גם לאמת את אופן הקידוד של המפתח ולבצע שינויים אם צריך.

אחרי שיוצרים או מייבאים גרסת מפתח, אי אפשר לשנות את הפרטים הבאים:

  • רמת ההגנה מציינת אם המפתח נשמר בתוכנה, ב-HSM מרובה-דיירים, ב-HSM של דייר יחיד או במערכת חיצונית לניהול מפתחות. אי אפשר להעביר חומר מפתח מאחת מסביבות האחסון האלה לסביבה אחרת. לכל הגרסאות של מפתח יש את אותה רמת הגנה.

  • המטרה מציינת אם גרסאות המפתח משמשות להצפנה סימטרית, להצפנה אסימטרית או לחתימה אסימטרית. המטרה של המפתח מגבילה את האלגוריתמים האפשריים שאפשר להשתמש בהם כדי ליצור גרסאות של המפתח הזה. לכל הגרסאות של מפתח יש אותה מטרה.

אם אין לכם מפתח לייבוא אבל אתם רוצים לאמת את התהליך של ייבוא מפתחות, אתם יכולים ליצור מפתח סימטרי במערכת המקומית באמצעות הפקודה הבאה:

openssl rand 32 > ${HOME}/test.bin

השתמשו במפתח הזה למטרות בדיקה בלבד. יכול להיות שמפתח שנוצר בדרך הזו לא מתאים לשימוש בייצור.

אם אתם צריכים לעטוף את המפתח באופן ידני, עשו זאת לפני שתמשיכו בתהליכים שבמדריך הזה.

יצירת מפתח יעד ואוסף מפתחות

מפתח Cloud KMS הוא אובייקט קונטיינר שמכיל אפס או יותר גרסאות מפתח. כל גרסת מפתח מכילה מפתח קריפטוגרפי.

כשמייבאים מפתח ל-Cloud KMS או ל-Cloud HSM, המפתח המיובא הופך לגרסת מפתח חדשה במפתח קיים של Cloud KMS או של Cloud HSM. בהמשך המדריך הזה, המפתח הזה נקרא מפתח היעד. כדי לייבא חומר מפתח למפתח היעד, הוא צריך להיות קיים.

ייבוא של גרסת מפתח לא משפיע על הגרסאות הקיימות של המפתח הזה. עם זאת, מומלץ ליצור מפתח ריק כשבודקים ייבוא מפתח. למפתח ריק אין גרסה, הוא לא פעיל ואי אפשר להשתמש בו.

אתם יכולים לציין שהמפתח החדש שיצרתם יכול להכיל רק גרסאות מיובאות, כדי למנוע יצירה מקרית של גרסאות חדשות ב-Cloud KMS.

מפתח קיים באוסף מפתחות. במדריך הזה, אוסף המפתחות הזה נקרא אוסף מפתחות היעד. המיקום של אוסף המפתחות של היעד קובע את המיקום שבו חומר המפתח יהיה זמין אחרי הייבוא. אי אפשר ליצור או לייבא מפתחות Cloud HSM במיקומים מסוימים. אחרי שיוצרים מפתח, אי אפשר להעביר אותו לאוסף מפתחות או למיקום אחר.

כדי ליצור מפתח ריק באוסף מפתחות חדש באמצעות Google Cloud CLI או מסוף Google Cloud , צריך לפעול לפי השלבים הבאים.

המסוף

  1. נכנסים לדף Key Management במסוף Google Cloud .

    כניסה אל Key Management

  2. לוחצים על Create key ring.

  3. בשדה שם אוסף המפתחות, מזינים את השם של אוסף המפתחות.

  4. בקטע Location type, בוחרים סוג מיקום ומיקום.

  5. לוחצים על יצירה. ייפתח הדף Create key.

  6. בשדה Key name, מזינים את שם המפתח.

  7. בשדה Protection level, בוחרים באפשרות Software,‏ HSM או Single-tenant HSM.

  8. אם בחרתם באפשרות Single-tenant HSM, בוחרים את המופע של Single-tenant HSM שבו רוצים ליצור את המפתח.

  9. בקטע Key material (חומר מפתח), בוחרים באפשרות Imported key (מפתח מיובא) ולוחצים על Continue (המשך). כך לא נוצרת גרסת מפתח ראשונית.

  10. מגדירים את המטרה ואת האלגוריתם של המפתח ולוחצים על המשך.

  11. אופציונלי: אם רוצים שהמפתח הזה יכיל רק גרסאות מיובאות של מפתחות, בוחרים באפשרות הגבלת גרסאות המפתח לייבוא בלבד. כך לא תוכלו ליצור בטעות גרסאות מפתח חדשות ב-Cloud KMS.

  12. אופציונלי: במפתחות מיובאים, הרוטציה האוטומטית מושבתת כברירת מחדל. כדי להפעיל רוטציית מפתחות אוטומטית, בוחרים ערך בשדה Key rotation period.

    אם מפעילים רוטציה אוטומטית, גרסאות מפתח חדשות ייווצרו ב-Cloud KMS, וגרסת המפתח המיובאת לא תהיה יותר גרסת המפתח שמוגדרת כברירת מחדל אחרי הרוטציה.

  13. לוחצים על יצירה.

gcloud

כדי להשתמש ב-Cloud KMS בשורת הפקודה, קודם צריך להתקין את הגרסה העדכנית של Google Cloud CLI או לשדרג אליה.

  1. יוצרים את אוסף מפתחות היעד. בוחרים מיקום שתואם לרמת ההגנה שבה רוצים להשתמש. מידע נוסף על המיקומים הנתמכים מופיע במאמר מיקומים ב-Cloud KMS.

    gcloud kms keyrings create KEY_RING \
      --location LOCATION
    

    מידע נוסף על יצירת מחזיקי מפתחות

  2. יוצרים את מפתח היעד באמצעות הפקודה kms keys create עם הדגל --skip-initial-version-creation. כך נוצר מפתח ללא גרסת מפתח ראשונית, וחומר המפתח המיובא הוא גרסה 1. משתמשים בדגל --import-only כדי למנוע מ-Cloud KMS ליצור חומר מפתח לגרסאות חדשות של מפתחות. אם הדגל הזה מוגדר, צריך לייבא גרסאות חדשות של המפתח הזה. צריך להחליף מפתחות שנוצרו כ---import-only באופן ידני.

    gcloud kms keys create KEY_NAME \
      --location LOCATION \
      --keyring KEY_RING \
      --purpose PURPOSE \
      --protection-level PROTECTION_LEVEL \
      --skip-initial-version-creation \
      --import-only
    

    מחליפים את מה שכתוב בשדות הבאים:

    • ‫KEY_NAME: השם שרוצים לתת למפתח.
    • ‫LOCATION: המיקום של אוסף המפתחות.
    • ‫KEY_RING: אוסף המפתחות שבו רוצים ליצור את המפתח.
    • ‫PURPOSE: המטרה שלשמה רוצים להשתמש במפתח.
    • ‫PROTECTION_LEVEL: רמת ההגנה שרוצים להשתמש בה למפתח, לדוגמה HSM.

    כדי ליצור מפתח Cloud HSM לדייר יחיד, מוסיפים לפקודה את הדגל --cryptoKeyBackend ואת מזהה המשאב של המכונה של Cloud HSM לדייר יחיד שאליה רוצים לייבא את המפתח:

    --crypto-key-backend="projects/INSTANCE_PROJECT/locations/LOCATION/singleTenantHsmInstances/INSTANCE_NAME"

Go

כדי להריץ את הקוד הזה, קודם צריך להגדיר סביבת פיתוח של Go ולהתקין את Cloud KMS Go SDK.

import (
	"context"
	"fmt"
	"io"

	kms "cloud.google.com/go/kms/apiv1"
	"cloud.google.com/go/kms/apiv1/kmspb"
)

// createKeyForImport creates a new asymmetric signing key in Cloud HSM.
func createKeyForImport(w io.Writer, parent, id string) error {
	// parent := "projects/my-project/locations/us-east1/keyRings/my-key-ring"
	// id := "my-imported-key"

	// Create the client.
	ctx := context.Background()
	client, err := kms.NewKeyManagementClient(ctx)
	if err != nil {
		return fmt.Errorf("failed to create kms client: %w", err)
	}
	defer client.Close()

	// Build the request.
	req := &kmspb.CreateCryptoKeyRequest{
		Parent:      parent,
		CryptoKeyId: id,
		CryptoKey: &kmspb.CryptoKey{
			Purpose: kmspb.CryptoKey_ASYMMETRIC_SIGN,
			VersionTemplate: &kmspb.CryptoKeyVersionTemplate{
				ProtectionLevel: kmspb.ProtectionLevel_HSM,
				Algorithm:       kmspb.CryptoKeyVersion_EC_SIGN_P256_SHA256,
			},
			// Ensure that only imported versions may be added to this key.
			ImportOnly: true,
		},
		SkipInitialVersionCreation: true,
	}

	// Call the API.
	result, err := client.CreateCryptoKey(ctx, req)
	if err != nil {
		return fmt.Errorf("failed to create key: %w", err)
	}
	fmt.Fprintf(w, "Created key: %s\n", result.Name)
	return nil
}

Java

כדי להריץ את הקוד הזה, קודם צריך להגדיר סביבת פיתוח של Java ולהתקין את Java SDK של Cloud KMS.

import com.google.cloud.kms.v1.CreateCryptoKeyRequest;
import com.google.cloud.kms.v1.CryptoKey;
import com.google.cloud.kms.v1.CryptoKey.CryptoKeyPurpose;
import com.google.cloud.kms.v1.CryptoKeyVersion.CryptoKeyVersionAlgorithm;
import com.google.cloud.kms.v1.CryptoKeyVersionTemplate;
import com.google.cloud.kms.v1.KeyManagementServiceClient;
import com.google.cloud.kms.v1.KeyRingName;
import com.google.cloud.kms.v1.ProtectionLevel;
import java.io.IOException;

public class CreateKeyForImport {

  public void createKeyForImport() throws IOException {
    // TODO(developer): Replace these variables before running the sample.
    String projectId = "your-project-id";
    String locationId = "us-east1";
    String keyRingId = "my-key-ring";
    String id = "my-import-key";
    createKeyForImport(projectId, locationId, keyRingId, id);
  }

  // Create a new crypto key to hold imported key versions.
  public void createKeyForImport(String projectId, String locationId, String keyRingId, String id)
      throws IOException {
    // Initialize client that will be used to send requests. This client only
    // needs to be created once, and can be reused for multiple requests. After
    // completing all of your requests, call the "close" method on the client to
    // safely clean up any remaining background resources.
    try (KeyManagementServiceClient client = KeyManagementServiceClient.create()) {
      // Build the parent name from the project, location, and key ring.
      KeyRingName keyRingName = KeyRingName.of(projectId, locationId, keyRingId);

      // Create the crypto key.
      CryptoKey createdKey =
          client.createCryptoKey(
              CreateCryptoKeyRequest.newBuilder()
                  .setParent(keyRingName.toString())
                  .setCryptoKeyId(id)
                  .setCryptoKey(
                      CryptoKey.newBuilder()
                          .setPurpose(CryptoKeyPurpose.ASYMMETRIC_SIGN)
                          .setVersionTemplate(
                              CryptoKeyVersionTemplate.newBuilder()
                                  .setProtectionLevel(ProtectionLevel.HSM)
                                  .setAlgorithm(CryptoKeyVersionAlgorithm.EC_SIGN_P256_SHA256))
                          // Ensure that only imported versions may be
                          // added to this key.
                          .setImportOnly(true))
                  .setSkipInitialVersionCreation(true)
                  .build());

      System.out.printf("Created crypto key %s%n", createdKey.getName());
    }
  }
}

Node.js

כדי להריץ את הקוד הזה, קודם צריך להגדיר סביבת פיתוח של Node.js ולהתקין את Cloud KMS Node.js SDK.

//
// TODO(developer): Uncomment these variables before running the sample.
//
// const projectId = 'my-project';
// const locationId = 'us-east1';
// const keyRingId = 'my-key-ring';
// const id = 'my-imported-key';

// Imports the Cloud KMS library
const {KeyManagementServiceClient} = require('@google-cloud/kms');

// Instantiates a client
const client = new KeyManagementServiceClient();

// Build the parent key ring name
const keyRingName = client.keyRingPath(projectId, locationId, keyRingId);

async function createKeyForImport() {
  const [key] = await client.createCryptoKey({
    parent: keyRingName,
    cryptoKeyId: id,
    cryptoKey: {
      purpose: 'ENCRYPT_DECRYPT',
      versionTemplate: {
        algorithm: 'GOOGLE_SYMMETRIC_ENCRYPTION',
        protectionLevel: 'HSM',
      },
      // Optional: ensure that only imported versions may be added to this
      // key.
      importOnly: true,
    },
    // Do not allow KMS to generate an initial version of this key.
    skipInitialVersionCreation: true,
  });

  console.log(`Created key for import: ${key.name}`);
  return key;
}

return createKeyForImport();

Python

כדי להריץ את הקוד הזה, קודם צריך להגדיר סביבת פיתוח ב-Python ולהתקין את Cloud KMS Python SDK.

from google.cloud import kms


def create_key_for_import(
    project_id: str, location_id: str, key_ring_id: str, crypto_key_id: str
) -> None:
    """

    Sets up an empty CryptoKey within a KeyRing for import.


    Args:
        project_id (string): Google Cloud project ID (e.g. 'my-project').
        location_id (string): Cloud KMS location (e.g. 'us-east1').
        key_ring_id (string): ID of the Cloud KMS key ring (e.g. 'my-key-ring').
        crypto_key_id (string): ID of the key to import (e.g. 'my-asymmetric-signing-key').
    """

    # Create the client.
    client = kms.KeyManagementServiceClient()

    # Build the key. For more information regarding allowed values of these fields, see:
    # https://googleapis.dev/python/cloudkms/latest/_modules/google/cloud/kms_v1/types/resources.html
    purpose = kms.CryptoKey.CryptoKeyPurpose.ASYMMETRIC_SIGN
    algorithm = kms.CryptoKeyVersion.CryptoKeyVersionAlgorithm.EC_SIGN_P256_SHA256
    protection_level = kms.ProtectionLevel.HSM
    key = {
        "purpose": purpose,
        "version_template": {
            "algorithm": algorithm,
            "protection_level": protection_level,
        },
    }

    # Build the parent key ring name.
    key_ring_name = client.key_ring_path(project_id, location_id, key_ring_id)

    # Call the API.
    created_key = client.create_crypto_key(
        request={
            "parent": key_ring_name,
            "crypto_key_id": crypto_key_id,
            "crypto_key": key,
            # Do not allow KMS to generate an initial version of this key.
            "skip_initial_version_creation": True,
        }
    )
    print(f"Created hsm key: {created_key.name}")

API

בדוגמאות האלה נעשה שימוש ב-curl כלקוח HTTP כדי להדגים את השימוש ב-API. מידע נוסף על בקרת גישה זמין במאמר גישה ל-Cloud KMS API.

  1. יוצרים אוסף מפתחות חדש:

    curl "https://cloudkms.googleapis.com/v1/projects/PROJECT_ID/locations/LOCATION/keyRings?keyRingId=KEY_RING" \
        --request "POST" \
        --header "authorization: Bearer TOKEN" \
        --header "content-type: application/json" \
        --header "x-goog-user-project: PROJECT_ID" \
        --data "{}"
    

    מידע נוסף מופיע במאמרי העזרה של KeyRing.create API.

  2. יוצרים מפתח ריק לייבוא בלבד:

    curl "https://cloudkms.googleapis.com/v1/projects/PROJECT_ID/locations/LOCATION/keyRings/KEY_RING/cryptoKeys?cryptoKeyId=KEY_NAME&skipInitialVersionCreation=true" \
        --request "POST" \
        --header "authorization: Bearer TOKEN" \
        --header "content-type: application/json" \
        --header "x-goog-user-project: PROJECT_ID" \
        --data "{"purpose":"PURPOSE", "importOnly": "true", "versionTemplate":{"protectionLevel":"PROTECTION_LEVEL","algorithm":"ALGORITHM"}}"
    

    מידע נוסף מופיע במאמרי העזרה של CryptoKey.create API.

    אם רוצים ליצור את המפתח ב-Cloud HSM עם דייר יחיד, מוסיפים את השדה cryptoKeyBackend לגוף הפקודה ואת מזהה המשאב של מופע Cloud HSM עם דייר יחיד שאליו רוצים לייבא את המפתח:

    "crypto-key-backend": "projects/INSTANCE_PROJECT/locations/LOCATION/singleTenantHsmInstances/INSTANCE_NAME"

אוסף המפתחות והמפתח קיימים עכשיו, אבל המפתח לא מכיל חומר מפתח, אין לו גרסה והוא לא פעיל. בשלב הבא, יוצרים משימת ייבוא.

יצירת משימת הייבוא

משימת ייבוא מגדירה את המאפיינים של המפתחות שהיא מייבאת, כולל מאפיינים שאי אפשר לשנות אחרי שהמפתח מיובא.

רמת ההגנה מגדירה אם המפתחות שיובאו על ידי עבודת הייבוא הזו יאוחסנו בתוכנה, ב-HSM מרובה-דיירים, ב-HSM של דייר יחיד או במערכת חיצונית לניהול מפתחות. אחרי שמבצעים ייבוא של המפתח, אי אפשר לשנות את רמת ההגנה.

שיטת הייבוא מגדירה את האלגוריתם שמשמש ליצירת מפתח האריזה שמגן על המפתחות המיובאים במהלך ההעברה מהמערכת המקומית לפרויקט היעד Google Cloud . אפשר לבחור מפתח RSA של 3072 ביט או של 4096 ביט. אם אין לכם דרישות ספציפיות, מומלץ להשתמש במפתח אריזה של 3,072 ביטים.

אפשר ליצור משימת ייבוא באמצעות ה-CLI של gcloud, מסוףGoogle Cloud או Cloud Key Management Service API.

המסוף

  1. נכנסים לדף Key Management במסוף Google Cloud .

    כניסה אל Key Management

  2. לוחצים על השם של אוסף המפתחות הרצוי.

  3. מגדירים את Protection level ל-Software,‏ HSM או Single-tenant HSM. משתמשים באותה רמת הגנה שהגדרתם עבור מפתח היעד.

  4. לוחצים על יצירת פעולת ייבוא.

  5. בשדה שם, מזינים את השם של פעולת הייבוא.

  6. בתפריט הנפתח שיטת ייבוא, בוחרים באפשרות 3072 ביט RSA או 4096 ביט RSA.

  7. לוחצים על יצירה.

gcloud

כדי להשתמש ב-Cloud KMS בשורת הפקודה, קודם צריך להתקין את הגרסה העדכנית של Google Cloud CLI או לשדרג אליה.

כדי ליצור משימת ייבוא, משתמשים בפקודה כמו זו:

gcloud kms import-jobs create IMPORT_JOB \
  --location LOCATION \
  --keyring KEY_RING \
  --import-method IMPORT_METHOD \
  --protection-level PROTECTION_LEVEL
  • משתמשים באותו אוסף מפתחות ובאותו מיקום כמו של מפתח היעד.
  • מגדירים את רמת ההגנה לאותו ערך שבו השתמשתם למפתח היעד.
  • מגדירים את שיטת הייבוא לאחת מהאפשרויות הבאות:
    • rsa-oaep-3072-sha1-aes-256
    • rsa-oaep-4096-sha1-aes-256
    • rsa-oaep-3072-sha256-aes-256
    • rsa-oaep-4096-sha256-aes-256
    • rsa-oaep-3072-sha256
    • rsa-oaep-4096-sha256

Go

כדי להריץ את הקוד הזה, קודם צריך להגדיר סביבת פיתוח של Go ולהתקין את Cloud KMS Go SDK.

import (
	"context"
	"fmt"
	"io"

	kms "cloud.google.com/go/kms/apiv1"
	"cloud.google.com/go/kms/apiv1/kmspb"
)

// createImportJob creates a new job for importing keys into KMS.
func createImportJob(w io.Writer, parent, id string) error {
	// parent := "projects/PROJECT_ID/locations/global/keyRings/my-key-ring"
	// id := "my-import-job"

	// Create the client.
	ctx := context.Background()
	client, err := kms.NewKeyManagementClient(ctx)
	if err != nil {
		return fmt.Errorf("failed to create kms client: %w", err)
	}
	defer client.Close()

	// Build the request.
	req := &kmspb.CreateImportJobRequest{
		Parent:      parent,
		ImportJobId: id,
		ImportJob: &kmspb.ImportJob{
			// See allowed values and their descriptions at
			// https://cloud.google.com/kms/docs/algorithms#protection_levels
			ProtectionLevel: kmspb.ProtectionLevel_HSM,
			// See allowed values and their descriptions at
			// https://cloud.google.com/kms/docs/key-wrapping#import_methods
			ImportMethod: kmspb.ImportJob_RSA_OAEP_3072_SHA1_AES_256,
		},
	}

	// Call the API.
	result, err := client.CreateImportJob(ctx, req)
	if err != nil {
		return fmt.Errorf("failed to create import job: %w", err)
	}
	fmt.Fprintf(w, "Created import job: %s\n", result.Name)
	return nil
}

Java

כדי להריץ את הקוד הזה, קודם צריך להגדיר סביבת פיתוח של Java ולהתקין את Java SDK של Cloud KMS.

import com.google.cloud.kms.v1.ImportJob;
import com.google.cloud.kms.v1.ImportJob.ImportMethod;
import com.google.cloud.kms.v1.KeyManagementServiceClient;
import com.google.cloud.kms.v1.KeyRingName;
import com.google.cloud.kms.v1.ProtectionLevel;
import java.io.IOException;

public class CreateImportJob {

  public void createImportJob() throws IOException {
    // TODO(developer): Replace these variables before running the sample.
    String projectId = "your-project-id";
    String locationId = "us-east1";
    String keyRingId = "my-key-ring";
    String id = "my-import-job";
    createImportJob(projectId, locationId, keyRingId, id);
  }

  // Create a new import job.
  public void createImportJob(String projectId, String locationId, String keyRingId, String id)
      throws IOException {
    // Initialize client that will be used to send requests. This client only
    // needs to be created once, and can be reused for multiple requests. After
    // completing all of your requests, call the "close" method on the client to
    // safely clean up any remaining background resources.
    try (KeyManagementServiceClient client = KeyManagementServiceClient.create()) {
      // Build the parent name from the project, location, and key ring.
      KeyRingName keyRingName = KeyRingName.of(projectId, locationId, keyRingId);

      // Build the import job to create, with parameters.
      ImportJob importJob =
          ImportJob.newBuilder()
              // See allowed values and their descriptions at
              // https://cloud.google.com/kms/docs/algorithms#protection_levels
              .setProtectionLevel(ProtectionLevel.HSM)
              // See allowed values and their descriptions at
              // https://cloud.google.com/kms/docs/key-wrapping#import_methods
              .setImportMethod(ImportMethod.RSA_OAEP_3072_SHA1_AES_256)
              .build();

      // Create the import job.
      ImportJob createdImportJob = client.createImportJob(keyRingName, id, importJob);
      System.out.printf("Created import job %s%n", createdImportJob.getName());
    }
  }
}

Node.js

כדי להריץ את הקוד הזה, קודם צריך להגדיר סביבת פיתוח של Node.js ולהתקין את Cloud KMS Node.js SDK.

//
// TODO(developer): Uncomment these variables before running the sample.
//
// const projectId = 'my-project';
// const locationId = 'us-east1';
// const keyRingId = 'my-key-ring';
// const id = 'my-import-job';

// Imports the Cloud KMS library
const {KeyManagementServiceClient} = require('@google-cloud/kms');

// Instantiates a client
const client = new KeyManagementServiceClient();

// Build the parent key ring name
const keyRingName = client.keyRingPath(projectId, locationId, keyRingId);

async function createImportJob() {
  const [importJob] = await client.createImportJob({
    parent: keyRingName,
    importJobId: id,
    importJob: {
      protectionLevel: 'HSM',
      importMethod: 'RSA_OAEP_3072_SHA256',
    },
  });

  console.log(`Created import job: ${importJob.name}`);
  return importJob;
}

return createImportJob();

Python

כדי להריץ את הקוד הזה, קודם צריך להגדיר סביבת פיתוח של Python ולהתקין את Cloud KMS Python SDK.

from google.cloud import kms


def create_import_job(
    project_id: str, location_id: str, key_ring_id: str, import_job_id: str
) -> None:
    """
    Create a new import job in Cloud KMS.

    Args:
        project_id (string): Google Cloud project ID (e.g. 'my-project').
        location_id (string): Cloud KMS location (e.g. 'us-east1').
        key_ring_id (string): ID of the Cloud KMS key ring (e.g. 'my-key-ring').
        import_job_id (string): ID of the import job (e.g. 'my-import-job').
    """

    # Create the client.
    client = kms.KeyManagementServiceClient()

    # Retrieve the fully-qualified key_ring string.
    key_ring_name = client.key_ring_path(project_id, location_id, key_ring_id)

    # Set paramaters for the import job, allowed values for ImportMethod and ProtectionLevel found here:
    # https://googleapis.dev/python/cloudkms/latest/_modules/google/cloud/kms_v1/types/resources.html

    import_method = kms.ImportJob.ImportMethod.RSA_OAEP_3072_SHA1_AES_256
    protection_level = kms.ProtectionLevel.HSM
    import_job_params = {
        "import_method": import_method,
        "protection_level": protection_level,
    }

    # Call the client to create a new import job.
    import_job = client.create_import_job(
        {
            "parent": key_ring_name,
            "import_job_id": import_job_id,
            "import_job": import_job_params,
        }
    )

    print(f"Created import job: {import_job.name}")

API

בדוגמאות האלה נעשה שימוש ב-curl כלקוח HTTP כדי להדגים את השימוש ב-API. מידע נוסף על בקרת גישה זמין במאמר גישה ל-Cloud KMS API.

כדי ליצור משימת ייבוא, משתמשים ב-method‏ ImportJobs.create:

curl "https://cloudkms.googleapis.com/v1/projects/PROJECT_ID/locations/LOCATION/keyRings/KEY_RING/importJobs?import_job_id=IMPORT_JOB_ID" \
    --request "POST" \
    --header "authorization: Bearer TOKEN" \
    --header "content-type: application/json" \
    --data '{"import_method": "IMPORT_METHOD", "protection_level": "PROTECTION_LEVEL"}'

מחליפים את מה שכתוב בשדות הבאים:

בדיקת המצב של משימת הייבוא

המצב הראשוני של משימת ייבוא הוא PENDING_GENERATION. כשהמצב הוא ACTIVE, אפשר להשתמש בו כדי לייבא מפתחות.

התוקף של עבודת ייבוא יפוג אחרי שלושה ימים. אם תוקף עבודת הייבוא פג, צריך ליצור עבודת ייבוא חדשה.

אתם יכולים לבדוק את הסטטוס של משימת הייבוא באמצעות Google Cloud CLI, מסוףGoogle Cloud או Cloud Key Management Service API.

המסוף

  1. נכנסים לדף Key Management במסוף Google Cloud .

    כניסה אל Key Management

  2. לוחצים על השם של אוסף המפתחות שמכיל את עבודת הייבוא.

  3. לוחצים על הכרטיסייה ייבוא משרות בחלק העליון של הדף.

  4. הסטטוס יופיע מתחת לסטטוס לצד השם של פעולת הייבוא.

gcloud

כדי להשתמש ב-Cloud KMS בשורת הפקודה, קודם צריך להתקין את הגרסה העדכנית של Google Cloud CLI או לשדרג אליה.

כשיש משימת ייבוא פעילה, אפשר להשתמש בה כדי לייבא מפתחות. הפעולה עשויה להימשך כמה דקות. משתמשים בפקודה הזו כדי לוודא שעבודת הייבוא פעילה. משתמשים במיקום ובמחזיק המפתחות שבהם יצרתם את עבודת הייבוא.

gcloud kms import-jobs describe IMPORT_JOB \
  --location LOCATION \
  --keyring KEY_RING \
  --format="value(state)"

הפלט אמור להיראות כך:

state: ACTIVE

Go

כדי להריץ את הקוד הזה, קודם צריך להגדיר סביבת פיתוח של Go ולהתקין את Cloud KMS Go SDK.

import (
	"context"
	"fmt"
	"io"

	kms "cloud.google.com/go/kms/apiv1"
	"cloud.google.com/go/kms/apiv1/kmspb"
)

// checkStateImportJob checks the state of an ImportJob in KMS.
func checkStateImportJob(w io.Writer, name string) error {
	// name := "projects/PROJECT_ID/locations/global/keyRings/my-key-ring/importJobs/my-import-job"

	// Create the client.
	ctx := context.Background()
	client, err := kms.NewKeyManagementClient(ctx)
	if err != nil {
		return fmt.Errorf("failed to create kms client: %w", err)
	}
	defer client.Close()

	// Call the API.
	result, err := client.GetImportJob(ctx, &kmspb.GetImportJobRequest{
		Name: name,
	})
	if err != nil {
		return fmt.Errorf("failed to get import job: %w", err)
	}
	fmt.Fprintf(w, "Current state of import job %q: %s\n", result.Name, result.State)
	return nil
}

Java

כדי להריץ את הקוד הזה, קודם צריך להגדיר סביבת פיתוח ב-Java ולהתקין את Cloud KMS Java SDK.

import com.google.cloud.kms.v1.ImportJob;
import com.google.cloud.kms.v1.ImportJobName;
import com.google.cloud.kms.v1.KeyManagementServiceClient;
import java.io.IOException;

public class CheckStateImportJob {

  public void checkStateImportJob() throws IOException {
    // TODO(developer): Replace these variables before running the sample.
    String projectId = "your-project-id";
    String locationId = "us-east1";
    String keyRingId = "my-key-ring";
    String importJobId = "my-import-job";
    checkStateImportJob(projectId, locationId, keyRingId, importJobId);
  }

  // Check the state of an import job in Cloud KMS.
  public void checkStateImportJob(
      String projectId, String locationId, String keyRingId, String importJobId)
      throws IOException {
    // Initialize client that will be used to send requests. This client only
    // needs to be created once, and can be reused for multiple requests. After
    // completing all of your requests, call the "close" method on the client to
    // safely clean up any remaining background resources.
    try (KeyManagementServiceClient client = KeyManagementServiceClient.create()) {
      // Build the parent name from the project, location, and key ring.
      ImportJobName importJobName = ImportJobName.of(projectId, locationId, keyRingId, importJobId);

      // Retrieve the state of an existing import job.
      ImportJob importJob = client.getImportJob(importJobName);
      System.out.printf(
          "Current state of import job %s: %s%n", importJob.getName(), importJob.getState());
    }
  }
}

Node.js

כדי להריץ את הקוד הזה, קודם צריך להגדיר סביבת פיתוח של Node.js ולהתקין את Cloud KMS Node.js SDK.

//
// TODO(developer): Uncomment these variables before running the sample.
//
// const projectId = 'my-project';
// const locationId = 'us-east1';
// const keyRingId = 'my-key-ring';
// const importJobId = 'my-import-job';

// Imports the Cloud KMS library
const {KeyManagementServiceClient} = require('@google-cloud/kms');

// Instantiates a client
const client = new KeyManagementServiceClient();

// Build the import job name
const importJobName = client.importJobPath(
  projectId,
  locationId,
  keyRingId,
  importJobId
);

async function checkStateImportJob() {
  const [importJob] = await client.getImportJob({
    name: importJobName,
  });

  console.log(
    `Current state of import job ${importJob.name}: ${importJob.state}`
  );
  return importJob;
}

return checkStateImportJob();

Python

כדי להריץ את הקוד הזה, קודם צריך להגדיר סביבת פיתוח של Python ולהתקין את Cloud KMS Python SDK.

from google.cloud import kms


def check_state_import_job(
    project_id: str, location_id: str, key_ring_id: str, import_job_id: str
) -> None:
    """
    Check the state of an import job in Cloud KMS.

    Args:
        project_id (string): Google Cloud project ID (e.g. 'my-project').
        location_id (string): Cloud KMS location (e.g. 'us-east1').
        key_ring_id (string): ID of the Cloud KMS key ring (e.g. 'my-key-ring').
        import_job_id (string): ID of the import job (e.g. 'my-import-job').
    """

    # Create the client.
    client = kms.KeyManagementServiceClient()

    # Retrieve the fully-qualified import_job string.
    import_job_name = client.import_job_path(
        project_id, location_id, key_ring_id, import_job_id
    )

    # Retrieve the state from an existing import job.
    import_job = client.get_import_job(name=import_job_name)

    print(f"Current state of import job {import_job.name}: {import_job.state}")

API

בדוגמאות האלה משתמשים ב-curl כצד הלקוח ב-HTTP כדי להדגים את השימוש ב-API. מידע נוסף על בקרת גישה זמין במאמר גישה ל-Cloud KMS API.

כדי לבדוק את הסטטוס של משימת ייבוא, משתמשים ב-method‏ ImportJobs.get:

curl "https://cloudkms.googleapis.com/v1/projects/PROJECT_ID/locations/LOCATION/keyRings/KEY_RING/importJobs/IMPORT_JOB_ID" \
    --request "GET" \
    --header "authorization: Bearer TOKEN"

ברגע שמשימת הייבוא פעילה, אפשר לשלוח בקשה לייבוא מפתח.

מניעת שינוי של עבודות ייבוא

עבודת הייבוא קובעת מאפיינים רבים של המפתח המיובא, כולל האלגוריתם של המפתח והאם מדובר במפתח HSM או במפתח תוכנה. אתם יכולים להגדיר הרשאות IAM כדי למנוע ממשתמשים ליצור משימות ייבוא, אבל לאפשר להם להשתמש במשימות ייבוא כדי לייבא מפתחות.

  1. מומלץ להעניק את ההרשאה importjobs.create רק לאדמינים מרכזיים.
  2. נותנים את ההרשאה importjobs.useToImport למשימת ייבוא ספציפית למפעיל שישתמש במשימה הזו כדי לייבא מפתחות.
  3. כשיוצרים את עבודת הייבוא, מציינים את רמת ההגנה ואת האלגוריתם של גרסאות המפתח שמייבאים באמצעותה.

עד שתוקף פעולת הייבוא יפוג, משתמשים שיש להם הרשאה importjobs.useToImport אבל אין להם הרשאה importjobs.create לפעולת ייבוא מסוימת, יכולים לייבא מפתחות אבל לא לשנות את המאפיינים של פעולת הייבוא.

ייבוא המפתח

אחרי בדיקת הסטטוס של משימת הייבוא, אפשר לשלוח בקשת ייבוא.

משתמשים בדגלים שונים כדי לשלוח את בקשת הייבוא, בהתאם לשאלה אם רוצים ש-Google Cloud CLI יעטוף את המפתח באופן אוטומטי או אם כבר עטפתם את המפתח באופן ידני.

בין אם עטפתם את המפתח באופן ידני או אוטומטי, אתם צריכים להגדיר את האלגוריתם לאלגוריתם נתמך שתואם לאורך המפתח בפועל שאתם רוצים לייבא, ולציין את מטרת המפתח.

  • מפתחות עם המטרה ENCRYPT_DECRYPT משתמשים באלגוריתם google-symmetric-encryption, והאורך שלהם הוא 32.

  • מפתחות עם המטרה ASYMMETRIC_DECRYPT או ASYMMETRIC_SIGN תומכים במגוון אלגוריתמים ואורכים.

    אי אפשר לשנות את המטרה של מפתח אחרי שיוצרים אותו, אבל אפשר ליצור גרסאות עוקבות של המפתח באורכים שונים מאורך הגרסה הראשונית של המפתח.

העברה אוטומטית של מפתח והייבוא שלו

כדי להשתמש ב-wrapping אוטומטי, צריך להשתמש ב-Google Cloud CLI. משתמשים בפקודה כמו זו שבהמשך. מגדירים את --target-key-file למיקום של המפתח הלא עטוף כדי לעטוף ולייבא אותו. לא להגדיר את --wrapped-key-file.

אפשר להגדיר את הדגל --public-key-file למיקום שבו המפתח הציבורי כבר הורד. כשמייבאים מספר גדול של מפתחות, האפשרות הזו מונעת את ההורדה של המפתח הציבורי במהלך כל ייבוא. לדוגמה, אפשר לכתוב סקריפט שמוריד את המפתח הציבורי פעם אחת, ואז מספק את המיקום שלו כשמייבאים כל מפתח.

gcloud kms keys versions import \
    --import-job IMPORT_JOB \
    --location LOCATION \
    --keyring KEY_RING \
    --key KEY_NAME \
    --algorithm ALGORITHM \
    --target-key-file PATH_TO_UNWRAPPED_KEY

המפתח נארז על ידי מפתח האריזה שמשויך לעבודת הייבוא, מועבר אל Google Cloudומיובא כגרסת מפתח חדשה במפתח היעד.

ייבוא של מפתח שעטוף באופן ידני

ההוראות בקטע הזה מתייחסות לייבוא מפתח שעטפתם באופן ידני. מגדירים את --wrapped-key-file למיקום של המפתח שעטפתם באופן ידני. לא להגדיר את --target-key-file.

אפשר להגדיר את הדגל --public-key-file למיקום שבו המפתח הציבורי כבר הורד. כשמייבאים מספר גדול של מפתחות, האפשרות הזו מונעת את ההורדה של המפתח הציבורי במהלך כל ייבוא. לדוגמה, אפשר לכתוב סקריפט שמוריד את המפתח הציבורי פעם אחת, ואז מספק את המיקום שלו כשמייבאים כל מפתח.

המסוף

  1. נכנסים לדף Key Management במסוף Google Cloud .

    כניסה אל Key Management

  2. לוחצים על השם של אוסף המפתחות שמכיל את עבודת הייבוא. מפתח היעד מוצג, יחד עם כל המפתחות האחרים באוסף המפתחות.

  3. לוחצים על השם של מפתח היעד ואז על Import key version.

  4. בתפריט הנפתח בחירת משימת ייבוא, בוחרים את משימת הייבוא.

  5. בבורר Upload the wrapped key, בוחרים את המפתח שכבר עטפתם.

  6. אם מייבאים מפתח אסימטרי, בוחרים את האלגוריתם מהתפריט הנפתח Algorithm. הדף ייבוא גרסת מפתח אמור להיראות כך:
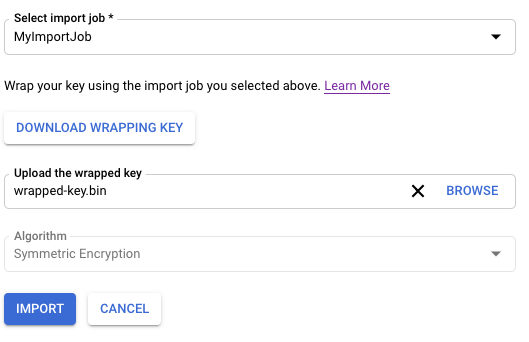
    ייבוא גרסת מפתח

  7. לוחצים על Import.

gcloud

כדי להשתמש ב-Cloud KMS בשורת הפקודה, קודם צריך להתקין את הגרסה העדכנית של Google Cloud CLI או לשדרג אליה.

משתמשים בפקודה כמו זו שבהמשך.

gcloud kms keys versions import \
  --import-job IMPORT_JOB \
  --location LOCATION \
  --keyring KEY_RING \
  --key KEY_NAME \
  --algorithm ALGORITHM \
  --wrapped-key-file PATH_TO_WRAPPED_KEY

מידע נוסף זמין בפלט של הפקודה gcloud kms keys versions import --help.

Go

כדי להריץ את הקוד הזה, קודם צריך להגדיר סביבת פיתוח של Go ולהתקין את Cloud KMS Go SDK.

import (
	"context"
	"crypto/ecdsa"
	"crypto/elliptic"
	"crypto/rand"
	"crypto/rsa"
	"crypto/sha1"
	"crypto/x509"
	"encoding/pem"
	"fmt"
	"io"

	kms "cloud.google.com/go/kms/apiv1"
	"cloud.google.com/go/kms/apiv1/kmspb"
	"github.com/google/tink/go/kwp/subtle"
)

// importManuallyWrappedKey wraps key material and imports it into KMS.
func importManuallyWrappedKey(w io.Writer, importJobName, cryptoKeyName string) error {
	// importJobName := "projects/PROJECT_ID/locations/global/keyRings/my-key-ring/importJobs/my-import-job"
	// cryptoKeyName := "projects/PROJECT_ID/locations/global/keyRings/my-key-ring/cryptoKeys/my-imported-key"

	// Generate a ECDSA keypair, and format the private key as PKCS #8 DER.
	key, err := ecdsa.GenerateKey(elliptic.P256(), rand.Reader)
	if err != nil {
		return fmt.Errorf("failed to generate keypair: %w", err)
	}
	keyBytes, err := x509.MarshalPKCS8PrivateKey(key)
	if err != nil {
		return fmt.Errorf("failed to format private key: %w", err)
	}

	// Create the client.
	ctx := context.Background()
	client, err := kms.NewKeyManagementClient(ctx)
	if err != nil {
		return fmt.Errorf("failed to create kms client: %w", err)
	}
	defer client.Close()

	// Generate a temporary 32-byte key for AES-KWP and wrap the key material.
	kwpKey := make([]byte, 32)
	if _, err := rand.Read(kwpKey); err != nil {
		return fmt.Errorf("failed to generate AES-KWP key: %w", err)
	}
	kwp, err := subtle.NewKWP(kwpKey)
	if err != nil {
		return fmt.Errorf("failed to create KWP cipher: %w", err)
	}
	wrappedTarget, err := kwp.Wrap(keyBytes)
	if err != nil {
		return fmt.Errorf("failed to wrap target key with KWP: %w", err)
	}

	// Retrieve the public key from the import job.
	importJob, err := client.GetImportJob(ctx, &kmspb.GetImportJobRequest{
		Name: importJobName,
	})
	if err != nil {
		return fmt.Errorf("failed to retrieve import job: %w", err)
	}
	pubBlock, _ := pem.Decode([]byte(importJob.PublicKey.Pem))
	pubAny, err := x509.ParsePKIXPublicKey(pubBlock.Bytes)
	if err != nil {
		return fmt.Errorf("failed to parse import job public key: %w", err)
	}
	pub, ok := pubAny.(*rsa.PublicKey)
	if !ok {
		return fmt.Errorf("unexpected public key type %T, want *rsa.PublicKey", pubAny)
	}

	// Wrap the KWP key using the import job key.
	wrappedWrappingKey, err := rsa.EncryptOAEP(sha1.New(), rand.Reader, pub, kwpKey, nil)
	if err != nil {
		return fmt.Errorf("failed to wrap KWP key: %w", err)
	}

	// Concatenate the wrapped KWP key and the wrapped target key.
	combined := append(wrappedWrappingKey, wrappedTarget...)

	// Build the request.
	req := &kmspb.ImportCryptoKeyVersionRequest{
		Parent:     cryptoKeyName,
		ImportJob:  importJobName,
		Algorithm:  kmspb.CryptoKeyVersion_EC_SIGN_P256_SHA256,
		WrappedKey: combined,
	}

	// Call the API.
	result, err := client.ImportCryptoKeyVersion(ctx, req)
	if err != nil {
		return fmt.Errorf("failed to import crypto key version: %w", err)
	}
	fmt.Fprintf(w, "Created crypto key version: %s\n", result.Name)
	return nil
}

Java

כדי להריץ את הקוד הזה, קודם צריך להגדיר סביבת פיתוח של Java ולהתקין את Java SDK של Cloud KMS.

import com.google.cloud.kms.v1.CryptoKeyName;
import com.google.cloud.kms.v1.CryptoKeyVersion;
import com.google.cloud.kms.v1.ImportCryptoKeyVersionRequest;
import com.google.cloud.kms.v1.ImportJob;
import com.google.cloud.kms.v1.ImportJobName;
import com.google.cloud.kms.v1.KeyManagementServiceClient;
import com.google.crypto.tink.subtle.Kwp;
import com.google.protobuf.ByteString;
import java.io.IOException;
import java.security.GeneralSecurityException;
import java.security.KeyFactory;
import java.security.KeyPair;
import java.security.KeyPairGenerator;
import java.security.PublicKey;
import java.security.SecureRandom;
import java.security.spec.ECGenParameterSpec;
import java.security.spec.MGF1ParameterSpec;
import java.security.spec.X509EncodedKeySpec;
import java.util.Base64;
import javax.crypto.Cipher;
import javax.crypto.spec.OAEPParameterSpec;
import javax.crypto.spec.PSource;

public class ImportManuallyWrappedKey {

  public void importManuallyWrappedKey() throws GeneralSecurityException, IOException {
    // TODO(developer): Replace these variables before running the sample.
    String projectId = "your-project-id";
    String locationId = "us-east1";
    String keyRingId = "my-key-ring";
    String cryptoKeyId = "my-crypto-key";
    String importJobId = "my-import-job";
    importManuallyWrappedKey(projectId, locationId, keyRingId, cryptoKeyId, importJobId);
  }

  // Generates and imports local key material into Cloud KMS.
  public void importManuallyWrappedKey(
      String projectId, String locationId, String keyRingId, String cryptoKeyId, String importJobId)
      throws GeneralSecurityException, IOException {

    // Generate a new ECDSA keypair, and format the private key as PKCS #8 DER.
    KeyPairGenerator generator = KeyPairGenerator.getInstance("EC");
    generator.initialize(new ECGenParameterSpec("secp256r1"));
    KeyPair kp = generator.generateKeyPair();
    byte[] privateBytes = kp.getPrivate().getEncoded();

    // Initialize client that will be used to send requests. This client only
    // needs to be created once, and can be reused for multiple requests. After
    // completing all of your requests, call the "close" method on the client to
    // safely clean up any remaining background resources.
    try (KeyManagementServiceClient client = KeyManagementServiceClient.create()) {
      // Build the crypto key and import job names from the project, location,
      // key ring, and ID.
      final CryptoKeyName cryptoKeyName =
          CryptoKeyName.of(projectId, locationId, keyRingId, cryptoKeyId);
      final ImportJobName importJobName =
          ImportJobName.of(projectId, locationId, keyRingId, importJobId);

      // Generate a temporary 32-byte key for AES-KWP and wrap the key material.
      byte[] kwpKey = new byte[32];
      new SecureRandom().nextBytes(kwpKey);
      Kwp kwp = new Kwp(kwpKey);
      final byte[] wrappedTargetKey = kwp.wrap(privateBytes);

      // Retrieve the public key from the import job.
      ImportJob importJob = client.getImportJob(importJobName);
      String publicKeyStr = importJob.getPublicKey().getPem();
      // Manually convert PEM to DER. :-(
      publicKeyStr = publicKeyStr.replace("-----BEGIN PUBLIC KEY-----", "");
      publicKeyStr = publicKeyStr.replace("-----END PUBLIC KEY-----", "");
      publicKeyStr = publicKeyStr.replaceAll("\n", "");
      byte[] publicKeyBytes = Base64.getDecoder().decode(publicKeyStr);
      PublicKey publicKey =
          KeyFactory.getInstance("RSA").generatePublic(new X509EncodedKeySpec(publicKeyBytes));

      // Wrap the KWP key using the import job key.
      Cipher cipher = Cipher.getInstance("RSA/ECB/OAEPWithSHA-1AndMGF1Padding");
      cipher.init(
          Cipher.ENCRYPT_MODE,
          publicKey,
          new OAEPParameterSpec(
              "SHA-1", "MGF1", MGF1ParameterSpec.SHA1, PSource.PSpecified.DEFAULT));
      byte[] wrappedWrappingKey = cipher.doFinal(kwpKey);

      // Concatenate the wrapped KWP key and the wrapped target key.
      ByteString combinedWrappedKeys =
          ByteString.copyFrom(wrappedWrappingKey).concat(ByteString.copyFrom(wrappedTargetKey));

      // Import the wrapped key material.
      CryptoKeyVersion version =
          client.importCryptoKeyVersion(
              ImportCryptoKeyVersionRequest.newBuilder()
                  .setParent(cryptoKeyName.toString())
                  .setImportJob(importJobName.toString())
                  .setAlgorithm(CryptoKeyVersion.CryptoKeyVersionAlgorithm.EC_SIGN_P256_SHA256)
                  .setRsaAesWrappedKey(combinedWrappedKeys)
                  .build());

      System.out.printf("Imported: %s%n", version.getName());
    }
  }
}

Node.js

כדי להריץ את הקוד הזה, קודם צריך להגדיר סביבת פיתוח של Node.js ולהתקין את Cloud KMS Node.js SDK.

//
// TODO(developer): Uncomment these variables before running the sample.
//
// const projectId = 'my-project';
// const locationId = 'us-east1';
// const keyRingId = 'my-key-ring';
// const cryptoKeyId = 'my-imported-key';
// const importJobId = 'my-import-job';

// Imports the Cloud KMS library
const {KeyManagementServiceClient} = require('@google-cloud/kms');

// Instantiates a client
const client = new KeyManagementServiceClient();

// Build the crypto key and importjob resource names
const cryptoKeyName = client.cryptoKeyPath(
  projectId,
  locationId,
  keyRingId,
  cryptoKeyId
);
const importJobName = client.importJobPath(
  projectId,
  locationId,
  keyRingId,
  importJobId
);

async function wrapAndImportKey() {
  // Generate a 32-byte key to import.
  const crypto = require('crypto');
  const targetKey = crypto.randomBytes(32);

  const [importJob] = await client.getImportJob({name: importJobName});

  // Wrap the target key using the import job key
  const wrappedTargetKey = crypto.publicEncrypt(
    {
      key: importJob.publicKey.pem,
      oaepHash: 'sha256',
      padding: crypto.constants.RSA_PKCS1_OAEP_PADDING,
    },
    targetKey
  );

  // Import the target key version
  const [version] = await client.importCryptoKeyVersion({
    parent: cryptoKeyName,
    importJob: importJobName,
    algorithm: 'GOOGLE_SYMMETRIC_ENCRYPTION',
    wrappedKey: wrappedTargetKey,
  });

  console.log(`Imported key version: ${version.name}`);
  return version;
}

return wrapAndImportKey();

Python

כדי להריץ את הקוד הזה, קודם צריך להגדיר סביבת פיתוח ב-Python ולהתקין את Cloud KMS Python SDK.

import os

# Import the client library and Python standard cryptographic libraries.
from cryptography.hazmat import backends
from cryptography.hazmat.primitives import hashes
from cryptography.hazmat.primitives import keywrap
from cryptography.hazmat.primitives import serialization
from cryptography.hazmat.primitives.asymmetric import ec
from cryptography.hazmat.primitives.asymmetric import padding
from google.cloud import kms


def import_manually_wrapped_key(
    project_id: str,
    location_id: str,
    key_ring_id: str,
    crypto_key_id: str,
    import_job_id: str,
) -> None:
    """
    Generates and imports local key material to Cloud KMS.

    Args:
        project_id (string): Google Cloud project ID (e.g. 'my-project').
        location_id (string): Cloud KMS location (e.g. 'us-east1').
        key_ring_id (string): ID of the Cloud KMS key ring (e.g. 'my-key-ring').
        crypto_key_id (string): ID of the key to import (e.g. 'my-asymmetric-signing-key').
        import_job_id (string): ID of the import job (e.g. 'my-import-job').
    """

    # Generate some key material in Python and format it in PKCS #8 DER as
    # required by Google Cloud KMS.
    key = ec.generate_private_key(ec.SECP256R1, backends.default_backend())
    formatted_key = key.private_bytes(
        serialization.Encoding.DER,
        serialization.PrivateFormat.PKCS8,
        serialization.NoEncryption(),
    )

    print(f"Generated key bytes: {formatted_key!r}")

    # Create the client.
    client = kms.KeyManagementServiceClient()

    # Retrieve the fully-qualified crypto_key and import_job string.
    crypto_key_name = client.crypto_key_path(
        project_id, location_id, key_ring_id, crypto_key_id
    )
    import_job_name = client.import_job_path(
        project_id, location_id, key_ring_id, import_job_id
    )

    # Generate a temporary 32-byte key for AES-KWP and wrap the key material.
    kwp_key = os.urandom(32)
    wrapped_target_key = keywrap.aes_key_wrap_with_padding(
        kwp_key, formatted_key, backends.default_backend()
    )

    # Retrieve the public key from the import job.
    import_job = client.get_import_job(name=import_job_name)
    import_job_pub = serialization.load_pem_public_key(
        bytes(import_job.public_key.pem, "UTF-8"), backends.default_backend()
    )

    # Wrap the KWP key using the import job key.
    wrapped_kwp_key = import_job_pub.encrypt(
        kwp_key,
        padding.OAEP(
            mgf=padding.MGF1(algorithm=hashes.SHA1()),
            algorithm=hashes.SHA1(),
            label=None,
        ),
    )

    # Import the wrapped key material.
    client.import_crypto_key_version(
        {
            "parent": crypto_key_name,
            "import_job": import_job_name,
            "algorithm": kms.CryptoKeyVersion.CryptoKeyVersionAlgorithm.EC_SIGN_P256_SHA256,
            "rsa_aes_wrapped_key": wrapped_kwp_key + wrapped_target_key,
        }
    )

    print(f"Imported: {import_job.name}")

API

בדוגמאות האלה נעשה שימוש ב-curl כלקוח HTTP כדי להדגים את השימוש ב-API. מידע נוסף על בקרת גישה זמין במאמר גישה ל-Cloud KMS API.

משתמשים ב-method ‏cryptoKeyVersions.import כדי לייבא מפתח.

curl "https://cloudkms.googleapis.com/v1/projects/PROJECT_ID/locations/LOCATION/keyRings/KEY_RING/cryptoKeys/KEY_NAME/cryptoKeyVersions:import" \
    --request "POST" \
    --header "authorization: Bearer TOKEN" \
    --header "content-type: application/json" \
    --data '{"importJob": "IMPORT_JOB_ID", "algorithm": "ALGORITHM", "wrappedKey": "WRAPPED_KEY"}'

מחליפים את מה שכתוב בשדות הבאים:

  • ‫IMPORT_JOB_ID: שם המשאב המלא של משימת הייבוא התואמת.

  • ‫ALGORITHM: ה-algorithm של המפתח שיובא, מסוג CryptoKeyVersionAlgorithm.

  • ‫WRAPPED_KEY: המפתח שעטוף ידנית בפורמט base64.

הבקשה לייבוא המפתח מתחילה. אתם יכולים לעקוב אחרי הסטטוס שלו.

בדיקת המצב של גרסת המפתח המיובאת

המצב הראשוני של גרסת מפתח מיובאת הוא PENDING_IMPORT. כשהסטטוס הוא ENABLED, גרסת המפתח יובאה בהצלחה. אם הייבוא נכשל, הסטטוס הוא IMPORT_FAILED.

אתם יכולים לבדוק את הסטטוס של בקשת הייבוא באמצעות Google Cloud CLI, מסוףGoogle Cloud או Cloud Key Management Service API.

המסוף

  1. נכנסים לדף Key Management במסוף Google Cloud .

    כניסה אל Key Management

  2. לוחצים על השם של אוסף המפתחות שמכיל את עבודת הייבוא.

  3. לוחצים על הכרטיסייה ייבוא משרות בחלק העליון של הדף.

  4. הסטטוס יופיע מתחת לסטטוס לצד השם של פעולת הייבוא.

gcloud

כדי להשתמש ב-Cloud KMS בשורת הפקודה, קודם צריך להתקין את הגרסה העדכנית של Google Cloud CLI או לשדרג אליה.

משתמשים בפקודה versions list כדי לבדוק את המצב. משתמשים באותו מיקום, באותו אוסף מפתחות ובאותו מפתח יעד שיצרתם קודם לכן בנושא הזה.

gcloud kms keys versions list \
  --keyring KEY_RING \
  --location LOCATION \
  --key KEY_NAME

Go

כדי להריץ את הקוד הזה, קודם צריך להגדיר סביבת פיתוח של Go ולהתקין את Cloud KMS Go SDK.

import (
	"context"
	"fmt"
	"io"

	kms "cloud.google.com/go/kms/apiv1"
	"cloud.google.com/go/kms/apiv1/kmspb"
)

// checkStateImportedKey checks the state of a CryptoKeyVersion in KMS.
func checkStateImportedKey(w io.Writer, name string) error {
	// name := "projects/PROJECT_ID/locations/global/keyRings/my-key-ring/cryptoKeys/my-imported-key/cryptoKeyVersions/1"

	// Create the client.
	ctx := context.Background()
	client, err := kms.NewKeyManagementClient(ctx)
	if err != nil {
		return fmt.Errorf("failed to create kms client: %w", err)
	}
	defer client.Close()

	// Call the API.
	result, err := client.GetCryptoKeyVersion(ctx, &kmspb.GetCryptoKeyVersionRequest{
		Name: name,
	})
	if err != nil {
		return fmt.Errorf("failed to get crypto key version: %w", err)
	}
	fmt.Fprintf(w, "Current state of crypto key version %q: %s\n", result.Name, result.State)
	return nil
}

Java

כדי להריץ את הקוד הזה, קודם צריך להגדיר סביבת פיתוח של Java ולהתקין את Java SDK של Cloud KMS.

import com.google.cloud.kms.v1.CryptoKeyVersion;
import com.google.cloud.kms.v1.CryptoKeyVersionName;
import com.google.cloud.kms.v1.KeyManagementServiceClient;
import java.io.IOException;

public class CheckStateImportedKey {

  public void checkStateImportedKey() throws IOException {
    // TODO(developer): Replace these variables before running the sample.
    String projectId = "your-project-id";
    String locationId = "us-east1";
    String keyRingId = "my-key-ring";
    String cryptoKeyId = "my-crypto-key";
    String cryptoKeyVersionId = "1";
    checkStateImportedKey(projectId, locationId, keyRingId, cryptoKeyId, cryptoKeyVersionId);
  }

  // Check the state of an imported key in Cloud KMS.
  public void checkStateImportedKey(
      String projectId,
      String locationId,
      String keyRingId,
      String cryptoKeyId,
      String cryptoKeyVersionId)
      throws IOException {
    // Initialize client that will be used to send requests. This client only
    // needs to be created once, and can be reused for multiple requests. After
    // completing all of your requests, call the "close" method on the client to
    // safely clean up any remaining background resources.
    try (KeyManagementServiceClient client = KeyManagementServiceClient.create()) {
      // Build the version name from its path components.
      CryptoKeyVersionName versionName =
          CryptoKeyVersionName.of(
              projectId, locationId, keyRingId, cryptoKeyId, cryptoKeyVersionId);

      // Retrieve the state of an existing version.
      CryptoKeyVersion version = client.getCryptoKeyVersion(versionName);
      System.out.printf(
          "Current state of crypto key version %s: %s%n", version.getName(), version.getState());
    }
  }
}

Node.js

כדי להריץ את הקוד הזה, קודם צריך להגדיר סביבת פיתוח של Node.js ולהתקין את Cloud KMS Node.js SDK.

//
// TODO(developer): Uncomment these variables before running the sample.
//
// const projectId = 'my-project';
// const locationId = 'us-east1';
// const keyRingId = 'my-key-ring';
// const cryptoKeyId = 'my-imported-key';
// const cryptoKeyVersionId = '1';

// Imports the Cloud KMS library
const {KeyManagementServiceClient} = require('@google-cloud/kms');

// Instantiates a client
const client = new KeyManagementServiceClient();

// Build the key version name
const keyVersionName = client.cryptoKeyVersionPath(
  projectId,
  locationId,
  keyRingId,
  cryptoKeyId,
  cryptoKeyVersionId
);

async function checkStateCryptoKeyVersion() {
  const [keyVersion] = await client.getCryptoKeyVersion({
    name: keyVersionName,
  });

  console.log(
    `Current state of key version ${keyVersion.name}: ${keyVersion.state}`
  );
  return keyVersion;
}

return checkStateCryptoKeyVersion();

Python

כדי להריץ את הקוד הזה, קודם צריך להגדיר סביבת פיתוח של Python ולהתקין את Cloud KMS Python SDK.

from google.cloud import kms


def check_state_imported_key(
    project_id: str, location_id: str, key_ring_id: str, import_job_id: str
) -> None:
    """
    Check the state of an import job in Cloud KMS.

    Args:
        project_id (string): Google Cloud project ID (e.g. 'my-project').
        location_id (string): Cloud KMS location (e.g. 'us-east1').
        key_ring_id (string): ID of the Cloud KMS key ring (e.g. 'my-key-ring').
        import_job_id (string): ID of the import job (e.g. 'my-import-job').
    """

    # Create the client.
    client = kms.KeyManagementServiceClient()

    # Retrieve the fully-qualified import_job string.
    import_job_name = client.import_job_path(
        project_id, location_id, key_ring_id, import_job_id
    )

    # Retrieve the state from an existing import job.
    import_job = client.get_import_job(name=import_job_name)

    print(f"Current state of import job {import_job.name}: {import_job.state}")

API

בדוגמאות האלה נעשה שימוש ב-curl כלקוח HTTP כדי להדגים את השימוש ב-API. מידע נוסף על בקרת גישה זמין במאמר גישה ל-Cloud KMS API.

מפעילים את השיטה ImportJob.get ובודקים את השדה state. אם הערך של state הוא PENDING_GENERATION, משימת הייבוא עדיין בתהליך יצירה. בודקים שוב את הסטטוס מדי פעם עד שהוא משתנה ל-ACTIVE.

אחרי שמייבאים את גרסת המפתח הראשונית, הסטטוס של המפתח משתנה לפעיל. לגבי מפתחות סימטריים, צריך להגדיר את גרסת המפתח המיובאת כגרסה הראשית לפני שתוכלו להשתמש במפתח.

מפתחות סימטריים: הגדרת הגרסה הראשית

השלב הזה נדרש כשמייבאים מפתחות סימטריים, והוא לא רלוונטי למפתחות אסימטריים. למפתח אסימטרי אין גרסה ראשית. כדי להגדיר את הגרסה הראשית, צריך להשתמש ב-Google Cloud CLI.

gcloud kms keys set-primary-version KEY_NAME\
    --location=LOCATION\
    --keyring=KEY_RING\
    --version=KEY_VERSION

ייבוא מחדש של מפתח שהושמד בעבר

שירות Cloud Key Management Service תומך בייבוא מחדש של מפתחות, שמאפשר לשחזר גרסת מפתח שיובאה בעבר במצב DESTROYED או IMPORT_FAILED למצב ENABLED, על ידי מתן חומר המפתח המקורי. אם לא בוצע ייבוא של חומר מפתח מקורי בגלל כשל בייבוא הראשוני, אפשר לספק חומר מפתח כלשהו.

הגבלות

  • אפשר לייבא מחדש רק את CryptoKeyVersions שיוצאו בעבר.
  • אם הגרסה יובאה בעבר בהצלחה, חומר המפתח שיובא מחדש חייב להתאים בדיוק לחומר המפתח המקורי.
  • CryptoKeyVersions שנמחקו לפני השקת התכונה הזו לא ניתנים לייבוא מחדש. הערך של השדה reimport_eligible של CryptoKeyVersion הוא true אם אפשר לייבא מחדש את הגרסה, ו-false אם אי אפשר.

אפשר לייבא מחדש מפתחות תוכנה ומפתחות Cloud HSM, אבל אי אפשר לייבא מחדש מפתחות חיצוניים.

ייבוא מחדש של מפתח שהושמד

יוצרים ImportJob לייבוא מחדש לפי השלבים במאמר יצירת משימת הייבוא. אתם יכולים להשתמש ב-ImportJob קיים או ב-ImportJob חדש, כל עוד רמת ההגנה תואמת לרמת ההגנה המקורית.

המסוף

  1. נכנסים לדף Key Management במסוף Google Cloud .

    כניסה אל Key Management

  2. לוחצים על השם של אוסף המפתחות שמכיל את המפתח שאת גרסת המפתח שלו רוצים לייבא מחדש.

  3. לוחצים על המפתח שרוצים לייבא מחדש את גרסת המפתח שלו.

  4. לוחצים על סמל שלוש הנקודות לצד גרסת המפתח שרוצים לייבא מחדש.

  5. בוחרים באפשרות ייבוא מחדש של גרסת מפתח.

  6. בתפריט הנפתח בחירת משימת ייבוא, בוחרים את משימת הייבוא.

  7. בבורר Upload the wrapped key, בוחרים את המפתח שכבר עטפתם. המפתח הזה חייב להתאים לחומר המפתח המקורי.

  8. לוחצים על ייבוא מחדש.

gcloud

כדי להשתמש ב-Cloud KMS בשורת הפקודה, קודם צריך להתקין את הגרסה העדכנית של Google Cloud CLI או לשדרג אליה.

  1. מייבאים מחדש את גרסת המפתח באמצעות חומר המפתח המקורי.

    gcloud kms keys versions import \
    --location LOCATION \
    --keyring KEY_RING \
    --key KEY_NAME \
    --version KEY_VERSION \
    --algorithm ALGORITHM \
    --import-job IMPORT_JOB \
    --target-key-file PATH_TO_KEY \
    

API

בדוגמאות האלה משתמשים ב-curl כצד הלקוח ב-HTTP כדי להדגים את השימוש ב-API. מידע נוסף על בקרת גישה זמין במאמר גישה ל-Cloud KMS API.

  1. בגוף הבקשה של השיטה cryptoKeyVersions.import, מגדירים את השדה cryptoKeyVersion לשם של גרסת המפתח שמייבאים. הוא חייב להיות צאצא של מפתח ההצפנה.

  2. בגוף הבקשה, מגדירים את השדה algorithm לאלגוריתם של המפתח שמייבאים. הערך הזה צריך להתאים לאלגוריתם של גרסת המפתח המקורית. השדה algorithm הוא מסוג CryptoKeyVersionAlgorithm.

  3. בגוף הבקשה, מגדירים את השדה wrappedKeyMaterial לחומר המפתח שכבר עטפתם.

  4. מפעילים את ה-method‏ cryptoKeyVersions.import. התגובה של cryptoKeyVersions.import היא מסוג CryptoKeyVersion. כשמייבאים מפתח בהצלחה, המצב שלו הוא ENABLED ואפשר להשתמש בו ב-Cloud KMS.

המאמרים הבאים