
이 가이드에서는 Document AI Warehouse를 사용하기 위한 모든 필수 설정 단계를 설명합니다.
Google Cloud 콘솔 정보
Google Cloud console 은 Google Cloud 제품을 사용하는 시스템을 프로비저닝, 구성, 관리, 모니터링하는 데 사용되는 웹 UI입니다.Google Cloud 콘솔을 사용하여 Document AI Warehouse 리소스를 설정하고 관리합니다.
프로젝트 만들기
Google Cloud에서 제공하는 서비스를 사용하려면 프로젝트를 만들어야 합니다.
프로젝트는 모든 Google Cloud 리소스를 구성합니다. 프로젝트는 다음 구성요소로 구성됩니다.
- 공동작업자 그룹
- 사용 설정된 API (및 기타 리소스)
- 모니터링 도구
- 결제 정보
- 인증 및 액세스 제어
하나의 프로젝트를 만들거나 여러 프로젝트를 만들 수 있습니다. 프로젝트를 사용하여 리소스 계층 구조에서 Google Cloud 리소스를 구성할 수 있습니다. 프로젝트에 대한 자세한 내용은 Resource Manager 문서를 참고하세요.
Google Cloud 콘솔의 프로젝트 선택기 페이지에서 Google Cloud 프로젝트를 선택하거나 만듭니다.
프로젝트를 선택하거나 만드는 데 필요한 역할
- 프로젝트 선택: 프로젝트를 선택하는 데는 특정 IAM 역할이 필요하지 않습니다. 역할이 부여된 프로젝트를 선택하면 됩니다.
-
프로젝트 만들기: 프로젝트를 만들려면
resourcemanager.projects.create권한이 포함된 프로젝트 생성자 역할(roles/resourcemanager.projectCreator)이 필요합니다. 역할 부여 방법 알아보기
결제 사용 설정
결제 계정은 정해진 리소스 집합의 비용을 누가 지불하는지 정의합니다. 결제 계정은 하나 이상의 프로젝트에 연결할 수 있습니다. 프로젝트 사용량이 연결된 결제 계정으로 청구됩니다. 프로젝트를 만들 때 결제를 구성할 수 있습니다. 자세한 내용은 결제 문서를 참고하세요.
Google Cloud 프로젝트에 결제가 사용 설정되어 있는지 확인합니다.
서비스 프로비저닝 및 초기화
Document AI Warehouse를 처음 사용하기 전에 Document AI Warehouse 프로비저닝 페이지에서 프로젝트와 연결된 리소스를 프로비저닝하고 초기화해야 합니다.
리소스를 프로비저닝하려면 프로젝트의 Content Warehouse Admin(콘텐츠 웨어하우스 관리자) 및 Service Usage Admin(서비스 사용량 관리자) 역할이 부여되어야 합니다.
프로비저닝 단계
리전을 선택합니다.
프로비저닝 페이지에서 사용 설정할 리전을 선택합니다.
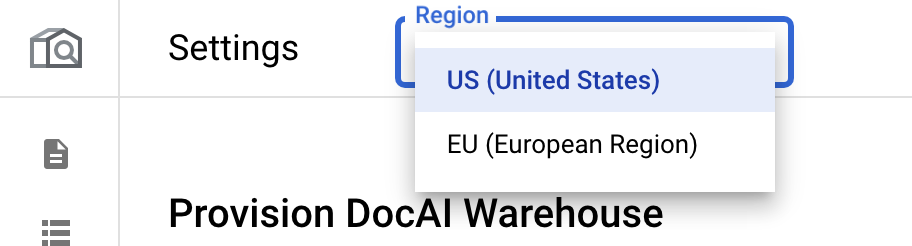
각 지역은 독립적입니다. 따라서 둘 이상의 리전을 사용하려면 각 리전을 별도로 프로비저닝해야 합니다.
핵심 API를 사용 설정합니다. {:#enable-core-api}:
사용 설정을 클릭합니다. 이렇게 하면 프로젝트에서 Document AI Warehouse API가 사용 설정됩니다.
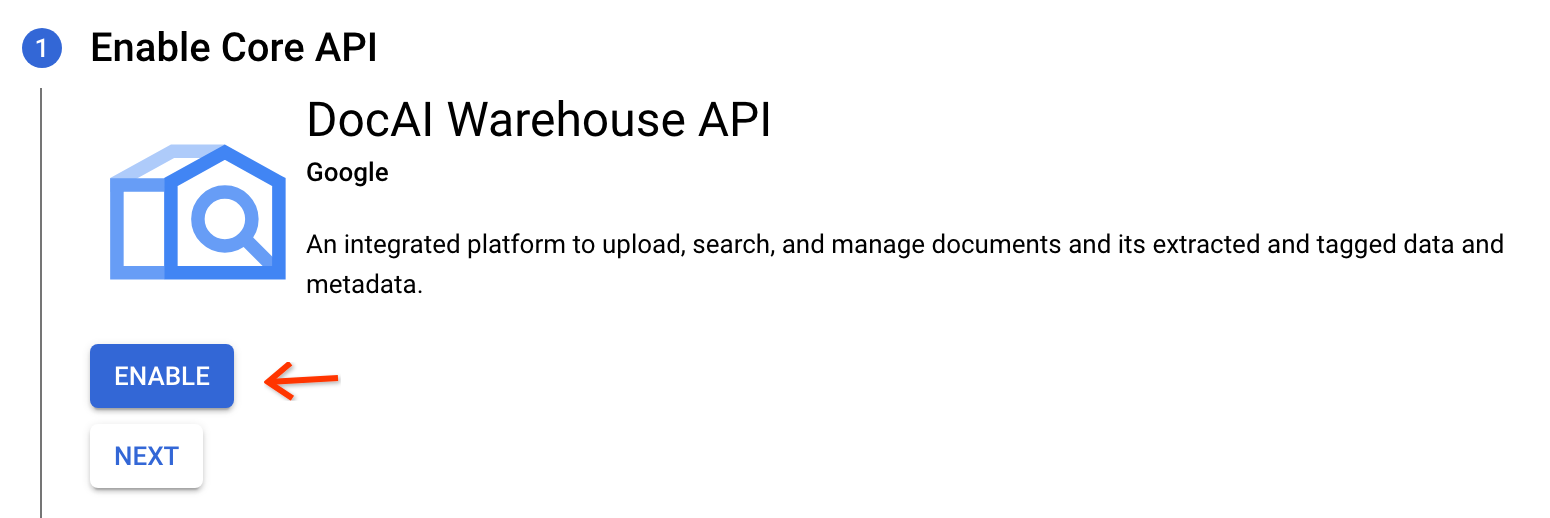
API가 사용 설정되면 다음을 클릭합니다.
인스턴스를 프로비저닝합니다.
이 단계에서는 Document AI Warehouse 서비스에서 프로젝트의 리소스를 프로비저닝합니다. 세 가지 액세스 제어 모드 중에서 선택해야 합니다. 신중하게 검토하여 사용 사례에 적합한 모드를 선택하세요. 자세한 내용은 액세스 제어 모드 페이지를 참고하세요.
액세스 제어 (ACL) 모드를 선택합니다.
[권장] Cloud ID의 사용자가 포함된 문서 수준 액세스 제어
조직이 Cloud ID 서비스에서 사용자 또는 그룹을 관리하는 경우에 해당합니다.
- Document AI Warehouse 인터페이스는 이 모드를 지원하여 사용자를 인증합니다.
조직의 LDAP 및 Active Directory 사용자 및 그룹을 Cloud ID에 동기화할 수 있습니다.
Google Workspace 사용자를 Cloud ID에 쉽게 추가할 수 있습니다.
Bring Your Own Identity(사용자 ID 사용) 서비스 액세스 제어의 사용자가 포함된 문서 수준 액세스 제어
사용자를 Cloud ID에 추가하거나 동기화할 수 없는 경우에 이 모드를 사용하되 하지만 다음과 같은 상황이 발생할 수 있습니다.
- Document AI Warehouse 인터페이스는 이 모드를 지원하지 않습니다. 맞춤 클라이언트 애플리케이션이 필요할 수 있습니다.
- 커스텀 클라이언트 애플리케이션이 ID 공급업체에 사용자를 인증하고 Document AI Warehouse API를 사용하여 사용자 및 그룹 멤버십을 전달합니다.
범용 액세스: 문서 수준 액세스 제어가 없습니다.
- Document AI Warehouse 인터페이스는 이 모드를 지원하여 사용자를 인증합니다.
- 이 모드는 일반적으로 인증을 요구하지 않고 공개 사용자에게 액세스 권한을 부여하는 데 사용됩니다.
- 커스텀 포털이 원하는 역할 (예: 문서 뷰어 역할)로 서비스 계정을 사용하여 모든 문서에 액세스하고 인증 없이 이 액세스 권한을 공개 사용자에게 전달할 수 있습니다.
Cloud ID의 사용자가 포함된 문서 수준 액세스 제어 Bring Your Own Identity(사용자 ID 사용) 서비스 액세스 제어의 사용자가 포함된 문서 수준 액세스 제어 범용 액세스 문서 수준 액세스 예 예 아니요 Document AI Warehouse UI 지원 예 아니요 예 (사용자에게 프로젝트 수준 액세스 권한이 있는 경우) 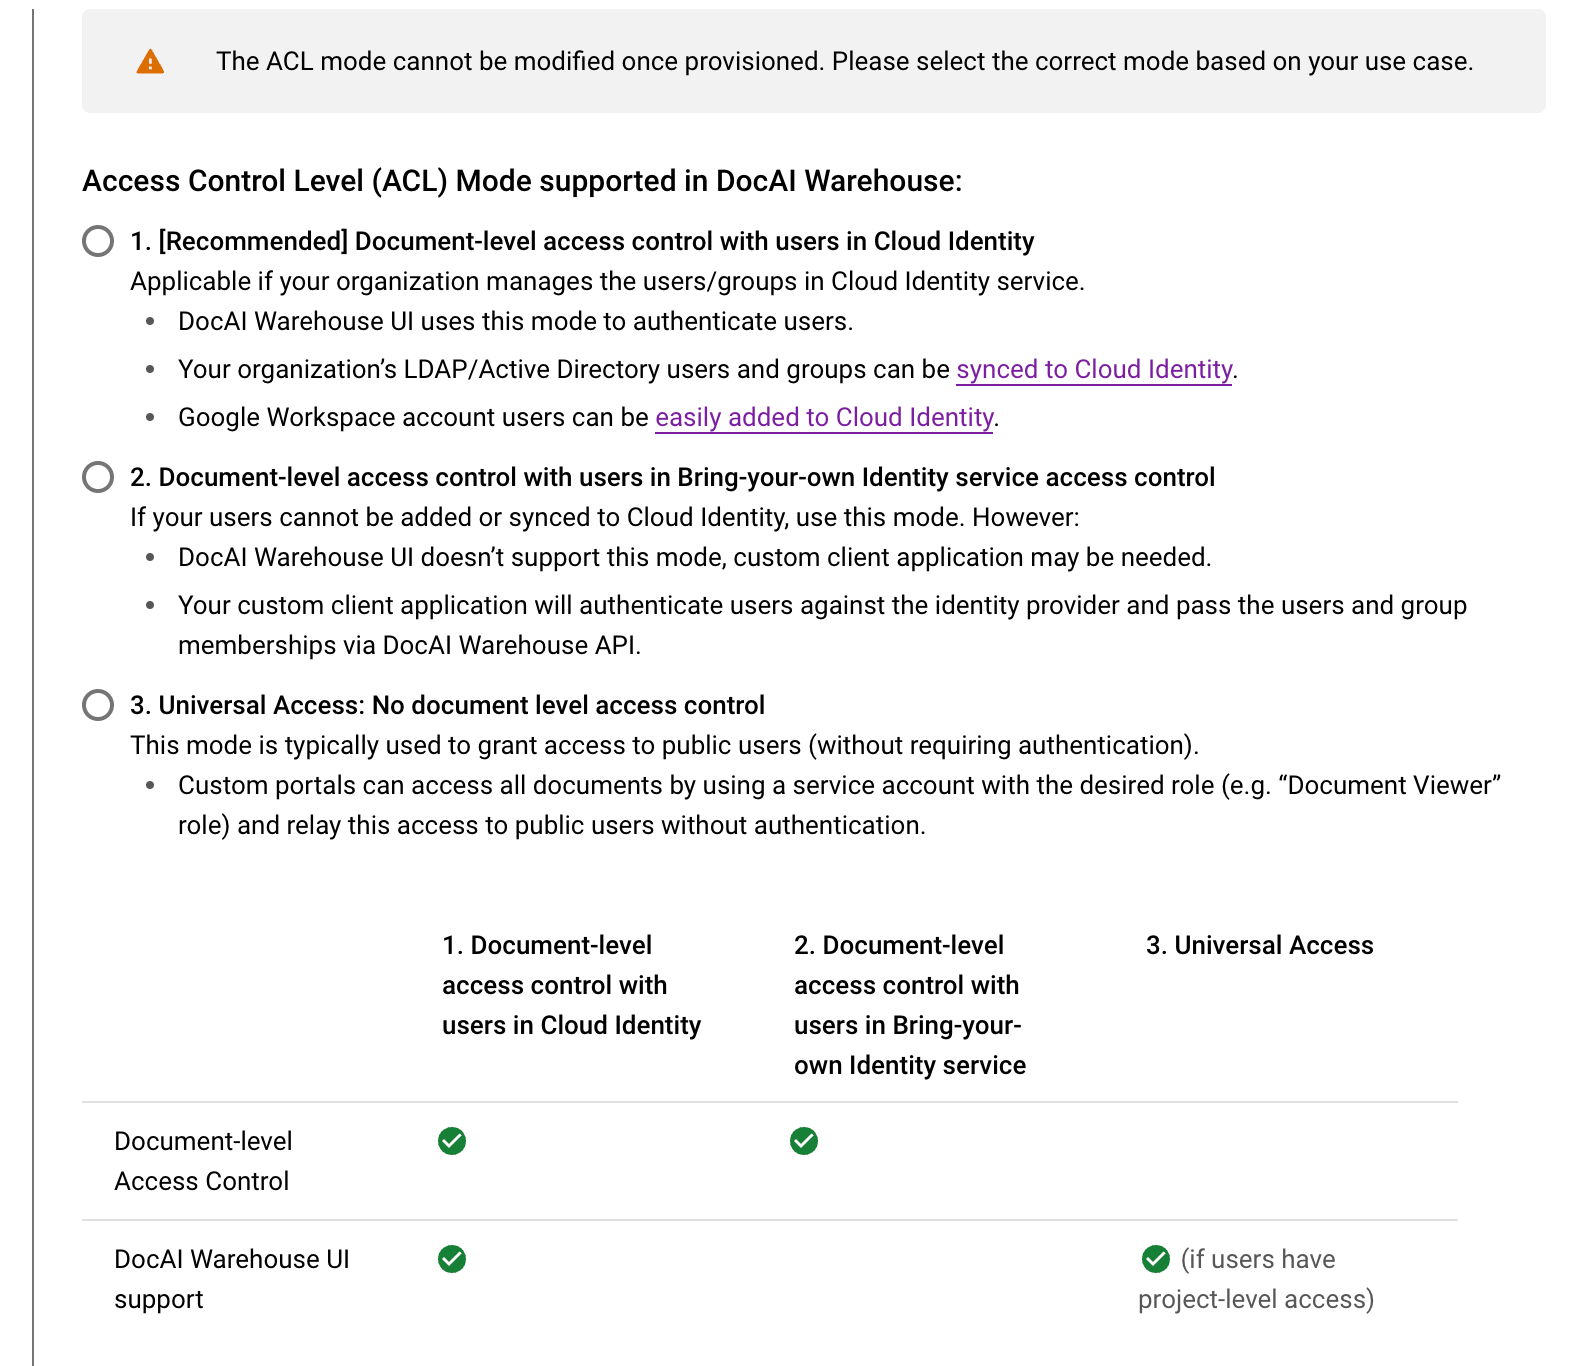
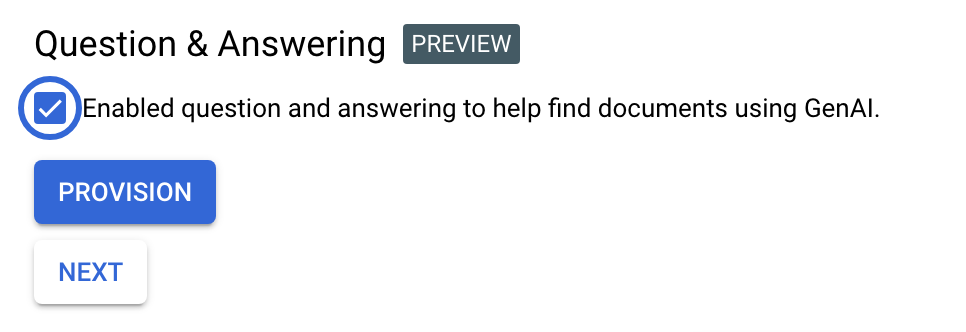
질문과 답변 사용 설정:
프로젝트에서 생성형 AI 검색을 사용 설정하려면 질문 및 답변을 확인하세요. 기능 사용을 위해 허용 목록에 추가되는 방법을 비롯한 자세한 내용은 생성형 AI 검색을 참고하세요.
프로비저닝 트리거:
프로비저닝을 클릭하여 프로젝트 프로비저닝을 시작합니다. 인스턴스를 설정하는 데 시간이 걸립니다(3~5분).
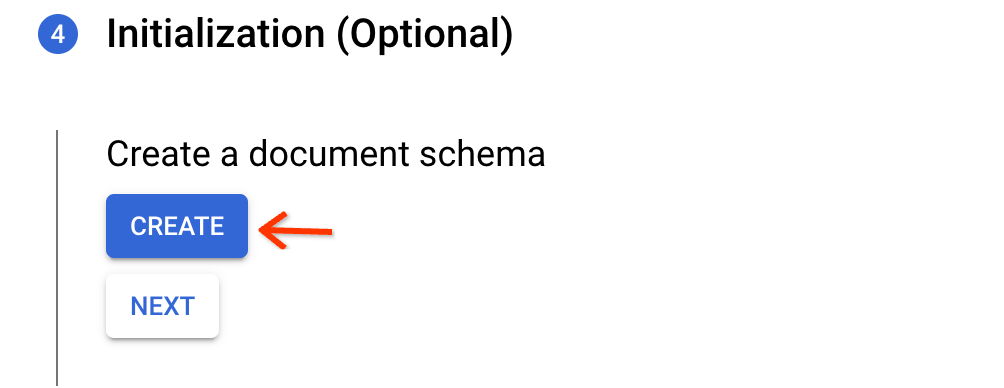
기본 스키마를 만듭니다.
초기화 단계에서 만들기를 클릭합니다. 이렇게 하면 OCR로 추출된 PDF 또는 TXT 파일에 사용할 수 있는 기본 스키마가 생성됩니다. 색인 생성을 위한 원시 텍스트 필드가 포함되어 있지만 속성은 포함되어 있지 않습니다.
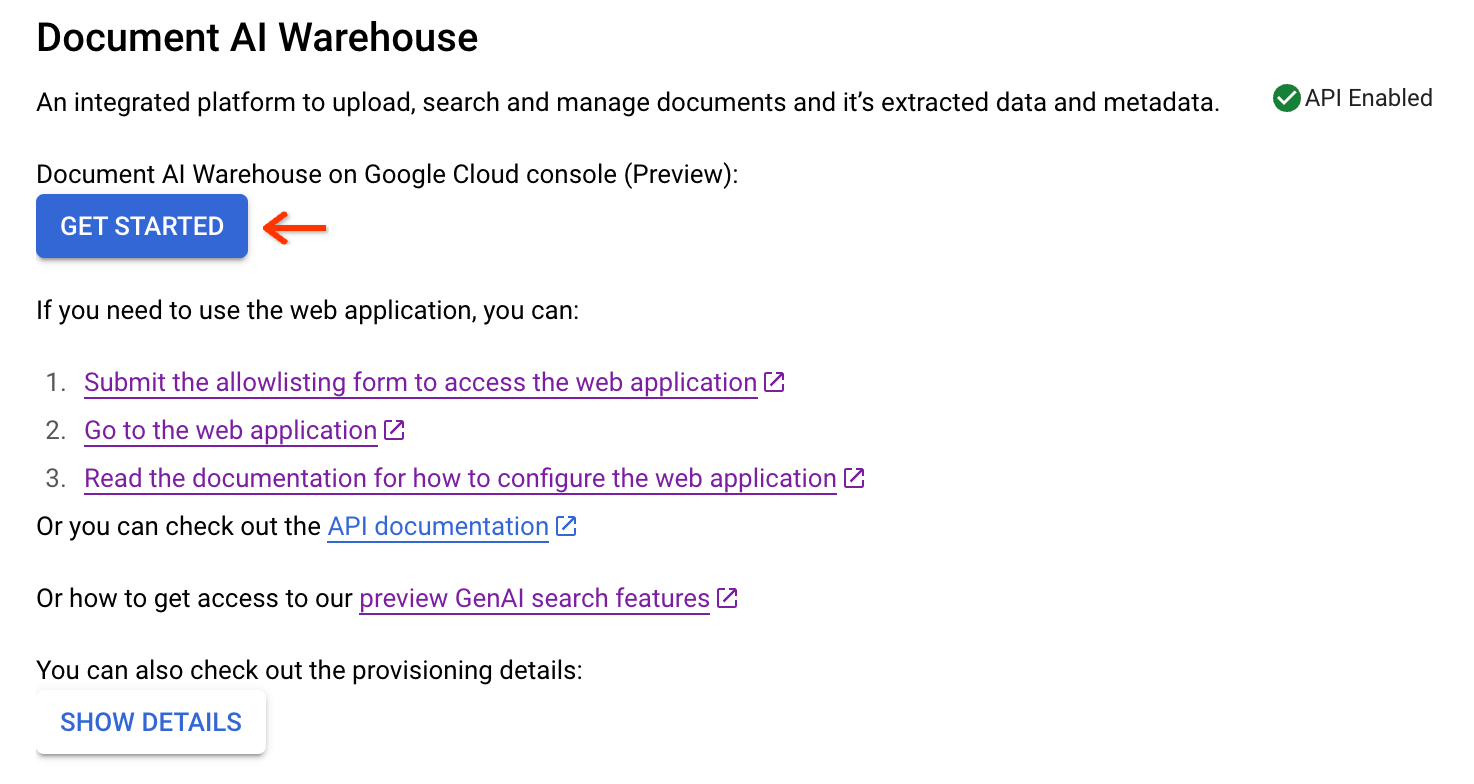
인스턴스 보기:
이렇게 하면 프로비저닝 프로세스가 완료됩니다. 프로젝트에서 문서 수준 액세스 제어를 사용하는 경우 다음 섹션으로 이동하여 프로젝트 수준 권한을 설정합니다.
콘솔 UI 기능의 Google Cloud 허용 목록에 있는 경우 시작하기를 클릭하여 Google Cloud 콘솔에서 Document AI Warehouse를 사용할 수 있습니다.
Google Cloud 콘솔 UI 기능의 허용 목록에 없는 경우 웹 애플리케이션을 구성하여 Document AI Warehouse 웹 애플리케이션을 설정하는 방법을 알아보세요.
사용자의 IAM에서 필요한 권한을 구성합니다. 문서 수준 액세스 제어가 사용 설정된 경우 프로젝트 수준 권한과 IAM 권한이 필요합니다. 자세한 내용은 필요한 권한을 참고하세요.
프로젝트 수준 권한 설정
프로젝트에서 문서 수준 액세스 제어 (ACL 모드 선택의 옵션 1)를 사용 설정하는 경우 관리자 계정 및 사용자에게 프로젝트 수준 권한을 부여해야 합니다.
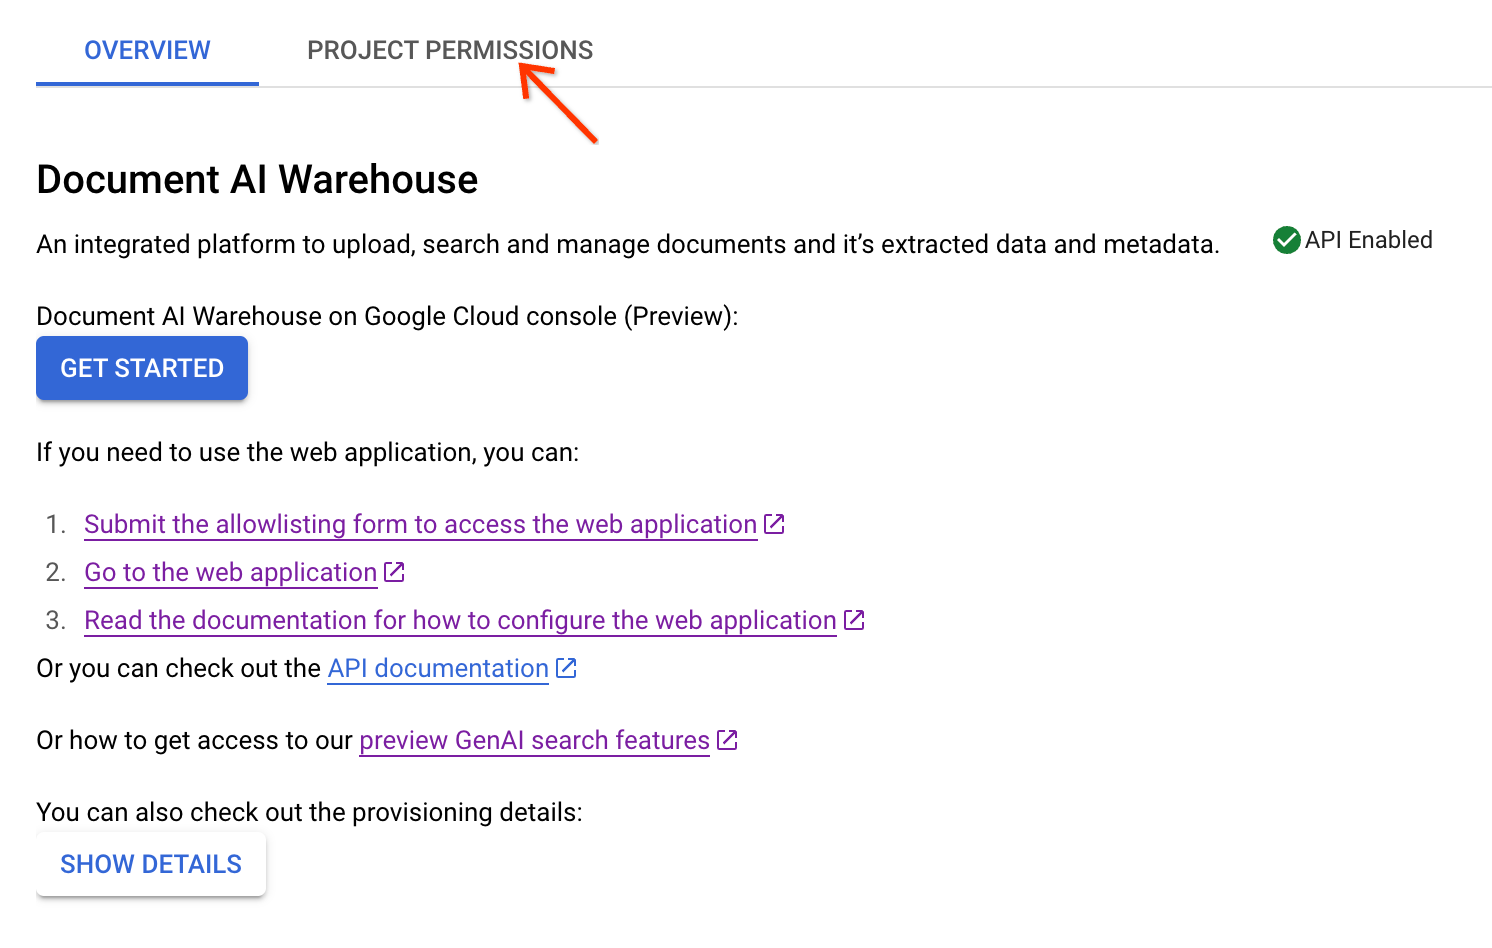
프로비저닝 후 최종 뷰에서 프로젝트 권한으로 이동합니다.
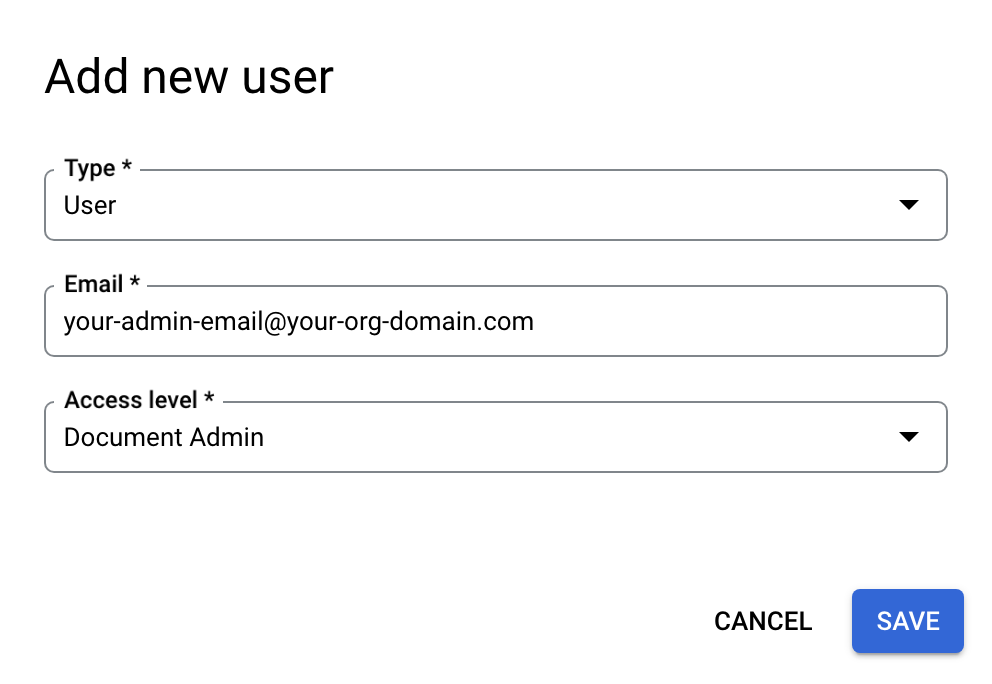
아래 단계에 따라 관리자 계정을 문서 관리자로 추가하세요.
사용자 추가를 클릭합니다.
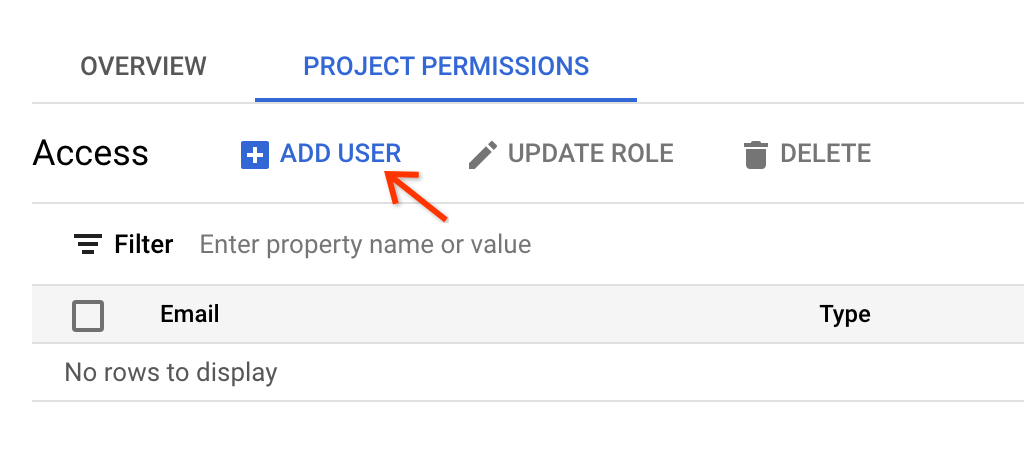
관리자의 이메일을 입력하고 액세스 수준으로 문서 관리자를 선택합니다. 저장을 클릭합니다.
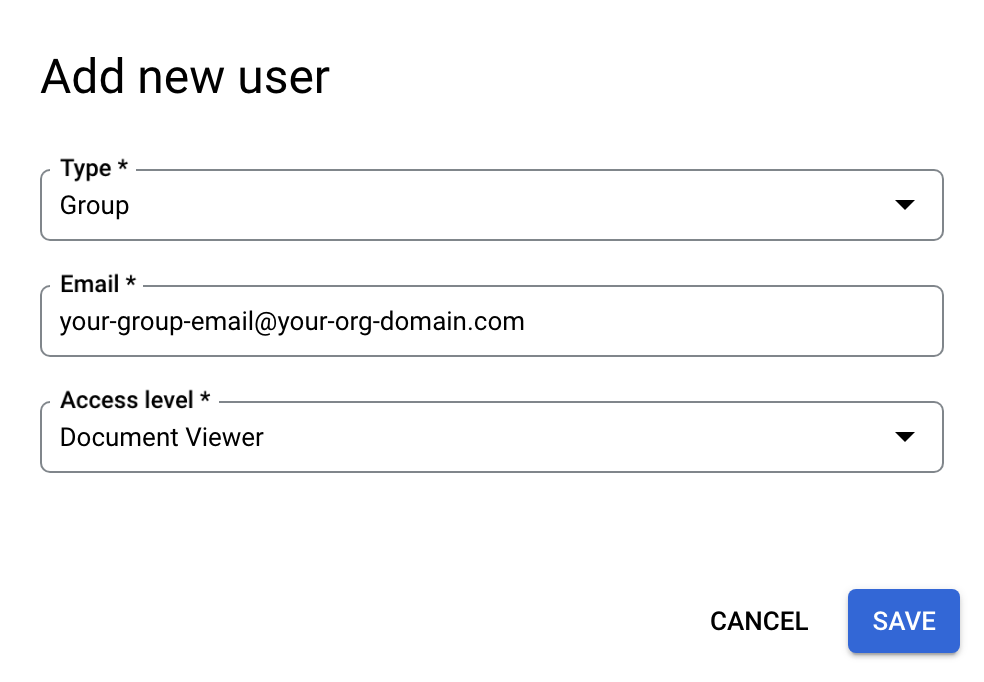
다른 사용자의 경우 다음과 같이 추가할 수 있습니다.
문서 관리자: 문서 업로드, 문서 소유자와 관계없이 모든 문서 보기/수정/삭제를 비롯하여 프로젝트의 모든 문서에 대한 전체 액세스 권한이 있는 역할입니다. 또한 문서 관리자는 모든 문서의 권한을 변경할 수 있습니다.
문서 편집자: 모든 문서에 대한 보기 및 수정 권한이 있는 역할입니다. 프로젝트에서 문서를 만들고 삭제할 수는 없으며 문서의 권한을 변경할 수도 없습니다.
문서 뷰어: 모든 문서에 대한 보기 권한만 있는 역할입니다. 문서 보기 권한 사용자는 문서를 만들거나, 수정하거나, 삭제하거나, 문서의 권한을 변경할 수 없습니다.
문서 작성자: 문서 업로드 권한만 있는 역할입니다. 문서 작성자는 업로드한 문서에 대한 모든 권한을 갖지만 해당 문서에 대한 명시적 권한을 얻지 않는 한 다른 문서에 대한 권한은 없습니다.
이메일은 단일 사용자 이메일 또는 그룹 이메일일 수 있습니다. 그룹 이메일을 지정할 때 유형 필드에서 그룹을 선택합니다.
필수 권한
Document AI Warehouse에는 IAM 위에 독립적인 ACL 시스템이 있습니다. 문서 수준 ACL 프로젝트의 경우 Document AI Warehouse의 ACL 시스템에서 추가 프로젝트 수준 권한을 부여받아야 합니다. 범용 액세스 프로젝트의 경우 IAM 권한만 필요합니다.
다음은 필요한 권한에 관한 요약 표입니다.
Document-ACL 프로젝트
| 사용자 유형 | IAM 역할 | Document AI Warehouse의 프로젝트 수준 권한 |
|---|---|---|
| 관리자 | 콘텐츠 웨어하우스 관리자 | 문서 관리자 |
| 일반 사용자 | 콘텐츠 웨어하우스 문서 스키마 뷰어 | 의도한 권한에 따라 문서 작성자/편집자/뷰어 |
범용 액세스 프로젝트
| 사용자 유형 | IAM 역할 |
|---|---|
| 관리자 | 1. 콘텐츠 웨어하우스 관리자 2. 콘텐츠 웨어하우스 문서 관리자 |
| 일반 사용자 | 1. 콘텐츠 웨어하우스 문서 스키마 뷰어 2. 의도한 권한에 따라 콘텐츠 웨어하우스 문서 생성자/뷰어/편집자 |
유니버설 액세스 프로젝트의 IAM 역할
| 역할 이름 | 역할 이름 | 목적 |
|---|---|---|
| 콘텐츠 웨어하우스 문서 생성자 | contentwarehouse.documentCreator |
문서 만들기 |
| 콘텐츠 웨어하우스 문서 뷰어 | contentwarehouse.documentViewer |
문서 보기 |
| 콘텐츠 웨어하우스 문서 편집자 | contentwarehouse.documentEditor |
문서 수정 (생성 및 삭제는 포함되지 않음) |
| 콘텐츠 웨어하우스 문서 관리자 | contentwarehouse.documentAdmin |
문서 관리 (생성 및 삭제 포함) |
| 콘텐츠 웨어하우스 관리자 | contentwarehouse.admin |
문서, 스키마, 규칙 관리 |
자세한 내용은 IAM 역할 및 권한을 참고하세요.
액세스 토큰 설정 (명령줄에서 API 호출)
명령줄 도구로 Document AI Warehouse API를 호출하려면 다음 단계를 따르세요.
환경에서 서비스 계정 키 파일 사용
Google Cloud CLI 설치 및 초기화 (선택사항)
gcloud CLI는 Google Cloud에서 호스팅되는 리소스와 애플리케이션을 관리하는 데 사용할 수 있는 도구 집합을 제공합니다.
다음 링크에서 안내를 제공합니다.
Google Cloud CLI를 설치합니다. 설치 후 다음 명령어를 실행하여 Google Cloud CLI를 초기화합니다.
gcloud init외부 ID 공급업체(IdP)를 사용하는 경우 먼저 제휴 ID로 gcloud CLI에 로그인해야 합니다.
액세스 토큰 생성하기
이전 단계에서 인증을 설정한 경우 Google Cloud CLI를 사용하여 인증 환경을 테스트할 수 있습니다. 다음 명령어를 실행하여 오류가 발생하지 않고 사용자 인증 정보가 반환되는지 확인합니다.
AUTH_TOKEN=$(gcloud auth application-default print-access-token --scopes=https://www.googleapis.com/auth/cloud-platform)
AUTH_TOKEN가 설정되어야 합니다. 예를 들면 다음과 같습니다.
$ echo $AUTH_TOKEN
ya29.c.b0AXv0zTPvXmEMZXCe781qL0Y3r1EKnw3k4DJcoWGZkyWKx-nMNVQVErQ3ge6XA2RXsTU1tf_SMLgeWC6xwS51tP8QZhbypuGczBzMgKWYExwATHt3Vn553edl8tmqCMjROgdQjCDd8i7as-236r4d8gNwKsR192gNgNw_0zzs0MPyNVmqydpfmpj8yBwJI5QWna1331GTGKgd3Ia16fTzAHrZC_GkcO0wJPo....................................................................................................................................................................................................................................................................................................................................................................................................................................................................................................................................................................................................................................................................................................................................................................................................................
Document AI Warehouse API 호출 테스트
AUTH_TOKEN는 모든 Document AI Warehouse API REST 샘플에서 API 호출을 인증하는 데 사용됩니다. 예를 들어 다음 명령어는 정의한 모든 문서 스키마를 검색합니다. 이러한 스키마는 프로젝트와 연결되어 있습니다 (대부분의 경우 위치로 'us'를 사용).
curl --header "Authorization: Bearer $AUTH_TOKEN" https://contentwarehouse.googleapis.com/v1/projects/PROJECT_NUMBER>/locations/LOCATION/documentSchemas
코드 샘플
Java
자세한 내용은 Document AI Warehouse Java API 참고 문서를 참고하세요.
Document AI Warehouse에 인증하려면 애플리케이션 기본 사용자 인증 정보를 설정합니다. 자세한 내용은 로컬 개발 환경의 인증 설정을 참조하세요.
Node.js
자세한 내용은 Document AI Warehouse Node.js API 참고 문서를 참고하세요.
Document AI Warehouse에 인증하려면 애플리케이션 기본 사용자 인증 정보를 설정합니다. 자세한 내용은 로컬 개발 환경의 인증 설정을 참조하세요.
Python
자세한 내용은 Document AI Warehouse Python API 참고 문서를 참고하세요.
Document AI Warehouse에 인증하려면 애플리케이션 기본 사용자 인증 정보를 설정합니다. 자세한 내용은 로컬 개발 환경의 인증 설정을 참조하세요.
다음 단계
웹 애플리케이션 (미리보기)을 사용하는 경우 Document AI Warehouse UI 관리로 이동하여 Document AI Warehouse의 UI를 설정합니다.
액세스 제어 관리로 이동하여 액세스 제어를 이해하고 구성합니다.
문서 스키마 관리로 이동하여 문서 스키마를 관리하는 방법을 알아보세요.
문서 검색으로 이동하여 문서를 검색하는 방법을 알아보세요.