
本指南說明如何使用網路鉤子,讓代理程式更具動態性。Cloud Functions 簡單易用,因此可用於代管 Webhook, 但您也可以透過許多其他方式代管 Webhook 服務。 這個範例也使用 Go 程式設計語言,但您可以採用Cloud Functions 支援的任何語言。 本指南的程式碼不需要編輯。
範例 Webhook 程式碼會執行下列作業:
- 從 Webhook 要求讀取參數值。
- 將參數值寫入 Webhook 回應。
- 在 Webhook 回應中提供文字回覆。
事前準備
如果您不打算使用 Webhook,可以略過本快速入門導覽課程。
閱讀本指南之前,請先完成下列工作:
- 詳閱流程基本概念。
- 執行設定步驟。
- 執行使用流程建構代理程式快速入門導覽課程中的步驟。以下步驟將繼續處理同一個代理程式。 如果該代理程式已不存在,您可以下載代理程式並還原。
建立 Cloud 函式
您可以使用 Google Cloud 控制台建立 Cloud Functions (參閱說明文件、開啟控制台)。如要為本指南建立函式,請按照下列步驟操作:
- 請務必將 Dialogflow CX 虛擬服務專員和函式放在同一個專案中。這是 Dialogflow CX 安全存取函式最簡單的方式。如要選取專案,請前往專案選取器。
- 前往 Cloud Functions 總覽頁面。
- 按一下「建立函式」,然後設定下列欄位:
- 環境:第 1 代
- 函式名稱:shirts-agent-webhook
- 區域:如果您為代理程式指定區域,請使用相同區域。
- HTTP 觸發條件類型:HTTP
- 網址:按一下此處的複製按鈕,然後儲存值。 設定 Webhook 時會需要這個網址。
- 驗證:需要驗證
- 必須使用 HTTPS:已勾選
- 按一下 [儲存]。
- 按一下「下一步」 (您不需要特殊的執行階段、建構作業、連線或安全性設定)。
- 設定下列欄位:
- 執行階段:選取最新的 Go 執行階段。
- 原始碼:內嵌編輯器
- 進入點:HandleWebhookRequest
將程式碼替換為下列內容:
// Package cxwh contains an example Dialogflow CX webhook
package cxwh

import (
	"encoding/json"
	"fmt"
	"log"
	"net/http"
)

type fulfillmentInfo struct {
	Tag string `json:"tag"`
}

type sessionInfo struct {
	Session    string         `json:"session"`
	Parameters map[string]any `json:"parameters"`
}

type text struct {
	Text []string `json:"text"`
}

type responseMessage struct {
	Text text `json:"text"`
}

type fulfillmentResponse struct {
	Messages []responseMessage `json:"messages"`
}

// webhookRequest is used to unmarshal a WebhookRequest JSON object. Note that
// not all members need to be defined--just those that you need to process.
// As an alternative, you could use the types provided by the Dialogflow protocol buffers:
// https://pkg.go.dev/google.golang.org/genproto/googleapis/cloud/dialogflow/cx/v3#WebhookRequest
type webhookRequest struct {
	FulfillmentInfo fulfillmentInfo `json:"fulfillmentInfo"`
	SessionInfo     sessionInfo     `json:"sessionInfo"`
}

// webhookResponse is used to marshal a WebhookResponse JSON object. Note that
// not all members need to be defined--just those that you need to process.
// As an alternative, you could use the types provided by the Dialogflow protocol buffers:
// https://pkg.go.dev/google.golang.org/genproto/googleapis/cloud/dialogflow/cx/v3#WebhookResponse
type webhookResponse struct {
	FulfillmentResponse fulfillmentResponse `json:"fulfillmentResponse"`
	SessionInfo         sessionInfo         `json:"sessionInfo"`
}

// confirm handles webhook calls using the "confirm" tag.
func confirm(request webhookRequest) (webhookResponse, error) {
	// Create a text message that utilizes the "size" and "color"
	// parameters provided by the end-user.
	// This text message is used in the response below.
	t := fmt.Sprintf("You can pick up your order for a %s %s shirt in 5 days.",
		request.SessionInfo.Parameters["size"],
		request.SessionInfo.Parameters["color"])

	// Create session parameters that are populated in the response.
	// The "cancel-period" parameter is referenced by the agent.
	// This example hard codes the value 2, but a real system
	// might look up this value in a database.
	p := map[string]any{"cancel-period": "2"}

	// Build and return the response.
	response := webhookResponse{
		FulfillmentResponse: fulfillmentResponse{
			Messages: []responseMessage{
				{
					Text: text{
						Text: []string{t},
					},
				},
			},
		},
		SessionInfo: sessionInfo{
			Parameters: p,
		},
	}
	return response, nil
}

// handleError handles internal errors.
func handleError(w http.ResponseWriter, err error) {
	w.WriteHeader(http.StatusInternalServerError)
	fmt.Fprintf(w, "ERROR: %v", err)
}

// HandleWebhookRequest handles WebhookRequest and sends the WebhookResponse.
func HandleWebhookRequest(w http.ResponseWriter, r *http.Request) {
	var request webhookRequest
	var response webhookResponse
	var err error

	// Read input JSON
	if err = json.NewDecoder(r.Body).Decode(&request); err != nil {
		handleError(w, err)
		return
	}
	log.Printf("Request: %+v", request)

	// Get the tag from the request, and call the corresponding
	// function that handles that tag.
	// This example only has one possible tag,
	// but most agents would have many.
	switch tag := request.FulfillmentInfo.Tag; tag {
	case "confirm":
		response, err = confirm(request)
	default:
		err = fmt.Errorf("Unknown tag: %s", tag)
	}
	if err != nil {
		handleError(w, err)
		return
	}
	log.Printf("Response: %+v", response)

	// Send response
	if err = json.NewEncoder(w).Encode(&response); err != nil {
		handleError(w, err)
		return
	}
}
按一下 [Deploy] (部署)。
等待狀態指標顯示函式已成功部署。等待期間,請檢查您剛部署的程式碼。 程式碼註解會說明重要詳細資料。
建立 Webhook
Webhook 現在是 Cloud 函式,接下來您要將這個 Webhook 與代理程式建立關聯。如要為代理程式建立 Webhook:
- 開啟 Dialogflow CX 控制台。
- 選擇 Google Cloud 專案。
- 選取代理程式。
- 選取「管理」分頁標籤。
- 按一下「Webhooks」。
- 點選「建立」。
- 填寫下列欄位:
- 顯示名稱:shirts-agent-webhook
- Webhook 網址:提供您在建立函式時儲存的 webhook 網址。
- 子類型:標準。
- 其他欄位則使用預設值。
- 按一下 [儲存]。
使用 Webhook
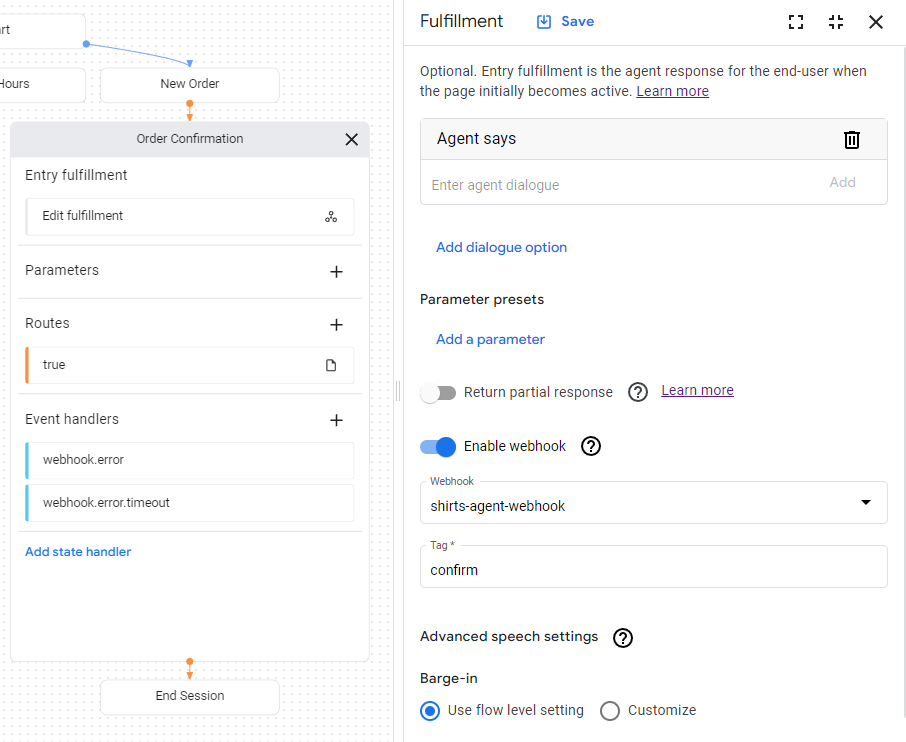
現在代理程式可以使用 Webhook,您將在執行要求中使用 Webhook。「訂單確認」頁面有項目履行作業,目前的回應是靜態文字。如要更新執行要求以使用 Webhook,請按照下列步驟操作:
- 選取「Build」(建構) 分頁標籤。
- 按一下「訂單確認」頁面,展開代理程式建構工具圖表中的頁面。
- 按一下頁面上的「Entry Fulfillment」欄位,開啟執行要求面板。
- 刪除「Agent says」(代理程式說) 標題下方的現有文字回應。 將游標懸停在文字上時,系統會顯示「刪除」delete按鈕。
- 按一下「啟用 Webhook」。
- 從「Webhook」下拉式選單中選取
shirts-agent-webhook選項。 - 在「標記」欄位中輸入
confirm。 - 按一下 [儲存]。
- 關閉完成面板。
部署的 Webhook 程式碼會傳送回應,建立名為 cancel-period 的參數。更新代理程式,在相同「訂單確認」頁面的最終代理程式回應中參照這個參數:
- 按一下顯示
true條件的條件路徑,開啟路徑面板。 - 向下捲動至路徑面板的「Fulfillment」(完成) 區段,
然後在「Agent says」(服務專員說) 標題下方新增以下文字回應:
You can cancel your order within $session.params.cancel-period days. Goodbye. - 按一下 [儲存]。
- 關閉路線面板。

在模擬工具中測試代理程式
代理程式和 Webhook 已準備就緒,可透過模擬工具進行測試:
- 按一下「測試代理程式」。
- 輸入
I want to buy a large red shirt,然後按下 Enter 鍵。
由於你同時提供尺寸和顏色,代理程式已掌握建立襯衫訂單所需的一切資訊,因此會直接轉移至「訂單確認」頁面。
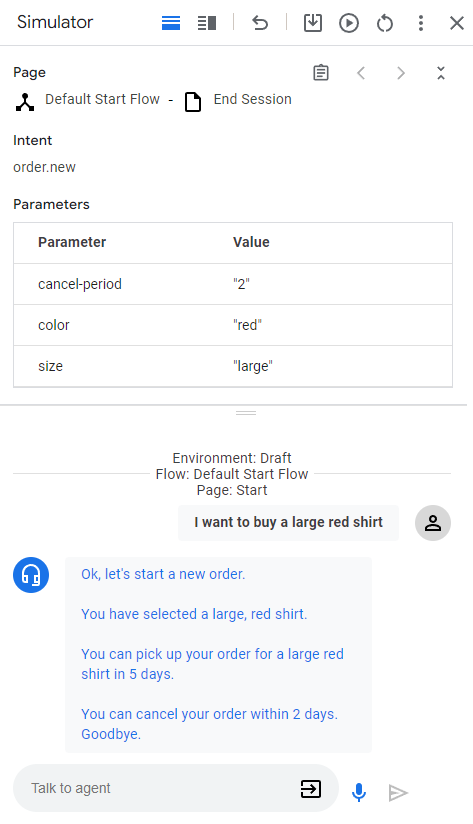
以下說明服務專員的回覆內容:
| 回應 | 說明 |
|---|---|
| 好的,請建立新訂單。 | 「New Order」(新訂單) 頁面啟用後,系統會呼叫項目履行作業。這項回應是由這個執行要求觸發。 |
| 你選取的是紅色大號襯衫。 | 為「新訂單」頁面提供所有表單參數後,系統會呼叫表單完成的條件路徑檢查。這項回應是由這條路徑的執行要求觸發。這個路徑也會轉換至「訂單確認」頁面。 |
| 你訂購的大號紅色上衣將在 5 天後送達。 | 「訂單確認」頁面的項目執行要求會呼叫 Webhook。查看 Webhook 程式碼中的 confirm 函式。該函式會建立這項文字回覆,並使用 Webhook 要求中提供的參數。 |
| 你可以在 2 天內取消訂單。Goodbye. | 「訂單確認」頁面具有條件路徑,且條件一律為 true。這項回應是由該路徑的執行要求觸發。請注意,回應會使用 Webhook 在 Webhook 回應中設定的參數。 |