
本頁面說明如何使用 Cloud Code,在單一工作區中管理多個 Cloud Functions 設定,以及重新排列 Cloud Run 函式 Explorer。
事前準備
本指南需要已設定的工作區 (至少列出一個設定的 launch.json 檔案)。如要開始使用範例,請參閱「建立及部署函式」快速入門導覽課程。
在單一工作區中管理多項設定
如要在 launch.json 檔案中新增 Cloud Functions 設定,請按照下列步驟操作:
按一下「Cloud Code」,然後展開「Cloud Functions」Explorer。
在 Cloud Run functions 探索器中,按一下「WORKSPACE」(工作區),然後點選「Add new cloud function configuration」(新增 Cloud Functions 設定)。
按照提示執行下列動作:
- 輸入函式名稱
- 選取 Cloud Run functions 環境
- 輸入進入點 (要為這個函式呼叫的方法名稱)
- 輸入測試輸入內容
或者,您也可以手動在
launch.json檔案中輸入這些值:{ "configurations": [ { "name": "Deploy Cloud Function", "type": "cloudcode.cloudfunctions", "request": "launch", "functionName": "hello-world-get", "gen": "GEN_2", "entryPoint": "helloGet" } ] }Cloud Run functions 工作區對應於
launch.json檔案中列出的第一個設定。工作區名稱會反映launch.json檔案中列出的第一個設定的functionName:{ "configurations": [ { "name": "Deploy Cloud Function", "type": "cloudcode.cloudfunctions", "request": "launch", "functionName": "hello-world-pub-sub", "gen": "GEN_2", "entryPoint": "helloPubSub" }, { "name": "Deploy Cloud Function", "type": "cloudcode.cloudfunctions", "request": "launch", "functionName": "hello-world-get", "gen": "GEN_2", "entryPoint": "helloGet" } ] }(選用) 如要從
launch.json檔案部署其他設定,請將要部署的設定移至launch.json檔案頂端,然後按一下「重新整理」重新整理 Cloud Functions 探索器。
將 Cloud Run functions Explorer 重新排列到 IDE 的檔案總管中
您可以執行下列操作,將 Cloud Run functions 檔案總管重新排列到 Cloud Shell 的檔案總管中:
將 Cloud Run functions Explorer 拖曳至 Cloud Shell 的檔案總管:
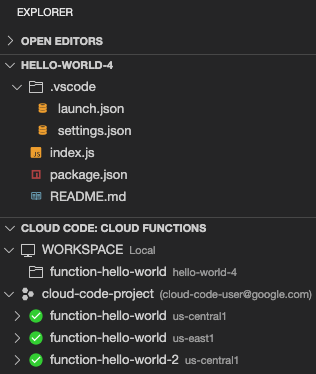
這樣一來,Cloud Run functions 探索器就會顯示在檔案探索器下方,您可以在與專案檔案相同的窗格中,查看已部署的函式和 Cloud Run functions 工作區。
(選用) 如要還原此配置,請將「Cloud Code: Cloud Functions」Explorer 的標題拖曳回「Cloud Code」Explorer。