
Create a subordinate CA from an external CA
This page describes how to create a subordinate certificate authority (CA) that chains up to an external root CA.
If you have an existing public key infrastructure (PKI) hierarchy containing a root CA and subordinate CAs, you can maintain the same root CA and create a subordinate CA in CA Service that chains up to your external root CA. The external root CA's key and operations remain outside of Google Cloud. You can only use the external root CA to issue the subordinate CA certificate to Google Cloud. The subordinate CA is immediately trusted by any workload that trusts the external root CA. You can then use the subordinate CA to issue certificates without needing to reach back to the external root CA at runtime.
Before you begin
- Make sure you have the CA Service Operation Manager
(
roles/privateca.caManager) or the CA Service Admin (roles/privateca.admin) IAM role. For information, see Configure IAM policies. - Identify the external root CA.
- Define the name, subject, validity period, and key size for the subordinate CA. For information, see Determine CA Settings.
Create a subordinate CA from an external CA
Creating a subordinate CA from an external CA involves the following steps:
Generate the subordinate CA Certificate Signing Request (CSR): The first step is to generate a CSR for the subordinate CA and then download the CSR.
Get the subordinate CA certificate signed by the external root CA: The second step is to submit the CSR to the external root CA for signing. Ensure that you follow the external root CA's specific instructions for submitting CSRs and obtaining signed certificates.
Import the signed subordinate CA certificate into CA Service: The final step is to upload the signed PEM certificate chain using either the Google Cloud CLI or the Google Cloud console.
The following section shows you how to create a subordinate CA from an external root CA.
Create a CSR
Console
In Google Cloud console, go to the Certificate Authority Service page.
Click the CA manager tab.
Click Create CA.
Select CA type:
- Click Subordinate CA.
- In the Valid for field, enter the duration that you want the certificates issued by the subordinate CA to be valid for.
- Click Root CA is external.
- Select one of the available options for the CA Tier. For more information, see Select the operation tiers.
- Under Regionalization, select a CA location from the list.
- Click Next.
- In the Organization (O) field, enter the name of your company.
- Optional: In the Organization unit (OU) field, enter the company subdivision or business unit.
- Optional: In the Country name (C) field, enter a two letter country code.
- Optional: In the State or province name field, enter the name of your state.
- Optional: In the Locality name field, enter the name of your city.
- In the CA common name (CN) field, enter the CA name.
- Click Continue.
- Choose the key algorithm that best meets your needs. For more details on signing key options, see Configure CA signing keys.
- To use a customer-managed signing key, select Customer-managed key and provide the Cloud Key Management Service crypto key version.
- Click Continue.
- Choose whether you want to use a Google-managed or a customer-managed Cloud Storage bucket.
- For a Google-managed Cloud Storage bucket, CA Service creates a Google-managed bucket in the same location as the CA.
- For a customer-managed Cloud Storage bucket, click Browse and select one of the existing Cloud Storage buckets.
- Click Continue.
The following steps are optional.
If you want to add labels to the CA, do the following:
- Click Add item.
- In the Key 1 field, enter the label key.
- In the Value 1 field, enter the label value.
- If you want to add another label, click Add item. Then, add the label key and value as mentioned in steps 2 and 3.
- Click Continue.
Carefully review all the settings, then click Done to create the CA.
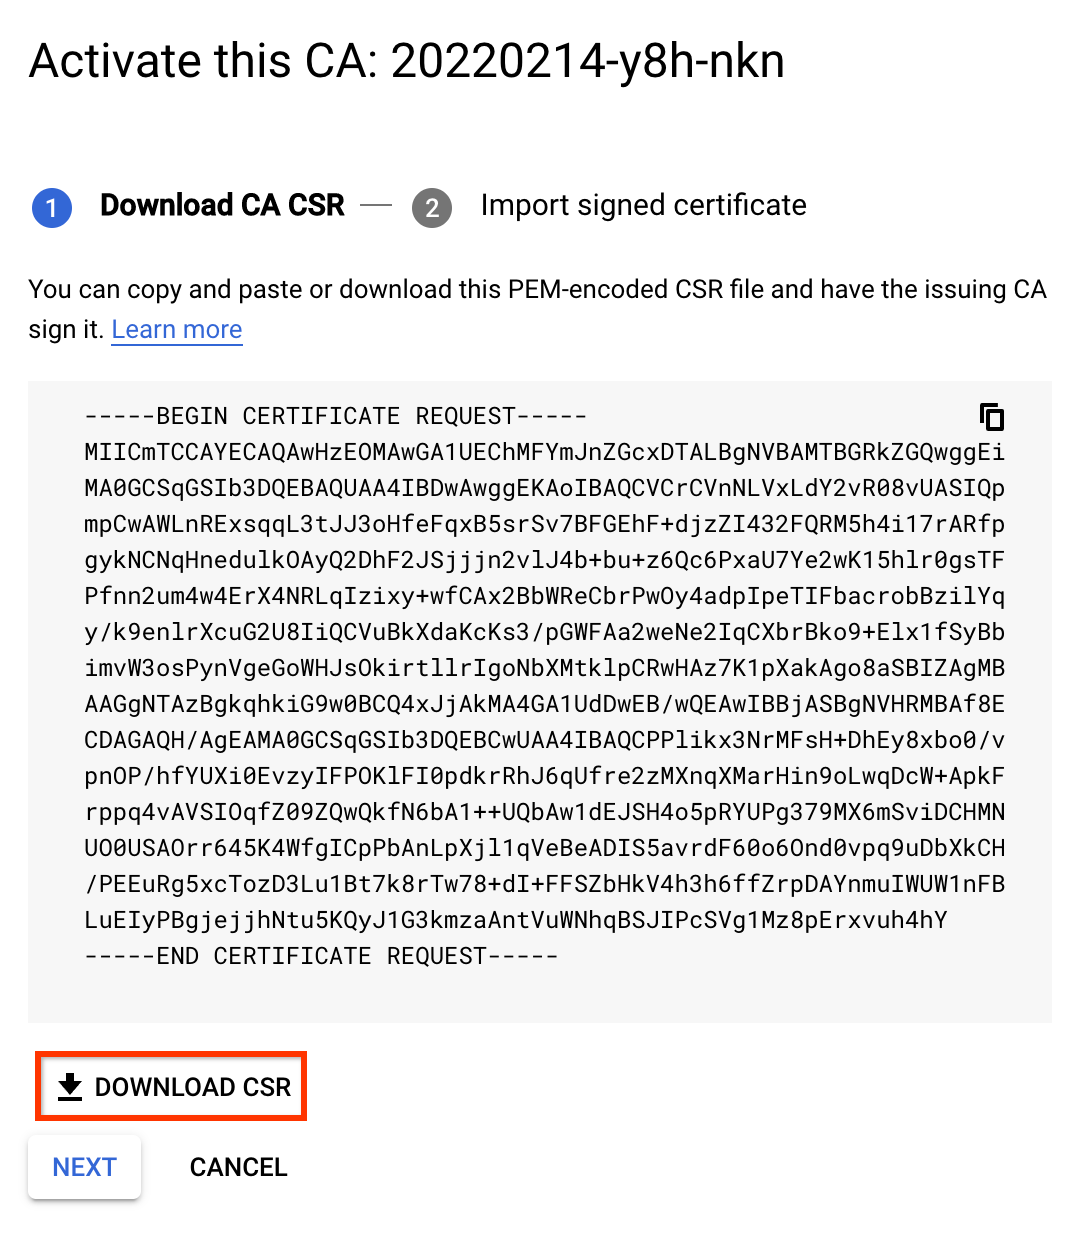
Download the CSR
- On the Certificate authority page, select the CA you want to activate.
- Click Activate.
In the dialog that opens, click Download CSR.
gcloud
To create a CA pool for the subordinate CA, run the following command. For more information, see Create a CA pool.
gcloud privateca pools create SUBORDINATE_POOL_ID --location=LOCATIONReplace the following:
- SUBORDINATE_POOL_ID: the name of the CA pool
- LOCATION: the location of the CA pool
To create a subordinate CA in the created CA pool, run the following
gcloudcommand. Thegcloudcommand also creates a CSR and saves it to the FILE_NAME file.gcloud privateca subordinates create SUBORDINATE_CA_ID \ --pool=SUBORDINATE_POOL_ID \ --location=LOCATION \ --create-csr --csr-output-file=FILE_NAME \ --key-algorithm="ec-p256-sha256" \ --subject="CN=Example Server TLS CA, O=Example LLC"Replace the following:
- SUBORDINATE_CA_ID: the unique identifier of the subordinate CA
- SUBORDINATE_POOL_ID: the name of the CA pool
- LOCATION: the location of the CA pool
- FILE_NAME: the name of the file where the PEM-encoded CSR is written
The
--key-algorithmflag specifies the cryptographic algorithm that you want to use for creating a managed Cloud HSM key for the CA.The
--subjectflag specifies the X.501 name of the certificate subject.For more information about the
gcloud privateca subordinates createcommand, see gcloud privateca subordinates create.To create a subordinate CA using a customer-managed signing key, run the following command:
  gcloud privateca subordinates create SUBORDINATE_CA_ID \
      --pool=SUBORDINATE_POOL_ID \
      --location=LOCATION \
      --create-csr --csr-output-file=FILE_NAME \
      --kms-key-version=KMS_KEY_VERSION \
      --subject="CN=Example Server TLS CA, O=Example LLC"
Replace the following:
- SUBORDINATE_CA_ID: the unique identifier of the subordinate CA
- SUBORDINATE_POOL_ID: the name of the CA pool
- LOCATION: the location of the CA pool
- FILE_NAME: the name of the file where the PEM-encoded CSR is written
- KMS_KEY_VERSION: the full resource ID of a customer-managed Cloud KMS crypto key version to use as the signing key
For more details on signing key options and preparing a customer-managed signing key, see Configure CA signing keys.
The following statement is returned when the CSR is created:
Created Certificate Authority [projects/my-project-pki/locations/us-west1/caPools/SUBORDINATE_POOL_ID/certificateAuthorities/SUBORDINATE_CA_ID] and saved CSR to FILE_NAME.
To see the exhaustive list of available settings, run the following command:
gcloud privateca subordinates create --help
If you lose the CSR, you can download it again using the following command:
gcloud privateca subordinates get-csr SUBORDINATE_CA_ID \
    --pool=SUBORDINATE_POOL_ID \
    --location=LOCATION
Terraform
To create a CA pool and a subordinate CA in that CA pool, use the following configuration file:
resource "google_privateca_ca_pool" "default" {
  name     = "test-ca-pool"
  location = "us-central1"
  tier     = "ENTERPRISE"
}

resource "google_privateca_certificate_authority" "sub-ca" {
  pool = google_privateca_ca_pool.default.name
  certificate_authority_id = "my-certificate-authority-sub"
  location = "us-central1"
  config {
    subject_config {
      subject {
        organization = "HashiCorp"
        common_name = "my-subordinate-authority"
      }
      subject_alt_name {
        dns_names = ["hashicorp.com"]
      }
    }
    x509_config {
      ca_options {
        is_ca = true
        # Force the sub CA to only issue leaf certs
        max_issuer_path_length = 0
      }
      key_usage {
        base_key_usage {
          cert_sign = true
          crl_sign = true
        }
        extended_key_usage {
        }
     }
   }
  }
  lifetime = "86400s"
  key_spec {
    algorithm = "RSA_PKCS1_4096_SHA256"
  }
  type = "SUBORDINATE"
}
To fetch the CSR, append the following configuration.
data "google_privateca_certificate_authority" "sub-ca-csr" {
  location = "us-central1"
  pool = google_privateca_ca_pool.default.name
  certificate_authority_id = google_privateca_certificate_authority.sub-ca.certificate_authority_id
}

output "csr" {
  value = data.google_privateca_certificate_authority.sub-ca-csr.pem_csr
}
Run
terraform apply.
Sign the CSR
Pass the generated CSR file to the member of your organization responsible for certificate issuance, and request that they sign it. The specific steps depend on your organization's setup.
You can experiment with a simple root CA using the following openssl commands:
Shell
Configure settings for the new root CA.
cat > root.conf <<- EOM
[ req ]
distinguished_name = req_distinguished_name
x509_extensions    = v3_ca
prompt             = no
[ req_distinguished_name ]
commonName = Sample Root
[ v3_ca ]
subjectKeyIdentifier=hash
basicConstraints=critical, CA:true
EOM
Create the new root CA.
openssl req -x509 -new -nodes -config root.conf -keyout rootCA.key \
  -days 3000 -out rootCA.crt -batch
Configure the extensions that must be added to the new subordinate CA certificate.
cat > extensions.conf <<- EOM
basicConstraints=critical,CA:TRUE,pathlen:0
keyUsage=critical,keyCertSign,cRLSign
extendedKeyUsage=critical,serverAuth
subjectKeyIdentifier=hash
authorityKeyIdentifier=keyid
EOM
Sign the subordinate CA's CSR with this root.
openssl x509 -req -in FILE_NAME -CA rootCA.crt -CAkey rootCA.key \
  -CAcreateserial -out subordinate.crt -days 1095 -sha256 -extfile extensions.conf
Concatenate the entire certificate chain into a single file.
cat subordinate.crt > chain.crt
cat rootCA.crt >> chain.crt
Upload the signed certificate
To activate a subordinate CA using a signed certificate, do the following:
Console
Go to the Certificate Authority Service page in the Google Cloud console.
Click the CA manager tab.
Under Certificate authorities, choose the subordinate CA that you created.
Click Activate.
In the dialog that opens, click Download CSR to download the PEM-encoded CSR file that the issuing CA can sign.
Click Next.
In the Upload Certificate Chain field, click Browse.
Upload the signed certificate file with
.crtextension.Click Activate.
gcloud
gcloud privateca subordinates activate SUBORDINATE_CA_ID \
    --pool=SUBORDINATE_POOL_ID \
    --location=LOCATION \
    --pem-chain ./chain.crt
Replace the following:
- SUBORDINATE_CA_ID: the unique identifier of the subordinate CA that you want to activate
- SUBORDINATE_POOL_ID: the name of the CA pool that contains the subordinate CA
- LOCATION: the location of the CA pool. For the complete list of locations, see Locations.
The --pem-chain flag is required. This flag specifies a file that contains the list of PEM-encoded certificates. The list of certificates starts with the current CA certificate and ends with the root CA certificate.
For more information about the gcloud privateca subordinates activate command, see gcloud privateca subordinates activate.
The following statement is returned when the signed certificate is uploaded:
Activated certificate authority [SUBORDINATE_CA_ID].
Terraform
- Save the signed CA certificate locally as
subordinate.crt. - Save the signer CA certificates locally as
rootCA.crt. - Remove the configuration for fetching CSR mentioned in the first step as it tries to fetch CSR which is not allowed after CA activation.
Update the subordinate CA configuration with the following fields and run
terraform apply.pem_ca_certificate = file("subordinate.crt") subordinate_config { pem_issuer_chain { pem_certificates = [file("rootCA.crt")] } }
If the issuer chain includes more than one CA, specify the value as
[file("intermediateCA.cert"), file("rootCA.crt")].
What's next
- Learn how to request certificates.
- Learn about templates and issuance policies.