


Cloud Workstations を使用すると、ワークステーション用のカスタム イメージを作成して使用できます。カスタム イメージの使用を開始したら、カスタム イメージの再ビルドを自動化して、ベースイメージで利用可能な修正や更新を pull すると便利です。
このチュートリアルでは、カスタム ワークステーション イメージにセキュリティに関するアップデートとパッチを確実に適用するための、自動パイプラインを構築する方法を説明します。
目標
このチュートリアルでは、次の手順でベースイメージの自動化されたパイプラインを構築します。
- カスタム イメージを保存してスキャンするための Artifact Registry リポジトリを作成します。
- イメージ構成を保存するように Google Cloud で GitHub を構成します。
- Cloud Build ビルドトリガーを作成して、カスタム イメージの作成と Artifact Registry へのデプロイを自動化する。
- Cloud Scheduler を構成して、ビルドを定期的に開始する。
- 自動化されたプロセスの結果を確認します。
費用
このドキュメントでは、課金対象である次の Google Cloudコンポーネントを使用します。
料金計算ツールを使うと、予想使用量に基づいて費用の見積もりを生成できます。
このドキュメントに記載されているタスクの完了後、作成したリソースを削除すると、それ以上の請求は発生しません。詳細については、クリーンアップをご覧ください。
始める前に
- Google Cloud アカウントにログインします。 Google Cloudを初めて使用する場合は、 アカウントを作成して、実際のシナリオで Google プロダクトのパフォーマンスを評価してください。新規のお客様には、ワークロードの実行、テスト、デプロイができる無料クレジット $300 分を差し上げます。
-
In the Google Cloud console, on the project selector page, select or create a Google Cloud project.
Roles required to select or create a project
- Select a project: Selecting a project doesn't require a specific IAM role—you can select any project that you've been granted a role on.
-
Create a project: To create a project, you need the Project Creator role
(
roles/resourcemanager.projectCreator), which contains theresourcemanager.projects.createpermission. Learn how to grant roles.
-
Verify that billing is enabled for your Google Cloud project.
Enable the Artifact Registry, Container Scanning API, Cloud Build, and Cloud Scheduler APIs, if any are not already enabled.
Roles required to enable APIs
To enable APIs, you need the
serviceusage.services.enablepermission. If you created the project, then you likely already have this permission through the Owner role (roles/owner). Otherwise, you can get this permission through the Service Usage Admin role (roles/serviceusage.serviceUsageAdmin). Learn how to grant roles.-
Install the Google Cloud CLI.
-
If you're using an external identity provider (IdP), you must first sign in to the
gcloudCLI with your federated identity. -
To initialize the
gcloudCLI, run the following command:gcloud init -
In the Google Cloud console, on the project selector page, select or create a Google Cloud project.
Roles required to select or create a project
- Select a project: Selecting a project doesn't require a specific IAM role—you can select any project that you've been granted a role on.
-
Create a project: To create a project, you need the Project Creator role
(
roles/resourcemanager.projectCreator), which contains theresourcemanager.projects.createpermission. Learn how to grant roles.
-
Verify that billing is enabled for your Google Cloud project.
Enable the Artifact Registry, Container Scanning API, Cloud Build, and Cloud Scheduler APIs, if any are not already enabled.
Roles required to enable APIs
To enable APIs, you need the
serviceusage.services.enablepermission. If you created the project, then you likely already have this permission through the Owner role (roles/owner). Otherwise, you can get this permission through the Service Usage Admin role (roles/serviceusage.serviceUsageAdmin). Learn how to grant roles.-
Install the Google Cloud CLI.
-
If you're using an external identity provider (IdP), you must first sign in to the
gcloudCLI with your federated identity. -
To initialize the
gcloudCLI, run the following command:gcloud init
環境を準備する
続行する前に、次の環境変数が設定されていることを確認してください。
使用するクラウド プロジェクトのプロジェクト ID を設定します。
PROJECT_ID=$PROJECT_IDリポジトリを保存する GitHub ユーザー名を設定します。
GITHUB_USER=$GITHUB_IDプロセス全体で使用する
PROJECT_NUMBER変数とREGION変数を設定します。PROJECT_NUMBER=$(gcloud projects describe $PROJECT_ID \ --format='value(projectNumber)') REGION=$REGION前の例で、$REGION は使用するリージョン名(例:
us-central1)に置き換えます。使用可能なリージョンの詳細については、Cloud Workstations のロケーションをご覧ください。
Artifact Registry リポジトリを作成する
このチュートリアルでは、Artifact Registry を使用してイメージを保存し、スキャンします。
次のコマンドを使用してリポジトリを作成します。
gcloud artifacts repositories create custom-images \
      --repository-format=docker \
      --location=$REGION \
      --description="Docker repository"
$REGION は、使用するリージョン名に置き換えます。
Artifact Registry にアクセスするときに
gcloudCLI 認証情報を使用するように Docker を構成します。gcloud auth configure-docker $REGION-docker.pkg.devArtifact Analysis を無効にするには、次のコマンドを実行します。
gcloud services disable containerscanning.googleapis.com
GitHub リポジトリを構成する
実際には、カスタム イメージの Dockerfile は Git リポジトリに保存します。自動化されたプロセスは、ビルドプロセス中にそのリポジトリにアクセスして、関連する構成と Dockerfile を pull します。
サンプル リポジトリをフォークする
コンテナ定義を指定するサンプル リポジトリをフォークする手順は次のとおりです。
- このリンクをクリックして、
software-delivery-workshopリポジトリの新しいフォークを作成します。 - プロンプトが表示されたら、GitHub にログインします。
- [Owner] で GitHub ユーザー名を選択します。リポジトリ名は
software-delivery-workshopとして表示されます。 - [フォークを作成] をクリックし、プロセスが完了するまで数秒待ちます。
Cloud Build を GitHub に接続する
次に、組み込みの GitHub 接続機能を使用して、そのリポジトリを Cloud Build に接続します。GitHub リポジトリへのリンクをクリックして、プロセスを完了する手順に従います。ウィザードの最後のステップでトリガーを作成する必要はありません。後でコマンドラインから行うことができるため、最後のステップはスキップできます。
別の Git リポジトリ ソリューションを使用する場合は、手順に沿って Cloud Build を GitLab に接続する、または Bitbucket に接続することもできます。
Cloud Build ビルドトリガーを作成する
サンプル リポジトリには、コンテナ イメージのビルドに使用されるコンテナ定義と Cloud Build 構成が含まれています。このステップでは、labs/cloudbuild-scheduled-jobs/code-oss-java フォルダの cloudbuild.yaml ファイルにある手順を実行する Cloud Build ビルドトリガーを作成します。
gcloud builds triggers create manual \
    --name=custom-image-trigger \
    --repo=$GITHUB_USER/software-delivery-workshop \
    --repo-type=GITHUB \
    --branch=main \
    --build-config=labs/cloudbuild-scheduled-jobs/code-oss-java/cloudbuild.yaml \
    --substitutions=_REGION=$REGION,_AR_REPO_NAME=custom-images,_AR_IMAGE_NAME=code-oss-java,_IMAGE_DIR=labs/cloudbuild-scheduled-jobs/code-oss-java

TRIGGER_ID=$(gcloud builds triggers list \
    --filter=name="custom-image-trigger" --format="value(id)")
この例では、次の構成を行います。
gcloudCLI コマンドによって、2 行目のnameフラグで示されているように、custom-image-triggerという名前の Cloud Build 内の手動トリガーが作成されます。- 次の 3 行には、ソース GitHub リポジトリに関連するフラグが含まれています。
- リポジトリへのパス
- リポジトリのタイプ
- ビルドする Git ブランチ
build-configフラグは、Git リポジトリ内の Cloud Build ファイルのパスを示します。ジョブを動的にするには、
substitutionsフラグを使用します。このジョブでは、コマンドは次の変数を渡します。- リージョン、
$_REGION - Artifact Registry リポジトリ名
$_AR_REPO_NAME - コンテナ イメージ名、
$_AR_IMAGE_NAME - ビルドする Dockerfile の場所、
$_IMAGE_DIR
cloudbuild.yaml ファイルを表示して、これらの変数がプロセスでどのように使用されているかを確認します。
- リージョン、
トリガーが作成されると、トリガーの一意の名前が取得され、後で使用できるように
$TRIGGER_ID環境変数に保存されます。
Cloud Scheduler を構成する
イメージが最新の更新とパッチで最新の状態に保たれるようにするには、Cloud Scheduler を使用して、設定された頻度で Cloud Build トリガーを実行します。このチュートリアルでは、ジョブは毎日実行されます。実際には、組織のニーズに合わせた頻度に設定して、最新の更新が常に含まれるようにします。
デフォルトのサービス アカウントに、Cloud Build トリガーを呼び出すために必要なロールを付与します。
gcloud projects add-iam-policy-binding $PROJECT_ID \
    --member="serviceAccount:$PROJECT_NUMBER-compute@developer.gserviceaccount.com" \
    --role="roles/cloudbuild.builds.editor"
Artifact Registry にイメージをアップロードするために必要なロールを Cloud Build サービス アカウントに付与します。
gcloud projects add-iam-policy-binding $PROJECT_ID \
    --member=serviceAccount:$PROJECT_NUMBER@cloudbuild.gserviceaccount.com \
    --role="roles/artifactregistry.admin"
次のコマンドを使用して Cloud Scheduler ジョブを作成します。
gcloud scheduler jobs create http run-build \
    --schedule='0 1 * * *' \
    --uri=https://cloudbuild.googleapis.com/v1/projects/$PROJECT_ID/locations/global/triggers/$TRIGGER_ID:run \
    --location=us-central1 \
    --oauth-service-account-email=$PROJECT_NUMBER-compute@developer.gserviceaccount.com \
    --oauth-token-scope=https://www.googleapis.com/auth/cloud-platform
ジョブは毎日 1 回実行されるように設定されていますが、この機能をすぐにテストするには、Cloud Scheduler からジョブを手動で実行します。
- Cloud Scheduler ページで、先ほど作成した「run-build」という名前のエントリを見つけます。
- [アクション] 列で、対象の行の more_vert [その他] オプション メニューをクリックします。
- [ジョブの実行を強制する] をクリックして、システムを手動でテストします。
コマンドが正常に実行されたら、Cloud Build の履歴ページに切り替えて進行状況を確認します。
結果を確認する
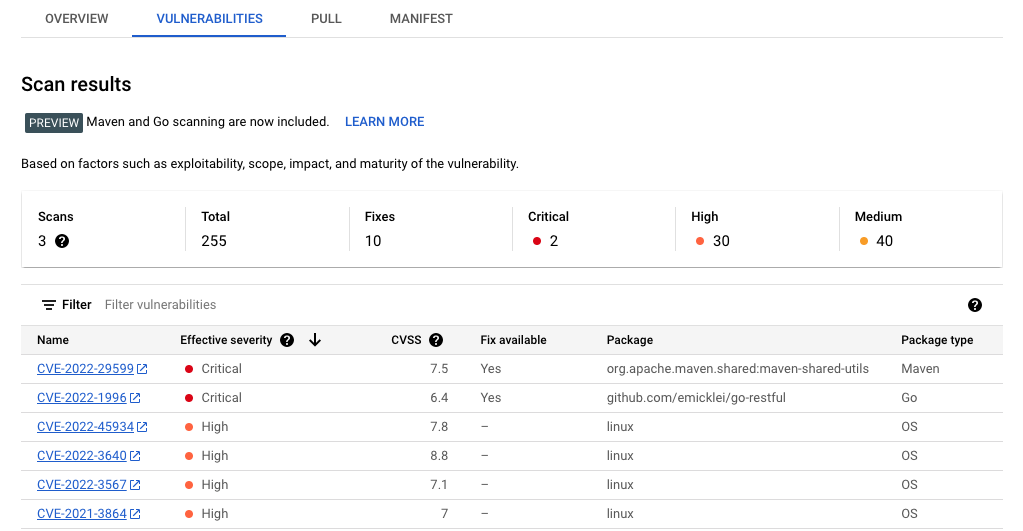
設定プロセスの一環として Container Scanning API を有効にしたため、Artifact Registry はセキュリティの脆弱性についてイメージを自動的にスキャンします。
脆弱性を確認するには:
Artifact Registry の [リポジトリ] ページを開きます。
リポジトリ リストで、リポジトリをクリックします。
イメージ名をクリックします。各イメージ ダイジェストの脆弱性の総数が、[脆弱性] 列に表示されます。

イメージで検出された脆弱性の一覧を表示するには、[脆弱性] 列のリンクをクリックします。脆弱性リストには、重大度、修正プログラムが入手可能かどうか、脆弱性が存在するパッケージの名前が表示されます。
クリーンアップ
このチュートリアルで使用したリソースについて、Google Cloud アカウントに課金されないようにするには、リソースを含むプロジェクトを削除するか、プロジェクトを維持して個々のリソースを削除します。
このページで使用したリソースについて、 Google Cloud アカウントに課金されないようにするには、不要になったリソースを忘れずに削除してください。
Google Cloud コンソールまたは gcloud CLI から Google Cloud プロジェクトを削除するには:
コンソール
- Google Cloud コンソールで [リソースの管理] ページに移動します。
- プロジェクト リストで、削除するプロジェクトを選択し、[削除] をクリックします。
- ダイアログでプロジェクト ID を入力し、[シャットダウン] をクリックしてプロジェクトを削除します。
gcloud
Google Cloud プロジェクトを削除する:
gcloud projects delete PROJECT_ID
次のステップ
- 使用可能な事前構成されたベースイメージのリストを確認する。
- コンテナ イメージをカスタマイズする。
- 使用可能なマシンタイプを確認する。
- セキュリティのベスト プラクティスを設定する。
- Google Cloud に関するリファレンス アーキテクチャ、図、ベスト プラクティスを確認する。Cloud アーキテクチャ センターをご覧ください。