
Membuat instance notebook terkelola menggunakan Google Cloud konsol
Pelajari cara membuat instance notebook terkelola Vertex AI Workbench dan membuka JupyterLab menggunakan Google Cloud konsol. Halaman ini juga menjelaskan cara menghentikan, memulai, mereset, atau menghapus instance notebook terkelola.
Sebelum memulai
- Sign in to your Google Cloud account. If you're new to Google Cloud, create an account to evaluate how our products perform in real-world scenarios. New customers also get $300 in free credits to run, test, and deploy workloads.
-
In the Google Cloud console, on the project selector page, select or create a Google Cloud project.
Roles required to select or create a project
- Select a project: Selecting a project doesn't require a specific IAM role—you can select any project that you've been granted a role on.
-
Create a project: To create a project, you need the Project Creator role
(
roles/resourcemanager.projectCreator), which contains theresourcemanager.projects.createpermission. Learn how to grant roles.
-
Verify that billing is enabled for your Google Cloud project.
-
Enable the Notebooks API.
Roles required to enable APIs
To enable APIs, you need the Service Usage Admin IAM role (
roles/serviceusage.serviceUsageAdmin), which contains theserviceusage.services.enablepermission. Learn how to grant roles. -
In the Google Cloud console, on the project selector page, select or create a Google Cloud project.
Roles required to select or create a project
- Select a project: Selecting a project doesn't require a specific IAM role—you can select any project that you've been granted a role on.
-
Create a project: To create a project, you need the Project Creator role
(
roles/resourcemanager.projectCreator), which contains theresourcemanager.projects.createpermission. Learn how to grant roles.
-
Verify that billing is enabled for your Google Cloud project.
-
Enable the Notebooks API.
Roles required to enable APIs
To enable APIs, you need the Service Usage Admin IAM role (
roles/serviceusage.serviceUsageAdmin), which contains theserviceusage.services.enablepermission. Learn how to grant roles. Di konsol Google Cloud , buka halaman Managed notebooks.
Klik Buat baru.
Di jendela Create instance, di kolom Name, masukkan
my-instance.Klik Create.
Di samping nama instance notebook terkelola, klik Open JupyterLab.
Pada dialog Authenticate your managed notebook, klik tombol untuk mendapatkan kode autentikasi.
Pilih akun, lalu klik Allow. Salin kode autentikasi.
Pada dialog Authenticate your Managed notebook, tempel kode autentikasi, lalu klik Authentication.
Instance notebook terkelola Anda akan membuka JupyterLab.
Pilih File > New > Notebook.
Dalam dialog Select kernel, pilih Python, lalu klik Select.
File notebook baru akan terbuka.
Di JupyterLab, pada menu Kernel, klik Change kernel.
Pada dialog Select kernel, pilih kernel lain untuk digunakan.
Klik Select.
Di file notebook JupyterLab Anda, klik nama kernel.

Pada dialog Select kernel, pilih kernel lain untuk digunakan.
Klik Select.
Di konsol Google Cloud , buka halaman Managed notebooks.
Pilih instance yang ingin Anda hentikan.
Klik Stop.
Di konsol Google Cloud , buka halaman Managed notebooks.
Pilih instance yang ingin Anda mulai.
Klik Start.
Di konsol Google Cloud , buka halaman Managed notebooks.
Pilih instance yang ingin Anda reset.
Klik Reset, lalu klik Reset untuk mengonfirmasi.
Di konsol Google Cloud , buka halaman Managed notebooks.
Pilih baris yang berisi instance yang ingin dihapus.
Klik Delete. (Bergantung pada ukuran jendela, tombol Delete mungkin ada di menu opsi .)
Untuk mengonfirmasi, klik Delete.
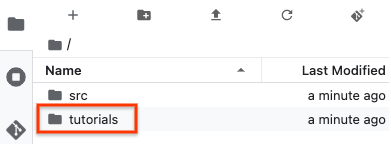
Coba salah satu tutorial yang disertakan dalam instance notebook terkelola Anda yang baru. Di JupyterLab File Browser, buka folder tutorials, dan buka salah satu file notebook.
Membuat instance
Setelah menyelesaikan tugas yang dijelaskan dalam dokumen ini, Anda dapat menghindari penagihan berkelanjutan dengan menghapus resource yang Anda buat. Untuk mengetahui informasi selengkapnya, lihat Pembersihan.
Buka JupyterLab
Setelah Anda membuat instance, Vertex AI Workbench akan otomatis memulai instance tersebut. Saat instance siap digunakan, Vertex AI Workbench akan mengaktifkan link Open JupyterLab.
Membuka file notebook baru
Mengubah kernel
Anda dapat mengubah kernel file notebook JupyterLab dari menu atau dalam file.
Menu
Di dalam file
Menghentikan instance
Memulai instance
Mereset instance
Mereset instance akan menghapus total isi memori instance Anda secara paksa dan mereset instance ke status awal. Untuk mempelajari lebih lanjut cara kerja mereset instance, lihat Mereset instance.
 Reset, lalu klik Reset untuk mengonfirmasi.
Pembersihan
Agar akun Google Cloud Anda tidak dikenai biaya untuk resource yang digunakan pada halaman ini, ikuti langkah-langkah berikut.
Jika Anda membuat project baru untuk mempelajari notebook terkelola Vertex AI Workbench dan Anda tidak lagi memerlukan project tersebut, hapus project tersebut.
Jika Anda menggunakan project Google Cloud yang sudah ada, hapus resource yang Anda buat untuk menghindari timbulnya biaya pada akun Anda: