
Vertex AI 上的 NVIDIA Triton
Vertex AI 支持在 NVIDIA GPU Cloud (NGC)(即 NVIDIA Triton 推理服务器映像)发布的自定义容器上运行的 Triton 推理服务器上部署模型。NVIDIA 提供的 Triton 映像包含满足自定义服务容器映像的 Vertex AI 要求所需的所有软件包和配置。该映像包含支持 TensorFlow、PyTorch、TensorRT、ONNX 和 OpenVINO 模型的 Triton 推断服务器。该映像还包含支持运行 XGBoost、LightGBM 和 Scikit-Learn 等机器学习框架的 FIL (Forest Inference Library) 后端。
Triton 会加载模型并公开使用标准推断协议的推断、运行状况和模型管理 REST 端点。在将模型部署到 Vertex AI 时,Triton 可识别 Vertex AI 环境并采用 Vertex AI Inference 协议来处理健康检查和推理请求。
以下列表简要介绍了 NVIDIA Triton 推断服务器的主要功能和用例:
- 支持多个深度学习和机器学习框架:Triton 支持部署多个模型并支持以下混合框架和模型格式 - TensorFlow(SavedModel 和 GraphDef)、PyTorch (TorchScript)、TensorRT、ONNX、OpenVINO 和 FIL 后端,以支持 XGBoost、LightGBM、Scikit-Learn 等框架以及任何自定义 Python 或 C++ 模型格式。
- 并发执行多个模型:Triton 允许在同一计算资源上使用零个或更多个 GPU 并发执行多个模型、同一模型的多个实例,或者两者。
- 模型集成学习(链式或流水线):Triton 集成学习支持将多个模型组成流水线(或组成 DAG,即有向无环图)的使用场景,这些模型之间具有连接起来的输入和输出张量。此外,借助 Triton Python 后端,您可以添加通过业务逻辑脚本 (BLS) 定义的任何预处理、后处理或控制流逻辑。
- 在 CPU 和 GPU 后端上运行:Triton 支持对在具有 CPU 和 GPU 的节点上部署的模型进行推断。
- 对推理请求进行动态批处理:对于支持批处理的模型,Triton 提供内置的调度和批处理算法。这些算法在服务器端动态地将各个推断请求进行批量合并,以改进推断吞吐量并提高 GPU 利用率。
如需详细了解 NVIDIA Triton 推断服务器,请参阅 Triton 文档。
可用的 NVIDIA Triton 容器映像
下表显示了 NVIDIA NGC 目录上可用的 Triton Docker 映像。根据您使用的模型框架、后端和容器映像大小选择映像。
xx 和 yy 分别表示 Triton 的主要版本和次要版本。
| NVIDIA Triton 映像 | 支持 |
|---|---|
xx.yy-py3 |
支持 TensorFlow、PyTorch、TensorRT、ONNX 和 OpenVINO 模型的完整容器 |
xx.yy-pyt-python-py3 |
仅限 PyTorch 和 Python 后端 |
xx.yy-tf2-python-py3 |
仅限 TensorFlow 2.x 和 Python 后端 |
xx.yy-py3-min |
根据需要自定义 Triton 容器 |
使用入门:使用 NVIDIA Triton 进行推理
下图显示了 Vertex AI Inference 上的 Triton 的简要架构:
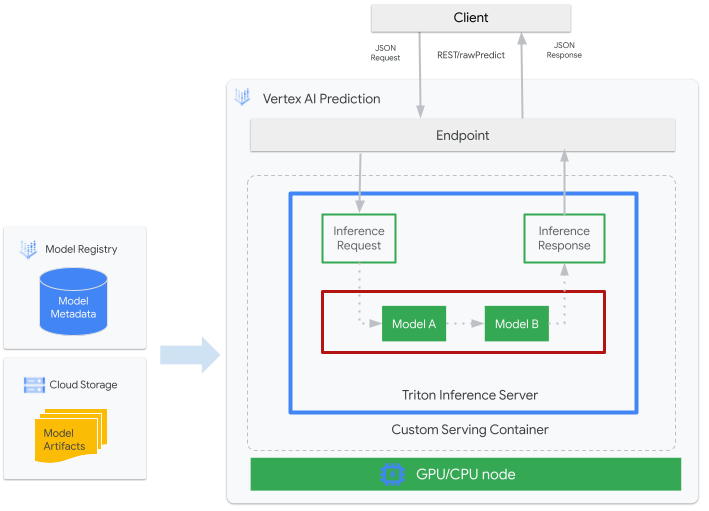
- 您需要向 Vertex AI Model Registry 注册将由 Triton 处理的机器学习模型。该模型的元数据会引用模型工件在 Cloud Storage 中的位置以及自定义服务容器及其配置。
- Vertex AI Model Registry 中的模型会部署到 Vertex AI Inference 端点,该端点将 Triton 推理服务器作为具有 CPU 和 GPU 的计算节点上的自定义容器运行。
- 推理请求通过 Vertex AI Inference 端点到达 Triton 推理服务器,并被路由到相应的调度器。
- 后端会使用批处理请求中提供的输入来执行推断并返回响应。
- Triton 提供就绪性和活跃性状况端点,使 Triton 能够集成到 Vertex AI 等部署环境中。
本教程介绍如何使用运行 NVIDIA Triton 推理服务器的自定义容器来在 Vertex AI 上部署机器学习模型,以进行在线推理。您将部署运行 Triton 的容器,以通过 TensorFlow Hub 提供的对象检测模型进行推理,该对象检测模型已在 COCO 2017 数据集上进行预训练。然后,您可以使用 Vertex AI 检测图片中的对象。
如需以笔记本形式运行本教程,请执行以下操作:
在 Colab 中打开 | 在 Colab Enterprise 中打开 | 在 GitHub 上查看 | 在 Vertex AI Workbench 中打开 |准备工作
- Sign in to your Google Cloud account. If you're new to Google Cloud, create an account to evaluate how our products perform in real-world scenarios. New customers also get $300 in free credits to run, test, and deploy workloads.
-
In the Google Cloud console, on the project selector page, select or create a Google Cloud project.
Roles required to select or create a project
- Select a project: Selecting a project doesn't require a specific IAM role—you can select any project that you've been granted a role on.
-
Create a project: To create a project, you need the Project Creator role
(
roles/resourcemanager.projectCreator), which contains theresourcemanager.projects.createpermission. Learn how to grant roles.
-
Verify that billing is enabled for your Google Cloud project.
-
Enable the Vertex AI API and Artifact Registry API APIs.
Roles required to enable APIs
To enable APIs, you need the Service Usage Admin IAM role (
roles/serviceusage.serviceUsageAdmin), which contains theserviceusage.services.enablepermission. Learn how to grant roles. -
In the Google Cloud console, activate Cloud Shell.
At the bottom of the Google Cloud console, a Cloud Shell session starts and displays a command-line prompt. Cloud Shell is a shell environment with the Google Cloud CLI already installed and with values already set for your current project. It can take a few seconds for the session to initialize.
-
Install the Google Cloud CLI.
-
If you're using an external identity provider (IdP), you must first sign in to the gcloud CLI with your federated identity.
-
To initialize the gcloud CLI, run the following command:
gcloud init - 按照 Artifact Registry 文档安装 Docker。
- LOCATION_ID:您的 Artifact Registry 代码库的区域,如前面的部分中所述
- PROJECT_ID:您的Google Cloud 项目的ID
如需在本地运行容器映像,请在 shell 中运行以下命令:
docker run -t -d -p 8000:8000 --rm \ --name=local_object_detector \ -e AIP_MODE=True \ LOCATION_ID-docker.pkg.dev/PROJECT_ID/getting-started-nvidia-triton/vertex-triton-inference \ --model-repository MODEL_ARTIFACTS_REPOSITORY \ --strict-model-config=false如上一节所述,替换以下内容:
- LOCATION_ID:您的 Artifact Registry 代码库的地区,如上一部分中所指定
- PROJECT_ID:您的Google Cloud 项目的ID
- MODEL_ARTIFACTS_REPOSITORY:模型制品所在的 Cloud Storage 路径。
此命令会以分离模式运行容器,将容器的端口
8000映射到本地环境的端口8000。NGC 提供的 Triton 映像会将 Triton 配置为使用端口8000。如需向容器的服务器发送健康检查,请在 shell 中运行以下命令:
curl -s -o /dev/null -w "%{http_code}" http://localhost:8000/v2/health/ready如果成功,服务器将返回状态代码
200。运行以下命令,以使用之前生成的载荷向容器的服务器发送推理请求并获取推理响应:
curl -X POST \ -H "Content-Type: application/json" \ -d @instances.json \ localhost:8000/v2/models/object_detector/infer | jq -c '.outputs[] | select(.name == "detection_classes")'此请求会使用 TensorFlow 对象检测示例随附的其中一个测试映像。
如果成功,则服务器会返回以下推理:
{"name":"detection_classes","datatype":"FP32","shape":[1,300],"data":[38,1,...,44]}如需停止容器,请在 shell 中运行以下命令:
docker stop local_object_detector如需向本地 Docker 安装授予推送到所选地区中 Artifact Registry 的权限,请在 shell 中运行以下命令:
gcloud auth configure-docker LOCATION_ID-docker.pkg.dev- 将 LOCATION_ID 替换为您在上一部分中创建了代码库的地区。
如需将您刚刚构建的容器映像推送到 Artifact Registry,请在 shell 中运行以下命令:
docker push LOCATION_ID-docker.pkg.dev/PROJECT_ID/getting-started-nvidia-triton/vertex-triton-inference如上一节所述,替换以下内容:
- LOCATION_ID:您的 Artifact Registry 代码库的地区,如上一部分中所指定
- PROJECT_ID:您的Google Cloud 项目的ID。
- LOCATION_ID:您在其中使用 Vertex AI 的区域。
- PROJECT_ID:您的Google Cloud 项目的ID
-
DEPLOYED_MODEL_NAME:
DeployedModel的名称。您还可以将Model的显示名用于DeployedModel。 - LOCATION_ID:您在其中使用 Vertex AI 的区域。
- ENDPOINT_NAME:端点的显示名称。
- LOCATION_ID:您在其中使用 Vertex AI 的区域。
- ENDPOINT_NAME:端点的显示名称。
-
DEPLOYED_MODEL_NAME:
DeployedModel的名称。您还可以将Model的显示名用于DeployedModel。 -
MACHINE_TYPE:可选。用于此部署的每个节点的机器资源。其默认设置为
n1-standard-2。详细了解机器类型。 - MIN_REPLICA_COUNT:此部署的最小节点数。 节点数可根据推理负载的需要而增加或减少,直至达到节点数上限并且绝不会少于此节点数。
- MAX_REPLICA_COUNT:此部署的节点数上限。 节点数可根据推理负载的需要而增加或减少,直至达到此节点数并且绝不会少于节点数下限。
ACCELERATOR_COUNT:要连接到运行作业的每台机器的加速器数量。通常为 1。如果未指定该值,则默认值为 1。
ACCELERATOR_TYPE:管理 GPU 的加速器配置。部署使用 Compute Engine 机器类型的模型时,您也可以选择 GPU 加速器,并且必须指定其类型。选项包括
nvidia-tesla-a100、nvidia-tesla-p100、nvidia-tesla-p4、nvidia-tesla-t4和nvidia-tesla-v100。- LOCATION_ID:您在其中使用 Vertex AI 的区域。
- ENDPOINT_NAME:端点的显示名称。
如需从端点取消部署模型并删除端点,请在 shell 中运行以下命令:
ENDPOINT_ID=$(gcloud ai endpoints list \ --region=LOCATION_ID \ --filter=display_name=ENDPOINT_NAME \ --format="value(name)") DEPLOYED_MODEL_ID=$(gcloud ai endpoints describe $ENDPOINT_ID \ --region=LOCATION_ID \ --format="value(deployedModels.id)") gcloud ai endpoints undeploy-model $ENDPOINT_ID \ --region=LOCATION_ID \ --deployed-model-id=$DEPLOYED_MODEL_ID gcloud ai endpoints delete $ENDPOINT_ID \ --region=LOCATION_ID \ --quiet将 LOCATION_ID 替换为您在上一部分中创建了模型的地区。
如需删除模型,请在 shell 中运行以下命令:
MODEL_ID=$(gcloud ai models list \ --region=LOCATION_ID \ --filter=display_name=DEPLOYED_MODEL_NAME \ --format="value(name)") gcloud ai models delete $MODEL_ID \ --region=LOCATION_ID \ --quiet将 LOCATION_ID 替换为您在上一部分中创建了模型的地区。
如需删除 Artifact Registry 代码库和容器映像,请在 shell 中运行以下命令:
gcloud artifacts repositories delete getting-started-nvidia-triton \ --location=LOCATION_ID \ --quiet将 LOCATION_ID 替换为您在上一部分中创建了 Artifact Registry 代码库的地区。
- Triton 自定义容器与 Vertex Explainable AI 和 Vertex AI 模型监控均不兼容。
- 如需详细了解在 Vertex AI 上使用 NVIDIA Triton 推理服务器进行部署的模式,请参阅 NVIDIA Triton 笔记本教程。
在本教程中,我们建议您使用 Cloud Shell 与 Google Cloud进行互动。如果您想使用其他 Bash shell 取代 Cloud Shell,请执行以下额外的配置:
构建并推送容器映像
如需使用自定义容器,您必须指定符合自定义容器要求的 Docker 容器映像。本部分将介绍如何创建容器映像并将其推送到 Artifact Registry。
下载模型工件
模型制品是机器学习训练创建的文件,可用于提供推理服务。它们至少包含经过训练的机器学习模型的结构和权重。模型工件的格式取决于您用于训练的机器学习框架。
在本教程中,您将从 TensorFlow Hub 下载已在 COCO 2017 数据集上经过训练的对象检测模型,而不是从头开始训练模型。Triton 要求将模型代码库按以下结构整理,以提供 TensorFlow SavedModel 格式:
└── model-repository-path
       └── model_name
              ├── config.pbtxt
              └── 1
                  └── model.savedmodel
                        └── <saved-model-files>
config.pbtxt 文件描述了模型的模型配置。默认情况下,您必须提供包含所需设置的模型配置文件。但是,如果 Triton 使用 --strict-model-config=false 选项启动,则在某些情况下,Triton 可以自动生成模型配置,而无需您明确提供。具体来说,TensorRT、TensorFlow SavedModel 和 ONNX 模型不需要模型配置文件,因为 Triton 可以自动派生所有必需的设置。所有其他模型类型必须提供模型配置文件。
# Download and organize model artifacts according to the Triton model repository spec
mkdir -p models/object_detector/1/model.savedmodel/
curl -L "https://tfhub.dev/tensorflow/faster_rcnn/resnet101_v1_640x640/1?tf-hub-format=compressed" | \
    tar -zxvC ./models/object_detector/1/model.savedmodel/
ls -ltr ./models/object_detector/1/model.savedmodel/
在本地下载模型后,模型代码库将整理如下:
./models
└── object_detector
    └── 1
        └── model.savedmodel
            ├── saved_model.pb
            └── variables
                ├── variables.data-00000-of-00001
                └── variables.index
将模型工件复制到 Cloud Storage 存储桶
下载的模型工件(包括模型配置文件)会被推送到 MODEL_ARTIFACTS_REPOSITORY 指定的 Cloud Storage 存储桶,您可以在创建 Vertex AI 模型资源时使用这些工件。
gcloud storage cp ./models/object_detector MODEL_ARTIFACTS_REPOSITORY/ --recursive
创建 Artifact Registry 仓库
创建 Artifact Registry 仓库以存储您将在下一部分中创建的容器映像。
为您的项目启用 Artifact Registry API 服务。
gcloud services enable artifactregistry.googleapis.com
在 shell 中运行以下命令以创建 Artifact Registry 代码库:
gcloud artifacts repositories create getting-started-nvidia-triton \
    --repository-format=docker \
    --location=LOCATION_ID \
    --description="NVIDIA Triton Docker repository"
将 LOCATION_ID 替换为 Artifact Registry 存储容器映像的区域。稍后,您必须在与此区域匹配的位置端点创建 Vertex AI 模型资源,因此请选择 Vertex AI 在其中具有位置端点的区域,例如 us-central1。
完成此操作后,该命令将输出以下内容:
Created repository [getting-started-nvidia-triton].
构建容器映像
NVIDIA 提供 Docker 映像,用于构建运行 Triton 并符合 Vertex AI 自定义容器要求的容器映像。您可以使用 docker 拉取映像,并标记映像将被推送到的 Artifact Registry 路径。
NGC_TRITON_IMAGE_URI="nvcr.io/nvidia/tritonserver:22.01-py3"
docker pull $NGC_TRITON_IMAGE_URI
docker tag $NGC_TRITON_IMAGE_URI LOCATION_ID-docker.pkg.dev/PROJECT_ID/getting-started-nvidia-triton/vertex-triton-inference
替换以下内容:
该命令可能会运行几分钟。
准备载荷文件,以便测试推理请求
如需向容器的服务器发送推理请求,请通过一个使用 Python 的示例映像文件准备载荷。运行以下 Python 脚本以生成载荷文件:
import json
import requests

# install required packages before running
# pip install pillow numpy --upgrade
from PIL import Image
import numpy as np

# method to generate payload from image url
def generate_payload(image_url):
    # download image from url and resize
    image_inputs = Image.open(requests.get(image_url, stream=True).raw)
    image_inputs = image_inputs.resize((200, 200))

    # convert image to numpy array
    image_tensor = np.asarray(image_inputs)
    # derive image shape
    image_shape = [1] + list(image_tensor.shape)

    # create payload request
    payload = {
        "id": "0",
        "inputs": [
            {
                "name": "input_tensor",
                "shape": image_shape,
                "datatype": "UINT8",
                "parameters": {},
                "data": image_tensor.tolist(),
            }
        ],
    }

    # save payload as json file
    payload_file = "instances.json"
    with open(payload_file, "w") as f:
        json.dump(payload, f)
    print(f"Payload generated at {payload_file}")

    return payload_file

if __name__ == '__main__':
  image_url = "https://github.com/tensorflow/models/raw/master/research/object_detection/test_images/image2.jpg"
  payload_file = generate_payload(image_url)
Python 脚本会生成载荷并输出以下响应:
Payload generated at instances.json
在本地运行容器(可选)
将容器映像推送到 Artifact Registry 以用于 Vertex AI 之前,您可以将其作为本地环境中的容器来运行,以验证服务器是否按预期运行:
将容器映像推送到 Artifact Registry
配置 Docker 以访问 Artifact Registry。然后,将您的容器映像推送到 Artifact Registry 代码库。
部署模型
在本部分中,您将创建一个模型和一个端点,然后将模型部署到该端点。
创建模型
如需创建使用运行 Triton 的自定义容器的 Model 资源,请使用 gcloud ai models upload 命令。
在创建模型之前,请先阅读自定义容器的设置,了解是否需要为容器指定可选的 sharedMemorySizeMb、startupProbe 和 healthProbe 字段。
gcloud ai models upload \
    --region=LOCATION_ID \
    --display-name=DEPLOYED_MODEL_NAME \
    --container-image-uri=LOCATION_ID-docker.pkg.dev/PROJECT_ID/getting-started-nvidia-triton/vertex-triton-inference \
    --artifact-uri=MODEL_ARTIFACTS_REPOSITORY \
    --container-args='--strict-model-config=false'
参数 --container-args='--strict-model-config=false' 允许 Triton 自动生成模型配置。
创建端点
您必须先将模型部署到端点,然后才能使用模型进行在线推理。如果要将模型部署到现有端点,则可以跳过此步骤。以下示例使用 gcloud ai endpoints create 命令:
gcloud ai endpoints create \
    --region=LOCATION_ID \
    --display-name=ENDPOINT_NAME
替换以下内容:
Google Cloud CLI 工具可能需要几秒钟才能创建端点。
将模型部署到端点
端点准备就绪后,您便可以将模型部署到端点。将模型部署到端点时,该服务会将物理资源与运行 Triton 的模型相关联以进行在线推理。
以下示例使用 gcloud ai endpoints deploy-model 命令将 Model 部署到在 GPU 上运行 Triton 的 endpoint,以提高推理速度,并且无需在多个 DeployedModel 资源之间拆分流量:
ENDPOINT_ID=$(gcloud ai endpoints list \ --region=LOCATION_ID\ --filter=display_name=ENDPOINT_NAME\ --format="value(name)") MODEL_ID=$(gcloud ai models list \ --region=LOCATION_ID\ --filter=display_name=DEPLOYED_MODEL_NAME\ --format="value(name)") gcloud ai endpoints deploy-model $ENDPOINT_ID \ --region=LOCATION_ID\ --model=$MODEL_ID \ --display-name=DEPLOYED_MODEL_NAME\ --machine-type=MACHINE_TYPE\ --min-replica-count=MIN_REPLICA_COUNT\ --max-replica-count=MAX_REPLICA_COUNT\ --accelerator=count=ACCELERATOR_COUNT,type=ACCELERATOR_TYPE\ --traffic-split=0=100
替换以下内容:
Google Cloud CLI 可能需要几秒钟才能将模型部署到端点。成功部署模型后,此命令将输出以下内容:
Deployed a model to the endpoint xxxxx. Id of the deployed model: xxxxx.
从已部署的模型获取在线推理
如需通过 Vertex AI Inference 端点调用模型,请使用标准推理请求 JSON 对象或带二进制扩展的推理请求 JSON 对象格式化推理请求,并向 Vertex AI REST rawPredict 端点提交请求。
以下示例使用 gcloud ai endpoints raw-predict 命令:
ENDPOINT_ID=$(gcloud ai endpoints list \
    --region=LOCATION_ID \
    --filter=display_name=ENDPOINT_NAME \
    --format="value(name)")

gcloud ai endpoints raw-predict $ENDPOINT_ID \
    --region=LOCATION_ID \
    --http-headers=Content-Type=application/json \
    --request=@instances.json
替换以下内容:
端点会为有效请求返回以下响应:
{
    "id": "0",
    "model_name": "object_detector",
    "model_version": "1",
    "outputs": [{
        "name": "detection_anchor_indices",
        "datatype": "FP32",
        "shape": [1, 300],
        "data": [2.0, 1.0, 0.0, 3.0, 26.0, 11.0, 6.0, 92.0, 76.0, 17.0, 58.0, ...]
    }]
}
清理
为避免产生额外的 Vertex AI 费用和 Artifact Registry 费用,请删除您在本教程中创建的 Google Cloud 资源: