
オンプレミス ホストは、公共のインターネット経由でベクトル検索のインデックス エンドポイントにアクセスできます。また、Cloud VPN や Cloud Interconnect を介した Private Service Connect を使用するハイブリッド ネットワーキング アーキテクチャを介してプライベート接続でアクセスすることもできます。どちらのオプションも SSL / TLS 暗号化に対応しています。ただし、プライベート オプションはパフォーマンスが大幅に向上するため、クリティカルなアプリケーションに適しています。
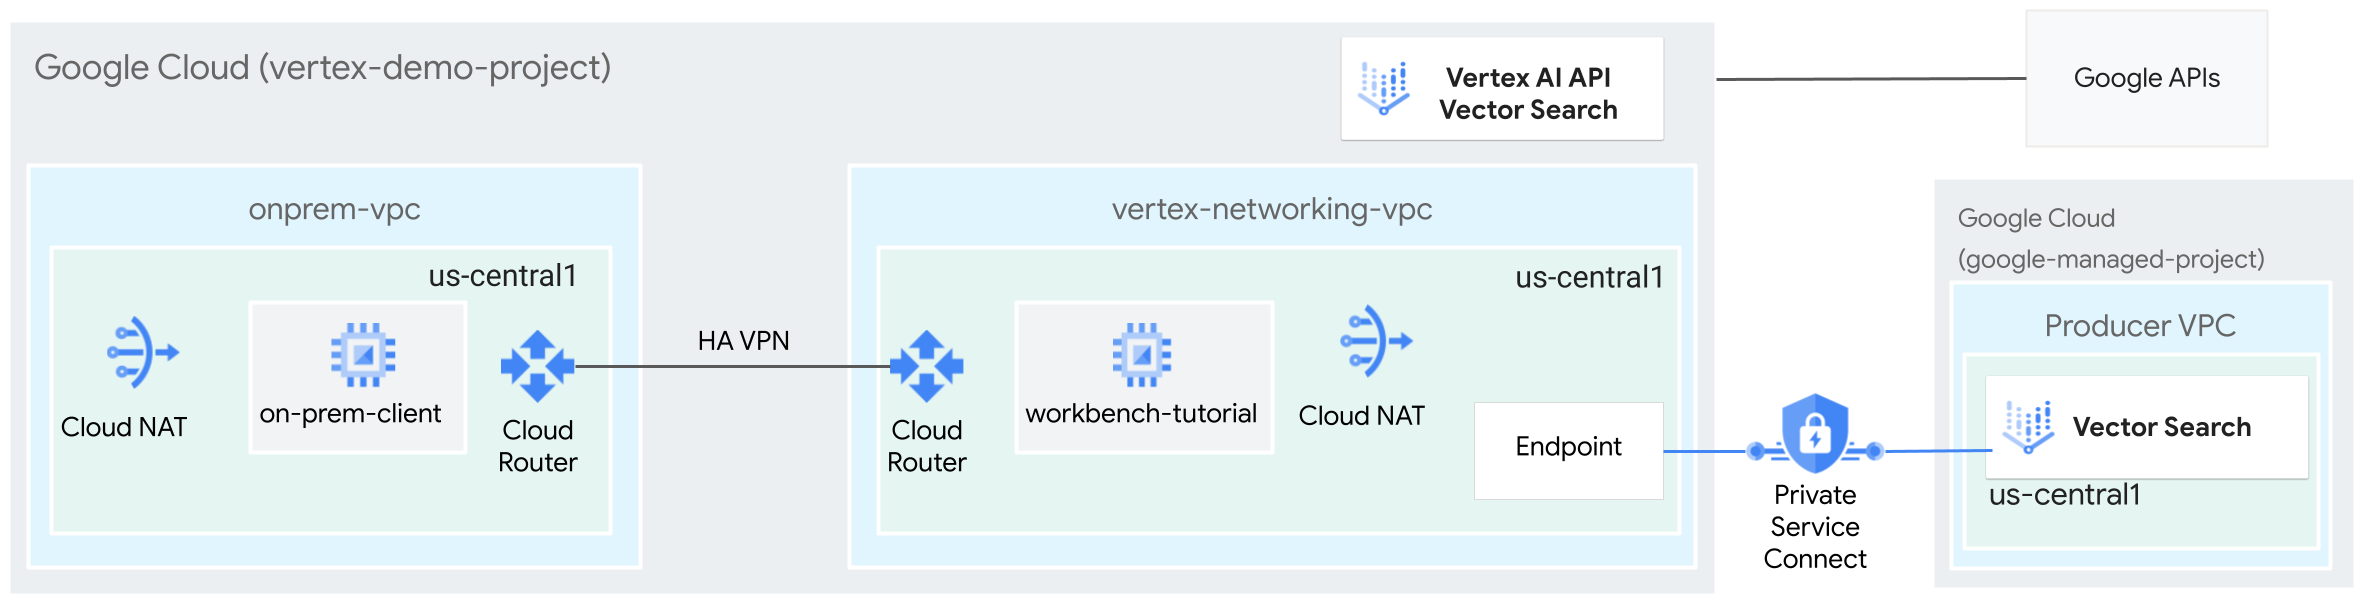
このチュートリアルでは、マルチクラウドとオンプレミスのプライベート接続の基盤となる 2 つの Virtual Private Cloud(VPC)ネットワーク間で、高可用性 VPN(HA VPN)を介してベクトル検索のインデックス エンドポイントにプライベート接続でアクセスします。
このチュートリアルは、Vertex AI、Virtual Private Cloud、 Google Cloud コンソール、Cloud Shell に精通している企業のネットワーク管理者、データ サイエンティスト、研究者を対象としています。ベクトル検索の知識があれば役立ちますが、必須ではありません。
目標
- 上の図に示すように、2 つの VPC ネットワークを作成します。
onprem-vpcは、オンプレミス ネットワークを表します。vertex-networking-vpcは、ベクトル検索のインデックス エンドポイント用です。
- HA VPN ゲートウェイ、Cloud VPN トンネル、Cloud Router をデプロイして、
vertex-networking-vpcとonprem-vpcに接続します。 - ベクトル検索のインデックスを作成してデプロイします。
- Private Service Connect 転送ルールを作成して、クエリをベクトル検索のインデックス エンドポイントに転送します。
- インデックス エンドポイントのルートを
onprem-vpcに通知するために、vertex-networking-vpcに Cloud Router のカスタム アドバタイズ ルートを構成します。 onprem-vpcに Compute Engine VM インスタンスを作成します。これは、HA VPN 経由でベクトル検索のインデックス エンドポイントにリクエストを送信するクライアント アプリケーションを表します。
費用
このドキュメントでは、課金対象である次の Google Cloudコンポーネントを使用します。
料金計算ツールを使うと、予想使用量に基づいて費用の見積もりを生成できます。
このドキュメントに記載されているタスクの完了後、作成したリソースを削除すると、それ以上の請求は発生しません。詳細については、クリーンアップをご覧ください。
始める前に
-
In the Google Cloud console, go to the project selector page.
-
Select or create a Google Cloud project.
Roles required to select or create a project
- Select a project: Selecting a project doesn't require a specific IAM role—you can select any project that you've been granted a role on.
-
Create a project: To create a project, you need the Project Creator role
(
roles/resourcemanager.projectCreator), which contains theresourcemanager.projects.createpermission. Learn how to grant roles.
-
Verify that billing is enabled for your Google Cloud project.
- このチュートリアルで説明するコマンドを実行するために、Cloud Shell を開きます。Cloud Shell は Google Cloud のインタラクティブなシェル環境であり、ウェブブラウザからプロジェクトやリソースを管理できます。
- Cloud Shell で現在のプロジェクトを Google Cloud プロジェクト ID に設定してから、同じプロジェクト ID を
projectidシェル変数に保存します。projectid="PROJECT_ID" gcloud config set project ${projectid} - プロジェクト オーナーでない場合は、プロジェクト IAM 管理者(roles/resourcemanager.projectIamAdmin)のロールを付与するようプロジェクト オーナーに依頼してください。このロールは、次のステップで IAM ロールを付与するために必要です。
-
Make sure that you have the following role or roles on the project: roles/aiplatform.user, roles/compute.instanceAdmin.v1, roles/compute.networkAdmin, roles/compute.securityAdmin, roles/dns.admin, roles/iam.serviceAccountAdmin, roles/iam.serviceAccountUser, roles/iap.admin, roles/iap.tunnelResourceAccessor, roles/notebooks.admin, roles/servicemanagement.quotaAdmin, roles/servicedirectory.editor, roles/storage.admin, roles/aiplatform.admin, roles/aiplatform.user, roles/resourcemanager.projectIamAdmin
Check for the roles
-
In the Google Cloud console, go to the IAM page.
Go to IAM - Select the project.
-
In the Principal column, find all rows that identify you or a group that you're included in. To learn which groups you're included in, contact your administrator.
- For all rows that specify or include you, check the Role column to see whether the list of roles includes the required roles.
Grant the roles
-
In the Google Cloud console, go to the IAM page.
IAM に移動 - プロジェクトを選択します。
- [ アクセスを許可] をクリックします。
-
[新しいプリンシパル] フィールドに、ユーザー ID を入力します。 これは通常、Google アカウントのメールアドレスです。
- [ロールを選択] リストでロールを選択します。
- 追加のロールを付与するには、 [別のロールを追加] をクリックして各ロールを追加します。
- [保存] をクリックします。
Enable the DNS, IAM, Compute Engine, Notebooks, and Vertex AI APIs.
Roles required to enable APIs
To enable APIs, you need the Service Usage Admin IAM role (
roles/serviceusage.serviceUsageAdmin), which contains theserviceusage.services.enablepermission. Learn how to grant roles. -
VPC ネットワークを作成する
このセクションでは、2 つの VPC ネットワークを作成します。1 つはベクトル検索のインデックスを作成してエンドポイントにデプロイするためのもので、もう 1 つは、そのエンドポイントへのプライベート アクセス用です。
ベクトル検索のインデックス エンドポイント(vertex-networking-vpc)の VPC ネットワークを作成します。
インデックス エンドポイント用の VPC ネットワークを作成します。
gcloud compute networks create vertex-networking-vpc --project=$projectid --subnet-mode customプライマリ IPv4 範囲が
172.16.20.0/28のworkbench-subnetという名前のサブネットを作成します。gcloud compute networks subnets create workbench-subnet \ --project=$projectid --range=172.16.20.0/28 \ --network=vertex-networking-vpc \ --region=us-central1 \ --enable-private-ip-google-accessプライマリ IPv4 範囲が
172.16.30.0/28のpsc-forwarding-rule-subnetという名前のサブネットを作成します。gcloud compute networks subnets create psc-forwarding-rule-subnet \ --project=$projectid \ --range=172.16.30.0/28 \ --network=vertex-networking-vpc \ --region=us-central1 \ --enable-private-ip-google-access
エンドポイント(onprem-vpc)へのプライベート アクセス用の VPC ネットワークを作成する
オンプレミス ネットワーク(
onprem-vpc)をシミュレートするための VPC ネットワークを作成します。gcloud compute networks create onprem-vpc \ --subnet-mode customonprem-vpcネットワークで、プライマリ IPv4 範囲が172.16.10.0/29のサブネットをonprem-vpc-subnet1という名前で作成します。gcloud compute networks subnets create onprem-vpc-subnet1 \ --network onprem-vpc \ --range 172.16.10.0/29 \ --region us-central1
VPC ネットワークが正しく構成されていることを確認する
Google Cloud コンソールで、[VPC ネットワーク] ページの [現在のプロジェクトのネットワーク] タブに移動します。
VPC ネットワークのリストで、2 つのネットワーク(
vertex-networking-vpcとonprem-vpc)が作成されていることを確認します。[現在のプロジェクトのサブネット] タブをクリックします。
VPC サブネットのリストで、
workbench-subnet、psc-forwarding-rule-subnet、onprem-vpc-subnet1サブネットが作成されていることを確認します。
on-prem-client VM インスタンスを作成する
このセクションでは、HA VPN 経由でベクトル検索のインデックス エンドポイントにリクエストを送信するクライアント アプリケーションを表す VM インスタンスを作成します。
Cloud Shell で、
on-prem-clientVM インスタンスを作成します。gcloud compute instances create on-prem-client \ --zone=us-central1-a \ --image-family=debian-11 \ --image-project=debian-cloud \ --subnet=onprem-vpc-subnet1 \ --scopes=https://www.googleapis.com/auth/cloud-platform \ --no-address \ --shielded-secure-boot \ --metadata startup-script="#! /bin/bash sudo apt-get update sudo apt-get install tcpdump dnsutils -y"
ハイブリッド接続を構成する
このセクションでは、相互に接続する 2 つの HA VPN ゲートウェイを作成します。1 つは vertex-networking-vpc VPC ネットワークにあります。もう 1 つは onprem-vpc VPC ネットワークにあります。各ゲートウェイには、Cloud Router と VPN トンネルのペアが含まれます。
HA VPN ゲートウェイの作成
Cloud Shell で、
vertex-networking-vpcVPC ネットワークに HA VPN ゲートウェイを作成します。gcloud compute vpn-gateways create vertex-networking-vpn-gw1 \ --network vertex-networking-vpc \ --region us-central1onprem-vpcVPC ネットワークに HA VPN ゲートウェイを作成します。gcloud compute vpn-gateways create onprem-vpn-gw1 \ --network onprem-vpc \ --region us-central1Google Cloud コンソールで、[VPN] ページの [Cloud VPN ゲートウェイ] タブに移動します。
2 つのゲートウェイ(
vertex-networking-vpn-gw1とonprem-vpn-gw1)が作成され、それぞれに 2 つのインターフェース IP アドレスがあることを確認します。
Cloud Router と Cloud NAT ゲートウェイを作成する
2 つの VPC ネットワークに、汎用の Cloud Router とリージョン用の Cloud Router を作成します。それぞれのリージョン用 Cloud Router で、Cloud NAT ゲートウェイを作成します。Cloud NAT ゲートウェイは、外部 IP アドレスを持たない Compute Engine 仮想マシン(VM)インスタンスに送信接続を提供します。
Cloud Shell で、
vertex-networking-vpcVPC ネットワークの Cloud Router を作成します。gcloud compute routers create vertex-networking-vpc-router1 \ --region us-central1\ --network vertex-networking-vpc \ --asn 65001onprem-vpcVPC ネットワークに Cloud Router を作成します。gcloud compute routers create onprem-vpc-router1 \ --region us-central1\ --network onprem-vpc\ --asn 65002vertex-networking-vpcVPC ネットワークにリージョン用の Cloud Router を作成します。gcloud compute routers create cloud-router-us-central1-vertex-nat \ --network vertex-networking-vpc \ --region us-central1リージョン用の Cloud Router で Cloud NAT ゲートウェイを構成します。
gcloud compute routers nats create cloud-nat-us-central1 \ --router=cloud-router-us-central1-vertex-nat \ --auto-allocate-nat-external-ips \ --nat-all-subnet-ip-ranges \ --region us-central1onprem-vpcVPC ネットワークにリージョン用の Cloud Router を作成します。gcloud compute routers create cloud-router-us-central1-onprem-nat \ --network onprem-vpc \ --region us-central1リージョン用の Cloud Router で Cloud NAT ゲートウェイを構成します。
gcloud compute routers nats create cloud-nat-us-central1-on-prem \
  --router=cloud-router-us-central1-onprem-nat \
  --auto-allocate-nat-external-ips \
  --nat-all-subnet-ip-ranges \
  --region us-central1
Google Cloud コンソールで、[Cloud Router] ページに移動します。
[Cloud Router] リストで、次のルーターが作成されていることを確認します。
cloud-router-us-central1-onprem-natcloud-router-us-central1-vertex-natonprem-vpc-router1vertex-networking-vpc-router1
新しい値を表示するには、 Google Cloud コンソールのブラウザタブを更新する必要があります。
[Cloud Router] リストで
cloud-router-us-central1-vertex-natをクリックします。[ルーターの詳細] ページで、
cloud-nat-us-central1Cloud NAT ゲートウェイが作成されていることを確認します。戻る矢印 をクリックして、[Cloud Router] ページに戻ります。
ルーターリストで
cloud-router-us-central1-onprem-natをクリックします。[ルーターの詳細] ページで、
cloud-nat-us-central1-on-premCloud NAT ゲートウェイが作成されていることを確認します。
VPN トンネルを作成する
Cloud Shell で、
vertex-networking-vpcネットワークにvertex-networking-vpc-tunnel0という VPN トンネルを作成します。gcloud compute vpn-tunnels create vertex-networking-vpc-tunnel0 \ --peer-gcp-gateway onprem-vpn-gw1 \ --region us-central1 \ --ike-version 2 \ --shared-secret [ZzTLxKL8fmRykwNDfCvEFIjmlYLhMucH] \ --router vertex-networking-vpc-router1 \ --vpn-gateway vertex-networking-vpn-gw1 \ --interface 0vertex-networking-vpcネットワークに、vertex-networking-vpc-tunnel1という VPN トンネルを作成します。gcloud compute vpn-tunnels create vertex-networking-vpc-tunnel1 \ --peer-gcp-gateway onprem-vpn-gw1 \ --region us-central1 \ --ike-version 2 \ --shared-secret [bcyPaboPl8fSkXRmvONGJzWTrc6tRqY5] \ --router vertex-networking-vpc-router1 \ --vpn-gateway vertex-networking-vpn-gw1 \ --interface 1onprem-vpcネットワークに、onprem-vpc-tunnel0という VPN トンネルを作成します。gcloud compute vpn-tunnels create onprem-vpc-tunnel0 \ --peer-gcp-gateway vertex-networking-vpn-gw1 \ --region us-central1\ --ike-version 2 \ --shared-secret [ZzTLxKL8fmRykwNDfCvEFIjmlYLhMucH] \ --router onprem-vpc-router1 \ --vpn-gateway onprem-vpn-gw1 \ --interface 0onprem-vpcネットワークに、onprem-vpc-tunnel1という VPN トンネルを作成します。gcloud compute vpn-tunnels create onprem-vpc-tunnel1 \ --peer-gcp-gateway vertex-networking-vpn-gw1 \ --region us-central1\ --ike-version 2 \ --shared-secret [bcyPaboPl8fSkXRmvONGJzWTrc6tRqY5] \ --router onprem-vpc-router1 \ --vpn-gateway onprem-vpn-gw1 \ --interface 1Google Cloud コンソールで、[VPN] ページに移動します。
VPN トンネルのリストで、4 つの VPN トンネルが作成されていることを確認します。
BGP セッションを確立する
Cloud Router は、Border Gateway Protocol(BGP)を使用して、VPC ネットワーク(この場合は vertex-networking-vpc)とオンプレミス ネットワーク(onprem-vpc で表される)間のルートを交換します。Cloud Router で、オンプレミス ルーターのインターフェースと BGP ピアを構成します。インターフェースと BGP ピア構成は、BGP セッションを形成します。このセクションでは、vertex-networking-vpc に 2 つ、onprem-vpc に 2 つの BGP セッションを作成します。
ルーター間のインターフェースと BGP ピアを構成すると、ルートの交換が自動的に開始されます。
vertex-networking-vpc の BGP セッションを確立する
Cloud Shell で、
vertex-networking-vpcネットワークにvertex-networking-vpc-tunnel0の BGP インターフェースを作成します。gcloud compute routers add-interface vertex-networking-vpc-router1 \ --interface-name if-tunnel0-to-onprem \ --ip-address 169.254.0.1 \ --mask-length 30 \ --vpn-tunnel vertex-networking-vpc-tunnel0 \ --region us-central1vertex-networking-vpcネットワークに、bgp-onprem-tunnel0の BGP ピアを作成します。gcloud compute routers add-bgp-peer vertex-networking-vpc-router1 \ --peer-name bgp-onprem-tunnel0 \ --interface if-tunnel0-to-onprem \ --peer-ip-address 169.254.0.2 \ --peer-asn 65002 \ --region us-central1vertex-networking-vpcネットワークに、vertex-networking-vpc-tunnel1の BGP インターフェースを作成します。gcloud compute routers add-interface vertex-networking-vpc-router1 \ --interface-name if-tunnel1-to-onprem \ --ip-address 169.254.1.1 \ --mask-length 30 \ --vpn-tunnel vertex-networking-vpc-tunnel1 \ --region us-central1vertex-networking-vpcネットワークに、bgp-onprem-tunnel1の BGP ピアを作成します。gcloud compute routers add-bgp-peer vertex-networking-vpc-router1 \ --peer-name bgp-onprem-tunnel1 \ --interface if-tunnel1-to-onprem \ --peer-ip-address 169.254.1.2 \ --peer-asn 65002 \ --region us-central1
onprem-vpc の BGP セッションを確立する
onprem-vpcネットワークに、onprem-vpc-tunnel0の BGP インターフェースを作成します。gcloud compute routers add-interface onprem-vpc-router1 \ --interface-name if-tunnel0-to-vertex-networking-vpc \ --ip-address 169.254.0.2 \ --mask-length 30 \ --vpn-tunnel onprem-vpc-tunnel0 \ --region us-central1onprem-vpcネットワークに、bgp-vertex-networking-vpc-tunnel0の BGP ピアを作成します。gcloud compute routers add-bgp-peer onprem-vpc-router1 \ --peer-name bgp-vertex-networking-vpc-tunnel0 \ --interface if-tunnel0-to-vertex-networking-vpc \ --peer-ip-address 169.254.0.1 \ --peer-asn 65001 \ --region us-central1onprem-vpcネットワークに、onprem-vpc-tunnel1の BGP インターフェースを作成します。gcloud compute routers add-interface onprem-vpc-router1 \ --interface-name if-tunnel1-to-vertex-networking-vpc \ --ip-address 169.254.1.2 \ --mask-length 30 \ --vpn-tunnel onprem-vpc-tunnel1 \ --region us-central1onprem-vpcネットワークに、bgp-vertex-networking-vpc-tunnel1の BGP ピアを作成します。gcloud compute routers add-bgp-peer onprem-vpc-router1 \ --peer-name bgp-vertex-networking-vpc-tunnel1 \ --interface if-tunnel1-to-vertex-networking-vpc \ --peer-ip-address 169.254.1.1 \ --peer-asn 65001 \ --region us-central1
BGP セッションの作成を確認する
Google Cloud コンソールで、[VPN] ページに移動します。
VPN トンネルのリストで、各トンネルの [BGP セッションのステータス] 列の値が「BGP セッションを構成」から「BGP が確立されました」に変更されていることを確認します。新しい値を表示するには、 Google Cloud コンソールのブラウザタブを更新する必要があります。
vertex-networking-vpc の学習されたルートを検証する
Google Cloud コンソールで、[VPC ネットワーク] ページに移動します。
VPC ネットワークのリストで
vertex-networking-vpcをクリックします。[ルート] タブをクリックします。
[リージョン] リストで [us-central1(アイオワ)] を選択し、[表示] をクリックします。
[送信先 IP 範囲] 列で、
onprem-vpc-subnet1サブネットの IP 範囲(172.16.10.0/29)が 2 回表示されていることを確認します。
on-prem-vpc の学習されたルートを検証する
戻る矢印 をクリックして、[VPC ネットワーク] ページに戻ります。
VPC ネットワークのリストで
on-prem-vpcをクリックします。[ルート] タブをクリックします。
[リージョン] リストで [us-central1(アイオワ)] を選択し、[表示] をクリックします。
[送信先 IP 範囲] 列で、
workbench-subnetサブネットの IP 範囲(172.16.20.0/28)とpsc-forwarding-rule-subnetサブネットの IP 範囲(172.16.30.0/28)が 2 回表示されていることを確認します。
Vertex AI Workbench インスタンスを作成する
このセクションでは、ユーザー管理のサービス アカウントを作成し、そのサービス アカウントを使用してGoogle Cloud サービスと API にアクセスする Vertex AI Workbench インスタンスを作成します。
サービス アカウントを作成する
このチュートリアルでは、Compute Engine と IAM のベスト プラクティスに従ってユーザー管理のサービス アカウントを作成します。
Cloud Shell で、
workbench-saという名前のサービス アカウントを作成します。gcloud iam service-accounts create workbench-sa \ --display-name="workbench-sa"サービス アカウントに Vertex AI ユーザー(
roles/aiplatform.user)の IAM ロールを割り当てます。gcloud projects add-iam-policy-binding $projectid \ --member="serviceAccount:workbench-sa@$projectid.iam.gserviceaccount.com" \ --role="roles/aiplatform.user"サービス アカウントにストレージ管理者(
roles/storage.admin)の IAM ロールを割り当てます。gcloud projects add-iam-policy-binding $projectid \ --member="serviceAccount:workbench-sa@$projectid.iam.gserviceaccount.com" \ --role="roles/storage.admin"サービス アカウントに Service Usage 管理者(
roles/serviceusage.serviceUsageAdmin)の IAM ロールを割り当てます。gcloud projects add-iam-policy-binding $projectid \ --member="serviceAccount:workbench-sa@$projectid.iam.gserviceaccount.com" \ --role="roles/serviceusage.serviceUsageAdmin"
Vertex AI Workbench インスタンスを作成する
workbench-sa サービス アカウントを指定して、Vertex AI Workbench インスタンスを作成します。
gcloud workbench instances create workbench-tutorial \
  --vm-image-project=deeplearning-platform-release \
  --vm-image-family=common-cpu-notebooks \
  --machine-type=n1-standard-4 \
  --location=us-central1-a \
  --subnet-region=us-central1 \
  --shielded-secure-boot=SHIELDED_SECURE_BOOT \
  --subnet=workbench-subnet \
  --disable-public-ip \
  --service-account-email=workbench-sa@$projectid.iam.gserviceaccount.com
ベクトル検索インデックスの作成とデプロイ
環境を準備する
Google Cloud コンソールで、[Vertex AI Workbench] ページの [インスタンス] タブに移動します。
Vertex AI Workbench インスタンス名(
workbench-tutorial)の横にある [JupyterLab を開く] をクリックします。Vertex AI Workbench インスタンスで JupyterLab が表示されます。
[File] > [New] > [Notebook] の順に選択します。
[Select Kernel] メニューから [Python 3 (Local)] を選択し、[Select] をクリックします。
新しいノートブックが開き、コードを入力するデフォルトのコードセルが表示されます。
[ ]:の後にテキスト フィールドが続いています。テキスト フィールドにコードを貼り付けます。Vertex AI SDK for Python をインストールするには、次のコードをセルに貼り付け、[ Run the selected cells and advance] をクリックします。
!pip install --upgrade --user google-cloud-aiplatform google-cloud-storageこのステップと以下の各ステップでは、[ Insert a cell below] を選択し、コードをセルに貼り付けて、[ Run selected cells and advance] をクリックします。
この Jupyter ランタイムで新しくインストールされたパッケージを使用するには、ランタイムを再起動する必要があります。
# Restart kernel after installs so that your environment can access the new packages import IPython app = IPython.Application.instance() app.kernel.do_shutdown(True)次の環境変数を設定します。PROJECT_ID は実際のプロジェクト ID に置き換えます。
# set project ID and location
PROJECT_ID = "PROJECT_ID"
LOCATION = "us-central1"

# generate a unique id for this session
from datetime import datetime
UID = datetime.now().strftime("%m%d%H%M")
API を有効にする
Jupyterlab ノートブックで次のコマンドを実行して、ノートブックで Compute Engine、Vertex AI、Cloud Storage の API を有効にします。
! gcloud services enable compute.googleapis.com aiplatform.googleapis.com storage.googleapis.com \
  --project {PROJECT_ID}
Cloud Storage バケットにサンプルデータを準備する
このチュートリアルでは、ベクトル検索のクイックスタートで使用したものと同じ TheLook データセットを使用します。このデータセットの詳細については、クイックスタート ドキュメント ページをご覧ください。
このセクションでは、Cloud Storage バケットを作成し、そのバケットにデータセットのエンベディング ファイルを配置します。このファイルは、後のステップでインデックスを作成する際に使用します。
Jupyterlab ノートブックで、Cloud Storage バケットを作成します。
BUCKET_URI = f"gs://{PROJECT_ID}-vs-quickstart-{UID}"
! gcloud storage buckets create $BUCKET_URI --location=$LOCATION --project=$PROJECT_ID
サンプル ファイルを Cloud Storage バケットにコピーします。
! gcloud storage cp "gs://github-repo/data/vs-quickstart/product-embs.json" $BUCKET_URIベクトル検索を使用してクエリを実行するには、エンベディング ファイルをローカル ディレクトリにコピーする必要があります。
! gcloud storage cp "gs://github-repo/data/vs-quickstart/product-embs.json" . # for query tests
ベクトル検索のインデックスを作成する
Jupyterlab ノートブックで、エンベディングをベクトル検索に読み込みます。
# init the aiplatform package from google.cloud import aiplatform aiplatform.init(project=PROJECT_ID, location=LOCATION)create_tree_ah_index関数を使用して MatchingEngineIndex を作成します(Matching Engine は、ベクトル検索の以前の名称です)。# create Index my_index = aiplatform.MatchingEngineIndex.create_tree_ah_index( display_name = f"vs-quickstart-index-{UID}", contents_delta_uri = BUCKET_URI, dimensions = 768, approximate_neighbors_count = 10, )MatchingEngineIndex.create_tree_ah_index()メソッドがインデックスを構築します。このチュートリアルでは、このタスクに 5~10 分ほどかかります。Google Cloud コンソールで、[ベクトル検索] ページの [インデックス] タブに移動します。
名前が
"vs-quickstart-index-"で始まり、正しいタイムスタンプを含むインデックスが存在することを確認します。インデックス ID をメモします。この ID は、後の手順でインデックスをデプロイする際に必要になります。
インデックス エンドポイントを作成する
Cloud Shell で、次のコマンドを実行します。ここで、PROJECT_ID はプロジェクト ID に置き換えます。
projectid=PROJECT_ID
gcloud config set project ${projectid}
SERVICE_PROJECT=${projectid}
REGION=us-central1
VERTEX_ENDPOINT=$REGION-aiplatform.googleapis.com
DISPLAY_NAME=vector-search
インデックス エンドポイントを作成します。
curl -H "Content-Type: application/json" \
  -H "Authorization: Bearer `gcloud auth print-access-token`" \
  https://$VERTEX_ENDPOINT/v1/projects/$SERVICE_PROJECT/locations/$REGION/indexEndpoints \
  -d '{displayName: "'$DISPLAY_NAME'", privateServiceConnectConfig: { enablePrivateServiceConnect: true, projectAllowlist: ["'$SERVICE_PROJECT'"] }}'
インデックス エンドポイントが作成されたことを確認します。
gcloud ai index-endpoints list --region=us-central1出力は次のようになります。この例では、インデックス エンドポイント ID は
8151506529447575552です。Using endpoint [https://us-central1-aiplatform.googleapis.com/] --- createTime: '2023-10-10T23:55:20.526145Z' displayName: vector-search encryptionSpec: {} etag: AMEw9yN2qytNiwT73uwYpz_7N_b2-O8D1AuNoDb5QjFmkU4ye5Gzk2oQlMZBR1XeoQ11 name: projects/725264228516/locations/us-central1/indexEndpoints/8151506529447575552 privateServiceConnectConfig: enablePrivateServiceConnect: true projectAllowlist: - vertex-genai-400103 - vertex-genai-400103 updateTime: '2023-10-10T23:55:21.951394Z'インデックス エンドポイント ID をメモします。この ID は、後のステップでインデックスをデプロイする際に必要になります。
インデックスをエンドポイントにデプロイする
Cloud Shell で次のコマンドを実行して、エンドポイントにインデックスをデプロイします。
gcloud ai index-endpoints deploy-index INDEX_ENDPOINT_ID \
  --deployed-index-id=vector_one \
  --display-name=vector-search \
  --index=INDEX \
  --project=$projectid \
  --region=us-central1
次の値を置き換えます。
- INDEX_ENDPOINT_ID: 作成した Private Service Connect インデックス エンドポイントのインデックス エンドポイント ID
- INDEX: デプロイするインデックスの ID
出力は次のようになります。この例では、インデックス エンドポイント ID は 8151506529447575552 です。
Using endpoint [https://us-central1-aiplatform.googleapis.com/]
The deploy index operation [projects/725264228516/locations/us-central1/indexEndpoints/8151506529447575552/operations/6271807495283408896] was submitted successfully.
デプロイ オペレーションには 10~15 分ほどかかります。インデックスをデプロイすると、サービス アタッチメントが生成されます。
インデックスがインデックス エンドポイントにデプロイされていることを確認する
Google Cloud コンソールで、[ベクトル検索] ページの [インデックス エンドポイント] タブに移動します。
vector-searchインデックス エンドポイントに、vector-searchというデプロイ済みのインデックスがあることを確認します。インデックス エンドポイント名の横に回転する青い円が表示されている場合、インデックスのデプロイはまだ完了していません。
インデックス エンドポイントのサービス アタッチメント URI を取得する
インデックスが完全にデプロイされたら、サービス アタッチメント URI を取得できます。
Cloud Shell で次のコマンドを実行して、サービス アタッチメント URI を取得します。
gcloud ai index-endpoints list --region=us-central1 | grep -i serviceAttachment:
次の出力例では、サービス アタッチメント URI は projects/je84d1de50cd8bddb-tp/regions/us-central1/serviceAttachments/sa-gkedpm-527af280e65971fd786aaf6163e798 です。
Using endpoint [https://us-central1-aiplatform.googleapis.com/]
 serviceAttachment: projects/je84d1de50cd8bddb-tp/regions/us-central1/serviceAttachments/sa-gkedpm-527af280e65971fd786aaf6163e798
projects で始まる serviceAttachment URI をメモします(例: projects/je84d1de50cd8bddb-tp/regions/us-central1/serviceAttachments/sa-gkedpm-527af280e65971fd786aaf6163e798)。これは、次のステップで転送ルールを作成する際に必要になります。
転送ルールを作成する
Cloud Shell で、ベクトル検索インデックスのクエリに使用する転送ルールの IP アドレスを予約します。
gcloud compute addresses create vector-search-forwarding-rule \
  --region=us-central1 \
  --subnet=psc-forwarding-rule-subnet
予約済みの IP アドレスを探します。
gcloud compute addresses list --filter="name=vector-search-forwarding-rule"エンドポイントをサービス アタッチメントに接続する転送ルールを作成します。SERVICE_ATTACHMENT_URI は、
serviceAttachmentURI に置き換えます。gcloud compute forwarding-rules create vector-search-forwarding-rule \ --region=us-central1 \ --network=vertex-networking-vpc \ --address=vector-search-forwarding-rule \ --target-service-attachment=SERVICE_ATTACHMENT_URIこのコマンドの使用例を次に示します。
gcloud compute forwarding-rules create vector-search-forwarding-rule \
  --region=us-central1 \
  --network=vertex-networking-vpc \
  --address=vector-search-forwarding-rule \
  --target-service-attachment=projects/je84d1de50cd8bddb-tp/regions/us-central1/serviceAttachments/sa-gkedpm-527af280e65971fd786aaf6163e798
Google Cloud コンソールで、[Private Service Connect] ページの [接続エンドポイント] タブに移動します。
vector-search-forwarding-ruleのステータスがAcceptedであることを確認します。Private Service Connect 転送ルールの IP アドレスをメモします。後のステップで、このエンドポイントを使用して、デプロイ済みのベクトル検索のインデックスと通信を確立します。
デプロイされたインデックスにクエリを実行する
ベクトル検索のインデックス エンドポイントに接続されている Private Service Connect 転送ルールが作成されたので、on-prem-client VM インスタンスから転送ルールにクエリを送信することで、デプロイされたインデックスをクエリできます。
Identity-Aware Proxy(IAP)に VM インスタンスへの接続を許可するには、次のファイアウォール ルールを作成します。
- IAP からアクセスできるようにするすべての VM インスタンスに適用されます。
- IP 範囲
35.235.240.0/20からポート 22 を経由する TCP トラフィックを許可します。この範囲には、IAP が TCP 転送に使用するすべての IP アドレスが含まれています。
ファイアウォールを作成したら、gRPC クライアントをインストールします。以降のステップでは、gRPC クライアントを使用して on-prem-client VM インスタンスからクエリを送信します。
ファイアウォール ルールを作成し、gRPC をインストールする
Cloud Shell で、次のコマンドを実行します。ここで、PROJECT_ID はプロジェクト ID に置き換えます。
projectid=PROJECT_ID gcloud config set project ${projectid}ssh-iap-vpcという名前の IAP ファイアウォール ルールを作成します。gcloud compute firewall-rules create ssh-iap-vpc \ --network onprem-vpc \ --allow tcp:22 \ --source-ranges=35.235.240.0/20on-prem-clientVM インスタンスにログインします。gcloud compute ssh on-prem-client \ --project=$projectid \ --zone=us-central1-a \ --tunnel-through-iapon-prem-clientVM インスタンスで、gRPCクライアントをインストールします。sudo apt-get install git -y git clone https://github.com/grpc/grpc.git sudo apt-get install build-essential autoconf libtool pkg-config -y sudo apt-get install cmake -y cd grpc/ git submodule update --init mkdir -p cmake/build cd cmake/build cmake -DgRPC_BUILD_TESTS=ON ../.. make grpc_cliインストールには 30 分ほどかかります。
既存のインデックス アイテムの ID を取得する
Google Cloud コンソールで、[Vertex AI Workbench] ページの [インスタンス] タブに移動します。
Vertex AI Workbench インスタンス名の横にある [JupyterLab を開く] をクリックします。
Vertex AI Workbench インスタンスで JupyterLab が表示されます。
[File] > [New] > [Terminal] を選択します。
(Cloud Shell ではなく)JupyterLab ターミナルで、インデックスの最後のエントリを表示します。
tail -1 product-embs.json次の例に示すように、アイテムの ID 番号を含むアイテムの最初の Key-Value ペアを探します。
"id":"27452"この ID 番号をメモしておきます。次のセクションでクエリを実行する際に必要になります。
ベクトル検索クエリを実行する
on-prem-client VM インスタンスで、デプロイされたインデックスにクエリを実行します。
./grpc_cli call FORWARDING_RULE_IP:10000 google.cloud.aiplatform.container.v1.MatchService.Match "deployed_index_id:'"vector_one"',embedding_id: '"ITEM_ID"'"
次の値を置き換えます。
- FORWARDING_RULE_IP: 前のセクションで作成した Private Service Connect 転送ルールの IP アドレス
- ITEM_ID: 前のセクションで保存したアイテム ID 番号
出力は次のようになります。
   user@on-prem-client:~/grpc/cmake/build$ ./grpc_cli call  172.16.30.2:10000  google.cloud.aiplatform.container.v1.MatchService.Match "deployed_index_id:'"vector_one"',embedding_id: '"20020916"'"
   connecting to 172.16.30.2:10000
   neighbor {
     id: "16136217"
     distance: 0.99999558925628662
   }
   neighbor {
     id: "2196405"
     distance: 0.82817935943603516
   }
   neighbor {
     id: "3796353"
     distance: 0.82687419652938843
   }
   neighbor {
     id: "815154"
     distance: 0.8179466724395752
   }
   neighbor {
     id: "16262338"
     distance: 0.816785454750061
   }
   neighbor {
     id: "31290454"
     distance: 0.81560027599334717
   }
   neighbor {
     id: "4012943"
     distance: 0.80958610773086548
   }
   neighbor {
     id: "39738359"
     distance: 0.8020891547203064
   }
   neighbor {
     id: "7691697"
     distance: 0.80035769939422607
   }
   neighbor {
     id: "6398888"
     distance: 0.79880392551422119
   }
   Rpc succeeded with OK status
クリーンアップ
このチュートリアルで使用したリソースについて、Google Cloud アカウントに課金されないようにするには、リソースを含むプロジェクトを削除するか、プロジェクトを維持して個々のリソースを削除します。
このチュートリアルで使用したリソースについて、 Google Cloud アカウントに課金されないようにするには、リソースを含むプロジェクトを削除するか、プロジェクトを維持して個々のリソースを削除します。
Google Cloud コンソールで個々のリソースを削除するには、次の操作を行います。
次の手順でベクトル検索のインデックスのデプロイを解除して削除します。
Google Cloud コンソールで、[ベクトル検索] ページの [インデックス] タブに移動します。
名前が
"vs-quickstart-index-"で始まり、正しいタイムスタンプを含むインデックスを探します。インデックス名をクリックします。
[インデックスの情報] ページで、[デプロイされたインデックス] リストのインデックス名の横にあるアクション アイコン をクリックし、[デプロイ解除] をクリックします。
インデックスのデプロイ解除には数分かかります。インデックス名の横に回転している青い円が表示されているか、インデックスのステータスが
Undeployingと表示されている場合、インデックスはまだデプロイ解除中です。インデックスのデプロイが解除されたことを確認するには、 Google Cloud コンソールのブラウザタブを更新する必要があります。戻る矢印 をクリックして [インデックス] タブに戻ります。
インデックス リストでインデックス名の横にあるアクション アイコン をクリックし、[削除] をクリックしてインデックスを削除します。
次の手順でインデックス エンドポイントを削除します。
Google Cloud コンソールで、[ベクトル検索] ページの [インデックス エンドポイント] タブに移動します。
インデックス エンドポイントのリストで、エンドポイントの名前の横にあるアクション アイコン をクリックし、[削除] をクリックしてインデックス エンドポイントを削除します。
次の手順で Vertex AI Workbench インスタンスを削除します。
Google Cloud コンソールの [Vertex AI] セクションで、[ワークベンチ] ページの [インスタンス] タブに移動します。
workbench-tutorialVertex AI Workbench インスタンスを選択して、削除アイコン をクリックします。
次の手順で Compute Engine VM インスタンスを削除します。
Google Cloud コンソールで、[Compute Engine] ページに移動します。
on-prem-clientVM インスタンスを選択し、削除アイコン をクリックします。
次の手順で VPN トンネルを削除します。
Google Cloud コンソールで、[VPN] ページに移動します。
[VPN] ページで、[Cloud VPN トンネル] タブをクリックします。
VPN トンネルのリストで、このチュートリアルで作成した 4 つの VPN トンネルを選択し、削除アイコン をクリックします。
次の手順で HA VPN ゲートウェイを削除します。
[VPN] ページで、[Cloud VPN ゲートウェイ] タブをクリックします。
VPN ゲートウェイのリストで
onprem-vpn-gw1をクリックします。[Cloud VPN ゲートウェイの詳細] ページで、VPN ゲートウェイの削除アイコン をクリックします。
必要に応じて、矢印 をクリックして VPN ゲートウェイのリストに戻り、
vertex-networking-vpn-gw1をクリックします。[Cloud VPN ゲートウェイの詳細] ページで、VPN ゲートウェイの削除アイコン をクリックします。
次の手順で Cloud Router を削除します。
[Cloud Router] ページに移動します。
Cloud Router のリストで、このチュートリアルで作成した 4 つのルーターを選択します。
削除アイコン をクリックして、ルーターを削除します。
これにより、Cloud Router に接続されている 2 つの Cloud NAT ゲートウェイも削除されます。
次の手順で
vertex-networking-vpcVPC ネットワークのvector-search-forwarding-rule転送ルールを削除します。[ロード バランシング] ページの [フロントエンド] タブに移動します。
転送ルールのリストで
vector-search-forwarding-ruleをクリックします。[転送ルールの詳細] ページで、削除アイコン をクリックします。
次の手順で VPC ネットワークを削除します。
[VPC ネットワーク] ページに移動します。
VPC ネットワークのリストで
onprem-vpcをクリックします。[VPC ネットワークの詳細] ページで、VPC ネットワークを削除アイコン をクリックします。
ネットワークを削除すると、そのサブネットワーク、ルート、ファイアウォール ルールも削除されます。
VPC ネットワークのリストに戻り、[
vertex-networking-vpc] をクリックします。[VPC ネットワークの詳細] ページで、VPC ネットワークを削除アイコン をクリックします。
次のようにストレージ バケットを削除します。
Google Cloud コンソールで、[Cloud Storage] ページに移動します。
ストレージ バケットを選択して、削除アイコン をクリックします。
次の手順で
workbench-saサービス アカウントを削除します。[サービス アカウント] ページに移動します。
workbench-saサービス アカウントを選択して、削除アイコン をクリックします。
次のステップ
- Vertex AI のエンドポイントとサービスにアクセスするためのエンタープライズ ネットワーキング オプションについて学習する。
- Private Service Connect の仕組みと、大きなパフォーマンス上のメリットが得られる理由を確認する。
- VPC Service Controls を使用して安全な境界を作成し、ベクトル検索インデックス エンドポイント上の Vertex AI やその他の Google API に対する公共のインターネット経由のアクセスを許可または拒否する方法を確認する。
- Google Cloud に関するリファレンス アーキテクチャ、図、ベスト プラクティスを確認する。Cloud アーキテクチャ センターをご覧ください。