
מטרות
העברת טקסט שזוהה על ידי Cloud Vision API אל Cloud Translation API.
אפשר ליצור מילוני מונחים של Cloud Translation ולהשתמש בהם כדי להתאים אישית תרגומים של Cloud Translation API.
יצירת ייצוג אודיו של טקסט מתורגם באמצעות Text-to-Speech API.
עלויות
לכל Google Cloud API יש מבנה תמחור נפרד.פרטים על התמחור מופיעים במדריך התמחור של Cloud Vision, במדריך התמחור של Cloud Translation ובמדריך התמחור של Text-to-Speech.
לפני שמתחילים
חשוב לוודא שיש לכם:- פרויקט במסוףGoogle Cloud עם Vision API, Cloud Translation API ו-Text-to-Speech API מופעלים
- היכרות בסיסית עם תכנות ב-Python או ב-NodeJS
הגדרה של ספריות לקוח
במדריך הזה נעשה שימוש בספריות הלקוח של Vision, Translation ו-Text-to-Speech.
כדי להתקין את ספריות הלקוח הרלוונטיות, מריצים את הפקודות הבאות מהטרמינל.
Python
  pip install --upgrade google-cloud-vision
  pip install --upgrade google-cloud-translate
  pip install --upgrade google-cloud-texttospeech
Node.js
  npm install @google-cloud/vision
  npm install @google-cloud/translate
  npm install @google-cloud/text-to-speech
הגדרת הרשאות ליצירת מילון מונחים
כדי ליצור מילוני מונחים לתרגום, צריך להשתמש במפתח של חשבון שירות עם הרשאות 'עורך Cloud Translation API'.
כדי להגדיר מפתח של חשבון שירות עם הרשאות עריכה ב-Cloud Translation API:
יוצרים חשבון שירות:
נכנסים לדף Service Accounts במסוף Google Cloud .
בוחרים את הפרויקט הרצוי.
לוחצים על יצירת חשבון שירות.
כותבים שם בשדה Service account name. השדה Service account ID ימולא במסוףGoogle Cloud בהתאם לשם הזה.
אופציונלי: בשדה Service account description, מזינים תיאור של חשבון השירות.
לוחצים על Create and continue.
לוחצים על השדה Select a role (בחירת תפקיד) ובוחרים באפשרות Cloud Translation > Cloud Translation API Editor (עורך Cloud Translation API).
לוחצים על Done כדי לסיים ליצור את חשבון השירות.
חשוב לא לסגור את החלון של הדפדפן, כי תשתמשו בו גם בשלב הבא.
מורידים מפתח JSON לחשבון השירות שיצרתם:
- במסוף Google Cloud , לוחצים על כתובת האימייל של חשבון השירות שיצרתם.
- לוחצים על Keys.
- לוחצים על Add key ואז על Create new key.
לוחצים על יצירה. למחשב שלכם תתבצע הורדה של קובץ JSON עם המפתח.
חשוב לאחסן את קובץ המפתח באופן מאובטח כי הוא יכול לשמש לצורך אימות כחשבון השירות שלכם. אפשר להעביר את הקובץ לאן שרוצים ולשנות את השם שלו למה שרוצים.
לוחצים על Close.
בטרמינל, מגדירים את המשתנה GOOGLE_APPLICATION_CREDENTIALS באמצעות הפקודה הבאה. מחליפים את path_to_key בנתיב של קובץ ה-JSON שהורדתם ומכיל את המפתח החדש של חשבון השירות.
Linux או macOS
export GOOGLE_APPLICATION_CREDENTIALS=path_to_key
Windows
set GOOGLE_APPLICATION_CREDENTIALS=path_to_key
ייבוא ספריות
במדריך הזה נעשה שימוש בייבוא המערכת ובייבוא ספריית הלקוח הבאים.
Python
לפני שמנסים את הדוגמה הזו, צריך לפעול לפי Pythonההוראות להגדרה במדריך למתחילים בנושא Cloud Translation באמצעות ספריות לקוח. מידע נוסף מופיע במאמרי העזרה של Cloud Translation Python API.
כדי לבצע אימות ב-Cloud Translation, צריך להגדיר את Application Default Credentials. מידע נוסף זמין במאמר הגדרת אימות לסביבת פיתוח מקומית.
Node.js
לפני שמנסים את הדוגמה הזו, צריך לפעול לפי Node.jsההוראות להגדרה במדריך למתחילים בנושא Cloud Translation באמצעות ספריות לקוח. מידע נוסף מופיע במאמרי העזרה של Cloud Translation Node.js API.
כדי לבצע אימות ב-Cloud Translation, צריך להגדיר את Application Default Credentials. מידע נוסף זמין במאמר הגדרת אימות לסביבת פיתוח מקומית.
הגדרת מזהה הפרויקט
צריך לשייך Google Cloud פרויקט לכל בקשה שנשלחת אל Google Cloud API. מגדירים את משתנה הסביבה GCLOUD_PROJECT מהטרמינל כדי לציין את Google Cloud הפרויקט.
בפקודה הבאה, מחליפים את project-id במזהה הפרויקט. Google Cloud מריצים את הפקודה הבאה מהטרמינל.
Linux או macOS
export GCLOUD_PROJECT=project-id
Windows
set GCLOUD_PROJECT=project-id
שימוש ב-Vision כדי לזהות טקסט מתמונה
שימוש ב-Vision API כדי לזהות ולחלץ טקסט מתמונה.
Vision API משתמש בזיהוי תווים אופטי (OCR) כדי לתמוך בשני פיצ'רים של זיהוי טקסט: זיהוי של טקסט צפוף, או DOCUMENT_TEXT_DETECTION, וזיהוי של טקסט דליל, או TEXT_DETECTION.
בדוגמה הבאה של קוד אפשר לראות איך משתמשים בתכונה DOCUMENT_TEXT_DETECTION של Vision API כדי לזהות טקסט בתמונה עם טקסט צפוף.
Python
לפני שמנסים את הדוגמה הזו, צריך לפעול לפי Pythonההוראות להגדרה במדריך למתחילים בנושא Cloud Translation באמצעות ספריות לקוח. מידע נוסף מופיע במאמרי העזרה של Cloud Translation Python API.
כדי לבצע אימות ב-Cloud Translation, צריך להגדיר את Application Default Credentials. מידע נוסף זמין במאמר הגדרת אימות לסביבת פיתוח מקומית.
Node.js
לפני שמנסים את הדוגמה הזו, צריך לפעול לפי Node.jsההוראות להגדרה במדריך למתחילים בנושא Cloud Translation באמצעות ספריות לקוח. מידע נוסף מופיע במאמרי העזרה של Cloud Translation Node.js API.
כדי לבצע אימות ב-Cloud Translation, צריך להגדיר את Application Default Credentials. מידע נוסף זמין במאמר הגדרת אימות לסביבת פיתוח מקומית.
שימוש בתרגום עם מילוני מונחים
אחרי שחולצים טקסט מתמונה, אפשר להשתמש במילוני מונחים לתרגום כדי להתאים אישית את התרגום של הטקסט שחולץ. מילוני מונחים מספקים תרגומים מוגדרים מראש שמבטלים את התרגומים של מונחים ייעודיים ב-Cloud Translation API.
תרחישי שימוש במילון המונחים:
שמות מוצרים: לדוגמה, 'Google Home' צריך להיות מתורגם ל-'Google Home'.
מילים דו-משמעיות: לדוגמה, המילה 'bat' יכולה להתייחס למחבט ספורט או לעטלף. אם אתם יודעים שאתם מתרגמים מילים שקשורות לספורט, יכול להיות שתרצו להשתמש במילון מונחים כדי להזין ל-Cloud Translation API את התרגום של המילה bat בהקשר של ספורט, ולא בהקשר של בעל חיים.
מילים שאולות: לדוגמה, המילה bouillabaisse בצרפתית מתורגמת ל-bouillabaisse באנגלית. השפה האנגלית שאלה את המילה bouillabaisse מהשפה הצרפתית. דובר אנגלית שלא מכיר את ההקשר התרבותי הצרפתי אולי לא יידע שבוילבאס היא מנת תבשיל דגים צרפתית. אפשר להשתמש במילוני מונחים כדי לשנות תרגום. לדוגמה, אפשר להגדיר ש-bouillabaisse בצרפתית יתורגם ל-fish stew באנגלית.
יצירת קובץ מילון מונחים
Cloud Translation API מקבל קובצי מילון מונחים בפורמטים TSV, CSV או TMX. במדריך הזה נשתמש בקובץ CSV שהועלה ל-Cloud Storage כדי להגדיר קבוצות של מונחים שווי ערך.
כדי ליצור קובץ CSV של מילון מונחים:
מציינים את השפה של עמודה באמצעות קודי שפה בתקן ISO-639 או בתקן BCP-47 בשורה הראשונה של קובץ ה-CSV.
fr,en,
מפרטים זוגות של מונחים מקבילים בכל שורה בקובץ ה-CSV. מפרידים בין התנאים באמצעות פסיקים. בדוגמה הבאה מוגדר תרגום לאנגלית של כמה מילים צרפתיות שקשורות לקולינריה.
fr,en,
chèvre,goat cheese,
crème brulée,crème brulée,
bouillabaisse,fish stew,
steak frites,steak with french fries,
הגדרת וריאנטים של מילה. Cloud Translation API הוא תלוי אותיות רישיות ורגיש לתווים מיוחדים כמו מילים עם סימני הטעמה. חשוב לוודא שהמילון מטפל בווריאציות של מילה על ידי הגדרה מפורשת של איותים שונים של המילה.
fr,en,
chevre,goat cheese,
Chevre,Goat cheese,
chèvre,goat cheese,
Chèvre,Goat cheese,
crème brulée,crème brulée,
Crème brulée,Crème brulée,
Crème Brulée,Crème Brulée,
bouillabaisse,fish stew,
Bouillabaisse,Fish stew,
steak frites,steak with french fries,
Steak frites,Steak with french fries,
Steak Frites,Steak with French Fries,
מעלים את מילון המונחים לקטגוריה של Cloud Storage. לצורך המדריך הזה, לא צריך להעלות קובץ מונחים לקטגוריה של Cloud Storage ולא צריך ליצור קטגוריה של Cloud Storage. במקום זאת, כדי להימנע מעלויות של Cloud Storage, אפשר להשתמש בקובץ המילון המונחים שזמין לכולם ונוצר לצורך המדריך הזה. שולחים את ה-URI של קובץ מילון מונחים ב-Cloud Storage אל Cloud Translation API כדי ליצור משאב מילון מונחים. ה-URI של קובץ המילון המונחים שזמין לכולם במדריך הזה הוא gs://cloud-samples-data/translation/bistro_glossary.csv. כדי להוריד את המילון, לוחצים על קישור ה-URI שלמעלה, אבל לא פותחים אותו בכרטיסייה חדשה.
יצירת משאב של מילון מונחים
כדי להשתמש במילון מונחים, צריך ליצור משאב מילון מונחים באמצעות Cloud Translation API. כדי ליצור משאב מילון מונחים, שולחים את ה-URI של קובץ מילון מונחים ב-Cloud Storage אל Cloud Translation API.
חשוב לוודא שאתם משתמשים במפתח של חשבון שירות עם הרשאות "עריכה של Cloud Translation API", ולוודא שהגדרתם את מזהה הפרויקט מהטרמינל.
הפונקציה הבאה יוצרת משאב של מילון מונחים. בעזרת המילון הזה, תוכלו להתאים אישית את בקשת התרגום בשלב הבא של המדריך הזה.
Python
לפני שמנסים את הדוגמה הזו, צריך לפעול לפי Pythonההוראות להגדרה במדריך למתחילים בנושא Cloud Translation באמצעות ספריות לקוח. מידע נוסף מופיע במאמרי העזרה של Cloud Translation Python API.
כדי לבצע אימות ב-Cloud Translation, צריך להגדיר את Application Default Credentials. מידע נוסף זמין במאמר הגדרת אימות לסביבת פיתוח מקומית.
Node.js
לפני שמנסים את הדוגמה הזו, צריך לפעול לפי Node.jsההוראות להגדרה במדריך למתחילים בנושא Cloud Translation באמצעות ספריות לקוח. מידע נוסף מופיע במאמרי העזרה של Cloud Translation Node.js API.
כדי לבצע אימות ב-Cloud Translation, צריך להגדיר את Application Default Credentials. מידע נוסף זמין במאמר הגדרת אימות לסביבת פיתוח מקומית.
תרגום באמצעות מילונים
אחרי שיוצרים משאב מילון מונחים, אפשר להשתמש בו כדי להתאים אישית את התרגומים של הטקסט ששולחים אל Cloud Translation API.
הפונקציה הבאה משתמשת במשאב המילון המונחים שיצרתם קודם כדי להתאים אישית את תרגום הטקסט.
Python
לפני שמנסים את הדוגמה הזו, צריך לפעול לפי Pythonההוראות להגדרה במדריך למתחילים בנושא Cloud Translation באמצעות ספריות לקוח. מידע נוסף מופיע במאמרי העזרה של Cloud Translation Python API.
כדי לבצע אימות ב-Cloud Translation, צריך להגדיר את Application Default Credentials. מידע נוסף זמין במאמר הגדרת אימות לסביבת פיתוח מקומית.
Node.js
לפני שמנסים את הדוגמה הזו, צריך לפעול לפי Node.jsההוראות להגדרה במדריך למתחילים בנושא Cloud Translation באמצעות ספריות לקוח. מידע נוסף מופיע במאמרי העזרה של Cloud Translation Node.js API.
כדי לבצע אימות ב-Cloud Translation, צריך להגדיר את Application Default Credentials. מידע נוסף זמין במאמר הגדרת אימות לסביבת פיתוח מקומית.
שימוש בהמרת טקסט לדיבור (TTS) עם שפת סימון לסינתזת דיבור (SSML)
עכשיו, אחרי שהתאמתם אישית תרגום של טקסט שזוהה בתמונה, אתם מוכנים להשתמש ב-Text-to-Speech API. באמצעות Text-to-Speech API אפשר ליצור אודיו סינתטי של הטקסט המתורגם.
Text-to-Speech API יוצר אודיו סינתטי ממחרוזת של טקסט פשוט או ממחרוזת של טקסט שמסומן באמצעות Speech Synthesis Markup Language (SSML). SSML היא שפת תגי עיצוב שתומכת בהוספת הערות לטקסט באמצעות תגי SSML. אפשר להשתמש בתגי SSML כדי להשפיע על האופן שבו Text-to-Speech API מעצב את יצירת הדיבור הסינתטי.
הפונקציה הבאה ממירה מחרוזת של SSML לקובץ MP3 של דיבור סינתטי.
Python
לפני שמנסים את הדוגמה הזו, צריך לפעול לפי Pythonההוראות להגדרה במדריך למתחילים בנושא Cloud Translation באמצעות ספריות לקוח. מידע נוסף מופיע במאמרי העזרה של Cloud Translation Python API.
כדי לבצע אימות ב-Cloud Translation, צריך להגדיר את Application Default Credentials. מידע נוסף זמין במאמר הגדרת אימות לסביבת פיתוח מקומית.
Node.js
לפני שמנסים את הדוגמה הזו, צריך לפעול לפי Node.jsההוראות להגדרה במדריך למתחילים בנושא Cloud Translation באמצעות ספריות לקוח. מידע נוסף מופיע במאמרי העזרה של Cloud Translation Node.js API.
כדי לבצע אימות ב-Cloud Translation, צריך להגדיר את Application Default Credentials. מידע נוסף זמין במאמר הגדרת אימות לסביבת פיתוח מקומית.
איך הכל משתלב יחד
בשלבים הקודמים הגדרתם פונקציות ב-hybrid_glossaries.py שמשתמשות ב-Vision, בתרגום ובהמרת טקסט לדיבור. עכשיו אפשר להשתמש בפונקציות האלה כדי ליצור דיבור סינתטי של טקסט מתורגם מהתמונה הבאה.
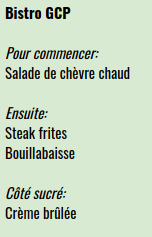
הקוד הבא קורא לפונקציות שמוגדרות ב-hybrid_glossaries.py כדי:
יצירת משאב מילון מונחים של Cloud Translation API
תשתמש ב-Vision API כדי לזהות טקסט בתמונה שלמעלה
לבצע תרגום של הטקסט שזוהה באמצעות מילון מונחים של Cloud Translation API
ליצור דיבור סינתטי של הטקסט המתורגם באמצעות המרת טקסט לדיבור (TTS)
Python
לפני שמנסים את הדוגמה הזו, צריך לפעול לפי Pythonההוראות להגדרה במדריך למתחילים בנושא Cloud Translation באמצעות ספריות לקוח. מידע נוסף מופיע במאמרי העזרה של Cloud Translation Python API.
כדי לבצע אימות ב-Cloud Translation, צריך להגדיר את Application Default Credentials. מידע נוסף זמין במאמר הגדרת אימות לסביבת פיתוח מקומית.
Node.js
לפני שמנסים את הדוגמה הזו, צריך לפעול לפי Node.jsההוראות להגדרה במדריך למתחילים בנושא Cloud Translation באמצעות ספריות לקוח. מידע נוסף מופיע במאמרי העזרה של Cloud Translation Node.js API.
כדי לבצע אימות ב-Cloud Translation, צריך להגדיר את Application Default Credentials. מידע נוסף זמין במאמר הגדרת אימות לסביבת פיתוח מקומית.
הרצת הקוד
כדי להריץ את הקוד, מזינים את הפקודה הבאה בטרמינל בספרייה שבה הקוד נמצא:
Python
python hybrid_tutorial.py
Node.js
node hybridGlossaries.js
הפלט הבא מופיע:
Created glossary bistro-glossary.
Audio content written to file resources/example.mp3
אחרי שמריצים את הקוד, עוברים לספרייה resources מתוך הספרייה hybrid_glossaries.
בודקים אם יש קובץ example.mp3 בספריית המשאבים.
מאזינים לקטע האודיו הבא כדי לוודא שקובץ example.mp3 נשמע זהה.
פתרון בעיות שמקפיצות הודעות שגיאה
403 IAM permission 'cloudtranslate.glossaries.create' denied.
החריגה הזו מתרחשת כשמשתמשים במפתח של חשבון שירות בלי הרשאות של 'עורך Cloud Translation API'.
KeyError: 'GCLOUD_PROJECT'
השגיאה הזו מתרחשת אם לא מגדירים את המשתנה GCLOUD_PROJECT.
400 Invalid resource name project id
החריגה הזו מתרחשת אם משתמשים בשם מילון מונחים שמכיל תווים שאינם אותיות קטנות, ספרות, נקודות, נקודתיים או מקפים, או אם משתמשים במפתח של חשבון שירות ללא הרשאות של 'עורך Cloud Translation API'.
File filename was not found.
החריגה הזו מתרחשת כשמגדירים את המשתנה GOOGLE_APPLICATION_CREDENTIALS לנתיב קבצים לא תקין.
Could not automatically determine credentials. Please set GOOGLE_APPLICATION_CREDENTIALS or explicitly create credentials and re-run the application
החריגה הזו מתרחשת אם לא מגדירים את המשתנה GOOGLE_APPLICATION_CREDENTIALS.
Forbidden: 403 POST API has not been used or is disabled
האזהרה הזו מוצגת כששולחים קריאה ל-Cloud Translation API, ל-Cloud Vision API או ל-Text-to-Speech API בלי להפעיל את ה-APIs האלה.
AttributeError: 'module' object has no attribute 'escape'
Python 2.7.10 או גרסאות קודמות לא תואמות ל-
HTML. כדי לפתור את השגיאה הזו, צריך להשתמש בסביבה וירטואלית של Python. הסביבה הווירטואלית תשתמש בגרסה החדשה ביותר של Python.UnicodeEncodeError
Python 2.7.10 או גרסאות קודמות לא תואמות ל-
HTML. כדי לפתור את השגיאה הזו, צריך להשתמש בסביבה וירטואלית של Python. הסביבה הווירטואלית תשתמש בגרסה החדשה ביותר של Python.
סידור וארגון
אם לא צריך את הפרויקט, אפשר להשתמש בGoogle Cloud מסוף כדי למחוק אותו. מחיקת הפרויקט תמנע חיובים נוספים בחשבון לחיוב ב-Cloud על המשאבים שבהם השתמשתם במדריך הזה.
מחיקת הפרויקט
- במסוףGoogle Cloud , עוברים לדף Projects.
- ברשימת הפרויקטים, בוחרים את הפרויקט שרוצים למחוק ולוחצים על מחיקה.
- כדי למחוק את הפרויקט, כותבים את מזהה הפרויקט בתיבת הדו-שיח ולוחצים על Shut down.
המאמרים הבאים
כל הכבוד! הרגע השתמשת ב-Vision OCR כדי לזהות טקסט בתמונה. לאחר מכן, יצרתם מילון מונחים לתרגום וביצעתם תרגום באמצעות המילון הזה. לאחר מכן, השתמשת בהמרת טקסט לדיבור כדי ליצור אודיו סינתטי של הטקסט המתורגם.
כדי להרחיב את הידע שלכם בנושא Vision, Translation ו-Text-to-Speech:
- יוצרים מילון מונחים משלכם. כך יוצרים קטגוריה ב-Cloud Storage ומעלים אליה את קובץ ה-CSV של המילון.
- אפשר לנסות דרכים אחרות לשימוש במילוני מונחים לתרגום.
- איך משתמשים ב-Cloud Storage עם Cloud Vision OCR
- מידע נוסף על שימוש ב-SSML עם המרת טקסט לדיבור
- כך משתמשים בשדה
imageContextשל Vision API כדי להעביר הקשר נוסף לגבי תמונה כשמשתמשים ב-OCR של Vision. - מדריכים של הקהילה