
Cloud Run provides an ephemeral disk volume that persists only for the duration of your instance. This feature lets you specify the amount of disk you need and the location for mounting it. Cloud Run will then allocate that amount of disk to your resource.
Disks are automatically provisioned, pre-formatted to ext4, and encrypted with instance-specific
keys at startup. Ephemeral disk creates your volume so that any user can read or
write to it. Because the storage is ephemeral, all data is permanently deleted
when the instance shuts down. This includes shutdowns caused by:
- Instance crashes
- Job task completion (success or failure)
Disks are dedicated to a specific instance and are not shared across other instances. You have control over the file system structure with a configurable mount point for each volume.
Before shutting down an instance, Cloud Run sends a SIGTERM signal
to all the containers in an instance, indicating the start of a 10-second period
before the actual shutdown occurs, at which point Cloud Run sends
a SIGKILL signal. You can use this 10-second window to perform cleanup operations
such as doing a final round of copying disk content persistent storage.
Use cases
You can use ephemeral disk for the following:
- Data processing workloads: When processing large data files in Cloud Run, you typically store the entire file in memory or orchestrate splitting it up into smaller pieces. With ephemeral storage, you won't need to pay for large amounts of memory to make a temporary local copy of your data. You will also be able to process larger data sets.
- Caching: In web serving use cases, caching data on disk rather than fetching from remote storage can optimize your application's latency.
Storage and instance limits
The following limits apply:
- Instance storage limit: each instance is limited to 10 GB of total space by default. If necessary, request a quota increase.
- Instance volume limit: each instance is limited to a maximum of 10 volumes.
- Project limit: each project is limited to 100 GB per region by default. If necessary, request a quota increase.
Request a quota increase
Projects using a Cloud Run ephemeral disk in a region for the first time are automatically granted 10 GB per instance, per region limit and 100 GB per project, per region limit.
If you need additional capacity, you must request a quota increase for your Cloud Run job. Use the links provided in the following buttons to request the quota you need.
| Current quota | Quota link |
|---|---|
| 10 GB per instance | Request greater quota per instance |
| 100 GB per project | Request greater quota per project |
For more information on requesting quota increases, see How to increase quota.
Limitations
The following limitations apply:- Ephemeral disk is only available in the second generation execution environment. By default, Cloud Run jobs use the second generation execution environment.
- Live migration is not supported. This means that Cloud Run jobs will be less reliable, especially long-running jobs.
Disallowed paths
Cloud Run does not allow you to mount a volume at /dev, /proc, or
/sys, or on their subdirectories.
Supported regions
The ephemeral disk feature is available in the following regions:
- For non-GPU workloads, ephemeral disk is available in:
- If you use GPUs, ephemeral disk is available in all regions that support GPUs.
Before you begin
- Sign in to your Google Cloud account. If you're new to Google Cloud, create an account to evaluate how our products perform in real-world scenarios. New customers also get $300 in free credits to run, test, and deploy workloads.
-
In the Google Cloud console, on the project selector page, select or create a Google Cloud project.
Roles required to select or create a project
- Select a project: Selecting a project doesn't require a specific IAM role—you can select any project that you've been granted a role on.
-
Create a project: To create a project, you need the Project Creator role
(
roles/resourcemanager.projectCreator), which contains theresourcemanager.projects.createpermission. Learn how to grant roles.
-
Verify that billing is enabled for your Google Cloud project.
-
In the Google Cloud console, on the project selector page, select or create a Google Cloud project.
Roles required to select or create a project
- Select a project: Selecting a project doesn't require a specific IAM role—you can select any project that you've been granted a role on.
-
Create a project: To create a project, you need the Project Creator role
(
roles/resourcemanager.projectCreator), which contains theresourcemanager.projects.createpermission. Learn how to grant roles.
-
Verify that billing is enabled for your Google Cloud project.
- Install and initialize the gcloud CLI.
-
Update components:
gcloud components update
- Review the Cloud Run pricing page for CPU, memory, and network egress. The entire size of the provisioned disk and the lifetime of the instance that is using it contribute to your cost.
Required roles
To get the permissions that you need to configure an ephemeral disk, ask your administrator to grant you the following IAM roles:
- Cloud Run Developer (
roles/run.developer) on the Cloud Run job - Service Account User (
roles/iam.serviceAccountUser) on the service identity
For a list of IAM roles and permissions that are associated with Cloud Run, see Cloud Run IAM roles and Cloud Run IAM permissions. If your Cloud Run job interfaces with Google Cloud APIs, such as Cloud Client Libraries, see the service identity configuration guide. For more information about granting roles, see deployment permissions and manage access.
Create and mount an ephemeral disk
You can create and mount an ephemeral disk using the Google Cloud console, Google Cloud CLI, YAML, or Terraform:
Console
In the Google Cloud console, go to the Cloud Run Jobs page:
Click Deploy container to fill out the initial job settings page. If you are configuring an existing job, select the job, then click View and edit job configuration.
Click Containers, Connections, Security to expand the job properties page.
Click the Container tab.
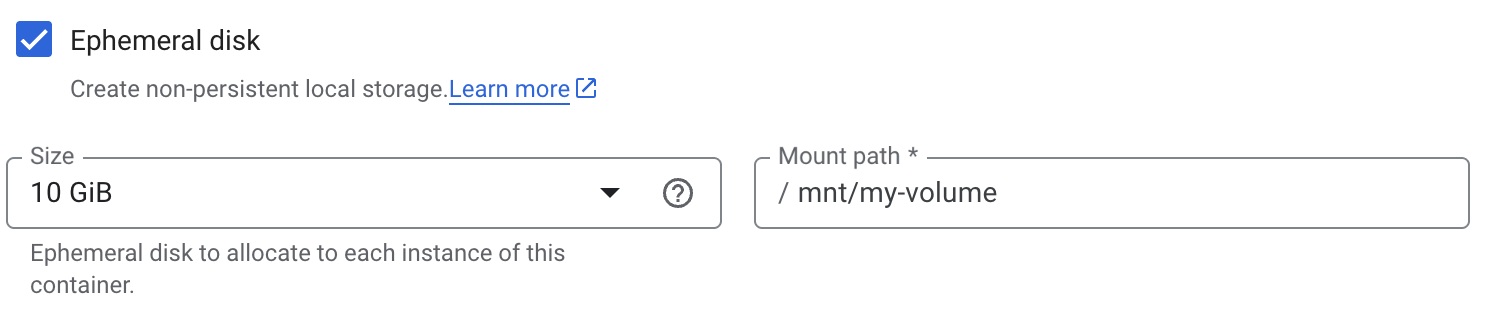
- Under Resources:
- Select Ephemeral Disk.
- Specify Ephemeral Disk size from the menu.
- Enter the mount path.
- Under Resources:
Click Create or Update.
gcloud
To add a volume and mount it:
gcloud beta run jobs update JOB \
    --add-volume=name=VOLUME_NAME,type=ephemeral-disk,size=SIZE \
    --add-volume-mount=volume=VOLUME_NAME,mount-path=MOUNT_PATH
Replace the following:
- JOB: the name of your job.
- VOLUME_NAME: the name you want to give your volume.
- SIZE: the disk size—for example,
100Gi. The size must be at least10Giforephemeral-diskvolumes. - MOUNT_PATH: the relative path where you are mounting the volume,
for example,
/mnt/my-volume.
YAML
If you are creating a new job, skip this step. If you are updating an existing job, download its YAML configuration:
gcloud run jobs describe JOB_NAME --format export > job.yaml
Configure the YAML file:
apiVersion: run.googleapis.com/v1
kind: Job
metadata:
  name: JOB
  labels:
    cloud.googleapis.com/location: REGION
  annotations:
    run.googleapis.com/launch-stage: BETA
spec:
  template:
    spec:
      template:
        spec:
          volumes:
          - name: VOLUME_NAME
            emptyDir:
              medium: Disk
              sizeLimit: SIZE
          containers:
          - image: IMAGE_URL
            volumeMounts:
            - name: VOLUME_NAME
              mountPath: MOUNT_PATH
Replace the following:
- JOB: the name of your job.
- REGION: the Google Cloud region.
- IMAGE_URL: a reference to the
container image—for
example,
us-docker.pkg.dev/cloudrun/container/job:latest. - VOLUME_NAME: the name you want to give your volume.
- MOUNT_PATH: the relative path where you are mounting the volume,
for example,
/mnt/my-volume. - SIZE: the disk size—for example,
100Gi. The size must be at least10Giforephemeral-diskvolumes.
Create or update the job using the following command:
gcloud run jobs replace job.yaml
Terraform
To learn how to apply or remove a Terraform configuration, see Basic Terraform commands.
Add the following to agoogle_cloud_run_v2_job
resource in your Terraform configuration: resource "google_cloud_run_v2_job" "default" {
name = "JOB"
location = "REGION"
deletion_protection = "true"
launch_stage = "BETA"
template {
template {
containers {
image = "IMAGE_URL"
volume_mounts {
name = "VOLUME_NAME"
mount_path = "MOUNT_PATH"
}
}
volumes {
name = "VOLUME_NAME"
empty_dir {
medium = "DISK"
size_limit = "SIZE"
}
}
}
}
lifecycle {
ignore_changes = [
launch_stage,
]
}
}
Replace the following:
- JOB: the name of your job.
- REGION: the Google Cloud region.
- IMAGE_URL: a reference to the
container image—for
example,
us-docker.pkg.dev/cloudrun/container/job:latest. - VOLUME_NAME: the name you want to give your volume.
- MOUNT_PATH: the relative path where you are mounting the volume,
for example,
/mnt/my-volume. - SIZE: the disk size—for example,
100Gi. The size must be at least10Giforephemeral-diskvolumes.
Reading and writing to a volume
If you use the Cloud Run volume mount feature, you access a mounted volume using the same libraries in your programming language that you use to read and write files on your local file system.
This is especially useful if you're using an existing container that expects data to be stored on the local file system and uses regular file system operations to access it.
The following snippets assume a volume mount with a mountPath set to /mnt/my-volume.
Nodejs
Use the File System module to create a new file or append to an existing file
in the volume, /mnt/my-volume:
var fs = require('fs');
fs.appendFileSync('/mnt/my-volume/sample-logfile.txt', 'Hello logs!', { flag: 'a+' });
Python
Write to a file kept in the volume, /mnt/my-volume:
f = open("/mnt/my-volume/sample-logfile.txt", "a")Go
Use the os package to create a new file kept in the volume, /mnt/my-volume:
f, err := os.Create("/mnt/my-volume/sample-logfile.txt")Java
Use the Java.io.File class to create a log file in the volume, /mnt/my-volume:
import java.io.File;
File f = new File("/mnt/my-volume/sample-logfile.txt");
Clear and remove volumes and volume mounts
You can clear all volumes and mounts or you can remove individual volumes and volume mounts.
Clear all volumes and volume mounts
To clear all volumes and volume mounts from your single-container job, run the following command:
gcloud run jobs update JOB \
    --clear-volumes
    --clear-volume-mounts
If you have multiple containers, follow the sidecars CLI conventions to clear volumes and volume mounts:
gcloud run jobs update JOB \
    --clear-volumes \
    --clear-volume-mounts \
    --container=container1 \
    --clear-volumes \
    -–clear-volume-mounts \
    --container=container2 \
    --clear-volumes \
    -–clear-volume-mounts
Remove individual volumes and volume mounts
In order to remove a volume, you must also remove all volume mounts using that volume.
To remove individual volumes or volume mounts, use the remove-volume and remove-volume-mount flags:
gcloud run jobs update JOB \
    --remove-volume VOLUME_NAME
    --container=container1 \
    --remove-volume-mount MOUNT_PATH \
    --container=container2 \
    --remove-volume-mount MOUNT_PATH
Best practices
Adhere to the following best practices to effectively manage ephemeral data and optimize storage performance.
Copy to persistent storage
If you intend to copy the ephemeral disk contents to persistent storage, such as
a Cloud Storage bucket, we recommend incrementally copying, rather than relying
on the 10-second SIGTERM to SIGKILL grace period.
See Container runtime contract
for more information on forced shutdowns.
Cloud Run can read and write from Cloud Storage without any additional networking setup. To achieve optimal performance, we recommend routing traffic to and from Cloud Storage through a VPC network using Direct VPC.
This method works if you don't need the Cloud Run resource to access the internet. If you do need internet access, either set up Cloud NAT, or see Internal traffic to a Google API.
To configure Direct VPC egress with a job complete the following steps:
In the Google Cloud console, go to the Cloud Run page:
If you are configuring a new job, click the Jobs tab and select Deploy container. Fill out the initial job settings page as needed. If you are configuring an existing job, click the job, then click View and edit job configuration.
Click Containers, Connections, Security to expand the job properties page.
Click the Connections tab.
Click Connect to a VPC for outbound traffic.
Click Send traffic directly to a VPC.
In the Network field, select the VPC network that you want to send traffic to.
In the Subnet field, select the subnet where your job receives IP addresses from. You can execute multiple jobs on the same subnet.
For Traffic routing, select one Route all traffic to the VPC to send all outbound traffic through the VPC network.
Click Create or Update.
To verify that your job is on your VPC network, click the job, then click the Configuration tab. The network and subnet are listed in the VPC card.
Enable Private Google Access on the subnet you connected to.