基本設定
標準的 Manufacturing Data Engine (MDE) 部署作業預設不會套用任何設定,因此您必須先設定,才能開始擷取資料。
本指南將逐步說明如何完成基本的 MDE 設定。舉例來說,測試系統是否能端對端運作。本指南說明如何為所有三種原型建立訊息類別、型別和剖析器。
如果您打算使用 Manufacturing Connect Edge (MCe) 擷取資料,請改為部署預設設定套件。
您可以透過 MDE API 或網頁介面完成這項設定。
訊息類別
本節提供 MDE 中可用訊息類別的範例。
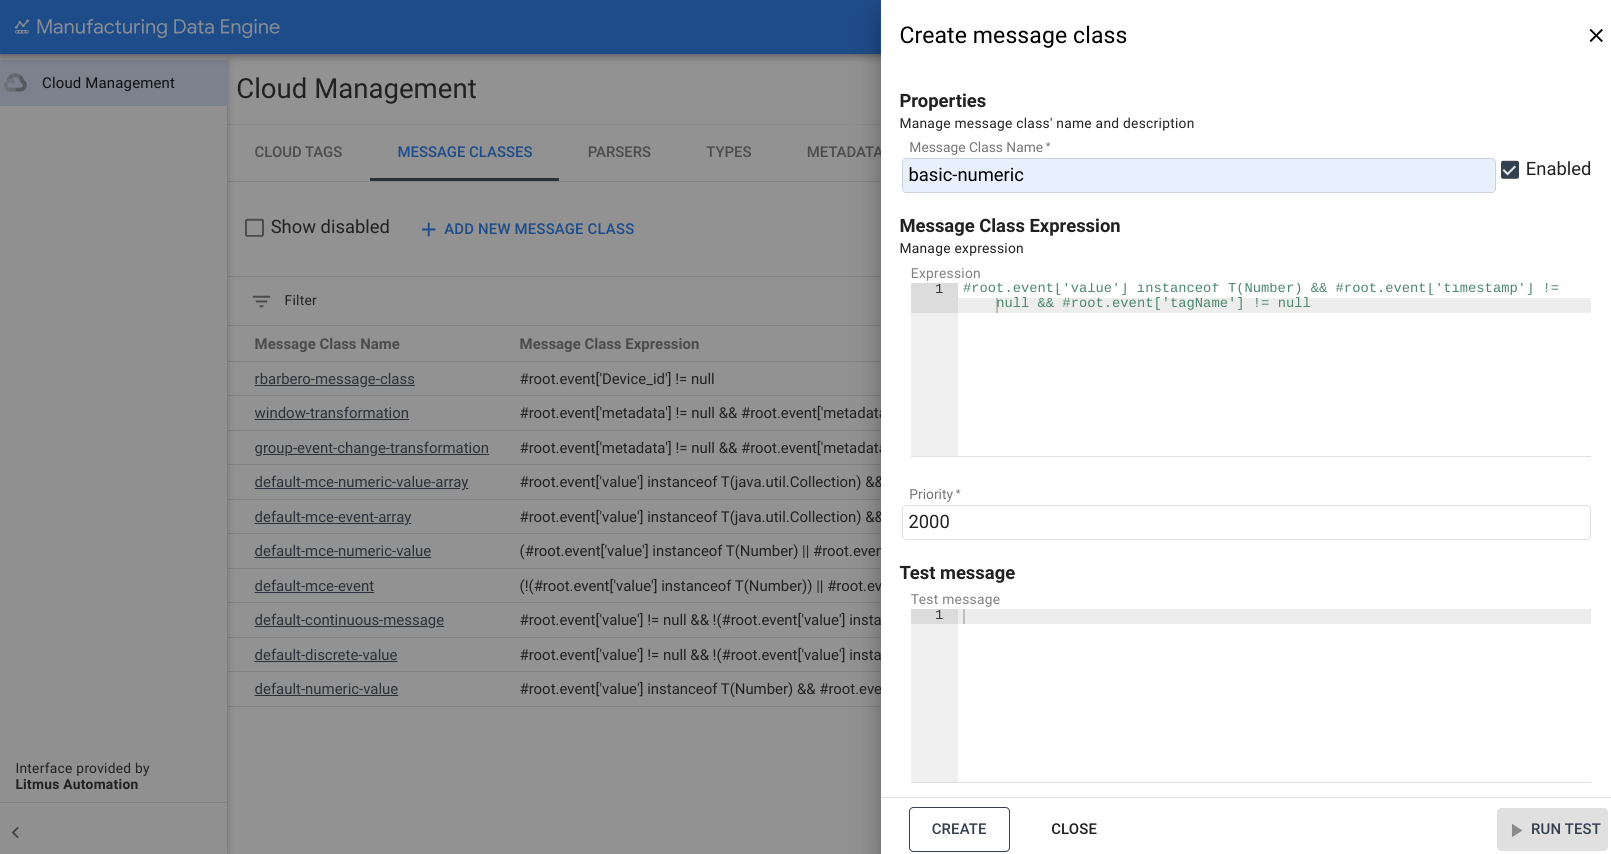
「numeric」的訊息類別
以下是 basic-numeric 訊息類別的範例:
REST
POST /configuration/v1/message-classes
{
   "name": "basic-numeric",
   "priority": 2000,
   "expression": "#root.event['value'] instanceof T(Number) && #root.event['timestamp'] != null && #root.event['tagName'] != null"
}
網頁介面
訊息類別名稱:basic-numeric
- 在 MDE 網頁介面中,按一下「訊息類別」。
- 按一下「新增訊息類別」。
- 將「Message Class name」(訊息類別名稱) 填入
basic-numeric。 複製下列運算式,並貼到「運算式」方塊中:
#root.event['value'] instanceof T(Number) && #root.event['timestamp'] != null && #root.event['tagName'] != null將優先順序變更為「
2000」。點選「建立」。
「discrete」的訊息類別
以下是 basic-discrete 訊息類別的範例:
REST
POST /configuration/v1/message-classes
   {
      "name": "basic-discrete",
      "priority": 1975,
      "expression": "#root.event['value'] != null && !(#root.event['value'] instanceof T(Number)) && #root.event['timestamp'] != null && #root.event['tagName'] != null"
   }
網頁介面
訊息類別名稱:basic-discrete
- 在 MDE 網頁介面中,按一下「訊息類別」。
- 按一下「新增訊息類別」。
- 將「Message Class name」(訊息類別名稱) 填入
basic-discrete。 複製下列運算式,並貼到「運算式」方塊中:
#root.event['value'] != null && !(#root.event['value'] instanceof T(Number)) && #root.event['timestamp'] != null && #root.event['tagName'] != null將優先順序變更為「
1975」。點選「建立」。

「continuous」的訊息類別
以下是 basic-continuous 訊息類別的範例:
REST
POST /configuration/v1/message-classes
   {
      "name": "basic-continuous",
      "priority": 1950,
      "expression": "#root.event['value'] != null && !(#root.event['value'] instanceof T(Number)) && #root.event['startTimestamp'] != null && #root.event['endTimestamp'] != null && #root.event['tagName'] != null"
   }
網頁介面
訊息類別名稱:basic-continuous
- 在 MDE 網頁介面中,按一下「訊息類別」。
- 按一下「新增訊息類別」。
- 將「Message Class name」(訊息類別名稱) 填入
basic-continuous。 複製下列運算式,並貼到「運算式」方塊中:
#root.event['value'] != null && !(#root.event['value'] instanceof T(Number)) && #root.event['startTimestamp'] != null && #root.event['endTimestamp'] != null && #root.event['tagName'] != null將優先順序變更為「
1950」。點選「建立」。

類型
本節將概略介紹 MDE 中可用的類型。
「numeric」的類型
以下是 basic-numeric 類型的範例:
REST
POST /configuration/v1/types
{
   "archetype": "NUMERIC_DATA_SERIES",
   "name": "basic-numeric"
}
網頁介面
名稱:basic-numeric
- 在 MDE 網頁介面上,按一下「類型」。
- 按一下「新增類型」。
- 在「Type name」(型別名稱) 部分填入
basic-numeric。 在「Archetype」(原型) 的下拉式選單中選取
NUMERIC_DATA_SERIES: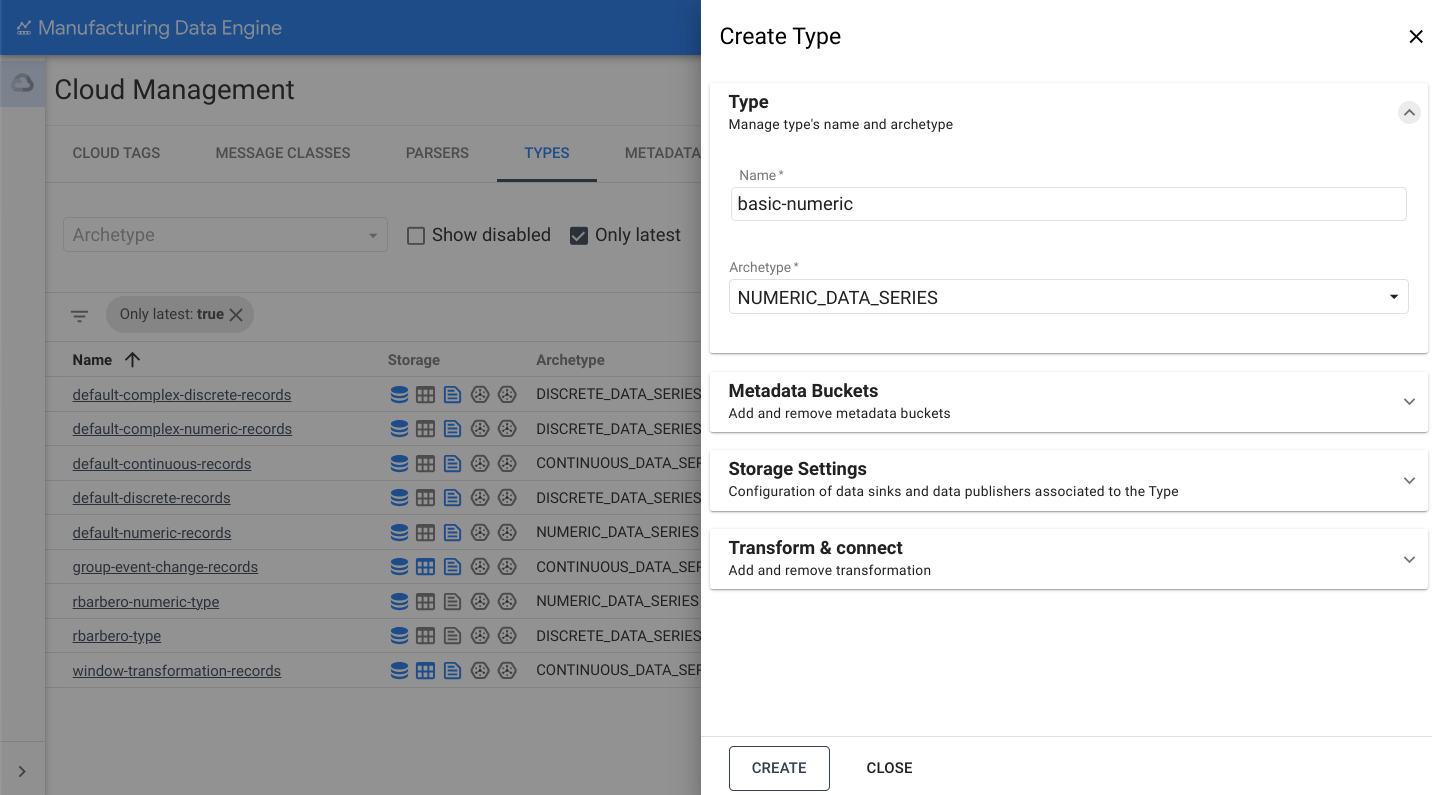
開啟「儲存空間設定」部分。
切換「傳送至 BigQuery」選項。
點選「建立」。
「discrete」的類型
以下是 basic-discrete 類型的範例:
REST
POST /configuration/v1/types
{
   "archetype": "DISCRETE_DATA_SERIES",
   "name": "basic-discrete"
}
網頁介面
名稱:basic-discrete
- 在 MDE 網頁介面上,按一下「類型」。
- 按一下「新增類型」。
- 在「Type name」(型別名稱) 部分填入
basic-discrete。 在「原型」的下拉式選單中選取 `
DISCRETE_DATA_SERIES: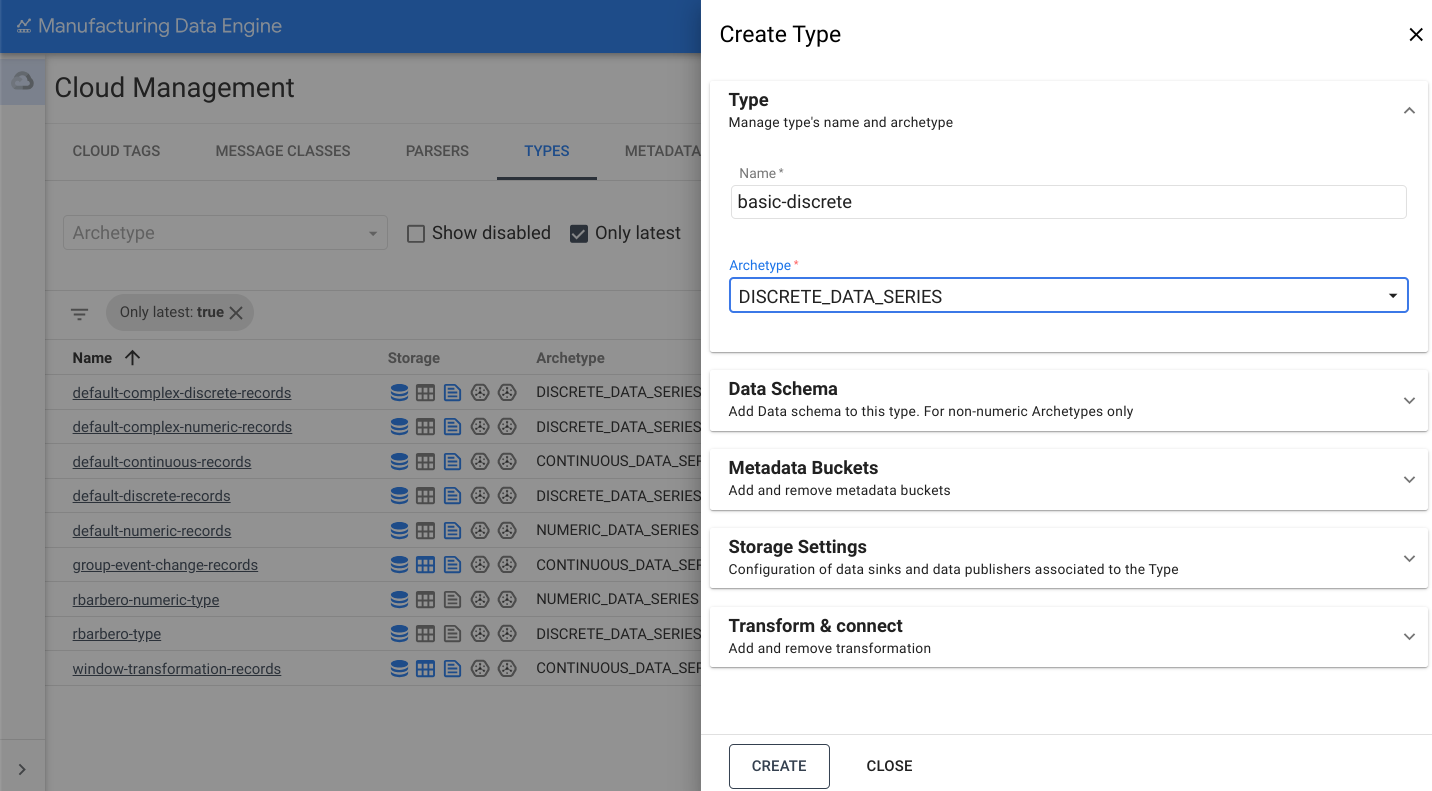
開啟「儲存空間設定」部分。
切換「傳送至 BigQuery」選項。
點選「建立」。
「continuous」的類型
以下是 basic-continuous 類型的範例:
REST
POST /configuration/v1/types
{
   "archetype": "CONTINUOUS_DATA_SERIES",
   "name": "basic-continuous"
}
網頁介面
名稱:basic-continuous
- 在 MDE 網頁介面上,按一下「類型」。
- 按一下「新增類型」。
- 在「Type name」(型別名稱) 部分填入
basic-continuous。 在「原型」的下拉式選單中選取 `
CONTINUOUS_DATA_SERIES: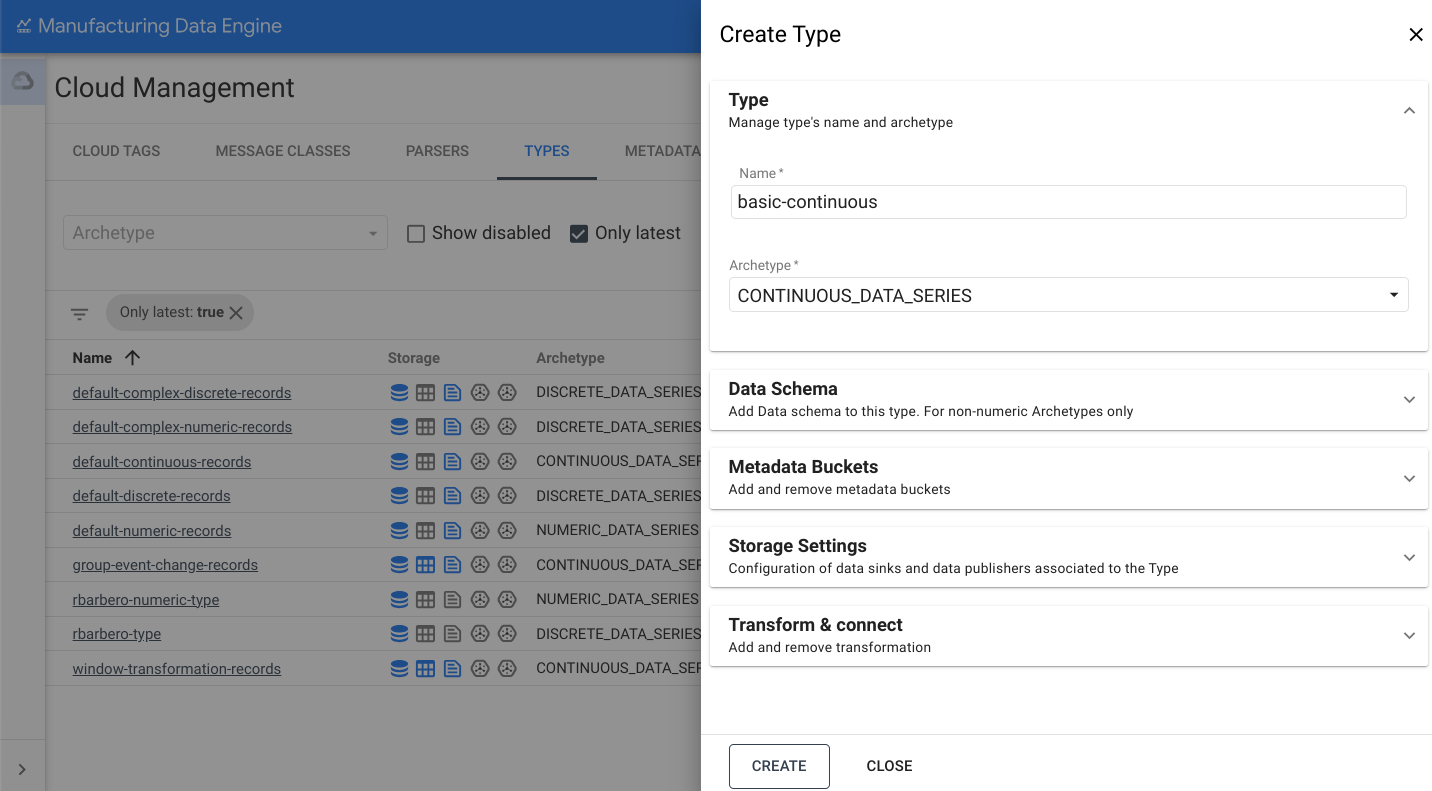
開啟「儲存空間設定」部分。
切換「傳送至 BigQuery」選項。
點選「建立」。
剖析器
本節將概略說明 MDE 中提供的各種剖析器。請確認類型已完全佈建並active,再建立剖析器。這項程序最多可能需要三分鐘。
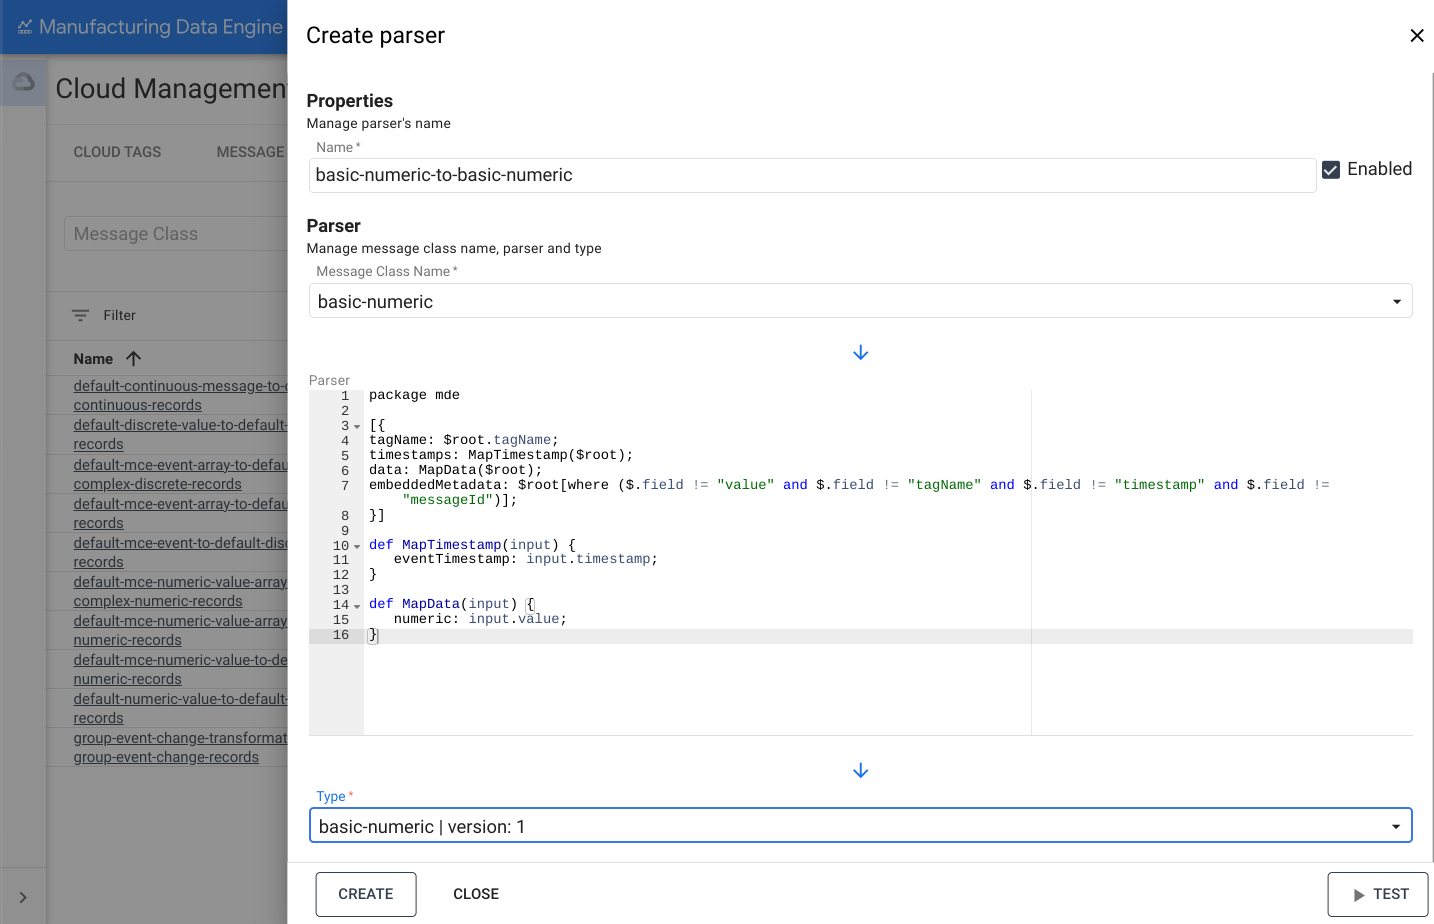
「numeric」的剖析器
以下是 basic-numeric 剖析器範例:
REST
POST /configuration/v1/parsers
{
   "name": "basic-numeric-to-basic-numeric",
   "messageClassName": "basic-numeric",
   "typeReference": {
         "name": "basic-numeric",
         "version": 1
   },
   "script": "package mde\n\n[{\ntagName: $root.tagName;\ntimestamps: MapTimestamp($root);\ndata: MapData($root);\nembeddedMetadata: $root[where ($.field != \"value\" and $.field != \"tagName\" and $.field != \"timestamp\" and $.field != \"messageId\")];\n}]\n\ndef MapTimestamp(input) {\n    eventTimestamp: input.timestamp;\n}\n\ndef MapData(input) {\n    numeric: input.value;\n}"
}
網頁介面
名稱:basic-numeric-to-basic-numeric
- 在 MDE 網頁介面中,按一下「剖析器」。
- 按一下「新增剖析器」。
- 在「Parser name」(剖析器名稱) 中填入
basic-numeric-to-basic-numeric。 - 在「Message Class Name」(訊息類別名稱) 的下拉式選單中選取
basic-numeric。 複製下列 Whistle 程式碼,然後貼到「Parser」(剖析器) 方塊中:
package mde [{ tagName: $root.tagName; timestamps: MapTimestamp($root); data: MapData($root); embeddedMetadata: $root[where ($.field != "value" and $.field != "tagName" and $.field != "timestamp" and $.field != "messageId")]; }] def MapTimestamp(input) { eventTimestamp: input.timestamp; } def MapData(input) { numeric: input.value; }在「類型」的下拉式選單中選取
basic-numeric | version: 1。點選「建立」。
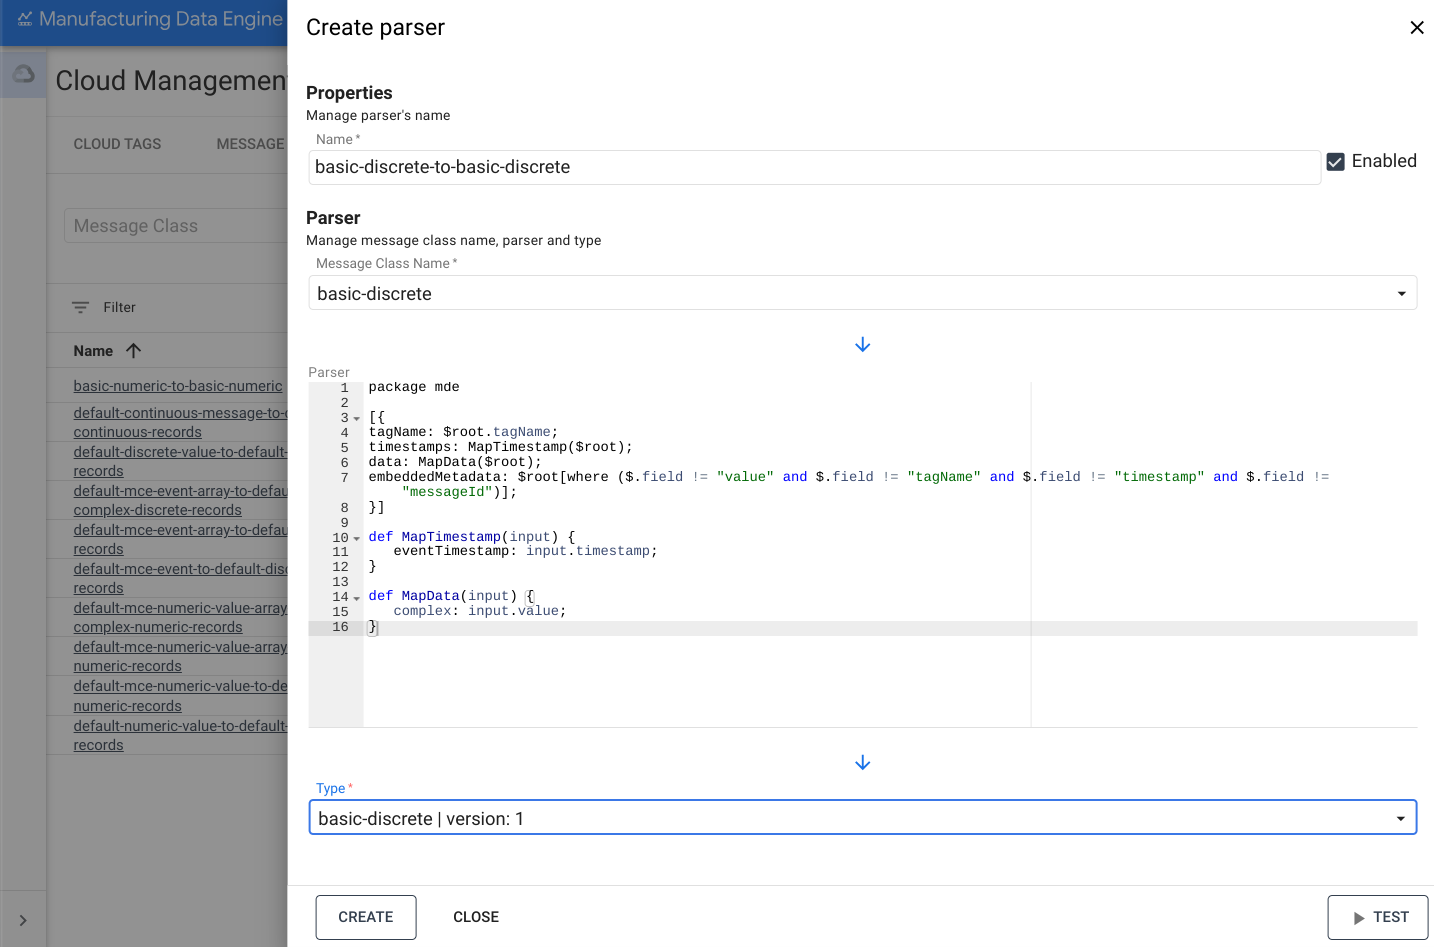
「discrete」的剖析器
以下是 basic-discrete 剖析器範例:
REST
POST /configuration/v1/parsers
{
   "name": "basic-discrete-to-basic-discrete",
   "messageClassName": "basic-discrete",
   "typeReference": {
         "name": "basic-discrete",
         "version": 1
   },
   "script": "package mde\n\n[{\ntagName: $root.tagName;\ntimestamps: MapTimestamp($root);\ndata: MapData($root);\nembeddedMetadata: $root[where ($.field != \"value\" and $.field != \"tagName\" and $.field != \"timestamp\" and $.field != \"messageId\")];\n}]\n\ndef MapTimestamp(input) {\n    eventTimestamp: input.timestamp;\n}\n\ndef MapData(input) {\n    complex: input.value;\n}\n"
}
網頁介面
名稱:basic-discrete-to-basic-discrete
- 在 MDE 網頁介面中,按一下「剖析器」。
- 按一下「新增剖析器」。
- 在「Parser name」(剖析器名稱) 中填入
basic-numeric-to-basic-discrete。 - 在「Message Class Name」(訊息類別名稱) 的下拉式選單中選取
basic-discrete。 複製下列 Whistle 程式碼,然後貼到「Parser」(剖析器) 方塊中:
package mde [{ tagName: $root.tagName; timestamps: MapTimestamp($root); data: MapData($root); embeddedMetadata: $root[where ($.field != "value" and $.field != "tagName" and $.field != "timestamp" and $.field != "messageId")]; }] def MapTimestamp(input) { eventTimestamp: input.timestamp; } def MapData(input) { complex: input.value; }在「類型」的下拉式選單中選取
basic-discrete | version: 1。點選「建立」。
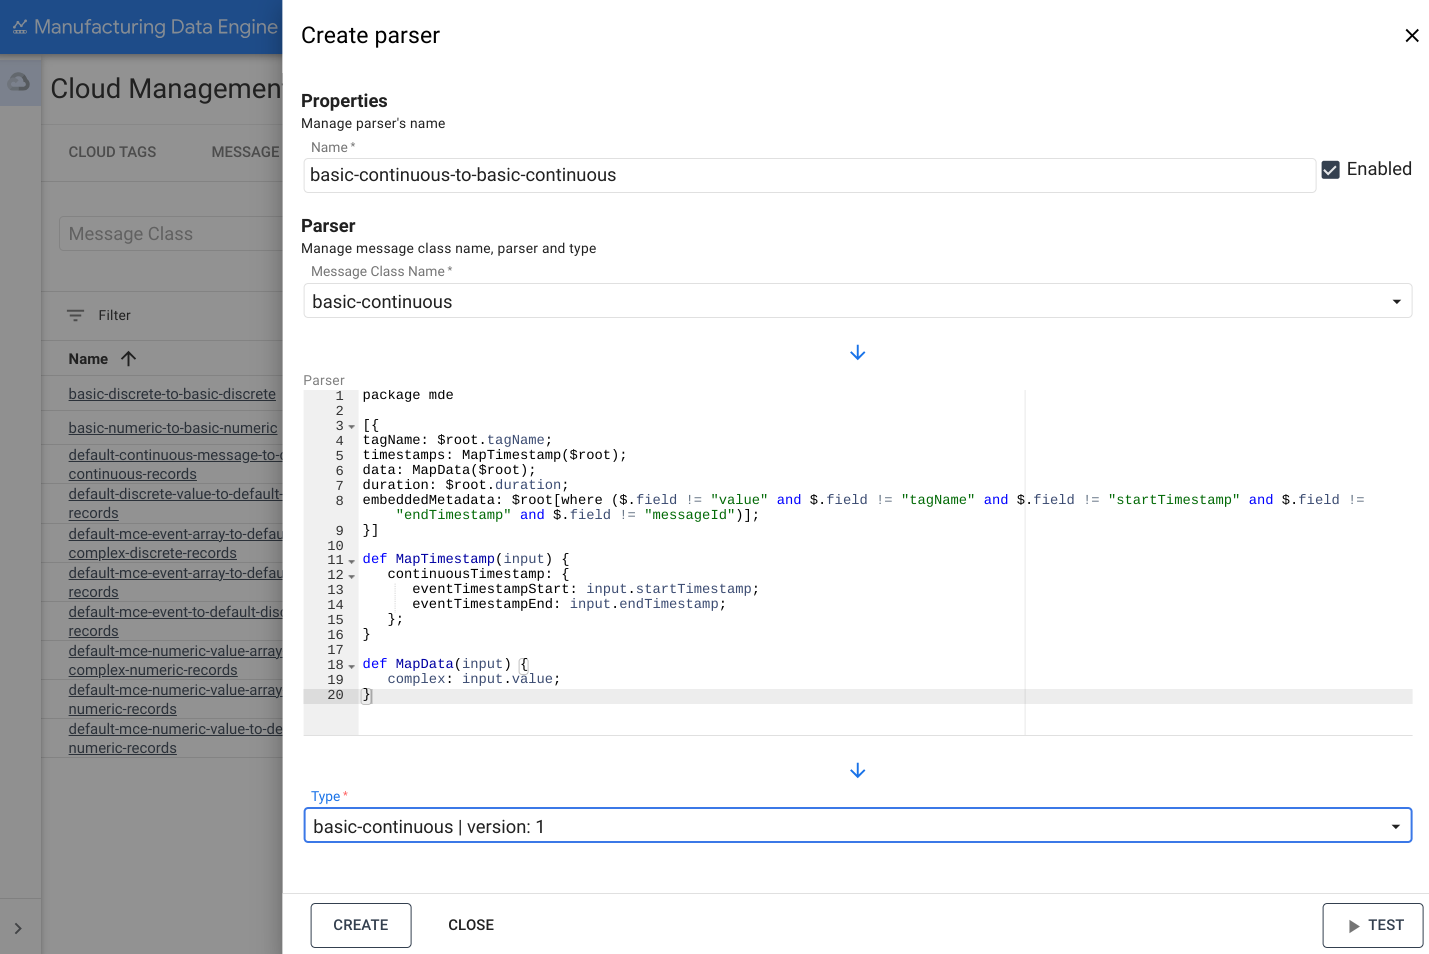
「continuous」的剖析器
以下是 basic-continuous 剖析器範例:
REST
POST /configuration/v1/parsers
{
   "name": "basic-continuous-to-basic-continuous",
   "messageClassName": "basic-continuous",
   "typeReference": {
         "name": "basic-continuous",
         "version": 1
   },
   "script": "package mde\n\n[{\ntagName: $root.tagName;\ntimestamps: MapTimestamp($root);\ndata: MapData($root);\nduration: $root.duration;\nembeddedMetadata: $root[where ($.field != \"value\" and $.field != \"tagName\" and $.field != \"startTimestamp\" and $.field != \"endTimestamp\" and $.field != \"messageId\")];\n}]\n\ndef MapTimestamp(input) {\n    continuousTimestamp: {\n        eventTimestampStart: input.startTimestamp;\n        eventTimestampEnd: input.endTimestamp;\n    };\n}\n\ndef MapData(input) {\n    complex: input.value;\n}\n"
}
網頁介面
名稱:basic-continuous-to-basic-continuous
- 在 MDE 網頁介面中,按一下「剖析器」。
- 按一下「新增剖析器」。
- 在「Parser name」(剖析器名稱) 中填入
basic-numeric-to-basic-continuous。 - 在「Message Class Name」(訊息類別名稱) 的下拉式選單中選取
basic-continuous。 複製下列 Whistle 程式碼,然後貼到「Parser」(剖析器) 方塊中:
package mde [{ tagName: $root.tagName; timestamps: MapTimestamp($root); data: MapData($root); duration: $root.duration; embeddedMetadata: $root[where ($.field != "value" and $.field != "tagName" and $.field != "startTimestamp" and $.field != "endTimestamp" and $.field != "messageId")]; }] def MapTimestamp(input) { continuousTimestamp: { eventTimestampStart: input.startTimestamp; eventTimestampEnd: input.endTimestamp; }; } def MapData(input) { complex: input.value; }在「類型」的下拉式選單中選取
basic-continuous | version: 1。點選「建立」。