

This page explains how to use a multi-tier CI/CD workflow in Looker after such a workflow has been installed and configured.
These instructions use a three-tier system that comprises development, QA, and production. However, you can apply the same principles to a two-tier or four-tier system.
These instructions also assume the use of GitHub as your Git provider. You can use other Git providers to create a CI/CD workflow; however, you must possess the expertise to modify these instructions for your provider.
Workflow overview
LookML developers begin by writing code in their development branch, which is normally named something like dev-my-user-ydnv, test their changes with Looker Continuous Integration (or by manually running a CI suite), and commit their code. Finally, they open a pull request to merge their code with the main branch.
When the pull request is opened, it brings the developer to GitHub. The developer should write a meaningful PR title by using conventional commits style and add a comment to the description that will be included in the changelog. If pull request triggering is configured, Looker Continuous Integration automatically validates the pull request, and developers can view the results in Looker or in GitHub.
Next, the developer should select a reviewer in GitHub. The reviewer will receive a notification and can add their review to the PR. If the reviewer approves the change, the PR is merged with the main branch. A WebHook is called and the development environment now sees the change.
Automatically, the Release Please automation will run and open a second PR to create a new tagged release. Or, if there is already a PR open for this purpose, Release Please updates that PR. The release PR has a version number associated with it, as well as a changelog that includes the titles and descriptions of the included changes.
When the Release Please generated PR is approved and merged, a new version tag is generated and the changelog is merged with the main branch. The QA and production instances of Looker can select this version using Advanced Deploy Mode.
Best practices for numbering releases and naming commits
The releases and their associated tags can be named and numbered in any way that makes sense in your environment. However, Semantic Versioning is used here, and is highly suggested because it works well with the Release Please plugin.
In Semantic Versioning the version consists of three numbers separated by periods: MAJOR.MINOR.PATCH
PATCHis incremented every time a release fixes a bugMINORis incremented andPATCHis set back to zero every time the release adds or refines a feature while being backward compatibleMAJORis incremented and bothMINORandPATCHare set to zero when a feature is added that is not backward compatible
Conventional Commits is a system of naming commits by the impact they have on end users. While not required, the use of conventional commit naming is also useful for the Release Please plugin.
In conventional commit naming, each commit message is prepended with an indicator of the scope of the change:
- A bug fix is indicated with
fix:likefix: set proper currency symbol on sale_amt format - A new feature is indicated with
feat:likefeat: added explore for sales by territory - A feature with a breaking change is indicated by
feat!:likefeat!: rewrote sales explore to use the new calendar view - When documentation is updated, but LookML is not changed, the commit message starts with
doc:
If conventional commits are used consistently, determining the semantic number to be used next is generally straightforward. If the commit log only consists of fix: and doc: commits, the PATCH should be incremented. If there is a feat: commit then MINOR should be incremented. If there is a feat!: then MAJOR should be incremented. The Release Please plugin can even generate a CHANGELOG file and tag the release automatically.
Using Advanced Deploy Mode
After changes are made and submitted as a PR on the development instance the Release Please plugin will tag the changes with a version tag like v1.2.3. Looker's Advanced Deploy Mode then makes these versions available in the Looker UI for the QA and production instances.
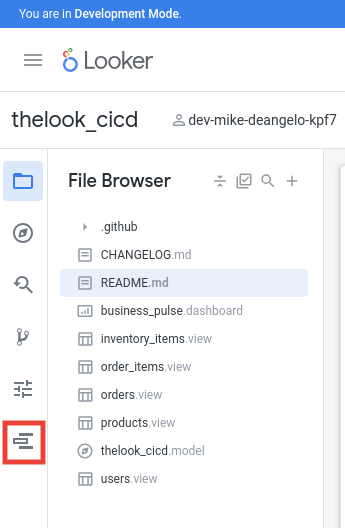
To deploy a change, choose the Deployment Manager from the Looker IDE:
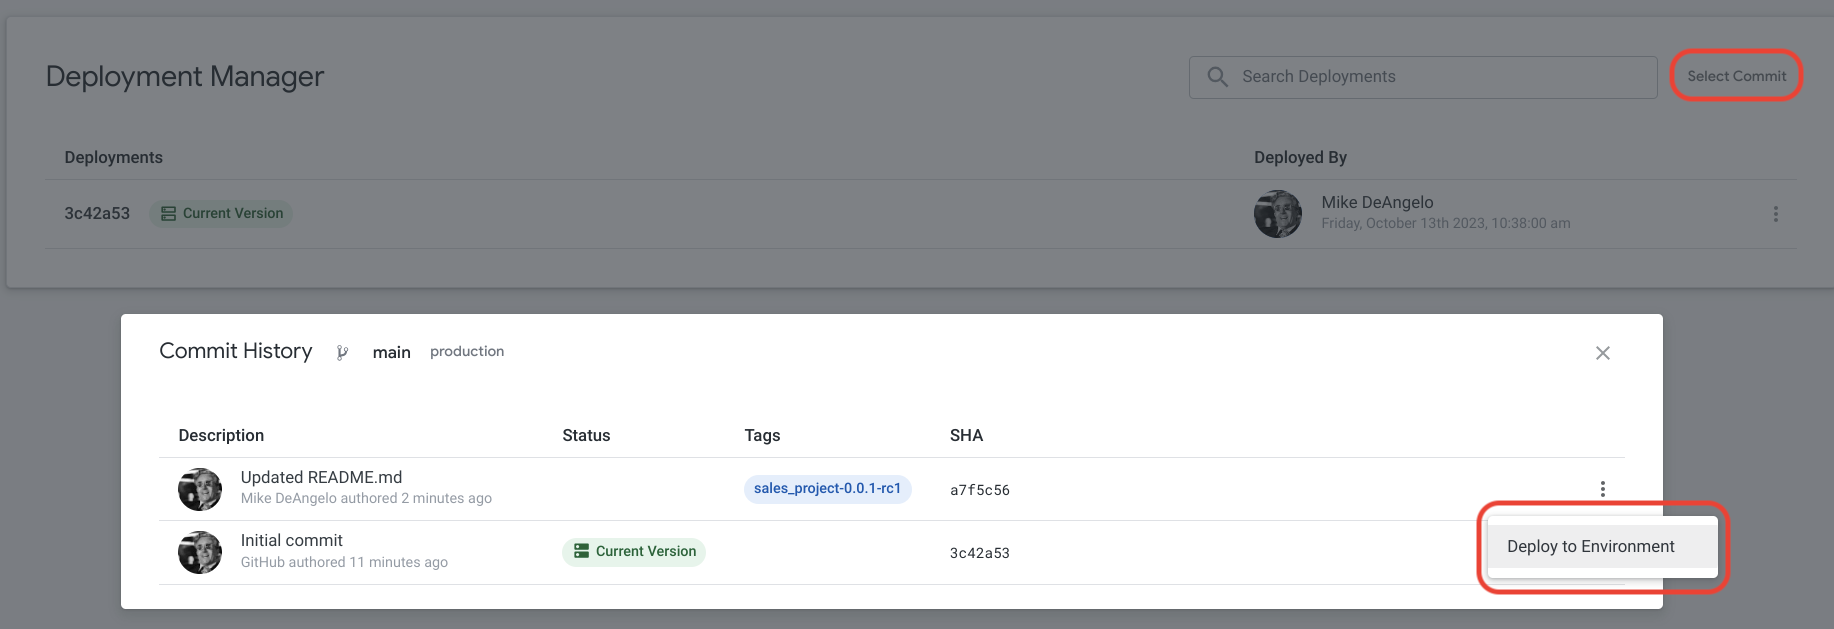
Click the Select Commit link in the upper right of the Deployment Manager. Next, select the three-dot menu that is associated with the tag that you want to deploy, and choose Deploy to Environment:
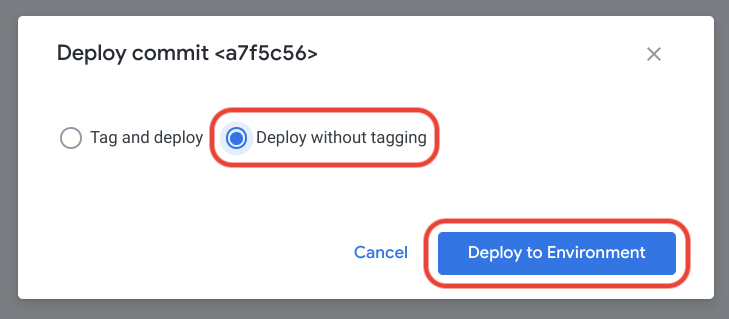
You don't need to tag the deployment again, so choose Deploy without tagging and press the Deploy to Environment button:
Finally, push to production using the Deployment Manager.
Using Looker Continuous Integration
To verify changes in a development branch or as part of a pull request, developers can use Looker Continuous Integration. Continuous Integration provides the following validators:
- SQL Validator — Verifies that the dimensions in your Explores run correctly against your database.
- Assert Validator — Runs any LookML data tests that were created by your Looker developers and returns all failures and errors.
- Content Validator — Runs the Looker content validation to test for errors in the Looks and dashboards in your LookML project.
- LookML Validator — Runs the LookML Validator to test for LookML errors in the project.
- Style Validator — Enforces LookML coding standards, naming conventions, and structural best practices across your project.
You can group these validators into Continuous Integration suites and run them automatically on pull requests, on a schedule, or manually.
SQL Validator
The Continuous Integration SQL Validator verifies that the dimensions in your Explores run correctly against your database. It tests whether fields that are defined in LookML Views correspond to valid SQL columns or expressions in the database.
The SQL Validator has the following key capabilities:
- Runs queries with
LIMIT 0andWHERE 1=2clauses to validate SQL without incurring data-scanning costs. - Supports incremental validation to test only the Explores that changed in the development branch.
- Scopes validation to specific Explores to query or exclude.
- Excludes specific dimensions from validation by using LookML tags or SQL comments (
tags: ["ci: ignore"]or-- ci: ignore).
For more information and configuration options, see the Continuous Integration SQL Validator documentation page.
LookML Validator
The Continuous Integration LookML Validator checks your LookML project for syntax errors, such as missing brackets or invalid field references. This validator is especially helpful for developers who write LookML outside the Looker IDE.
The LookML Validator has the following key capabilities:
- Lets you set a severity threshold (Error, Warning, or Info) that determines what message severity level causes a run to fail.
- Lets you configure a timeout duration for validation runs.
For more information and configuration options, see the Continuous Integration LookML Validator documentation page.
Content Validator
The Continuous Integration Content Validator verifies that saved content, such as Looks and user-defined dashboards (UDDs), still functions properly after LookML changes are made.
The Content Validator has the following key capabilities:
- Scopes validation to specific content folders or Explores.
- Excludes content in personal folders.
- Supports incremental validation to find errors that are unique to the development branch.
For more information and configuration options, see the Continuous Integration Content Validator documentation page.
Assert Validator
The Continuous Integration Assert Validator runs LookML data tests that are defined in your project to verify model logic and data integrity.
For example, a LookML data test might look like the following:
test: historic_revenue_is_accurate {
  explore_source: orders {
    column: total_revenue { field: orders.total_revenue }
    filters: [orders.created_date: "2024"]
  }
  assert: revenue_is_expected_value {
    expression: ${orders.total_revenue} = 626000 ;;
  }
}
The Assert Validator has the following key capabilities:
- Scopes assert validation to specific Explores to query or exclude.
- Lets you configure query concurrency to manage database load.
For more information and configuration options, see the Continuous Integration Assert Validator documentation page.
Managing and running CI suites
To manage and run Continuous Integration tests, follow these steps:
- Create suites: Configure which validators to run and set their options on the Suites page in the Looker IDE. For more information, see the Creating a Continuous Integration suite documentation page.
- Trigger runs: Trigger validation runs automatically on pull requests, on a schedule, or manually for a development branch or production. For more information, see the Running Continuous Integration suites documentation page.
- View results: Review error messages, affected LookML lines, and links to Explores and dashboards on the CI run results page. For more information, see the Viewing the results of a CI run documentation page.
Link stability for Looks and dashboards
By default, Looks and dashboards are given ascending numeric IDs that are used in the URL for the Look or dashboard. However, there is no way to keep these in sync across systems. Therefore, a URL for a specific dashboard in development won't point to the same dashboard in QA or production.
For UDDs there is an option to use a slug instead of an ID as part of the URL. The slug is a semi-random set of characters rather than a number. The slug can be set as part of the import and so that a similar URL can point to the same UDD on development, QA, and production. Using slugs instead of IDs is a best practice, particularly when "clicking through" to a UDD from Look or another UDD.
The slug can be found by inspecting the output of gzr dashboard cat. The slug can be used in the dashboard URL in place of the numeric ID.
Migrating user content with Gazer
Copying content such as Looks and dashboards between the development, QA, and production is often useful. You may want to produce content that showcases new LookML additions, or verify that saved content still functions correctly after LookML changes. In these situations Gazer can be used to copy content between instances.
LookML dashboards
LookML dashboards are synced between instances during the regular LookML CI/CD workflow. However, if any UDDs are synced with LookML dashboards, they can be updated with Gazer by using the following command:
gzr dashboard sync_lookml DASHBOARD_ID --host TARGET_SYSTEM_URL
User-defined dashboards
User Defined Dashboards (UDDs) can be migrated with Gazer by referencing the dashboard's ID and the URL of the Looker instance where the UDD resides. Gazer saves the dashboard configuration to a JSON file which is then imported into the target Looker instance.
The command to extract the UDD configuration is as follows:
gzr dashboard cat DASHBOARD_ID --host TARGET_SYSTEM_URL --dir .
This will generate a file named Dashboard_DASHBOARD_ID_DASHBOARD_NAME.json that contains the dashboard's configuration.
The UDD can be imported into the target system using the following command:
gzr dashboard import Dashboard_DASHBOARD_ID_DASHBOARD_NAME.json FOLDER_ID \
    --host TARGET_SYSTEM_URL
Looks
Look migration works very similarly to UDD migration. First, use Gazer to save the Look configuration to a JSON file:
gzr look cat LOOK_ID --host SOURCE_SYSTEM_URL --dir .
Then, import the Look into the target instance:
gzr look import Look_LOOK_ID_LOOK_NAME.json FOLDER_ID \
    --host TARGET_SYSTEM_URL