
本教學課程說明如何設定及部署範例 API 和可擴充服務 Proxy (ESP),上述元件會在 Compute Engine 的預先建立 Docker 容器中運作。本文採用 OpenAPI 規格說明範例 API。另外,本教學課程也會說明如何建立 API 金鑰,以及如何用於 API 要求。
如需 Cloud Endpoints 的總覽資訊,請參閱關於 Endpoints 和 Endpoints 架構。
目標
請根據以下的主要工作清單,逐步進行本教學課程的各個步驟。您必須完成所有工作才能成功傳送要求至 API。
- 設定 Google Cloud 專案。請參閱「事前準備」一節。
- 建立 Compute Engine VM 執行個體。請參閱建立 Compute Engine 執行個體一節。
- 下載程式碼範例。請參閱「取得程式碼範例」。
- 設定
openapi.yaml檔案,這個檔案用於設定 Endpoints。請參閱設定 Endpoints 一節。 - 部署 Endpoints 設定以建立 Endpoints 服務。請參閱部署 Endpoints 設定一節。
- 在 Compute Engine VM 上部署 API 和 ESP。請參閱部署 API 後端一節。
- 使用 IP 位址傳送要求至 API。詳情請參閱使用 IP 位址傳送要求一節。
- 為範例 API 設定 DNS 記錄。請參閱為 Endpoints 設定 DNS 一節。
- 使用完整的網域名稱將要求傳送至 API,請參閱使用 FQDN 傳送要求一節。
- 追蹤 API 活動。請參閱追蹤 API 活動一節。
- 避免系統向您的 Google Cloud 帳戶收取相關費用。請參閱「清理」。
費用
在本文件中,您會使用下列 Google Cloud的計費元件:
如要根據預測用量估算費用,請使用 Pricing Calculator。
完成本文所述工作後,您可以刪除建立的資源,避免繼續計費,詳情請參閱「清除所用資源」。
事前準備
- 登入 Google Cloud 帳戶。如果您是 Google Cloud新手,歡迎 建立帳戶,親自評估產品在實際工作環境中的成效。新客戶還能獲得價值 $300 美元的免費抵免額,可用於執行、測試及部署工作負載。
-
In the Google Cloud console, on the project selector page, select or create a Google Cloud project.
Roles required to select or create a project
- Select a project: Selecting a project doesn't require a specific IAM role—you can select any project that you've been granted a role on.
-
Create a project: To create a project, you need the Project Creator role
(
roles/resourcemanager.projectCreator), which contains theresourcemanager.projects.createpermission. Learn how to grant roles.
-
Verify that billing is enabled for your Google Cloud project.
-
In the Google Cloud console, on the project selector page, select or create a Google Cloud project.
Roles required to select or create a project
- Select a project: Selecting a project doesn't require a specific IAM role—you can select any project that you've been granted a role on.
-
Create a project: To create a project, you need the Project Creator role
(
roles/resourcemanager.projectCreator), which contains theresourcemanager.projects.createpermission. Learn how to grant roles.
-
Verify that billing is enabled for your Google Cloud project.
- 記下專案 ID,後續步驟將會用到。
-
您需要一個可以將要求傳送至範例 API 的應用程式。
- Linux 和 macOS 使用者:本教學課程提供了使用
curl的範例,這項工具通常已預先安裝於您的作業系統。如果您尚未安裝curl,可以前往curl的版本與下載頁面下載這項工具。 - Windows 使用者:本教學課程提供了使用
Invoke-WebRequest的範例,PowerShell 3.0 以上版本均支援這項工具。
- Linux 和 macOS 使用者:本教學課程提供了使用
- 下載 Google Cloud CLI。
-
更新 gcloud CLI 並安裝 Endpoints 元件。
gcloud components update
-
確認 Google Cloud CLI (
gcloud) 已取得授權,可存取您在 Google Cloud上的資料與服務:gcloud auth login
-
將預設專案設為您的專案 ID。
gcloud config set project YOUR_PROJECT_ID
將 YOUR_PROJECT_ID 替換為專案 ID。如果您有其他 Google Cloud 專案,並想使用
gcloud加以管理,請參閱「管理 gcloud CLI 設定」。
完成本文所述工作後,您可以刪除建立的資源,避免繼續計費,詳情請參閱「清除所用資源」一節。
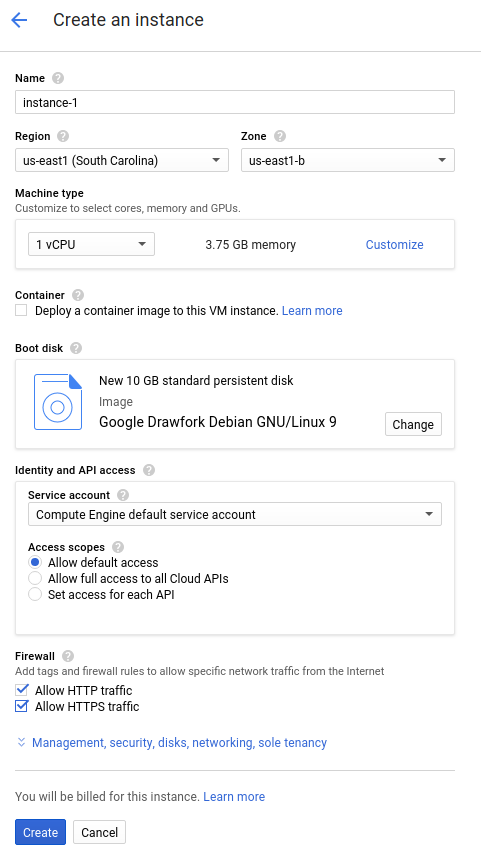
建立 Compute Engine 執行個體
- 前往 Google Cloud 控制台的「Create an instance」(建立執行個體)頁面。
- 按一下「Select」(選取)。
- 在「Firewall」(防火牆) 區段中,選取「Allow HTTP traffic」(允許 HTTP 流量) 和「Allow HTTPS traffic」(允許 HTTPS 流量)。
- 按一下「Create」(建立),即可建立 VM。
- 確定您可以連線至自己的 VM 執行個體。
- 在虛擬機器執行個體清單中,找到您要建立連線的執行個體,然後在該列中點選「SSH」SSH。
- 您現在可以使用終端機在 Debian 執行個體上執行 Linux 指令。
- 輸入
exit來中斷與執行個體之間的連線。
- 記下執行個體的名稱、區域和外部 IP 位址,以便用於後續步驟。
如要建立 Compute Engine 執行個體,請按照下列指示操作:
啟動執行個體會花費一些時間。如果執行個體準備就緒,就會列在「VM Instances」(VM 執行個體) 頁面中,並顯示綠色的狀態圖示。
下載程式碼範例
將程式碼範例下載至本機電腦。
如何複製或下載範例 API:
- 將範例應用程式存放區複製到您的本機電腦:
git clone https://github.com/GoogleCloudPlatform/java-docs-samples
或者,您也可以選擇下載範例 ZIP 檔案,然後再解壓縮。
- 前往包含程式碼範例的目錄:
cd java-docs-samples/endpoints/getting-started
如何複製或下載範例 API:
- 將範例應用程式存放區複製到您的本機電腦:
git clone https://github.com/GoogleCloudPlatform/python-docs-samples
或者,您也可以選擇下載範例 ZIP 檔案,然後再解壓縮。
- 前往包含程式碼範例的目錄:
cd python-docs-samples/endpoints/getting-started
如何複製或下載範例 API:
- 確定您已設定
GOPATH環境變數。 - 將範例應用程式存放區複製到您的本機電腦:
go get -d github.com/GoogleCloudPlatform/golang-samples/endpoints/getting-started
- 前往包含程式碼範例的目錄:
cd $GOPATH/src/github.com/GoogleCloudPlatform/golang-samples/endpoints/getting-started
如何複製或下載範例 API:
- 將範例應用程式存放區複製到您的本機電腦:
git clone https://github.com/GoogleCloudPlatform/php-docs-samples
或者,您也可以選擇下載範例 ZIP 檔案,然後再解壓縮。
- 前往包含程式碼範例的目錄:
cd php-docs-samples/endpoints/getting-started
如何複製或下載範例 API:
- 將範例應用程式存放區複製到您的本機電腦:
git clone https://github.com/GoogleCloudPlatform/ruby-docs-samples
或者,您也可以選擇下載範例 ZIP 檔案,然後再解壓縮。
- 前往包含程式碼範例的目錄:
cd ruby-docs-samples/endpoints/getting-started
如何複製或下載範例 API:
- 將範例應用程式存放區複製到您的本機電腦:
git clone https://github.com/GoogleCloudPlatform/nodejs-docs-samples
或者,您也可以選擇下載範例 ZIP 檔案,然後再解壓縮。
- 前往包含程式碼範例的目錄:
cd nodejs-docs-samples/endpoints/getting-started
設定 Endpoints
您必須提供符合 OpenAPI 2.0 或 OpenAPI 3.x 的 OpenAPI 文件,此文件須說明您應用程式的介面以及所有驗證需求。詳情請參閱「支援的 OpenAPI 版本」。
此外,您也必須加入內含各應用程式網址的 Google 專用欄位,這樣 ESPv2 才能獲得叫用應用程式所需的資訊。如果您還不熟悉 OpenAPI,請參閱 OpenAPI 總覽瞭解詳情。
OpenAPI 2.0
如要使用 OpenAPI 2.0 規格設定端點,可以使用下載的程式碼範例的 endpoints/getting-started 目錄中提供的 openapi.yaml 檔案。
OpenAPI 2.0 規格的內容應與下列內容類似:
swagger: "2.0"
info:
  description: "A simple Google Cloud Endpoints API example."
  title: "Endpoints Example"
  version: "1.0.0"

host: "echo-api.endpoints.YOUR_PROJECT_ID.cloud.goog"

consumes:
  - "application/json"
produces:
  - "application/json"

schemes:
# Uncomment the next line if you configure SSL for this API.
# - "https"
  - "http"

paths:
  /echo:
    post:
      description: "Echo back a given message."
      operationId: "echo"
      produces:
        - "application/json"
      responses:
        200:
          description: "Echo"
          schema:
            $ref: "#/definitions/echoMessage"
      parameters:
        -
          description: "Message to echo"
          in: body
          name: message
          required: true
          schema:
            $ref: "#/definitions/echoMessage"
      security:
        - api_key: []
  /auth/info/googlejwt:
    get:
      description: "Returns the requests' authentication information."
      operationId: "auth_info_google_jwt"
      produces:
        - "application/json"
      responses:
        200:
          description: "Authenication info."
          schema:
            $ref: "#/definitions/authInfoResponse"
      security:
        - api_key: []
          google_jwt: []
  /auth/info/googleidtoken:
    get:
      description: "Returns the requests' authentication information."
      operationId: "authInfoGoogleIdToken"
      produces:
        - "application/json"
      responses:
        200:
          description: "Authentication info."
          schema:
            $ref: "#/definitions/authInfoResponse"
      security:
        - api_key: []
          google_id_token: []

definitions:
  echoMessage:
    type: "object"
    properties:
      message:
        type: "string"
  authInfoResponse:
    properties:
      id:
        type: "string"
      email:
        type: "string"

securityDefinitions:
  # This section configures basic authentication with an API key.
  api_key:
    type: "apiKey"
    name: "key"
    in: "query"

  # This section configures authentication using Google API Service Accounts
  # to sign a json web token. This is mostly used for server-to-server
  # communication.
  google_jwt:
    authorizationUrl: ""
    flow: "implicit"
    type: "oauth2"
    # This must match the 'iss' field in the JWT.
    x-google-issuer: "jwt-client.endpoints.sample.google.com"
    # Update this with your service account's email address.
    x-google-jwks_uri: "https://www.googleapis.com/service_accounts/v1/jwk/YOUR_SERVICE_ACCOUNT_EMAIL"
    # This must match the "aud" field in the JWT. You can add multiple
    # audiences to accept JWTs from multiple clients.
    x-google-audiences: "echo.endpoints.sample.google.com"
  # This section configures authentication using Google OAuth2 ID Tokens.
  # ID Tokens can be obtained using OAuth2 clients, and can be used to access
  # your API on behalf of a particular user.

  google_id_token:
    authorizationUrl: ""
    flow: "implicit"
    type: "oauth2"
    x-google-issuer: "https://accounts.google.com"
    x-google-jwks_uri: "https://www.googleapis.com/oauth2/v3/certs"
    # Your OAuth2 client's Client ID must be added here. You can add
    # multiple client IDs to accept tokens from multiple clients.
    x-google-audiences: "YOUR_CLIENT_ID"
OpenAPI 3.x
如要使用 OpenAPI 3.x 規格設定端點,可以取代下載的程式碼範例的 endpoints/getting-started 目錄中 openapi.yaml 檔案的內容:
- 在文字編輯器中開啟
openapi.yaml,並將內容替換為下列程式碼:openapi: 3.0.4 info: description: "A simple Google Cloud Endpoints API example." title: "Endpoints Example" version: "1.0.0" servers: - url: "http://echo-api.endpoints.YOUR_PROJECT_ID.cloud.goog" x-google-endpoint: {} paths: "/echo": post: description: "Echo back a given message." operationId: "echo" requestBody: description: "Message to echo" required: true content: "application/json": schema: $ref: "#/components/schemas/echoMessage" responses: '200': description: "Echo" content: "application/json": schema: $ref: "#/components/schemas/echoMessage" security: - api_key: [] "/auth/info/googlejwt": get: description: "Returns the requests' authentication information." operationId: "auth_info_google_jwt" responses: '200': description: "Authentication info." content: "application/json": schema: $ref: "#/components/schemas/authInfoResponse" security: - api_key: [] google_jwt: [] "/auth/info/googleidtoken": get: description: "Returns the requests' authentication information." operationId: "authInfoGoogleIdToken" responses: '200': description: "Authentication info." content: "application/json": schema: $ref: "#/components/schemas/authInfoResponse" security: - api_key: [] google_id_token: [] components: schemas: echoMessage: type: "object" properties: message: type: "string" authInfoResponse: properties: id: type: "string" email: type: "string" securitySchemes: api_key: type: "apiKey" name: "key" in: "query" google_jwt: type: "oauth2" flows: implicit: authorizationUrl: "" scopes: {} google_jwt: type: "oauth2" flows: implicit: authorizationUrl: "" scopes: {} x-google-auth: issuer: "jwt-client.endpoints.sample.google.com" jwksUri: "https://www.googleapis.com/service_accounts/v1/jwk/YOUR_SERVICE_ACCOUNT_EMAIL" audiences: "echo.endpoints.sample.google.com" google_id_token: type: "oauth2" flows: implicit: authorizationUrl: "" scopes: {} x-google-issuer: "https://accounts.google.com" x-google-jwks_uri: "https://www.googleapis.com/oauth2/v3/certs" x-google-audiences: "YOUR_CLIENT_ID"
- 儲存
openapi.yaml的新內容。
本教學課程會使用 OpenAPI 規格的 Google 專屬擴充功能,讓您設定服務名稱。指定服務名稱的方法取決於您使用的 OpenAPI 規格版本。
OpenAPI 2.0
使用 host 欄位指定服務名稱:
host: echo-api.endpoints.YOUR_PROJECT_ID.cloud.goog
如要設定 Endpoints:
- 開啟
openapi.yaml檔案。 - 在
host欄位中,將 YOUR_PROJECT_ID 替換為 Google Cloud 專案 ID。 - 儲存
openapi.yaml檔案。
OpenAPI 3.x
在 servers 物件中使用 url 欄位指定服務名稱:
servers:
- url: https://echo-api.endpoints.YOUR_PROJECT_ID.cloud.goog
    x-google-endpoint: {}
如要設定 Endpoints:
- 開啟
openapi.yaml檔案。 - 如果
openapi.yaml檔案有host欄位,請移除該欄位。 - 新增
servers物件,如下所示。 - 在
url欄位中,將 YOUR_PROJECT_ID 替換為 Google Cloud 專案 ID。 - 儲存
openapi.yaml檔案。
完成下列的所有設定步驟之後,您就能使用 IP 位址成功將要求傳送至範例 API。請參閱「為 Endpoints 設定 DNS」一節,瞭解如何將 echo-api.endpoints.YOUR_PROJECT_ID.cloud.goog 設為完整網域名稱 (FQDN)。
部署 Endpoints 設定
如要部署 Endpoints 設定,請使用 gcloud endpoints
services deploy 指令。這個指令會使用 Service Management 建立代管服務。
如何部署 Endpoints 設定:
- 確認您位於
openapi.yaml設定檔所在的目錄。 - 上傳設定並建立代管服務:
gcloud endpoints services deploy openapi.yaml
接著,gcloud 指令會呼叫 Service Management API,並使用您在 openapi.yaml 檔案 host 或 servers.url 欄位中指定的名稱建立代管服務。Service Management 會依據 openapi.yaml 檔案中的設定建立服務。變更 openapi.yaml 時,您必須重新部署檔案才能更新 Endpoints 服務。
Service Management 在建立和設定服務時,會輸出資訊至終端機。您可以放心忽略 openapi.yaml 檔案中路徑不需要 API 金鑰的警告。完成服務設定程序之後,Service Management 會顯示含有服務設定 ID 與服務名稱的訊息,類似於以下內容:
Service Configuration [2017-02-13r0] uploaded for service [echo-api.endpoints.example-project-12345.cloud.goog]
在上方的範例中,2017-02-13r0 是服務設定 ID,echo-api.endpoints.example-project-12345.cloud.goog 則為 Endpoints 服務。服務設定 ID 是由一個日期戳記和一個修訂版本編號所組成。如果您在同一天再次部署 openapi.yaml 檔案,服務設定 ID 中的修訂版本編號就會遞增。您可以在 Google Cloud 主控台的「Endpoints」 >「Services」(服務) 頁面中查看 Endpoints 服務設定。
如果您收到錯誤訊息,請參閱 Endpoints 設定部署疑難排解一文。
檢查必要服務
Endpoints 和 ESP 至少需要啟用下列 Google 服務:| 名稱 | 標題 |
|---|---|
servicemanagement.googleapis.com |
Service Management API |
servicecontrol.googleapis.com |
Service Control API |
在大多數情況下,gcloud endpoints services deploy 指令會啟用這些必要服務。不過在以下情況中,即便您成功執行 gcloud 指令,還是無法啟用必要服務:
您使用 Terraform 之類的第三方應用程式,而其中未包含這些服務。
您已將 Endpoints 設定部署至現有Google Cloud 專案,但在專案中已明確停用這些服務。
使用下列指令確認必要服務已啟用:
gcloud services list
如果必要的服務並未列出,請執行下列指令加以啟用:
gcloud services enable servicemanagement.googleapis.com
gcloud services enable servicecontrol.googleapis.com
同時啟用 Endpoints 服務:
gcloud services enable ENDPOINTS_SERVICE_NAME
如要判斷 ENDPOINTS_SERVICE_NAME,您可以採取下列任一做法:
部署 Endpoints 設定後,請前往 Cloud 控制台的「Endpoints」頁面。「服務名稱」欄下方會顯示可能的 ENDPOINTS_SERVICE_NAME 清單。
如果是 OpenAPI,ENDPOINTS_SERVICE_NAME 是您在 OpenAPI 規格的
host欄位中指定的內容。如果是 gRPC,ENDPOINTS_SERVICE_NAME 是您在 gRPC Endpoints 設定的name欄位中指定的內容。
如要進一步瞭解 gcloud 指令,請參閱 gcloud 服務。
部署 API 後端
到目前為止,您已將 OpenAPI 文件部署到 Service Management,但尚未部署為 API 後端提供服務的程式碼。本節會逐步引導您在 VM 執行個體中設定 Docker,並在 Docker 容器中執行 API 後端程式碼和 ESP。
檢查必要權限
- 前往 Google Cloud 控制台的 Compute Engine 執行個體頁面。
- 從清單中選取執行個體。
- 您可以查看相關聯的服務帳戶及其擁有的權限。
將必要權限授予服務帳戶:
gcloud projects add-iam-policy-binding PROJECT_ID

--member "serviceAccount:SERVICE_ACCOUNT"

--role roles/servicemanagement.serviceController
詳情請參閱「 何謂角色和權限?」。
在 VM 執行個體中安裝 Docker
如要在 VM 執行個體上安裝 Docker,請執行下列操作:
- 執行以下指令來設定專案區域:
gcloud config set compute/zone YOUR_INSTANCE_ZONE
將 YOUR_INSTANCE_ZONE 替換成您執行個體的執行區域。
- 使用下列指令連線至您的執行個體:
gcloud compute ssh INSTANCE_NAME
將 INSTANCE_NAME 替換成您的 VM 執行個體名稱。
- 如要設定 Docker 存放區,請參閱 Docker 說明文件。請務必按照符合所用 VM 執行個體版本和架構的步驟操作:
- Jessie 以上版本
- x86_64/amd64
在 Docker 容器中執行 API 和 ESP
ESP 是位於後端程式碼前方的 nginx Proxy。這個 Proxy 會處理連入流量,藉此提供驗證、API 金鑰管理、記錄和其他 Endpoints API 管理功能。
如要在 Docker 容器中安裝及執行範例 API 與 ESP,請按照下列指示操作:
- 建立自己的容器網路,名稱為
esp_net。sudo docker network create --driver bridge esp_net
- 執行提供範例 API 的範例 Echo 伺服器:
Java sudo docker run --detach --name=echo --net=esp_net gcr.io/google-samples/echo-java:1.0
Python sudo docker run --detach --name=echo --net=esp_net gcr.io/google-samples/echo-python:1.0
前往 sudo docker run --detach --name=echo --net=esp_net gcr.io/google-samples/echo-go:1.0
PHP sudo docker run --detach --name=echo --net=esp_net gcr.io/google-samples/echo-php:1.0
Ruby sudo docker run --detach --name=echo --net=esp_net gcr.io/google-samples/echo-ruby:1.0
NodeJS sudo docker run --detach --name=echo --net=esp_net gcr.io/google-samples/echo-node:1.0
- 執行預先封裝的公用 ESP Docker 容器。在 ESP 啟動選項中,將 SERVICE_NAME 替換為您的服務名稱。這個名稱與您在 OpenAPI 文件
host欄位中設定的名稱相同。sudo docker run \ --name=esp \ --detach \ --publish=80:8080 \ --net=esp_net \ gcr.io/endpoints-release/endpoints-runtime:1 \ --service=SERVICE_NAME \ --rollout_strategy=managed \ --backend=echo:8080--rollout_strategy=managed選項可將 ESP 設為使用最新部署的服務設定。指定此選項時,在您部署新服務設定後最多 5 分鐘內,ESP 會偵測到變更並自動開始使用新設定。建議您指定此選項而非讓 ESP 使用特定的設定 ID。 如要瞭解所用的其他 ESP 選項,請參閱 ESP 啟動選項。
如果您收到錯誤訊息,請參閱在 Compute Engine 上排解 Cloud Endpoints 的問題一文。
詳情請參閱部署 API 後端一節。
使用 IP 位址傳送要求
範例 API 和 ESP 在 Compute Engine 執行個體中運作之後,您就可以從自己的本機電腦將要求傳送至 API。
建立 API 金鑰並設定環境變數
程式碼範例需要 API 金鑰。為了簡化要求,請設定 API 金鑰的環境變數。
在您用於 API 的 Google Cloud 專案中,在 API 憑證頁面上建立 API 金鑰。如要在其他 Google Cloud 專案中建立 API 金鑰,請參閱「在 Google Cloud 專案中啟用 API」。
- 按一下 [Create credentials] (建立憑證),然後選取 [API key] (API 金鑰)。
- 將金鑰複製到剪貼簿。
- 按一下 [Close] (關閉)。
- 在本機電腦中貼上 API 金鑰,以便指派給環境變數:
- 在 Linux 或 macOS 中:
export ENDPOINTS_KEY=AIza... - 在 Windows PowerShell 中:
$Env:ENDPOINTS_KEY="AIza..."
- 在 Linux 或 macOS 中:
傳送要求
Linux 或 mac OS
使用 curl,透過先前設定的 ENDPOINTS_KEY 環境變數傳送 HTTP 要求。將 IP_ADDRESS 替換為您的執行個體外部 IP 位址。
curl --request POST \
   --header "content-type:application/json" \
   --data '{"message":"hello world"}' \
   "http://IP_ADDRESS:80/echo?key=${ENDPOINTS_KEY}"
在上方的 curl 中:
--data選項會指定要發布至 API 的資料。--header選項會指定資料採用 JSON 格式。
PowerShell
使用 Invoke-WebRequest,透過先前設定的 ENDPOINTS_KEY 環境變數傳送 HTTP 要求。將 IP_ADDRESS 替換為您的執行個體外部 IP 位址。
(Invoke-WebRequest -Method POST -Body '{"message": "hello world"}' `
    -Headers @{"content-type"="application/json"} `
    -URI "http://IP_ADDRESS:80/echo?key=$Env:ENDPOINTS_KEY").Content
在上述範例中,前兩行的結尾為倒引號。當您將範例貼到 PowerShell 中時,請確保倒引號後面沒有空格。 如要瞭解範例要求中使用的選項,請參閱 Microsoft 說明文件中的 Invoke-WebRequest。
第三方應用程式
您可以使用諸如 Chrome 瀏覽器擴充功能 Postman 等第三方應用程式,傳送要求:
- 選取
POST做為 HTTP 動詞。 - 選取
content-type鍵和application/json值做為標頭。 - 輸入以下內文:
{"message":"hello world"} -
在網址中使用實際的 API 金鑰,而非環境變數。例如:
http://192.0.2.0:80/echo?key=AIza...
API 會回應您傳送的訊息,並傳回以下內容:
{
  "message": "hello world"
}
如果您未取得成功的回應,請參閱排解回應錯誤一文。
您已在 Endpoints 中部署並測試了 API!
為 Endpoints 設定 DNS
API 的 Endpoints 服務名稱位於 .endpoints.YOUR_PROJECT_ID.cloud.goog 網域,因此您只需要略為調整 openapi.yaml 檔案的設定,即可將該網域當做完整的網域名稱 (FQDN)。這樣一來,您就能使用 echo-api.endpoints.YOUR_PROJECT_ID.cloud.goog (而非 IP 位址) 將要求傳送至範例 API。
如何設定 Endpoints DNS:
OpenAPI 2.0
- 開啟 OpenAPI 設定檔
openapi.yaml,並在檔案最上層新增x-google-endpoints屬性 (請勿使用縮排或巢狀結構),如以下程式碼片段所示:host: "echo-api.endpoints.YOUR_PROJECT_ID.cloud.goog" x-google-endpoints: - name: "echo-api.endpoints.YOUR_PROJECT_ID.cloud.goog" target: "IP_ADDRESS" - 在
name屬性中,將 YOUR_PROJECT_ID 替換為您的專案 ID。 - 在
target屬性中,將 IP_ADDRESS 替換為您向範例 API 傳送要求時使用的 IP 位址。 - 將更新的 OpenAPI 設定檔部署至 Service Management:
gcloud endpoints services deploy openapi.yaml
OpenAPI 3.x
- 開啟 OpenAPI 設定檔
openapi.yaml,並在檔案最上層新增servers.url屬性 (請勿使用縮排或巢狀結構),如以下程式碼片段所示:servers: - url: "echo-api.endpoints.YOUR_PROJECT_ID.cloud.goog" x-google-endpoint: target: "IP_ADDRESS" - 在
name屬性中,將 YOUR_PROJECT_ID 替換為您的專案 ID。 - 在
target屬性中,將 IP_ADDRESS 替換為您向範例 API 傳送要求時使用的 IP 位址。 - 將更新的 OpenAPI 設定檔部署至 Service Management:
gcloud endpoints services deploy openapi.yaml
舉例來說,假設 openapi.yaml 檔案的設定如下:
OpenAPI 2.0
host: "echo-api.endpoints.example-project-12345.cloud.goog"
x-google-endpoints:
- name: "echo-api.endpoints.example-project-12345.cloud.goog"
  target: "192.0.2.1"
OpenAPI 3.x
servers:
  - url: "echo-api.endpoints.example-project-12345.cloud.goog"
    x-google-endpoint:
      target: "192.0.2.1"
您使用前述的 gcloud 指令部署 openapi.yaml 檔案時,Service Management 會建立 DNS A 記錄 echo-api.endpoints.my-project-id.cloud.goog,這個記錄會解析為目標 IP 位址 192.0.2.1。新的 DNS 設定可能需要幾分鐘才會生效。
設定安全資料傳輸層 (SSL)
如要進一步瞭解如何設定 DNS 和安全資料傳輸層 (SSL),請參閱啟用 Endpoints 的安全資料傳輸層 (SSL) 一文。
使用 FQDN 傳送要求
為範例 API 設定 DNS 記錄之後,請使用 FQDN (將 YOUR_PROJECT_ID 替換為您的專案 ID) 與先前設定的 ENDPOINTS_KEY 環境變數向 API 傳送要求:
- 在 Linux 或 mac OS 中:
curl --request POST \
    --header "content-type:application/json" \
    --data '{"message":"hello world"}' \
    "http://echo-api.endpoints.YOUR_PROJECT_ID.cloud.goog:80/echo?key=${ENDPOINTS_KEY}"
- 在 Windows PowerShell 中:
(Invoke-WebRequest -Method POST -Body '{"message": "hello world"}' -Headers @{"content-type"="application/json"} -URI "http://echo-api.endpoints.[YOUR_PROJECT_ID].cloud.goog:80/echo?key=$Env:ENDPOINTS_KEY").Content
追蹤 API 活動
如要追蹤 API 活動,請執行下列步驟:
在「Endpoints」>「Services」(服務) 頁面中查看 API 的活動圖表。
要求可能需要一些時間才能反映在圖表中。在「Logs Explorer」(記錄檔探索工具) 頁面中查看您的 API 要求記錄。
清除所用資源
為避免因為本教學課程所用資源,導致系統向 Google Cloud 帳戶收取費用,請刪除含有相關資源的專案,或者保留專案但刪除個別資源。
- 刪除 API:
gcloud endpoints services delete SERVICE_NAME
將
SERVICE_NAME改為您的服務名稱。 - 前往 Google Cloud 控制台的「VM instances」(VM 執行個體) 頁面。
- 選取要刪除的執行個體旁的核取方塊。
- 如要刪除執行個體,請依序點選 「More actions」(更多動作) 和「Delete」(刪除),然後按照指示操作。