


本教學課程說明如何使用 GitHub Actions 工作流程,將使用 .NET Framework 的 ASP.NET Model-View-Controller (MVC) 網頁應用程式部署至 Google Kubernetes Engine (GKE)。
本教學課程適用於具備 Microsoft .NET、GitHub Actions 和 GKE 基本知識的開發人員和 DevOps 工程師。您也需要 GitHub 帳戶才能執行本教學課程。
目標
將使用 .NET Framework 4 的 ASP.NET MVC 網頁應用程式部署至 Google Kubernetes Engine,並在 Windows 上執行。
下圖顯示 GitHub Actions 工作流程,可將 ASP.NET MVC 網頁應用程式部署至 Google Kubernetes Engine (GKE)。
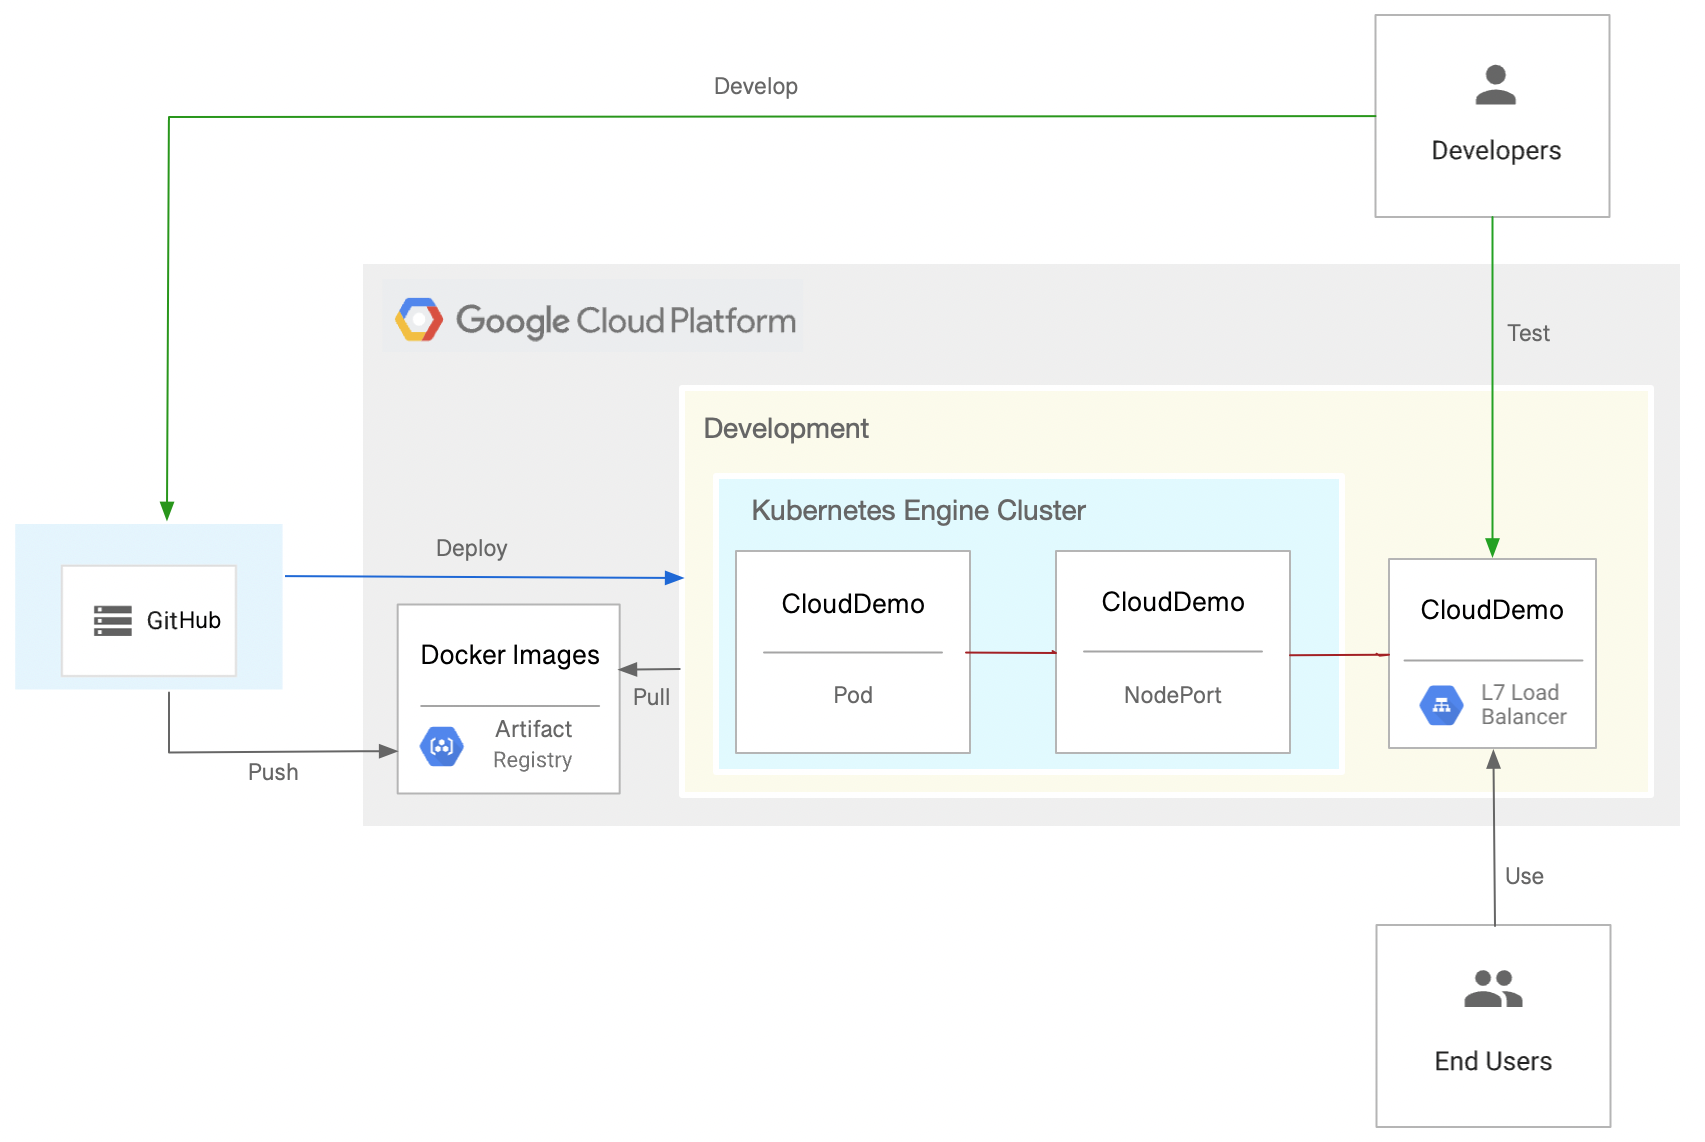
本教學課程將說明如何完成下列工作,以達成目標:
- 建立 GitHub 存放區
- 設定驗證機制
- 部署 GKE 叢集和 Artifact Registry 存放區
- 建立 GitHub Actions 工作流程
費用
在本文件中,您將使用下列 Google Cloud計費元件:
如要根據預測用量估算費用,請使用 Pricing Calculator。
完成本文所述工作後,您可以刪除建立的資源,避免繼續計費,詳情請參閱「清除所用資源」一節。
事前準備
- 登入 Google Cloud 帳戶。如果您是 Google Cloud新手,歡迎 建立帳戶,親自體驗產品的實際應用成效。新客戶還能獲得價值 $300 美元的免費抵免額,能用於執行、測試及部署工作負載。
-
In the Google Cloud console, on the project selector page, select or create a Google Cloud project.
Roles required to select or create a project
- Select a project: Selecting a project doesn't require a specific IAM role—you can select any project that you've been granted a role on.
-
Create a project: To create a project, you need the Project Creator role
(
roles/resourcemanager.projectCreator), which contains theresourcemanager.projects.createpermission. Learn how to grant roles.
-
Verify that billing is enabled for your Google Cloud project.
Enable the Artifact Registry and Google Kubernetes Engine APIs, if any are not already enabled.
Roles required to enable APIs
To enable APIs, you need the
serviceusage.services.enablepermission. If you created the project, then you likely already have this permission through the Owner role (roles/owner). Otherwise, you can get this permission through the Service Usage Admin role (roles/serviceusage.serviceUsageAdmin). Learn how to grant roles.-
In the Google Cloud console, on the project selector page, select or create a Google Cloud project.
Roles required to select or create a project
- Select a project: Selecting a project doesn't require a specific IAM role—you can select any project that you've been granted a role on.
-
Create a project: To create a project, you need the Project Creator role
(
roles/resourcemanager.projectCreator), which contains theresourcemanager.projects.createpermission. Learn how to grant roles.
-
Verify that billing is enabled for your Google Cloud project.
Enable the Artifact Registry and Google Kubernetes Engine APIs, if any are not already enabled.
Roles required to enable APIs
To enable APIs, you need the
serviceusage.services.enablepermission. If you created the project, then you likely already have this permission through the Owner role (roles/owner). Otherwise, you can get this permission through the Service Usage Admin role (roles/serviceusage.serviceUsageAdmin). Learn how to grant roles.
建立 GitHub 存放區
在 GitHub 帳戶中建立 dotnet-docs-samples 存放區的分支。由於我們是使用 GitHub Actions 建構,因此必須執行這個步驟。
- 前往
dotnet-docs-samplesGitHub 存放區。 - 按一下「Fork」。
在「Create a new fork」(建立新分支) 頁面中,設定下列項目:
- 擁有者 - 你的 GitHub 帳戶
- 存放區名稱 -
dotnet-docs-samples
按一下「建立分叉」。
設定驗證機制
準備 Google Cloud 專案,讓 GitHub Actions 能夠驗證並存取 Google Cloud 專案中的資源。
建立 workload identity federation 集區和提供者
如要允許 GitHub Actions 驗證 Google Cloud 並部署至 GKE,請使用工作負載身分聯盟。使用 workload identity federation,即可避免儲存及管理 GitHub Actions 工作負載的服務帳戶金鑰。
使用 workload identity federation 時,必須提供 workload identity pool 和提供者。 建議您使用專案管理 workload identity pool 和提供者。 為求簡單起見,在本教學課程中,請在與 GKE 叢集相同的專案中建立集區和提供者:
開啟 Google Cloud 控制台。
-
在 Google Cloud 控制台中啟用 Cloud Shell。
Google Cloud 控制台底部會開啟 Cloud Shell 工作階段,並顯示指令列提示。Cloud Shell 是已安裝 Google Cloud CLI 的殼層環境,並已設定適用於您目前專案的值。工作階段可能要幾秒鐘的時間才能初始化。
建立新的 workload identity pool:
gcloud iam workload-identity-pools create github-actions \
    --location="global" \
    --description="GitHub Actions tutorial" \
    --display-name="GitHub Actions"
將 GitHub Actions 新增為 workload identity pool 提供者:
gcloud iam workload-identity-pools providers create-oidc github-actions-oidc \
    --location="global" \
    --workload-identity-pool=github-actions \
    --issuer-uri="https://token.actions.githubusercontent.com/" \
    --attribute-mapping="google.subject=assertion.sub" \
    --attribute-condition="assertion.repository_owner=='ORGANIZATION'"
將
ORGANIZATION替換為 GitHub 機構名稱。
建立服務帳戶
在 Cloud Shell 中,建立 GitHub Actions 可用來發布 Docker 映像檔及部署至 GKE 的服務帳戶:
SERVICE_ACCOUNT=$(gcloud iam service-accounts create github-actions-workflow \
  --display-name "GitHub Actions workflow" \
  --format "value(email)")
將 Artifact Registry 寫入者角色 (
roles/artifactregistry.writer) 授予服務帳戶,允許 GitHub 動作推送至 Artifact Registry:gcloud projects add-iam-policy-binding $(gcloud config get-value core/project) \ --member serviceAccount:$SERVICE_ACCOUNT \ --role roles/artifactregistry.writer
將 Google Kubernetes Engine 開發人員角色 (
roles/container.developer) 授予服務帳戶,允許 GitHub 動作推送至 Artifact Registry:gcloud projects add-iam-policy-binding $(gcloud config get-value core/project) \ --member serviceAccount:$SERVICE_ACCOUNT \ --role roles/container.developer
允許 GitHub Actions 工作流程使用服務帳戶
允許 GitHub Actions 工作流程模擬及使用服務帳戶:
初始化環境變數,其中包含 GitHub Actions 工作流程使用的主體。主體類似於使用者名稱,可明確識別 GitHub 存放區和分支版本:
SUBJECT=repo:
OWNER/dotnet-docs-samples:ref:refs/heads/main將
OWNER改成您的 GitHub 使用者名稱。授予主體模擬服務帳戶的權限:
PROJECT_NUMBER=$(gcloud projects describe $(gcloud config get-value core/project) --format='value(projectNumber)')

gcloud iam service-accounts add-iam-policy-binding $SERVICE_ACCOUNT \
  --role=roles/iam.workloadIdentityUser \
  --member="principal://iam.googleapis.com/projects/$PROJECT_NUMBER/locations/global/workloadIdentityPools/github-actions/subject/$SUBJECT"
部署 GKE 叢集和 Artifact Registry 存放區
建立 Docker 映像檔的存放區:
gcloud artifacts repositories create clouddemo \
  --repository-format=docker \
  --location=us-central1
允許「Compute Engine 預設服務帳戶」存取存放區:
gcloud projects add-iam-policy-binding $(gcloud config get-value core/project) \
  --member=serviceAccount:$PROJECT_NUMBER-compute@developer.gserviceaccount.com \
  --role=roles/artifactregistry.reader
建立叢集:
gcloud container clusters create clouddemo-windows \
  --enable-ip-alias \
  --zone us-central1-a

gcloud container node-pools create clouddemo-windows-pool \
  --cluster=clouddemo-windows \
  --image-type=WINDOWS_LTSC_CONTAINERD \
  --no-enable-autoupgrade \
  --machine-type=n1-standard-2 \
  --zone us-central1-a
這個指令可能需要幾分鐘才能完成。
取得叢集的專案名稱和專案編號:
echo "Project ID: $(gcloud config get-value core/project)"
echo "Project Number: $(gcloud projects describe $(gcloud config get-value core/project) --format=value\(projectNumber\))"
稍後會需要用到這些值。
建立 GitHub Actions 工作流程
您現在可以使用 GitHub Actions 設定持續整合。每當有任何提交內容推送至 Git 存放區時,GitHub Actions 工作流程就會建構程式碼,並將建構構件封裝至 Docker 容器。然後將容器發布至 Artifact Registry。
存放區已包含下列 Dockerfile:
存放區也包含 Kubernetes 資訊清單:
建立 GitHub Actions 工作流程,用於執行下列作業:
- 使用 workload identity federation 和您先前建立的服務帳戶,向 Google Cloud 進行驗證。
- 建構 Docker 映像檔並部署至 Artifact Registry。
- 將 Docker 映像檔部署至 GKE。
如要建立 GitHub Actions 工作流程,請按照下列步驟操作:
- 在 GitHub 中,前往
dotnet-docs-samples存放區的分支。 - 依序點選「新增檔案」 >「建立新檔案」。
在「Name your file」(為檔案命名) 文字欄位中,輸入下列名稱:
.github/workflows/deploy-gke.yaml
將下列程式碼複製到檔案中:
name: Build and Deploy to GKE on: push: branches: - main env: PROJECT_ID:PROJECT_IDPROJECT_NUMBER:PROJECT_NUMBERCLUSTER: clouddemo-windows CLUSTER_ZONE: us-central1-a REPOSITORY: clouddemo REPOSITORY_REGION: us-central1 IMAGE: clouddemo jobs: build: runs-on: windows-2019 # Matches WINDOWS_LTSC in GKE permissions: id-token: write contents: read steps: - name: Checkout uses: actions/checkout@v3 # # Authenticate to Google Cloud using workload identity federation # - id: 'auth' name: 'Obtain access token by using workload identity federation' uses: 'google-github-actions/auth@v0' with: create_credentials_file: true token_format: access_token workload_identity_provider: projects/${{ env.PROJECT_NUMBER }}/locations/global/workloadIdentityPools/github-actions/providers/github-actions-oidc service_account: github-actions-workflow@${{ env.PROJECT_ID }}.iam.gserviceaccount.com - name: Connect to Artifact Registry run: |- echo ${{ steps.auth.outputs.access_token }} | docker login -u oauth2accesstoken --password-stdin https://${{ env.REPOSITORY_REGION }}-docker.pkg.dev - name: Connect to GKE uses: google-github-actions/get-gke-credentials@v0 with: cluster_name: ${{ env.CLUSTER }} location: ${{ env.CLUSTER_ZONE }} # # Build the .NET code # - name: Setup MSBuild uses: microsoft/setup-msbuild@v1 - name: Setup NuGet uses: NuGet/setup-nuget@v1 - name: Restore NuGet packages run: nuget restore applications/clouddemo/net4/CloudDemo.Mvc.sln - name: Build solution run: msbuild /t:Rebuild /p:Configuration=Release /p:DeployOnBuild=true /p:PublishProfile=FolderProfile /nologo applications/clouddemo/net4/CloudDemo.Mvc.sln # # Build the Docker image and push it to Artifact Registry # - name: Create image tag run: echo "IMAGE_TAG=${{ env.REPOSITORY_REGION }}-docker.pkg.dev/${{ env.PROJECT_ID }}/${{ env.REPOSITORY }}/${{ env.IMAGE }}:$env:GITHUB_SHA" >> $env:GITHUB_ENV - name: Lock image version in deployment.yaml shell: pwsh run: (Get-Content applications\clouddemo\net4\deployment.yaml) -replace "CLOUDDEMO_IMAGE","${{ env.IMAGE_TAG }}" | Out-File -Encoding ASCII applications\clouddemo\net4\deployment.yaml - name: Build Docker image run: docker build --tag "${{ env.IMAGE_TAG }}" applications/clouddemo/net4 - name: Publish Docker image to Google Artifact Registry run: docker push "${{ env.IMAGE_TAG }" # # Deploy to GKE # - name: Deploy to GKE run: kubectl apply -f applications/clouddemo/net4/deployment.yaml替換下列值:
PROJECT_ID:包含 GKE 叢集的專案 ID。PROJECT_NUMBER:含有 GKE 叢集的專案專案編號。
在「Commit new file」(提交新檔案) 專區中輸入提交訊息 (例如
Add workflow),然後按一下「Commit new file」(提交新檔案)。在選單中按一下「動作」,然後等待工作流程完成。
工作流程可能需要幾分鐘才能完成。
在 Google Cloud 控制台中,重新整理「Services & Ingress」(服務與輸入) 頁面。
前往「Ingress」分頁。
找出 clouddemo 叢集的 Ingress 服務,並等待狀態切換為「Ok」。這可能需要幾分鐘的時間。
開啟同一列「前端」欄中的連結。負載平衡器需要幾分鐘才能啟用,因此 CloudDemo 應用程式一開始可能無法載入。負載平衡器準備就緒後,您會看到 CloudDemo 應用程式,這次是在正式版叢集中執行,且標題為自訂標題。
清除所用資源
完成教學課程後,您可以清理所建立的資源,這樣資源就不會繼續使用配額,也不會產生費用。下列各節將說明如何刪除或關閉這些資源。
刪除 GitHub 存放區
如要刪除 GitHub 存放區,請參閱「刪除存放區」。刪除存放區會導致所有原始碼變更遺失。
刪除專案
如要避免付費,最簡單的方法就是刪除您為了本教學課程而建立的專案。
刪除 Google Cloud 專案:
gcloud projects delete PROJECT_ID
後續步驟
- 在 Kubernetes 上部署、管理容器化應用程式,並調度資源。
- 請參閱「Google Cloud Well-Architected Framework」中的最佳做法。
- 探索 Google Cloud 的參考架構、圖表和最佳做法。歡迎瀏覽我們的 Cloud Architecture Center。