クイックスタート

このガイドでは、Document AI ウェアハウスの使用を開始するために必要なすべての設定手順を説明します。

Google Cloud コンソールについて

Google Cloud console は、 Google Cloud プロダクトを使用するシステムのプロビジョニング、構成、管理、モニタリングに使用されるウェブ UI です。Google Cloud コンソールを使用して、Document AI Warehouse リソースを設定して管理します。

プロジェクトを作成する

Google Cloudが提供するサービスを使用するには、プロジェクトを作成する必要があります。

プロジェクトはすべての Google Cloud リソースを整理します。プロジェクトは、次のコンポーネントで構成されます。

  • 共同編集者
  • 有効な API とその他のリソース
  • モニタリング ツール
  • お支払い情報
  • 認証とアクセス制御

1 つのプロジェクトを作成することも、複数のプロジェクトを作成することもできます。プロジェクトを使用して、リソース階層内で Google Cloud リソースを構成できます。プロジェクトの詳細については、Resource Manager のドキュメントをご覧ください。

In the Google Cloud console, on the project selector page, select or create a Google Cloud project.

Roles required to select or create a project

  • Select a project: Selecting a project doesn't require a specific IAM role—you can select any project that you've been granted a role on.
  • Create a project: To create a project, you need the Project Creator role (roles/resourcemanager.projectCreator), which contains the resourcemanager.projects.create permission. Learn how to grant roles.

Go to project selector

課金を有効にする

請求先アカウントは、特定のリソースセットに対する支払いを誰が行うかを定義します。請求先アカウントは 1 つ以上のプロジェクトにリンクできます。プロジェクトの利用料金は、リンクされた請求先アカウントに請求されます。請求情報は、プロジェクトの作成時に構成できます。詳細については、お支払いとご請求に関するドキュメントをご覧ください。

Verify that billing is enabled for your Google Cloud project.

サービスをプロビジョニングして初期化する

Document AI ウェアハウスを初めて使用する前に、Document AI ウェアハウスのプロビジョニング ページで、プロジェクトに関連付けられたリソースをプロビジョニングして初期化する必要があります。

リソースをプロビジョニングする場合は、プロジェクトの Content Warehouse 管理者ロールと Service Usage 管理者ロールが付与されている必要があります。

プロビジョニングのステップ

  1. リージョンを選択します。

    プロビジョニング ページで、有効にするリージョンを選択します。

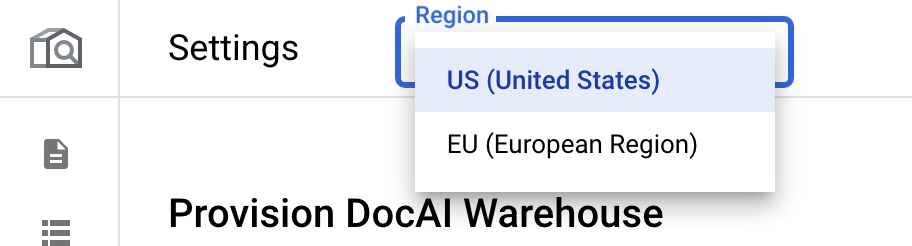
    各リージョンは独立しています。そのため、複数のリージョンを使用する場合は、各リージョンを個別にプロビジョニングします。

  2. コア API を有効にします。{:#enable-core-api}:

    [有効にする] をクリックします。これにより、プロジェクトで Document AI Warehouse API が有効になります。

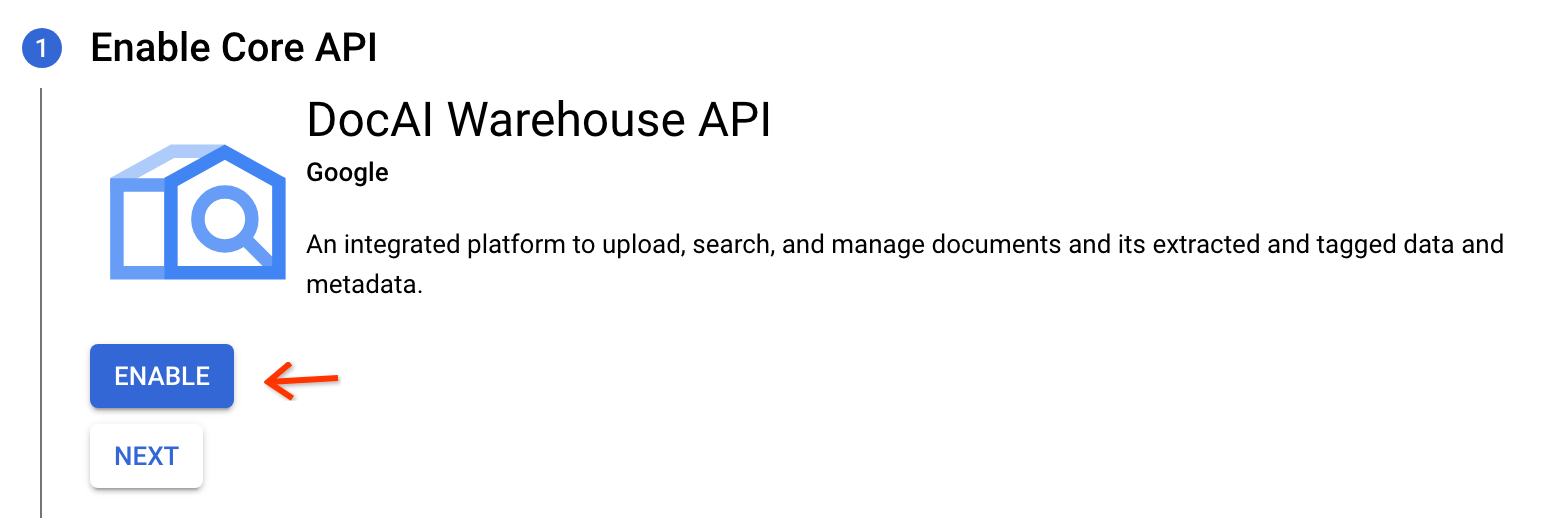
    API が有効になったら、[次へ] をクリックします。

  3. インスタンスをプロビジョニングします。

    このステップでは、Document AI Warehouse サービスでプロジェクトのリソースをプロビジョニングします。3 つのアクセス制御モードから選択する必要があります。ユースケースに適したモードを選択するために、これらを慎重に確認してください。詳細については、アクセス制御モードのページをご覧ください。

    1. アクセス制御(ACL)モードを選択します。

      • [推奨] Cloud Identity のユーザーに対するドキュメント レベルのアクセス制御。

        これは、組織が Cloud Identity サービスでユーザーまたはグループを管理している場合に適用されます。

        • Document AI ウェアハウス インターフェースは、このモードをサポートしてユーザーを認証します。
        • 組織の LDAP と Active Directory のユーザーとグループは、Cloud Identity に同期できます。

        • Google Workspace ユーザーは、Cloud Identity に簡単に追加できます。

      • お客様独自のアカウント管理サービスのユーザーに対するドキュメント レベルのアクセス制御。

        Cloud Identity にユーザーを追加または同期できない場合は、このモードを使用します。ただし、次の点にご注意ください。

        • Document AI Warehouse インターフェースはこのモードをサポートしていません。カスタム クライアント アプリケーションが必要になることがあります。
        • カスタム クライアント アプリケーションは、ID プロバイダに対してユーザーを認証し、Document AI Warehouse API を使用してユーザーとグループ メンバーを渡します。
      • ユニバーサル アクセス: ドキュメント レベルのアクセス制御なし。

        • Document AI ウェアハウスのインターフェースは、このモードをサポートしてユーザーを認証します。
        • このモードは通常、認証を必要とせずに一般ユーザーにアクセス権を付与する場合に使用します。
        • カスタム ポータルは、必要なロール(ドキュメント閲覧者ロールなど)を持つサービス アカウントを使用してすべてのドキュメントにアクセスでき、認証なしでこのアクセスを一般ユーザーにリレーできます。
      Cloud Identity のユーザーに対するドキュメント レベルのアクセス制御 お客様独自のアカウント管理サービスのユーザーに対するドキュメント レベルのアクセス制御 ユニバーサル アクセス
      ドキュメント レベルのアクセス はい はい いいえ
      Document AI ウェアハウス UI のサポート はい いいえ ○(ユーザーがプロジェクト レベルのアクセス権を持っている場合)
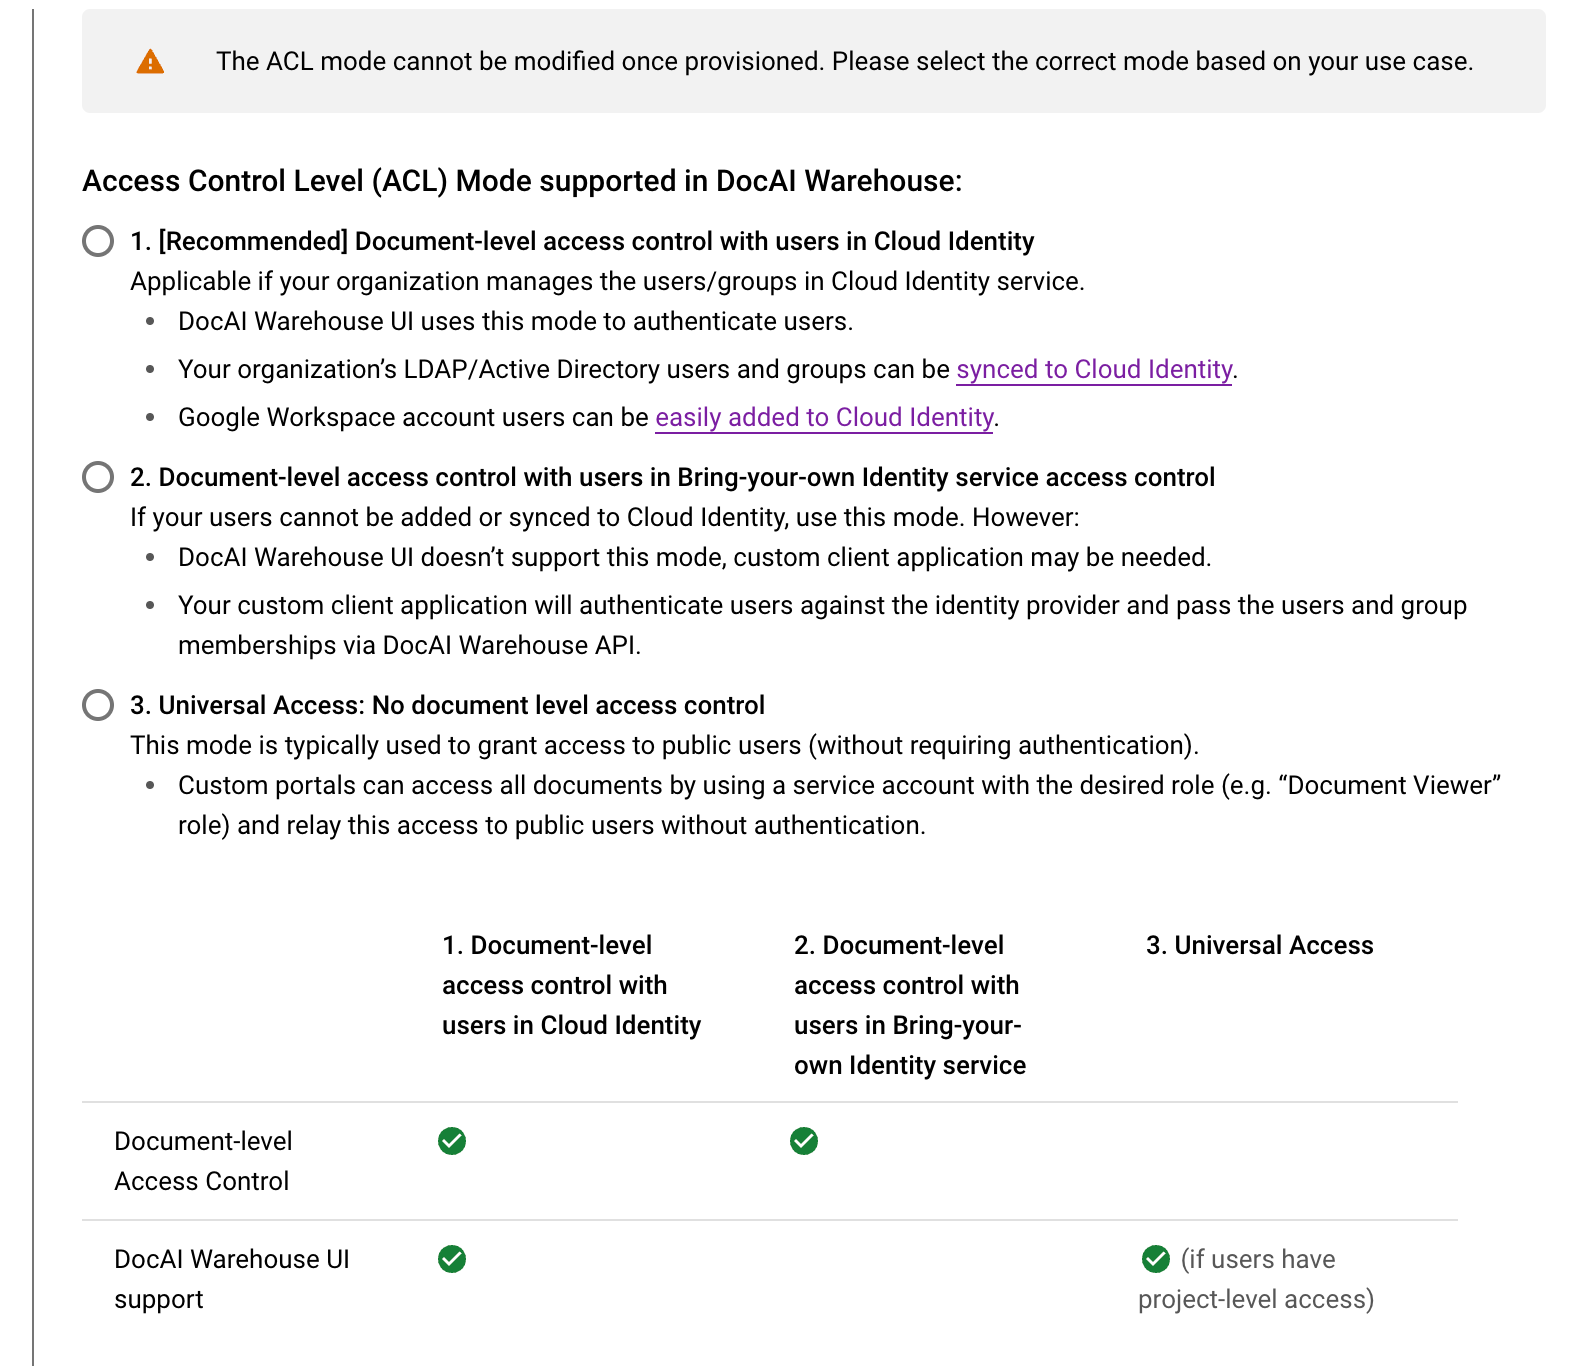
    2. 質問と回答を有効にする:

      プロジェクトで生成 AI 検索を有効にする場合は、[質問と回答] をオンにします。この機能を使用するための許可リストへの登録方法など、詳細については、生成 AI 検索をご覧ください。

  4. プロビジョニングをトリガー:

    [プロビジョニング] をクリックして、プロジェクトのプロビジョニングを開始します。インスタンスの設定にはしばらく(3 ~ 5 分)かかります。
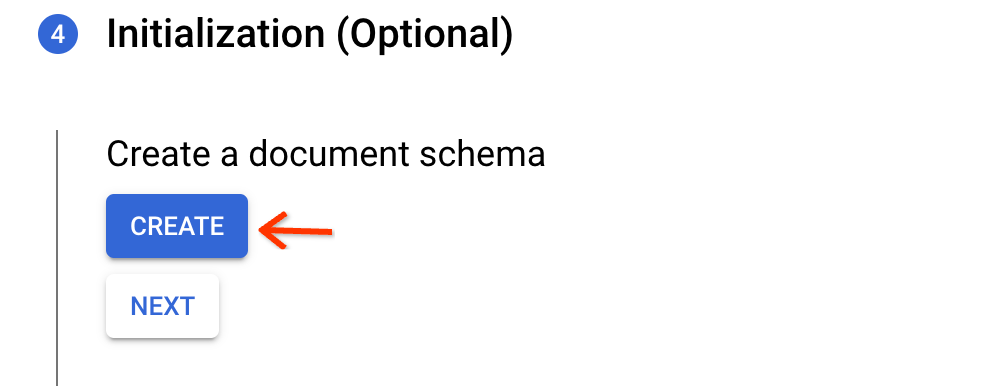
  5. デフォルトのスキーマを作成します。

    初期化ステップで [作成] をクリックします。これにより、OCR で抽出された PDF ファイルまたは TXT ファイルに使用できるデフォルトのスキーマが作成されます。インデックス作成用の未加工のテキスト フィールドが含まれていますが、プロパティは含まれていません。

  6. インスタンスを表示します。

    これでプロビジョニング プロセスが完了します。プロジェクトでドキュメント レベルのアクセス制御を使用している場合は、次のセクションに進んでプロジェクト レベルの権限を設定します。

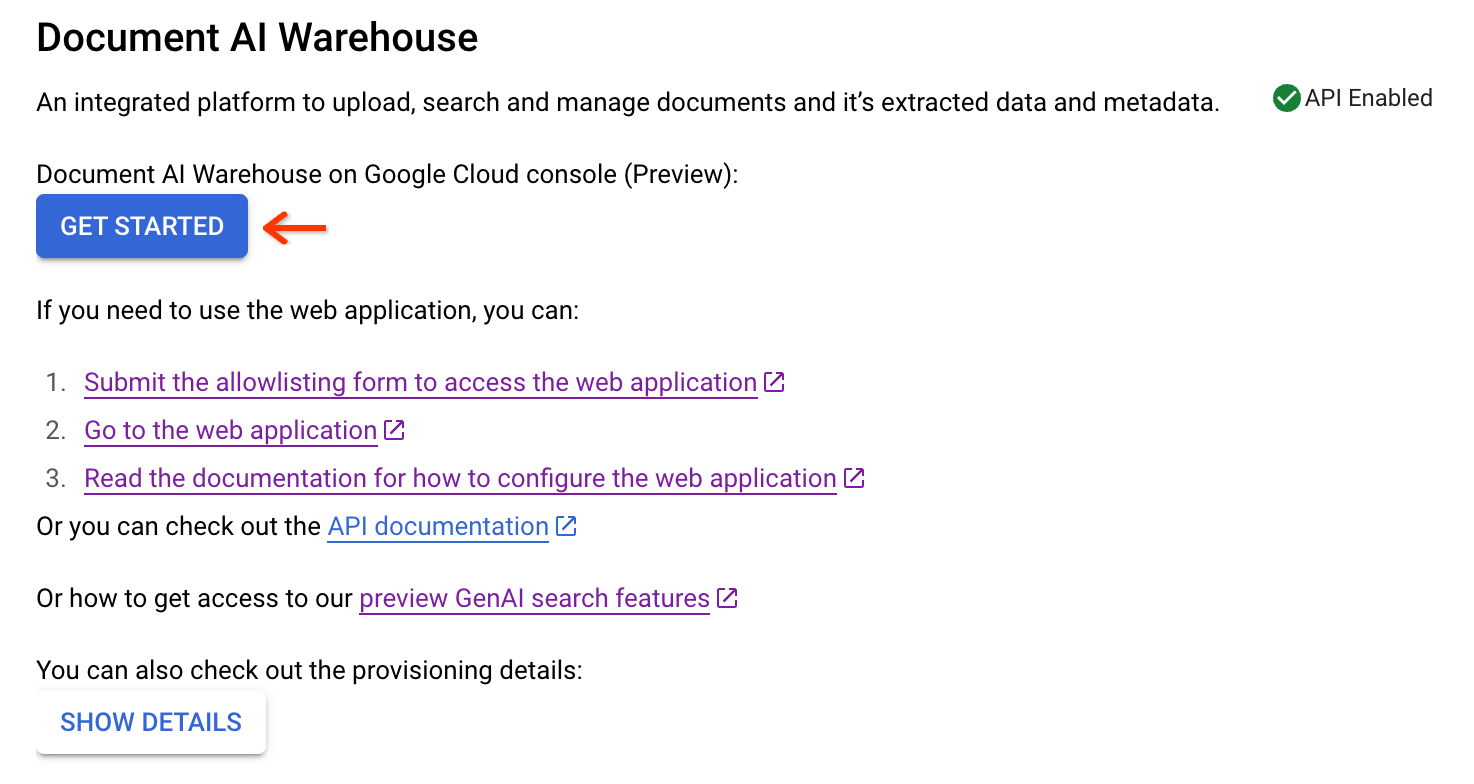
    Google Cloud コンソール UI 機能の許可リストに登録されている場合は、[始める] をクリックして、 Google Cloud コンソールで Document AI Warehouse の使用を開始できます。

    Google Cloud コンソール UI 機能の許可リストに登録されていない場合は、ウェブ アプリケーションを構成するに進んで、Document AI ウェアハウス ウェブ アプリケーションの設定方法を確認してください。

  7. ユーザーに必要な権限を IAM で構成します。ドキュメント レベルのアクセス制御が有効になっている場合は、プロジェクト レベルの権限と IAM 権限が必要です。詳細については、必要な権限をご覧ください。

プロジェクト レベルの権限を設定する

プロジェクトでドキュメント レベルのアクセス制御(ACL モードの選択のオプション 1)を有効にしている場合は、管理者アカウントとユーザーにプロジェクト レベルの権限を付与する必要があります。

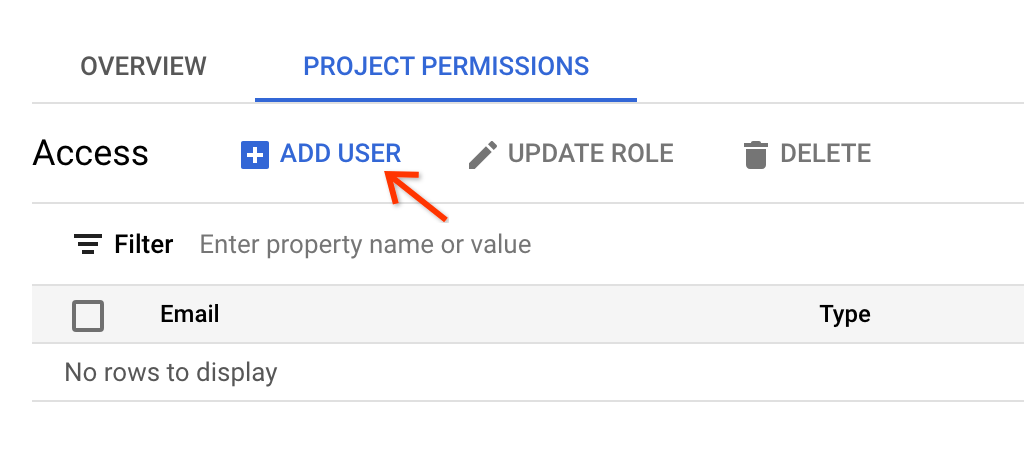
これを行うには、プロビジョニング後の最終ビューで [プロジェクトの権限] に移動します。

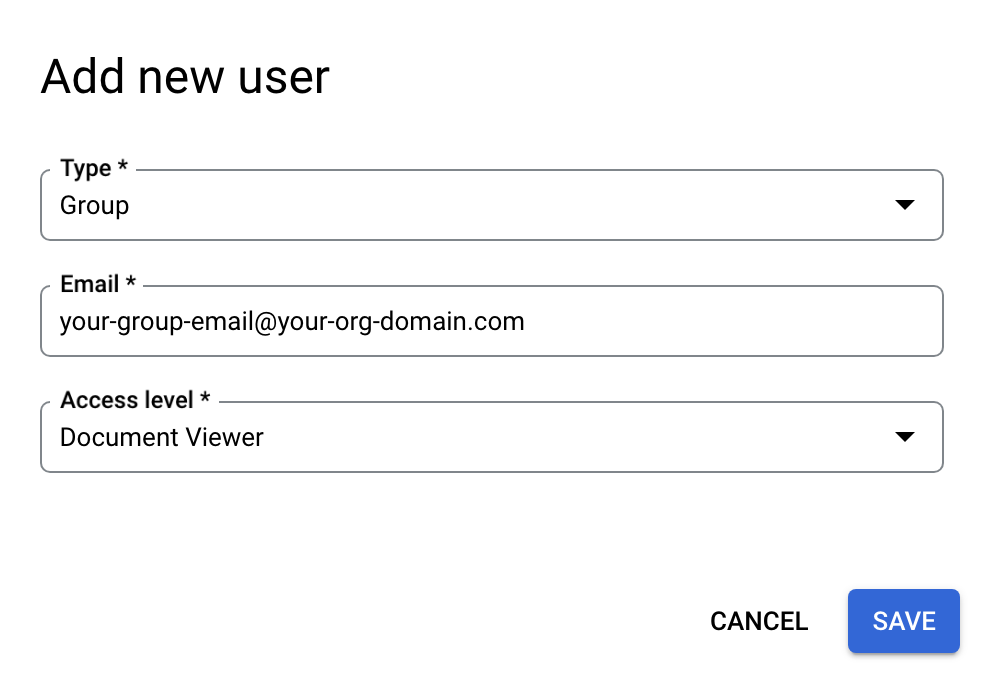
管理者アカウントをドキュメント管理者として追加する手順は次のとおりです。

  1. [ユーザーを追加] をクリックします。

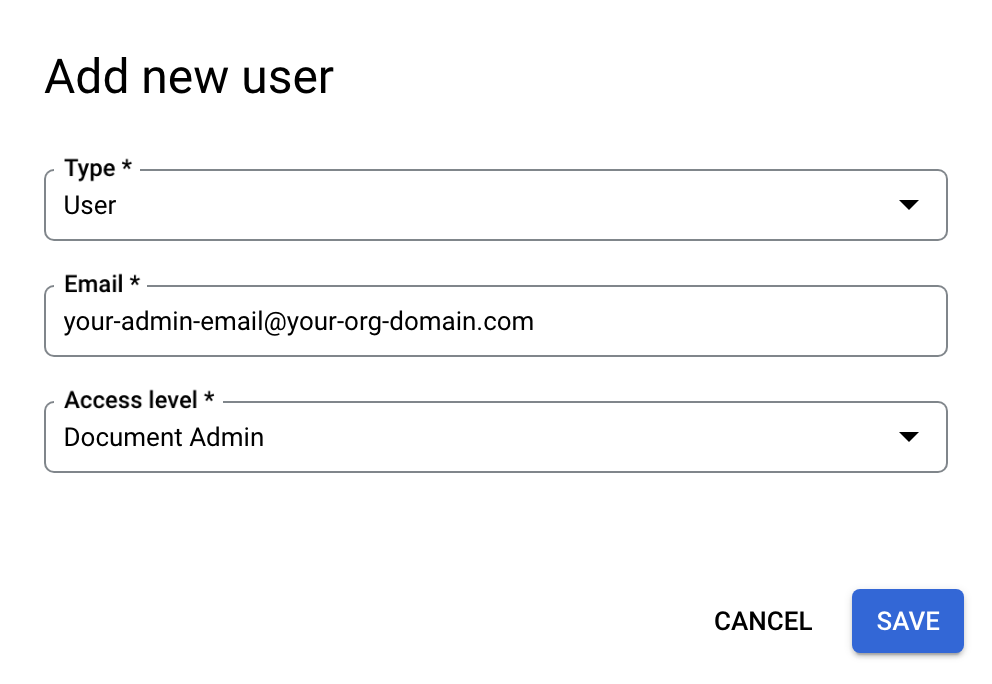
  2. 管理者のメールアドレスを入力し、アクセスレベルとして [ドキュメント管理者] を選択します。[保存] をクリックします。

  3. 他のユーザーは、次のように追加できます。

    1. ドキュメント管理者: ドキュメントの所有者に関係なく、ドキュメントのアップロード、すべてのドキュメントの表示、編集、削除など、プロジェクト内のすべてのドキュメントにフルアクセスできるロール。また、ドキュメント管理者はすべてのドキュメントの権限を変更できます。

    2. ドキュメント編集者: すべてのドキュメントの表示と編集の権限を持つロール。ただし、プロジェクトでドキュメントを作成および削除することはできず、ドキュメントの権限を変更することもできません。

    3. ドキュメント閲覧者: すべてのドキュメントに対する閲覧権限のみを持つロール。ドキュメント閲覧者は、ドキュメントの作成、編集、削除、権限の変更を行うことはできません。

    4. ドキュメント作成者: ドキュメントのアップロード権限のみを持つロール。ドキュメントの作成者は、アップロードしたドキュメントに対するすべての権限を持ちますが、他のドキュメントに対する権限は、それらのドキュメントに対する明示的な権限を取得しない限り持ちません。

  4. メールは、単一のユーザーのメールアドレスまたはグループのメールアドレスのいずれかになります。グループ メールを指定する場合は、[タイプ] フィールドで [グループ] を選択します。

必要な権限

Document AI ウェアハウスでは、IAM の上に独立した ACL システムがあります。ドキュメント レベルの ACL プロジェクトでは、Document AI Warehouse の ACL システムで追加のプロジェクト レベルの権限を取得する必要があります。ユニバーサル アクセス プロジェクトでは、IAM 権限のみが必要です。

必要な権限の概要表は次のとおりです。

Document-ACL プロジェクト

ユーザーの種類 IAM ロール Document AI ウェアハウスのプロジェクト レベルの権限
管理者ユーザー Content Warehouse 管理者 ドキュメント管理者
通常のユーザー Content Warehouse ドキュメント スキーマ閲覧者 ドキュメント作成者/編集者/閲覧者(目的の権限に応じて)

ユニバーサル アクセス プロジェクト

ユーザーの種類 IAM ロール
管理者ユーザー 1. Content Warehouse 管理者
2。Content Warehouse ドキュメント管理者
通常のユーザー 1. Content Warehouse ドキュメント スキーマ閲覧者
2. Content Warehouse ドキュメント作成者/閲覧者/編集者(目的の権限に応じて)
ユニバーサル アクセス プロジェクトの IAM ロール
ロールのタイトル ロール名 目的
Content Warehouse ドキュメント作成者 contentwarehouse.documentCreator ドキュメントを作成する
Content Warehouse ドキュメント閲覧者 contentwarehouse.documentViewer ドキュメントの閲覧
Content Warehouse ドキュメント編集者 contentwarehouse.documentEditor ドキュメントの編集(作成と削除は含まれません)
Content Warehouse ドキュメント管理者 contentwarehouse.documentAdmin ドキュメントの管理(作成、削除など)
Content Warehouse 管理者 contentwarehouse.admin ドキュメント、スキーマ、ルールの管理

詳細については、IAM のロールと権限をご覧ください。

アクセス トークンを設定する(コマンドラインから API を呼び出す場合)

コマンドライン ツールで Document AI Warehouse API を呼び出す手順は次のとおりです。

環境でサービス アカウント キー ファイルを使用する

Provide authentication credentials to your application code by setting the environment variable GOOGLE_APPLICATION_CREDENTIALS. This variable applies only to your current shell session. If you want the variable to apply to future shell sessions, set the variable in your shell startup file, for example in the ~/.bashrc or ~/.profile file.

Linux または macOS

export GOOGLE_APPLICATION_CREDENTIALS="KEY_PATH"

Replace KEY_PATH with the path of the JSON file that contains your credentials.

For example:

export GOOGLE_APPLICATION_CREDENTIALS="/home/user/Downloads/service-account-file.json"

Windows

For PowerShell:

$env:GOOGLE_APPLICATION_CREDENTIALS="KEY_PATH"

Replace KEY_PATH with the path of the JSON file that contains your credentials.

For example:

$env:GOOGLE_APPLICATION_CREDENTIALS="C:\Users\username\Downloads\service-account-file.json"

For command prompt:

set GOOGLE_APPLICATION_CREDENTIALS=KEY_PATH

Replace KEY_PATH with the path of the JSON file that contains your credentials.

Google Cloud CLI をインストールして初期化する(省略可)

gcloud CLI には、 Google Cloudでホストされるリソースやアプリケーションの管理に使用できる一連のツールが用意されています。

次のリンクで手順を説明します。

Google Cloud CLI をインストールします。 インストール後、次のコマンドを実行して Google Cloud CLI を初期化します。

gcloud init

外部 ID プロバイダ(IdP)を使用している場合は、まず連携 ID を使用して gcloud CLI にログインする必要があります。

アクセス トークンを生成する

前の手順で認証を設定した場合は、Google Cloud CLI を使用して認証環境をテストできます。次のコマンドを実行し、エラーが発生せず、認証情報が返されることを確認します。

AUTH_TOKEN=$(gcloud auth application-default print-access-token --scopes=https://www.googleapis.com/auth/cloud-platform)

AUTH_TOKEN が設定されていることを確認します。次に例を示します。

$ echo $AUTH_TOKEN
ya29.c.b0AXv0zTPvXmEMZXCe781qL0Y3r1EKnw3k4DJcoWGZkyWKx-nMNVQVErQ3ge6XA2RXsTU1tf_SMLgeWC6xwS51tP8QZhbypuGczBzMgKWYExwATHt3Vn553edl8tmqCMjROgdQjCDd8i7as-236r4d8gNwKsR192gNgNw_0zzs0MPyNVmqydpfmpj8yBwJI5QWna1331GTGKgd3Ia16fTzAHrZC_GkcO0wJPo....................................................................................................................................................................................................................................................................................................................................................................................................................................................................................................................................................................................................................................................................................................................................................................................................................

Document AI ウェアハウス API の呼び出しをテストする

AUTH_TOKEN は、すべての Document AI Warehouse API REST サンプルで API 呼び出しの認証に使用されます。たとえば、次のコマンドは、プロジェクトに関連付けられている定義済みのすべてのドキュメント スキーマを取得します(ほとんどの場合、ロケーションとして「us」を使用します)。

  curl --header "Authorization: Bearer $AUTH_TOKEN" https://contentwarehouse.googleapis.com/v1/projects/PROJECT_NUMBER>/locations/LOCATION/documentSchemas

コードサンプル

Java

詳細については、Document AI Warehouse Java API リファレンス ドキュメントをご覧ください。

Document AI Warehouse に対する認証を行うには、アプリケーションのデフォルト認証情報を設定します。詳細については、ローカル開発環境の認証の設定をご覧ください。

public class QuickStart {

  public static void main(String[] args)
      throws IOException, InterruptedException, ExecutionException, TimeoutException {
    // TODO(developer): Replace these variables before running the sample.
    String projectId = "your-project-id";
    String location = "your-region"; // Format is "us" or "eu".
    String userId = "your-user-id"; // Format is user:<user-id>
    quickStart(projectId, location, userId);
  }

  public static void quickStart(String projectId, String location, String userId)
      throws IOException, InterruptedException, ExecutionException, TimeoutException {
    String projectNumber = getProjectNumber(projectId);

    String endpoint = "contentwarehouse.googleapis.com:443";
    if (!"us".equals(location)) {
      endpoint = String.format("%s-%s", location, endpoint);
    }
    DocumentSchemaServiceSettings documentSchemaServiceSettings = 
         DocumentSchemaServiceSettings.newBuilder().setEndpoint(endpoint).build(); 

    // Create a Schema Service client
    try (DocumentSchemaServiceClient documentSchemaServiceClient =
        DocumentSchemaServiceClient.create(documentSchemaServiceSettings)) {
      /*  The full resource name of the location, e.g.:
      projects/{project_number}/locations/{location} */
      String parent = LocationName.format(projectNumber, location);

      /* Create Document Schema with Text Type Property Definition
       * More detail on managing Document Schemas: 
       * https://cloud.google.com/document-warehouse/docs/manage-document-schemas */
      DocumentSchema documentSchema = DocumentSchema.newBuilder()
          .setDisplayName("My Test Schema")
          .setDescription("My Test Schema's Description")
          .addPropertyDefinitions(
            PropertyDefinition.newBuilder()
              .setName("test_symbol")
              .setDisplayName("Searchable text")
              .setIsSearchable(true)
              .setTextTypeOptions(TextTypeOptions.newBuilder().build())
              .build()).build();

      // Define Document Schema request
      CreateDocumentSchemaRequest createDocumentSchemaRequest =
          CreateDocumentSchemaRequest.newBuilder()
            .setParent(parent)
            .setDocumentSchema(documentSchema).build();

      // Create Document Schema
      DocumentSchema documentSchemaResponse =
          documentSchemaServiceClient.createDocumentSchema(createDocumentSchemaRequest); 


      // Create Document Service Client Settings
      DocumentServiceSettings documentServiceSettings = 
          DocumentServiceSettings.newBuilder().setEndpoint(endpoint).build();

      // Create Document Service Client and Document with relevant properties 
      try (DocumentServiceClient documentServiceClient =
          DocumentServiceClient.create(documentServiceSettings)) {
        TextArray textArray = TextArray.newBuilder().addValues("Test").build();
        Document document = Document.newBuilder()
              .setDisplayName("My Test Document")
              .setDocumentSchemaName(documentSchemaResponse.getName())
              .setPlainText("This is a sample of a document's text.")
              .addProperties(
                Property.newBuilder()
                  .setName(documentSchema.getPropertyDefinitions(0).getName())
                  .setTextValues(textArray)).build();

        // Define Request Metadata for enforcing access control
        RequestMetadata requestMetadata = RequestMetadata.newBuilder()
            .setUserInfo(
            UserInfo.newBuilder()
              .setId(userId).build()).build();

        // Define Create Document Request 
        CreateDocumentRequest createDocumentRequest = CreateDocumentRequest.newBuilder()
            .setParent(parent)
            .setDocument(document)
            .setRequestMetadata(requestMetadata)
            .build();

        // Create Document
        CreateDocumentResponse createDocumentResponse =
            documentServiceClient.createDocument(createDocumentRequest);

        System.out.println(createDocumentResponse.getDocument().getName());
        System.out.println(documentSchemaResponse.getName());
      }
    }
  }

  private static String getProjectNumber(String projectId) throws IOException { 
    try (ProjectsClient projectsClient = ProjectsClient.create()) { 
      ProjectName projectName = ProjectName.of(projectId); 
      Project project = projectsClient.getProject(projectName);
      String projectNumber = project.getName(); // Format returned is projects/xxxxxx
      return projectNumber.substring(projectNumber.lastIndexOf("/") + 1);
    } 
  }
}

Node.js

詳細については、Document AI Warehouse Node.js API リファレンス ドキュメントをご覧ください。

Document AI Warehouse に対する認証を行うには、アプリケーションのデフォルト認証情報を設定します。詳細については、ローカル開発環境の認証の設定をご覧ください。

/**
 * TODO(developer): Uncomment these variables before running the sample.
 * const projectNumber = 'YOUR_PROJECT_NUMBER';
 * const location = 'YOUR_PROJECT_LOCATION'; // Format is 'us' or 'eu'
 * const userId = 'user:xxx@example.com'; // Format is "user:xxx@example.com"
 */

// Import from google cloud
const {DocumentSchemaServiceClient, DocumentServiceClient} =
  require('@google-cloud/contentwarehouse').v1;

const apiEndpoint =
  location === 'us'
    ? 'contentwarehouse.googleapis.com'
    : `${location}-contentwarehouse.googleapis.com`;

// Create service client
const schemaClient = new DocumentSchemaServiceClient({
  apiEndpoint: apiEndpoint,
});
const serviceClient = new DocumentServiceClient({apiEndpoint: apiEndpoint});

// Get Document Schema
async function quickstart() {
  // The full resource name of the location, e.g.:
  // projects/{project_number}/locations/{location}
  const parent = `projects/${projectNumber}/locations/${location}`;

  // Initialize request argument(s)
  const schemaRequest = {
    parent: parent,
    documentSchema: {
      displayName: 'My Test Schema',
      propertyDefinitions: [
        {
          name: 'testPropertyDefinitionName', // Must be unique within a document schema (case insensitive)
          displayName: 'searchable text',
          isSearchable: true,
          textTypeOptions: {},
        },
      ],
    },
  };

  // Create Document Schema
  const documentSchema =
    await schemaClient.createDocumentSchema(schemaRequest);

  const documentRequest = {
    parent: parent,
    document: {
      displayName: 'My Test Document',
      documentSchemaName: documentSchema[0].name,
      plainText: "This is a sample of a document's text.",
      properties: [
        {
          name: 'testPropertyDefinitionName',
          textValues: {values: ['GOOG']},
        },
      ],
    },
    requestMetadata: {userInfo: {id: userId}},
  };

  // Make Request
  const response = serviceClient.createDocument(documentRequest);

  // Print out response
  response.then(
    result => console.log(`Document Created: ${JSON.stringify(result)}`),
    error => console.log(`error: ${error}`)
  );
}

Python

詳細については、Document AI Warehouse Python API リファレンス ドキュメントをご覧ください。

Document AI Warehouse に対する認証を行うには、アプリケーションのデフォルト認証情報を設定します。詳細については、ローカル開発環境の認証の設定をご覧ください。


from google.cloud import contentwarehouse

# TODO(developer): Uncomment these variables before running the sample.
# project_number = 'YOUR_PROJECT_NUMBER'
# location = 'YOUR_PROJECT_LOCATION' # Format is 'us' or 'eu'
# user_id = "user:xxxx@example.com" # Format is "user:xxxx@example.com"


def quickstart(project_number: str, location: str, user_id: str) -> None:
    # Create a Schema Service client
    document_schema_client = contentwarehouse.DocumentSchemaServiceClient()

    # The full resource name of the location, e.g.:
    # projects/{project_number}/locations/{location}
    parent = document_schema_client.common_location_path(
        project=project_number, location=location
    )

    # Define Schema Property of Text Type
    property_definition = contentwarehouse.PropertyDefinition(
        name="stock_symbol",  # Must be unique within a document schema (case insensitive)
        display_name="Searchable text",
        is_searchable=True,
        text_type_options=contentwarehouse.TextTypeOptions(),
    )

    # Define Document Schema Request
    create_document_schema_request = contentwarehouse.CreateDocumentSchemaRequest(
        parent=parent,
        document_schema=contentwarehouse.DocumentSchema(
            display_name="My Test Schema",
            property_definitions=[property_definition],
        ),
    )

    # Create a Document schema
    document_schema = document_schema_client.create_document_schema(
        request=create_document_schema_request
    )

    # Create a Document Service client
    document_client = contentwarehouse.DocumentServiceClient()

    # The full resource name of the location, e.g.:
    # projects/{project_number}/locations/{location}
    parent = document_client.common_location_path(
        project=project_number, location=location
    )

    # Define Document Property Value
    document_property = contentwarehouse.Property(
        name=document_schema.property_definitions[0].name,
        text_values=contentwarehouse.TextArray(values=["GOOG"]),
    )

    # Define Document
    document = contentwarehouse.Document(
        display_name="My Test Document",
        document_schema_name=document_schema.name,
        plain_text="This is a sample of a document's text.",
        properties=[document_property],
    )

    # Define Request
    create_document_request = contentwarehouse.CreateDocumentRequest(
        parent=parent,
        document=document,
        request_metadata=contentwarehouse.RequestMetadata(
            user_info=contentwarehouse.UserInfo(id=user_id)
        ),
    )

    # Create a Document for the given schema
    response = document_client.create_document(request=create_document_request)

    # Read the output
    print(f"Rule Engine Output: {response.rule_engine_output}")
    print(f"Document Created: {response.document}")

次のステップ