


יצירת צינור עיבוד מסמכים באמצעות Workflows
אם אתם משתמשים ב-Document AI כדי ליצור תהליכי עבודה שכוללים כמה שלבים לעיבוד מסמכים, יכול להיות שתרצו להשתמש בתזמור בלי שרת כדי לנהל את תהליך העבודה.
תהליכי עבודה מקשרים בין סדרה של משימות בסדר שאתם מגדירים. הוא לא דורש ניהול תשתית, ואפשר להגדיל או להקטין את הקיבולת שלו לפי הצורך, כולל הקטנה לאפס. במודל התמחור של תשלום לפי שימוש, אתם משלמים רק על זמן הביצוע.
ב-Workflows יש מחבר מובנה ל-Document AI API. כדי להשתמש ב-Connectors לא צריך לכתוב קוד נוסף, רק להגדיר את השלבים באמצעות קובץ הגדרה. המחברים מטפלים בפורמט של הבקשות ומסתירים את פרטי ה-API. המחברים מספקים גם התנהגות מובנית לאימות, לטיפול בניסיונות חוזרים ולפעולות ארוכות טווח.
מידע נוסף זמין במאמר הסבר על מחברים.
במדריך הזה נעבד קבוצה של חשבוניות לדוגמה באמצעות מעבד ניתוח חשבוניות עם עיבוד באצווה
לחצו על תראו לי איך כדי לקרוא הסבר מפורט על המשימה ישירות במסוף Google Cloud :
לפני שמתחילים
- נכנסים לחשבון Google Cloud . אם אתם משתמשים חדשים ב- Google Cloud, צרו חשבון כדי שתוכלו להעריך את הביצועים של המוצרים שלנו בתרחישים מהעולם האמיתי. לקוחות חדשים מקבלים בחינם גם קרדיט בשווי 300$ להרצה, לבדיקה ולפריסה של עומסי העבודה.
-
In the Google Cloud console, on the project selector page, select or create a Google Cloud project.
Roles required to select or create a project
- Select a project: Selecting a project doesn't require a specific IAM role—you can select any project that you've been granted a role on.
-
Create a project: To create a project, you need the Project Creator role
(
roles/resourcemanager.projectCreator), which contains theresourcemanager.projects.createpermission. Learn how to grant roles.
-
If you're using an existing project for this guide, verify that you have the permissions required to complete this guide. If you created a new project, then you already have the required permissions.
-
Verify that billing is enabled for your Google Cloud project.
Enable the Document AI, Cloud Storage, Workflows APIs.
Roles required to enable APIs
To enable APIs, you need the
serviceusage.services.enablepermission. If you created the project, then you likely already have this permission through the Owner role (roles/owner). Otherwise, you can get this permission through the Service Usage Admin role (roles/serviceusage.serviceUsageAdmin). Learn how to grant roles.-
In the Google Cloud console, on the project selector page, select or create a Google Cloud project.
Roles required to select or create a project
- Select a project: Selecting a project doesn't require a specific IAM role—you can select any project that you've been granted a role on.
-
Create a project: To create a project, you need the Project Creator role
(
roles/resourcemanager.projectCreator), which contains theresourcemanager.projects.createpermission. Learn how to grant roles.
-
If you're using an existing project for this guide, verify that you have the permissions required to complete this guide. If you created a new project, then you already have the required permissions.
-
Verify that billing is enabled for your Google Cloud project.
Enable the Document AI, Cloud Storage, Workflows APIs.
Roles required to enable APIs
To enable APIs, you need the
serviceusage.services.enablepermission. If you created the project, then you likely already have this permission through the Owner role (roles/owner). Otherwise, you can get this permission through the Service Usage Admin role (roles/serviceusage.serviceUsageAdmin). Learn how to grant roles.
התפקידים הנדרשים
כדי לקבל את ההרשאות שדרושות ליצירת סיווג בהתאמה אישית, צריך לבקש מהאדמין להקצות לכם את תפקידי ה-IAM הבאים בפרויקט:
- אדמין של Document AI (
roles/documentai.admin) - אדמין IAM בפרויקט (
roles/resourcemanager.projectIamAdmin) - משתמש בחשבון שירות (
roles/iam.serviceAccountUser) - אדמין באחסון (
roles/storage.admin) - עורך תהליכי עבודה (
roles/workflows.editor) -
כדי ליצור חשבון שירות חדש:
יצירת חשבונות שירות (
roles/iam.serviceAccountCreator)
להסבר על מתן תפקידים, ראו איך מנהלים את הגישה ברמת הפרויקט, התיקייה והארגון.
יכול להיות שאפשר לקבל את ההרשאות הנדרשות גם באמצעות תפקידים בהתאמה אישית או תפקידים מוגדרים מראש.
יצירת כלי לניתוח חשבוניות
אפשר להשתמש במסוף Google Cloud כדי ליצור כלי חדש לניתוח חשבוניות. מידע נוסף זמין במאמר בנושא יצירה וניהול של מעבדים.
בתפריט הניווט במסוף Google Cloud , לוחצים על Document AI ובוחרים באפשרות Processor Gallery.
בגלריית המעבדים,
מחפשים את Invoice Parser ולוחצים על Create (יצירה).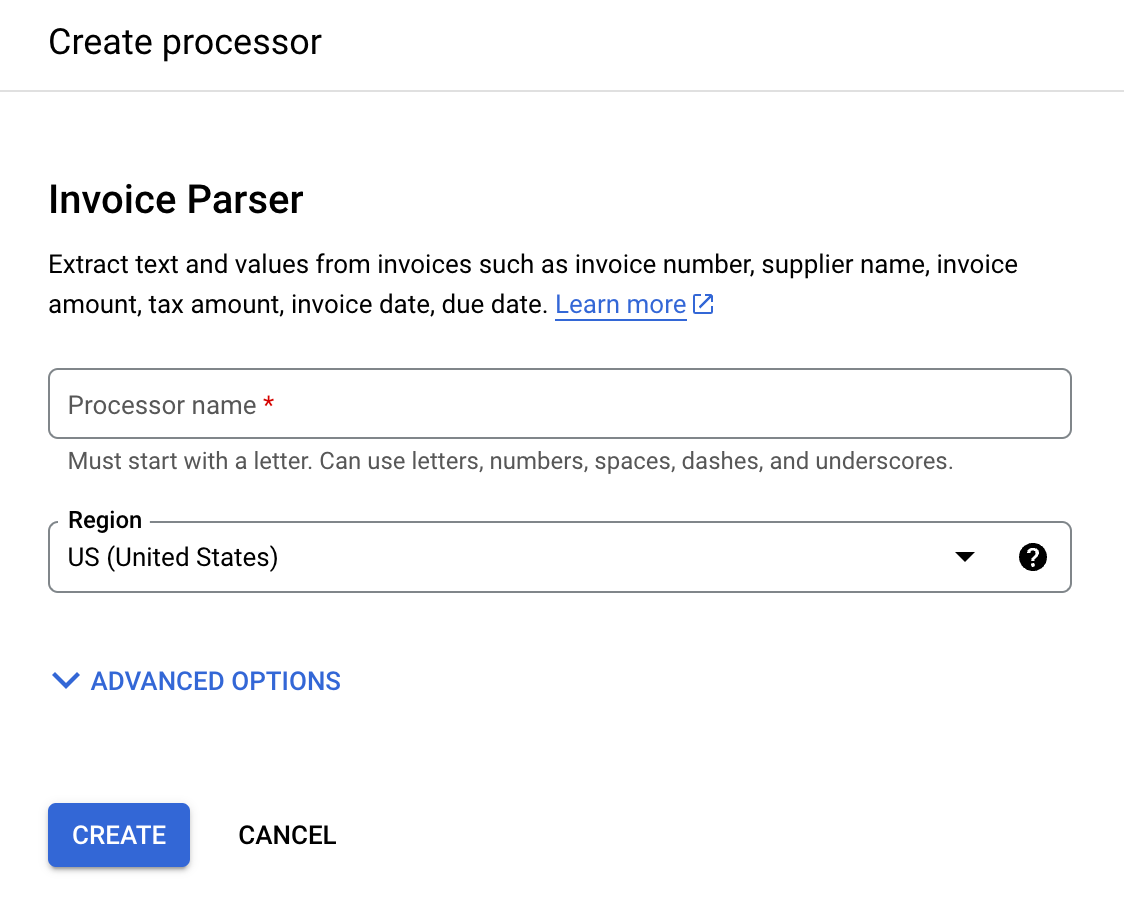
מזינים שם מעבד, למשל
workflows-invoice-processor.בוחרים את האזור (
locationב-Document AI API) שבו רוצים לארח את המעבד.לוחצים על יצירה. מופיעה הכרטיסייה פרטי המעבד.
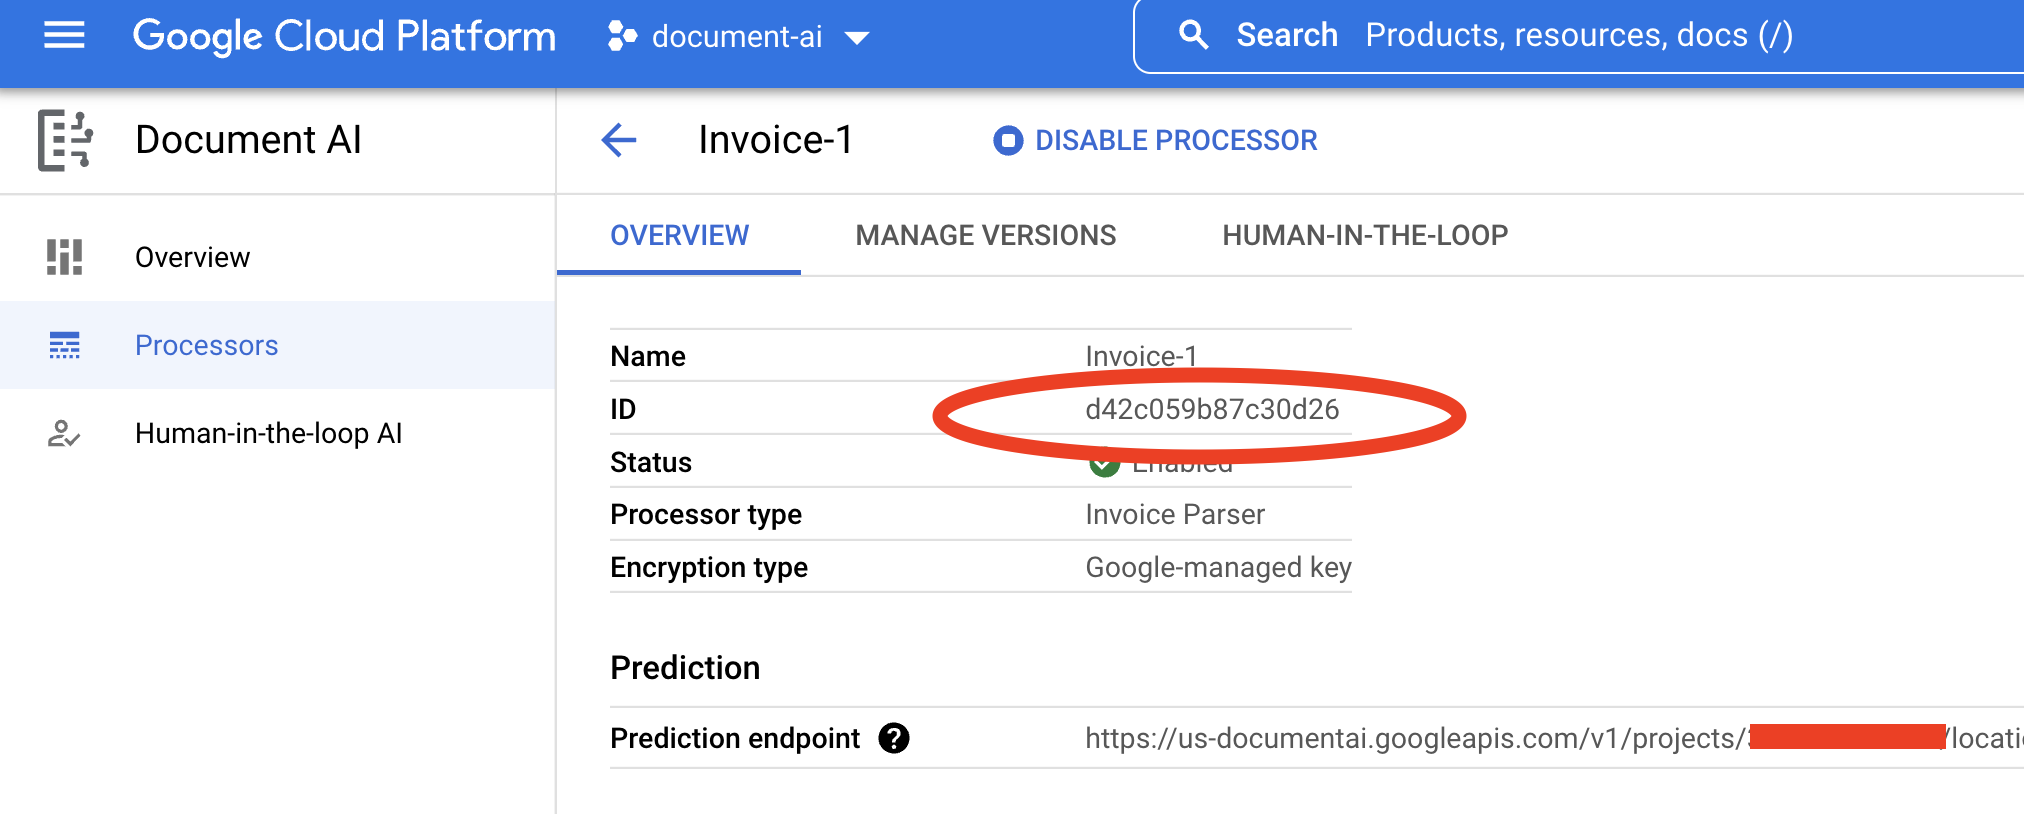
מעתיקים את מזהה המעבד. תצטרכו להשתמש בערך הזה בקוד בהמשך.
הגדרת קטגוריית פלט ב-Cloud Storage
כשמשתמשים בעיבוד באצווה (אסינכרוני), קובצי הקלט והפלט צריכים להיות מאוחסנים ב-Cloud Storage. הקטגוריה הבאה מכילה קבצים לדוגמה שאפשר להשתמש בהם כקלט למדריך הזה:
gs://cloud-samples-data/documentai/workflows
מגדירים קטגוריה לאחסון קובצי הפלט בפרויקט.
כדי ליצור קטגוריה, פועלים לפי ההוראות במאמר יצירת קטגוריות במסמכי Cloud Storage, או משתמשים בקטגוריה קיימת.
יוצרים תיקייה בקטגוריה (לדוגמה,
docai-workflows-output).
יצירת תהליך עבודה
פותחים את לוח הבקרה של Workflows במסוף Google Cloud .
לוחצים על
יצירה כדי ליצור את תהליך העבודה הראשון. מופיע הדף Create Workflow (יצירת תהליך עבודה).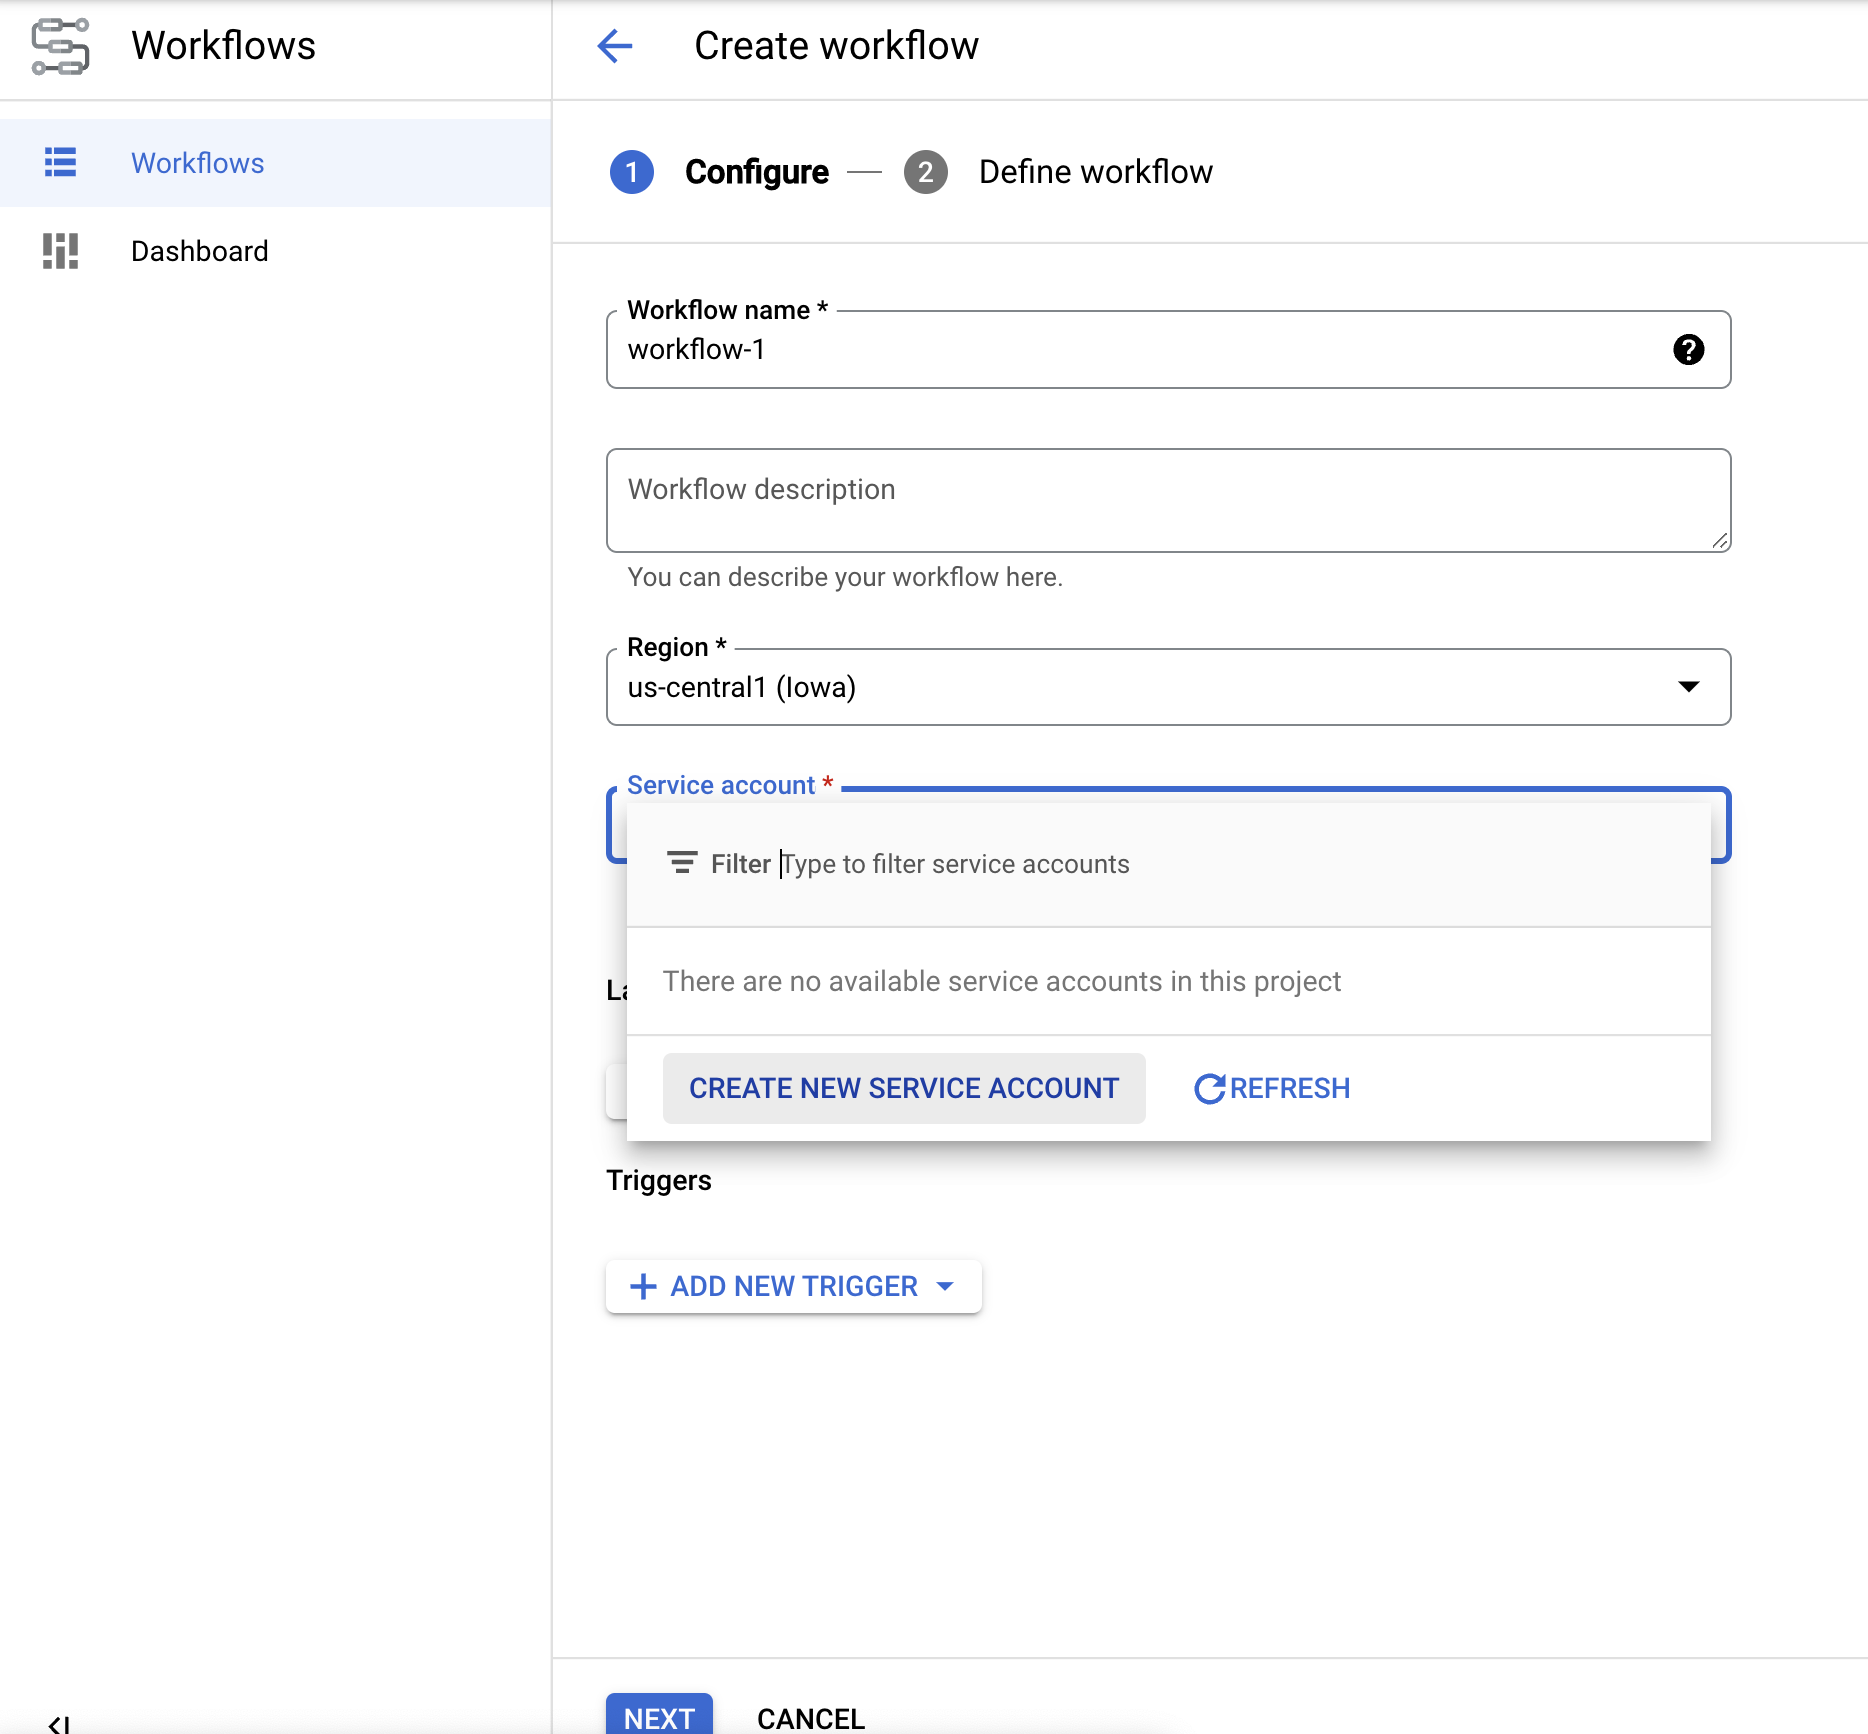
משנים את השם של תהליך העבודה ל-docai-workflows-quickstart.מוסיפים תיאור ובוחרים חשבון שירות אם יש לכם כזה לפרויקט הזה.
- אם אין לכם חשבון שירות, בוחרים באפשרות יצירת חשבון שירות חדש.
- נותנים שם לחשבון השירות ולוחצים על Create and Continue (יצירה והמשך).
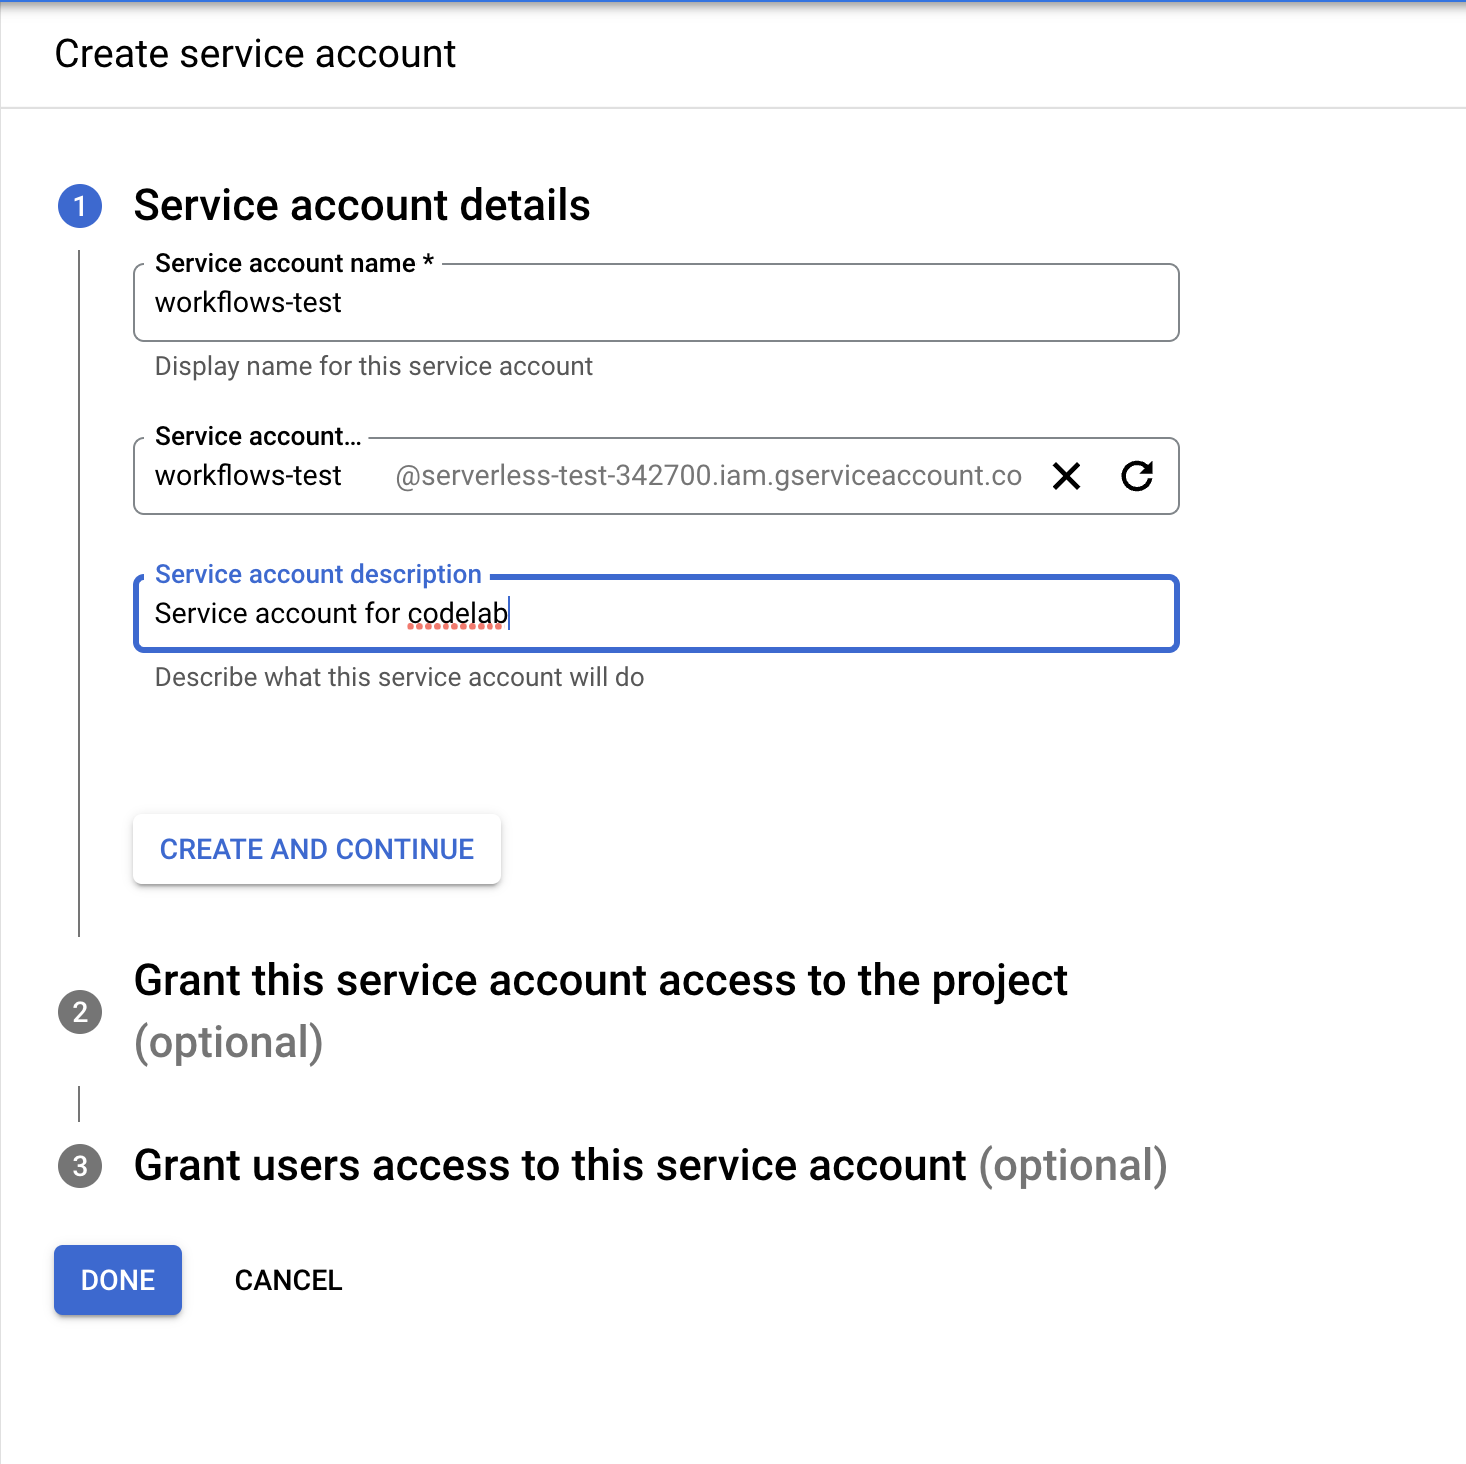
- מקצים לו את התפקידים הבאים:
Document AI API UserWorkflows InvokerLogs WriterService Usage Consumer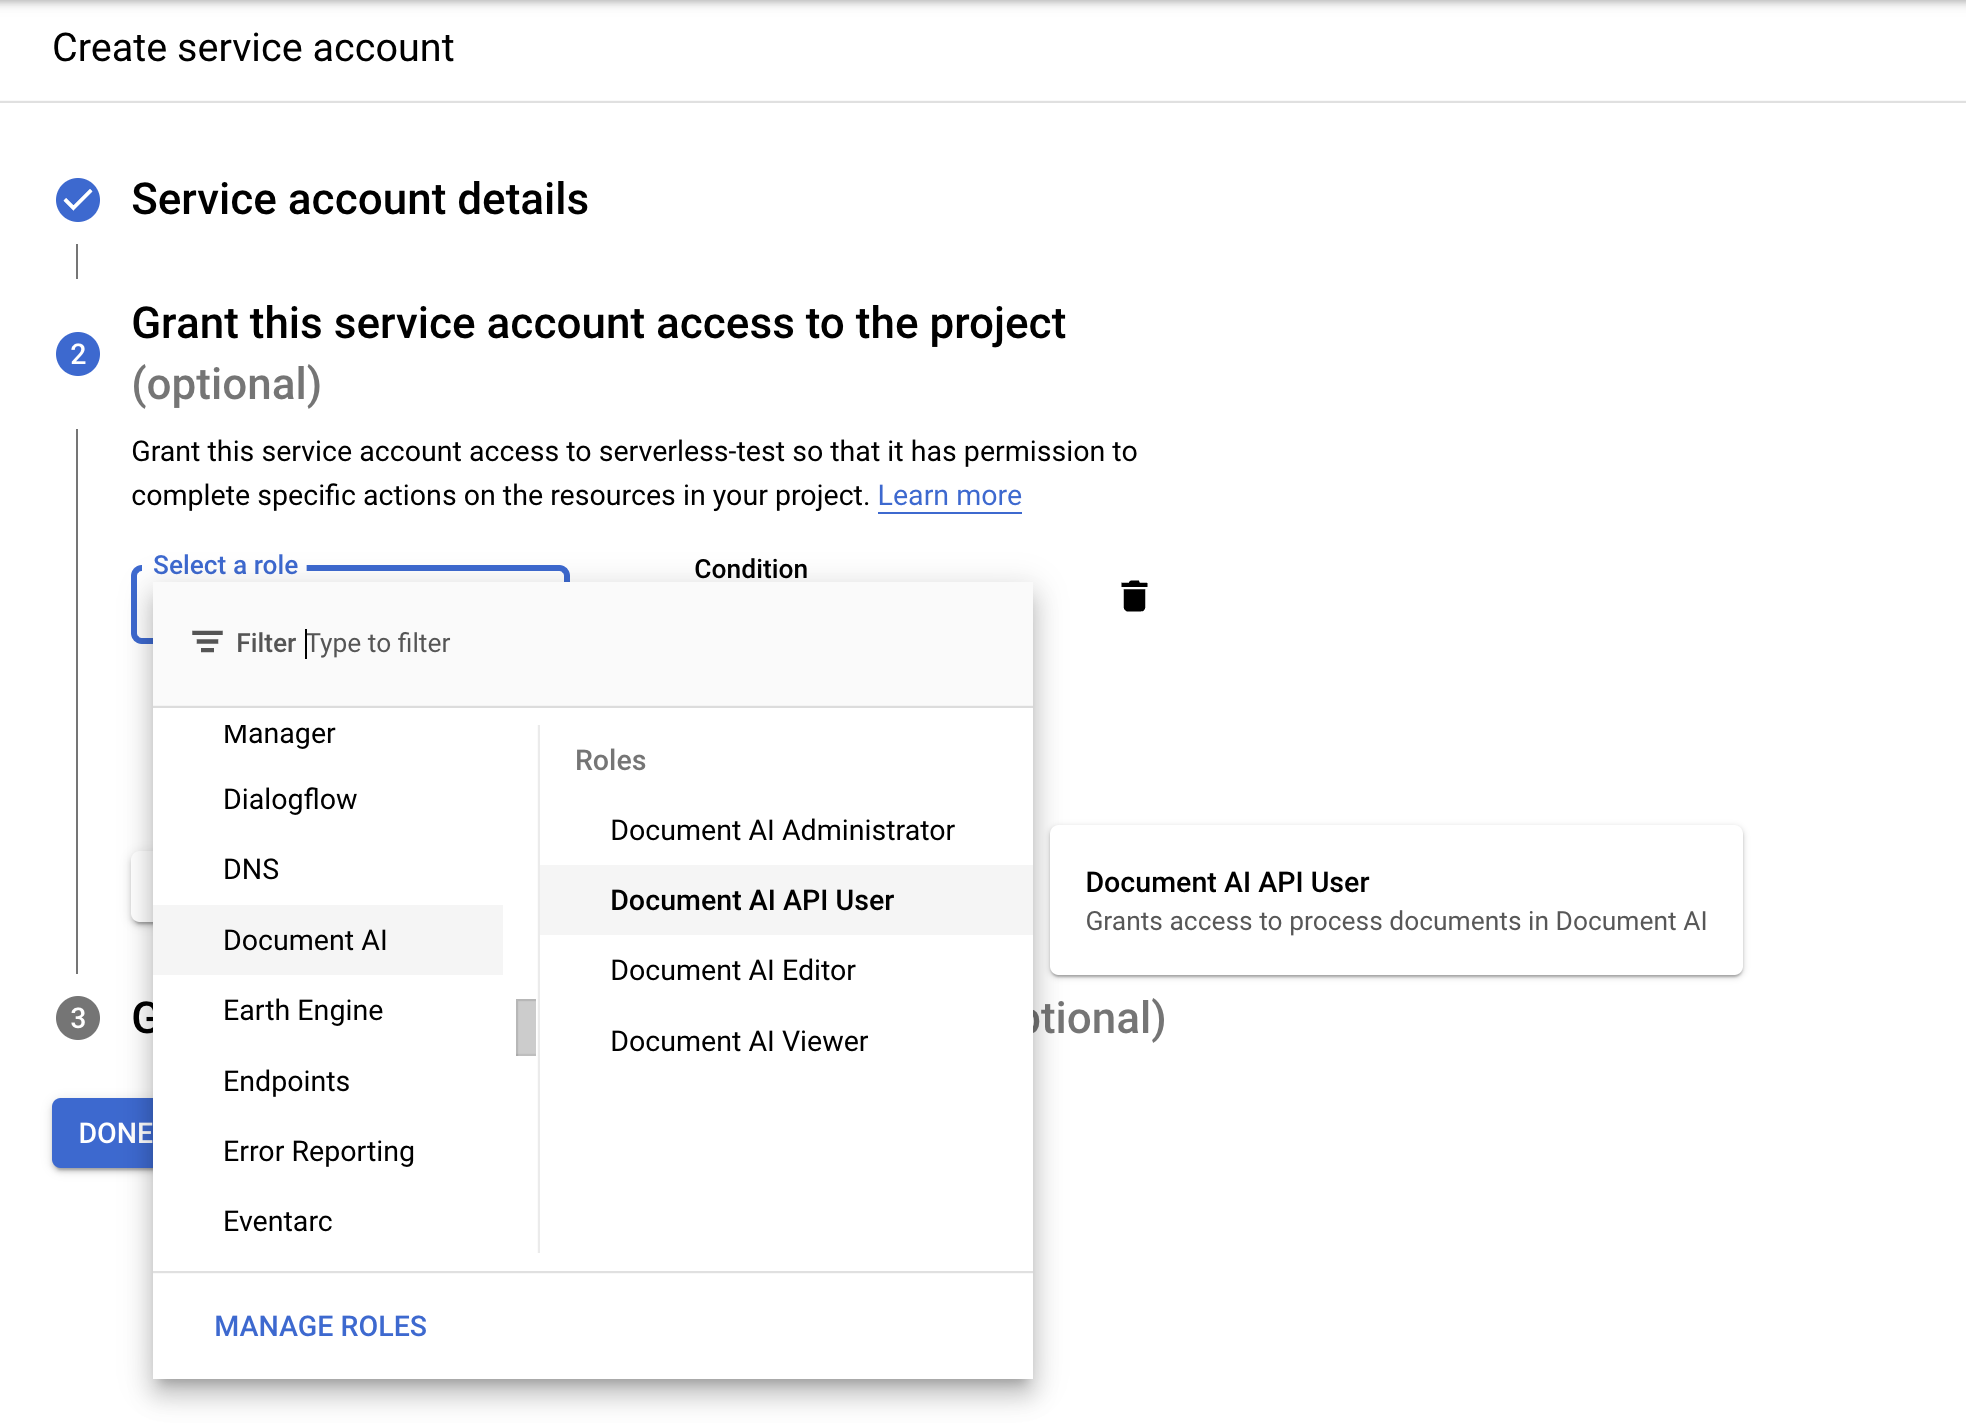
- נותנים שם לחשבון השירות ולוחצים על Create and Continue (יצירה והמשך).
- אם אין לכם חשבון שירות, בוחרים באפשרות יצירת חשבון שירות חדש.
בדף Create Workflow, לוחצים על
Next .
הגדרת תהליך עבודה
ב
עורך תהליכי העבודה , מוחקים את קובץ ה-YAML שמוגדר כברירת מחדל ומדביקים את הקוד הבא:main: params: [input] steps: - start: call: sys.log args: text: ${input} - vars: assign: - input_gcs_bucket: ${input.inputBucket} - output_gcs_bucket: ${input.outputBucket} - processor_id: ${input.processorId} - location: ${input.location} - project_id: ${sys.get_env("GOOGLE_CLOUD_PROJECT_ID")} - batch_process: call: googleapis.documentai.v1.projects.locations.processors.batchProcess args: name: ${"projects/" + project_id + "/locations/" + location + "/processors/" + processor_id} location: ${location} body: inputDocuments: gcsPrefix: gcsUriPrefix: ${input_gcs_bucket} documentOutputConfig: gcsOutputConfig: gcsUri: ${output_gcs_bucket} skipHumanReview: true result: batch_process_resp - return: return: ${batch_process_resp}
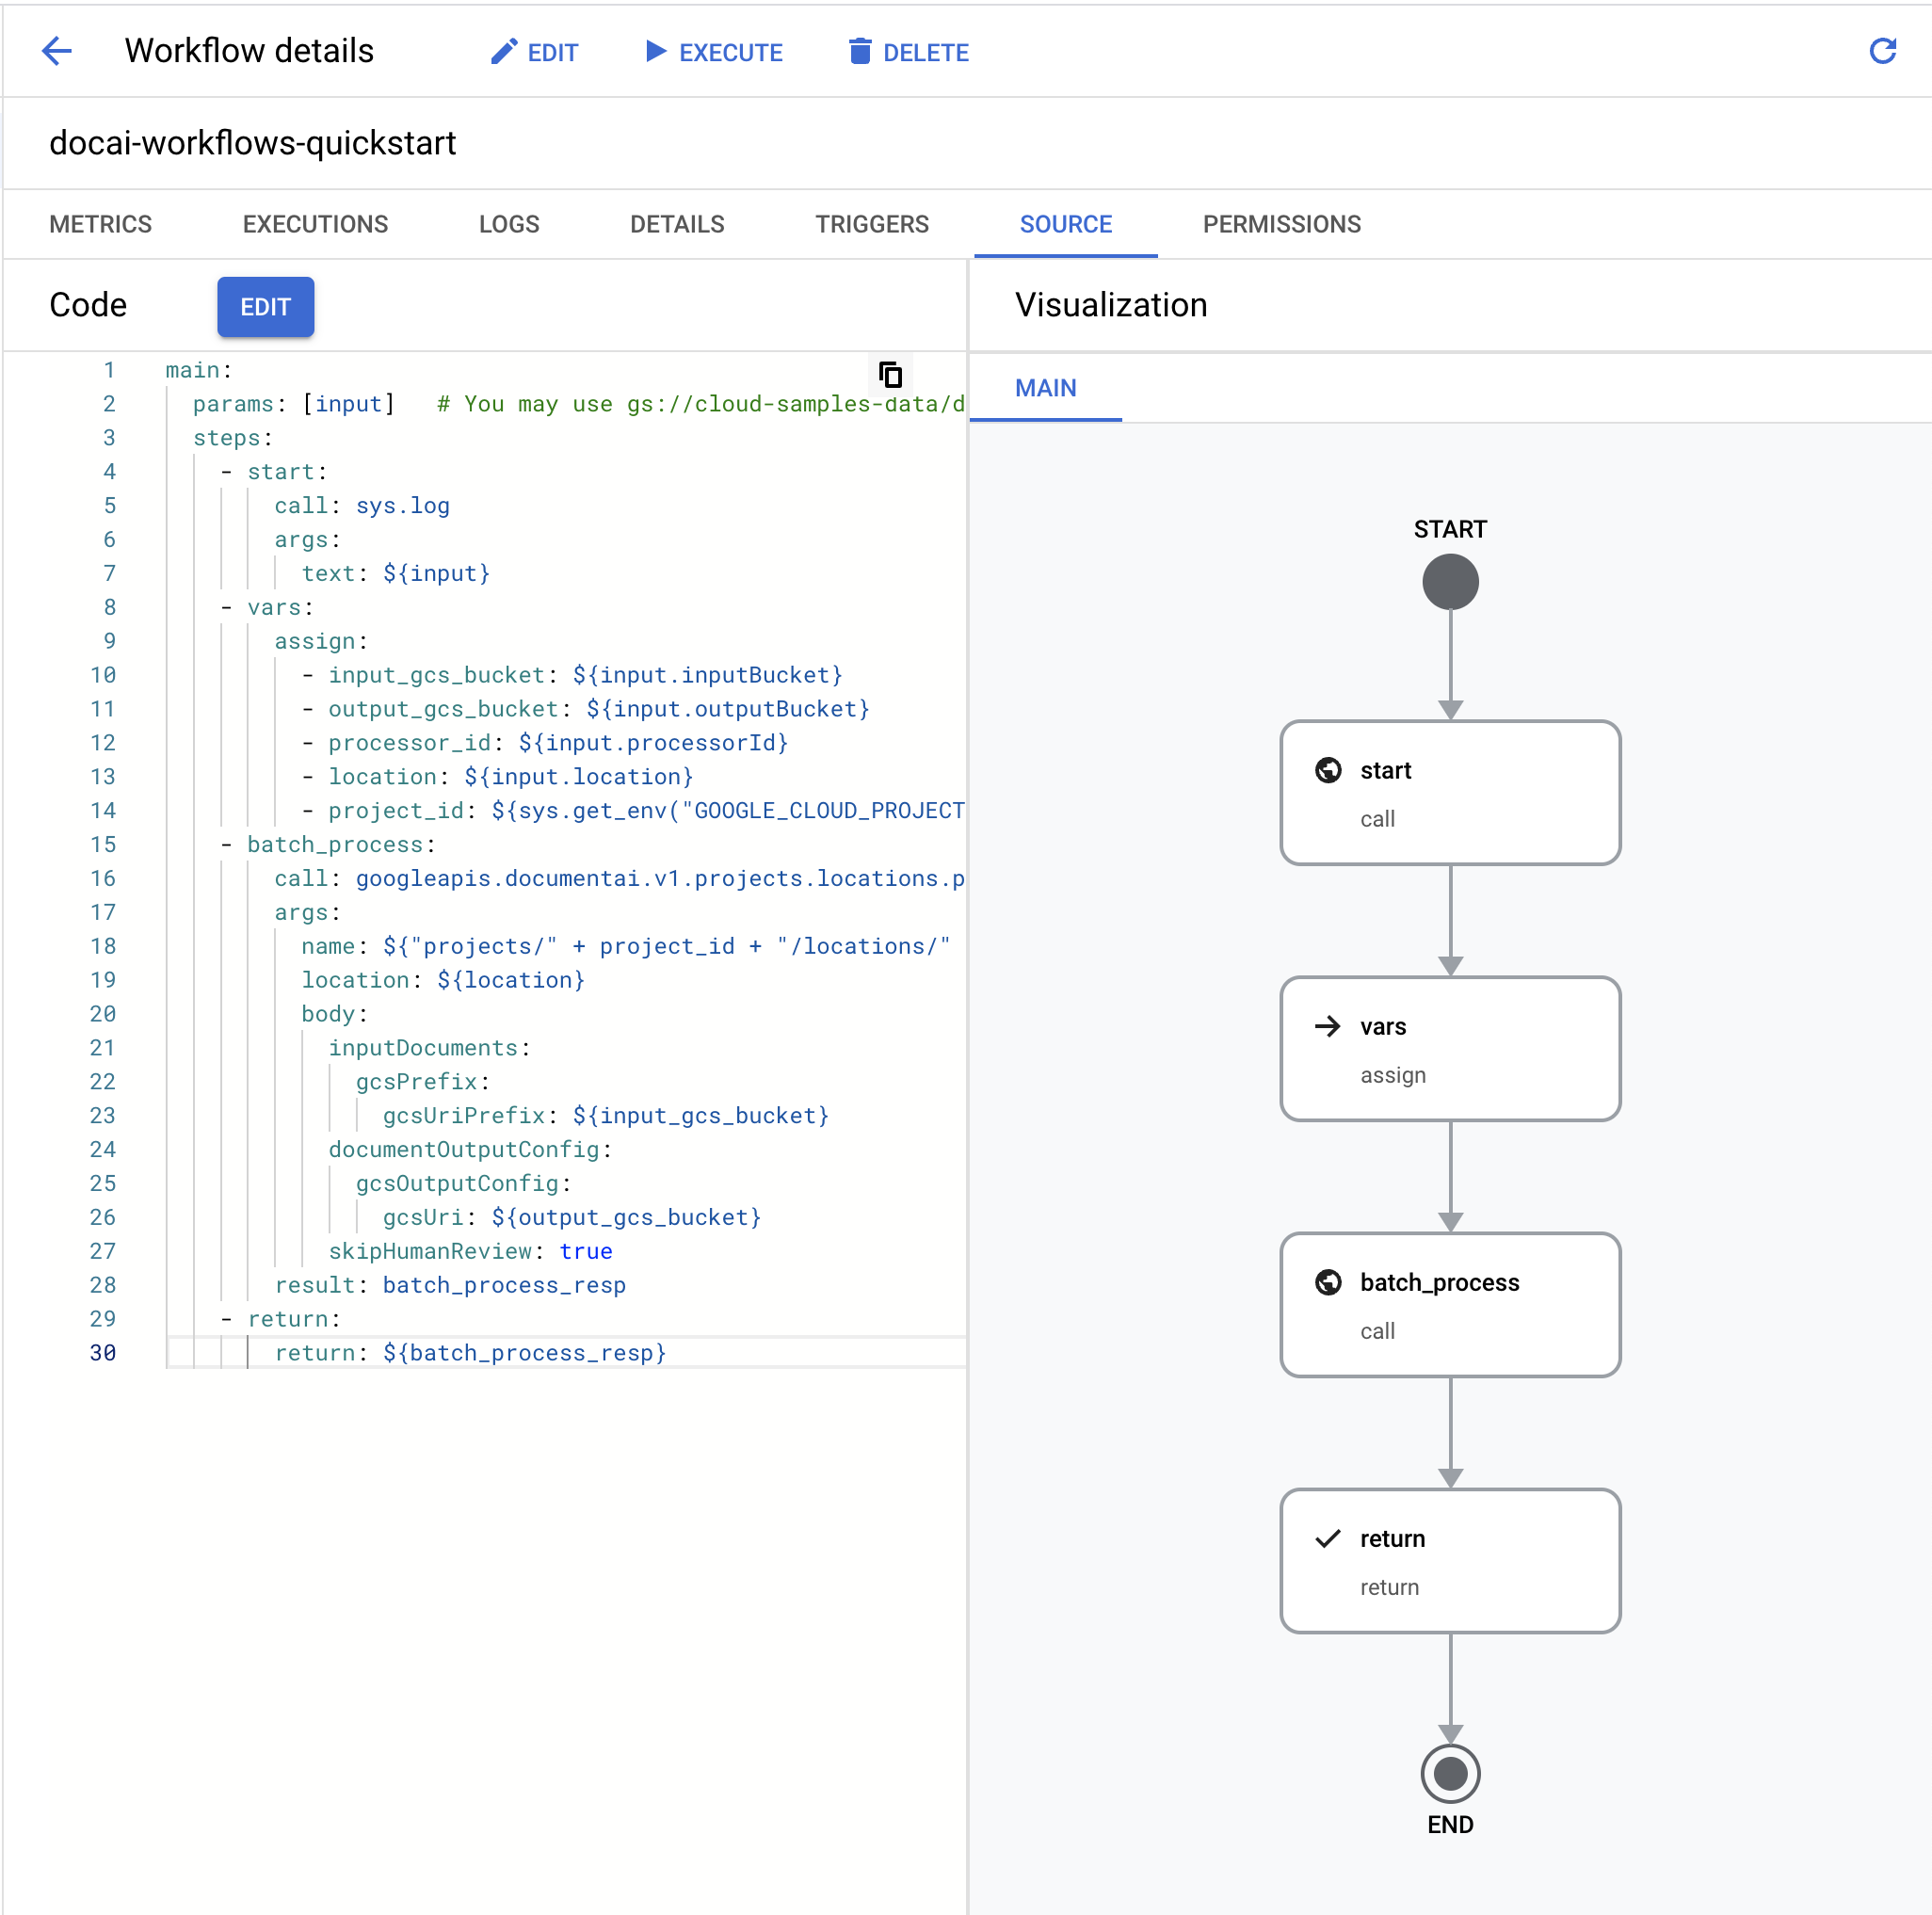
- לוחצים על
פריסה .
בדיקת תהליך העבודה
אחרי פריסת תהליך העבודה, תועברו לדף Workflow details (פרטי תהליך העבודה).
לוחצים על
הפעלה בחלק העליון של הדף כדי לעבור לדף הפעלת תהליך עבודה. בדף הזה אפשר לבדוק את תהליך העבודה במסוף.מחליפים את משתני הפלייסהולדר בקלט ה-JSON הבא:
- OUTPUT_BUCKET_PATH: הנתיב המלא לדלי ולתיקייה של הפלט שנוצרו קודם.
- PROCESSOR_ID: מזהה המעבד שיצרתם קודם.
- LOCATION: האזור של המעבד שנוצר קודם.
{
  "inputBucket": "gs://cloud-samples-data/documentai/workflows",
  "outputBucket": "OUTPUT_BUCKET_PATH",
  "processorId": "PROCESSOR_ID",
  "location": "LOCATION"
}
מעתיקים את ה-JSON אל
תיבת הטקסט של הקלט .בתחתית תהליך העבודה, לוחצים על
הפעלה כדי לבדוק את הקלט וממתינים כמה רגעים עד שהתהליך יסתיים.אחרי שהזרימה מסתיימת, פלט ה-JSON אמור להיראות בערך כך.
{
  "done": true,
  "metadata": {
    "@type": "type.googleapis.com/google.cloud.documentai.v1.BatchProcessMetadata",
    "createTime": "2023-02-24T18:31:18.521764Z",
    "individualProcessStatuses": [
      {
        "humanReviewStatus": {
          "state": "SKIPPED"
        },
        "inputGcsSource": "gs://cloud-samples-data/documentai/workflows/baking_technologies_invoice.pdf",
        "outputGcsDestination": "OUTPUT_BUCKET_PATH/11119195367705871803/0",
        "status": {}
      },
      {
        "humanReviewStatus": {
          "state": "SKIPPED"
        },
        "inputGcsSource": "gs://cloud-samples-data/documentai/workflows/generic_invoice.pdf",
        "outputGcsDestination": "OUTPUT_BUCKET_PATH/11119195367705871803/1",
        "status": {}
      },
      {
        "humanReviewStatus": {
          "state": "SKIPPED"
        },
        "inputGcsSource": "gs://cloud-samples-data/documentai/workflows/google_invoice.pdf",
        "outputGcsDestination": "OUTPUT_BUCKET_PATH/11119195367705871803/2",
        "status": {}
      }
    ],
    "state": "SUCCEEDED",
    "updateTime": "2023-02-24T18:31:52.543163Z"
  },
  "name": "projects/PROJECT_ID/locations/LOCATION/operations/11119195367705871803",
  "response": {
    "@type": "type.googleapis.com/google.cloud.documentai.v1.BatchProcessResponse"
  }
}
פותחים את דלי האחסון של הפלט ורואים את הפלט של כל חשבונית שעברה עיבוד בתיקייה שנקראת על שם מזהה הפעולה.

בתוך התיקייה הזו יהיו תיקיות משנה, אחת לכל מסמך שעבר עיבוד מהקבוצה של קובצי הקלט, שמכילות קובצי JSON של
Document.אפשר לבדוק כל קובץ JSON או לכתוב קוד כדי להשתמש בשדות הרלוונטיים לתרחיש השימוש שלכם. מידע נוסף זמין במדריך לטיפול בתגובת העיבוד.
עכשיו אפשר לקשר שלבים נוספים בתהליך העבודה כדי לעבד את הפלט, למשל להוסיף את הישויות שחולצו למסד נתונים לצורך ניתוח.
מידע נוסף על הפעלת תהליכי עבודה זמין במאמרי העזרה בנושא Workflows.
הסרת המשאבים
כדי לא לצבור חיובים לחשבון Google Cloud על המשאבים שבהם השתמשתם בדף הזה, פועלים לפי השלבים הבאים:
כדי להימנע מחיובים מיותרים ב- Google Cloud , אפשר להשתמש ב-Google Cloud console כדי למחוק את המעבד, הקטגוריה, תהליך העבודה והפרויקט אם אין בהם צורך.
המאמרים הבאים
- מידע נוסף על Workflows
- מידע נוסף על המחבר של Document AI Workflows
- כאן אפשר לראות רשימה ותיאורים של המעבדים שזמינים כרגע.
- איך מטפלים בתגובה לעיבוד