
本教學課程說明如何使用 Apache Beam YAML 語法建立 Dataflow 資料處理管道。您將瞭解如何使用 Google Cloud 控制台中的工作建構工具 UI,從檔案讀取資料、套用轉換,以及將結果寫入另一個檔案。本教學課程適用於 Apache Beam 新手,或想瞭解如何使用 YAML API 建構管道的開發人員。
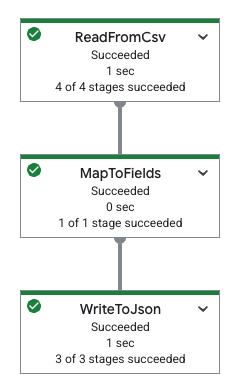
下表顯示 Google Cloud 控制台中的管道圖,以及對應的 YAML 規格。
|
pipeline: transforms: - name: ReadFromCsv type: ReadFromCsv config: path: 'gs://[...]/restaurant-data.csv' - name: MapToFields type: MapToFields input: ReadFromCsv config: language: python fields: Lowercase_menu_item: Item.lower() Total_price: Price + Tax append: true - name: WriteToJson type: WriteToJson input: MapToFields config: path: 'gs://[...]/restaurant-data_map-fields.json' |
目標
在本教學課程中,您將瞭解如何執行下列操作:
- 建立 Beam YAML 管道,讀取、寫入及轉換資料。
- 依據內容篩選資料。
- 使用 Python 運算式對應欄位。
- 使用 SQL 查詢及匯總資料。
- 使用 Google Cloud 控制台工作建構工具 UI 中的建構工具表單,建構及執行 Beam YAML 管道。
費用
在本文件中,您會使用下列 Google Cloud的計費元件:
如要根據預測用量估算費用,請使用 Pricing Calculator。
完成本文所述工作後,您可以刪除建立的資源,避免繼續計費,詳情請參閱「清除所用資源」。
事前準備
請先完成下列步驟,再執行管道。
設定專案
- 登入 Google Cloud 帳戶。如果您是 Google Cloud新手,歡迎 建立帳戶,親自評估產品在實際工作環境中的成效。新客戶還能獲得價值 $300 美元的免費抵免額,可用於執行、測試及部署工作負載。
-
In the Google Cloud console, on the project selector page, select or create a Google Cloud project.
Roles required to select or create a project
- Select a project: Selecting a project doesn't require a specific IAM role—you can select any project that you've been granted a role on.
-
Create a project: To create a project, you need the Project Creator role
(
roles/resourcemanager.projectCreator), which contains theresourcemanager.projects.createpermission. Learn how to grant roles.
-
Verify that billing is enabled for your Google Cloud project.
Enable the Dataflow, Compute Engine, Cloud Storage APIs.
Roles required to enable APIs
To enable APIs, you need the
serviceusage.services.enablepermission. If you created the project, then you likely already have this permission through the Owner role (roles/owner). Otherwise, you can get this permission through the Service Usage Admin role (roles/serviceusage.serviceUsageAdmin). Learn how to grant roles.-
In the Google Cloud console, on the project selector page, select or create a Google Cloud project.
Roles required to select or create a project
- Select a project: Selecting a project doesn't require a specific IAM role—you can select any project that you've been granted a role on.
-
Create a project: To create a project, you need the Project Creator role
(
roles/resourcemanager.projectCreator), which contains theresourcemanager.projects.createpermission. Learn how to grant roles.
-
Verify that billing is enabled for your Google Cloud project.
Enable the Dataflow, Compute Engine, Cloud Storage APIs.
Roles required to enable APIs
To enable APIs, you need the
serviceusage.services.enablepermission. If you created the project, then you likely already have this permission through the Owner role (roles/owner). Otherwise, you can get this permission through the Service Usage Admin role (roles/serviceusage.serviceUsageAdmin). Learn how to grant roles.
建立 Cloud Storage 值區
您必須先建立 Cloud Storage 值區,才能執行管道。
建立 Cloud Storage bucket:
- 前往 Google Cloud 控制台的 Cloud Storage「Buckets」(值區) 頁面。
- 點選 「Create」(建立)。
- 在「建立 bucket」頁面中,輸入 bucket 資訊。如要前往下一個步驟,請按「繼續」。
- 在「Name your bucket」(為 bucket 命名) 欄位中,輸入 bucket 的專屬名稱。請勿在 bucket 名稱中加入任何機密資訊,因為 bucket 命名空間全域通用並會公開顯示。
-
在「Choose where to store your data」(選擇資料的儲存位置) 專區中,執行下列操作:
- 選取「位置類型」。
- 從「位置類型」下拉式選單中,選擇要永久儲存 bucket 資料的位置。
- 如果您選取「雙區域」位置類型,也可以使用相關核取方塊啟用強化型複製。
- 如要設定跨值區複製,請選取「透過 Storage 移轉服務新增跨值區複製作業」,然後按照下列步驟操作:
設定跨 bucket 複製作業
- 在「Bucket」選單中選取 bucket。
在「複製設定」部分,按一下「設定」,設定複製作業的設定。
系統隨即會顯示「設定跨 bucket 複製作業」窗格。
- 如要依物件名稱前置字串篩選要複製的物件,請輸入要納入或排除物件的前置字串,然後按一下「新增前置字串」。
- 如要為複製的物件設定儲存空間級別,請從「儲存空間級別」選單中選取儲存空間級別。如果略過這個步驟,複製的物件預設會使用目標值區的儲存空間級別。
- 按一下 [完成]。
-
在「選擇資料儲存方式」部分,執行下列操作:
- 在「設定預設類別」部分,選取「Standard」。
- 如要啟用階層命名空間,請在「為資料密集型工作負載提供最理想的儲存空間」部分,選取「為這個值區啟用階層命名空間」。
- 在「選取如何控制物件的存取權」部分,選取 bucket 是否要強制執行禁止公開存取,並為 bucket 的物件選取存取權控管方法。
-
在「選擇保護物件資料的方式」部分,執行下列操作:
- 在「資料保護」下方,選取要為 bucket 設定的選項。
- 如要啟用虛刪除,請按一下「虛刪除政策 (用於資料復原)」核取方塊,並指定要保留物件的天數 (刪除後)。
- 如要設定「物件版本管理」,請按一下「物件版本管理 (用於版本管控)」核取方塊,並指定每個物件的版本數量上限,以及非現行版本失效的天數。
- 如要為物件和 bucket 啟用保留政策,請勾選「保留 (符合法規)」核取方塊,然後執行下列操作:
- 如要啟用 Object Retention Lock,請按一下「啟用物件保留功能」核取方塊。
- 如要啟用「Bucket Lock」,請勾選「Set bucket retention policy」(設定值區保留政策) 核取方塊,然後選擇保留期限的時間單位和長度。
- 如要選擇物件資料的加密方式,請展開「資料加密」部分 (),然後選取「資料加密」方法。
- 在「資料保護」下方,選取要為 bucket 設定的選項。
- 點選「建立」。
複製下列內容,因為後續章節會用到:
- Cloud Storage bucket 名稱。
- 您的 Google Cloud 專案 ID。
如要找出這個 ID,請參閱「識別專案」。
虛擬私有雲網路
根據預設,每個新專案一開始都是使用預設網路。如果專案的預設網路已停用或刪除,您必須在專案中建立網路,並將Compute 網路使用者角色 (roles/compute.networkUser) 指派給使用者帳戶。
讀取、寫入及轉換資料
本節說明如何搭配 Dataflow 使用 Beam YAML 語法,透過下列方式讀取、寫入及篩選資料:
- 透過使用者介面驅動的開發方式,在 Google Cloud 控制台的工作建構工具使用者介面中建構及執行工作。具體來說,您會使用工作建構工具 UI 中的建構工具表單,因此不需要手動建立 YAML 檔案。
儲存在可公開檢視的 Cloud Storage bucket 中的 CSV 檔案資料。這項資料包含模擬餐廳菜單資料,如下所示:
restaurant-data.csvMenu item,Category,Price,Tax Classic Cheeseburger,Entree,9.99,0.7 Margherita Pizza,Entree,14.50,1.02 Grilled Salmon with Asparagus,Entree,21.99,1.54 Chicken Caesar Salad,Salad,12.75,0.89 Spaghetti Carbonara,Entree,16.25,1.14 Beef Tacos (3),Entree,10.50,0.74 Vegetable Stir-Fry,Entree,13.00,0.91 Shrimp Scampi,Entree,19.75,1.38 Chicken Pot Pie,Entree,15.50,1.09 Steak Frites,Entree,28.00,1.96 Lobster Mac and Cheese,Entree,25.50,1.79 Pork Belly Bao Buns (2),Appetizer/Side,11.25,0.79 Mushroom Risotto,Entree,17.50,1.23 Fish and Chips,Entree,14.00,0.98 Buffalo Wings (6),Appetizer/Side,9.50,0.67 French Onion Soup,Appetizer/Side,7.00,0.49 Tomato Soup with Grilled Cheese,Appetizer/Side,10.00,0.7 Avocado Toast,Appetizer/Side,8.50,0.6 Quesadilla with Chicken,Appetizer/Side,11.75,0.82 Pad Thai,Entree,15.00,1.05 Chicken Tikka Masala,Entree,18.50,1.3 Burrito Bowl,Entree,13.50,0.95 Sushi Combo (8 pieces),Entree,22.00,1.54 Greek Salad,Salad,11.00,0.77 Clam Chowder,Appetizer/Side,8.00,0.56 New York Cheesecake,Dessert,6.50,0.46 Chocolate Lava Cake,Dessert,7.50,0.53 Apple Pie,Dessert,5.00,0.35 Tiramisu,Dessert,8.00,0.56 Crème brûlée,Dessert,7.00,0.49 Iced Coffee,Beverage,3.50,0.25 Lemonade,Beverage,3.00,0.21 Orange Juice,Beverage,4.00,0.28 Soda,Beverage,2.50,0.18 Craft Beer,Beverage,6.00,0.42 Glass of Wine,Beverage,9.00,0.63 Margarita,Beverage,12.00,0.84 Moscow Mule,Beverage,11.50,0.81 Old Fashioned,Beverage,13.00,0.91 Espresso,Beverage,3.00,0.21 Cappuccino,Beverage,4.50,0.32 Latte,Beverage,5.00,0.35 Mocha,Beverage,5.50,0.39 Hot Chocolate,Beverage,4.00,0.28 Breakfast Burrito,Breakfast,10.50,0.74 Pancakes (3),Breakfast,8.00,0.56 Waffles,Breakfast,9.00,0.63 Eggs Benedict,Breakfast,14.00,0.98 Omelette,Breakfast,11.00,0.77 Fruit Salad,Salad,7.50,0.53 Yogurt Parfait,Breakfast,6.00,0.42
讀取及篩選資料
以下範例說明如何從 CSV 檔案讀取資料、篩選特定資訊,以及將篩選後的資料寫入 JSON 檔案。
這個範例使用 Filter 轉換,可讓您選擇性保留符合特定條件的資料。以下範例會篩選資料集,只保留 Price 大於或等於 20.00 的記錄。
如要讀取 CSV 資料並輸出經過篩選的 JSON 內容,請完成下列步驟:
前往 Google Cloud 控制台的 Dataflow「Jobs」(工作) 頁面。
按一下「從建構工具建立工作」。
在「Job builder」(工作建構工具) 分頁中,保持選取「Builder form」(建構工具表單)。
在「Job name」(工作名稱) 欄位中輸入
filter-python-job。在「Job type」(工作類型) 區段,保持選取「 Batch」(批次)。
在「來源」部分:
在「New source」(新增來源) 面板的「Source name」(來源名稱) 欄位中,將名稱變更為
ReadCsv。在「來源類型」清單中,選取「Cloud Storage 中的 CSV」。
在「CSV location」(CSV 位置) 欄位中輸入:
cloud-samples-data/dataflow/tutorials/restaurant-data.csv按一下 [完成]。
在「Transforms」(轉換) 部分:
按一下「新增轉換作業」。
在「轉換名稱」欄位中,輸入
FilterPrice。在「轉換類型」清單中,選取「篩選 (Python)」。
在「Python filter expression」(Python 篩選運算式) 欄位中,輸入
Price >= 20.00。在「Input step for the transform」(轉換的輸入步驟) 清單中,保持選取「
ReadCsv」。按一下 [完成]。
在「Sinks」(接收器) 部分:
在「Sink name」(接收器名稱) 欄位中,將名稱變更為
WriteJson。在「接收器類型」清單中,選取「Cloud Storage 中的 JSON 檔案」。
在「JSON location」(JSON 位置) 欄位中輸入:
BUCKET_NAME/output/restaurant-data_filtered.json請將
BUCKET_NAME改成您的 Cloud Storage 值區名稱。在「Input step for the sink」(接收器的輸入步驟) 清單中,保留選取的
FilterPrice。按一下 [完成]。
在「Dataflow Options」部分,按一下「Run job」。
檢查工作輸出內容
工作完成後,請完成下列步驟,查看管道的輸出內容:
在 Google Cloud 控制台,前往「Cloud Storage bucket」頁面。
在值區清單中,按一下您在「建立 Cloud Storage 值區」中建立的值區名稱。
按一下名為
restaurant-data_filtered.json-00000-of-00001的檔案。在「物件詳細資料」頁面中,按一下已驗證的網址,即可查看管道輸出內容。
輸出內容應如下所示:
{"Item":"Grilled Salmon with Asparagus","Category":"Entree","Price":21.99,"Tax":1.54}
{"Item":"Steak Frites","Category":"Entree","Price":28.0,"Tax":1.96}
{"Item":"Lobster Mac and Cheese","Category":"Entree","Price":25.5,"Tax":1.79}
{"Item":"Sushi Combo (8 pieces)","Category":"Entree","Price":22.0,"Tax":1.54}
使用 Python 對應欄位
使用MapToFields轉換,您可以根據現有欄位建立新欄位。以下範例會建立菜單品項的小寫版本、計算總價,並將值附加至現有值之後。
前往Google Cloud 控制台的 Dataflow「Jobs」(工作) 頁面。
按一下 「Create job from builder」(從建構工具建立工作)。
在「Job builder」(工作建構工具) 分頁中,保持選取「Builder form」(建構工具表單)。
在「Job name」(工作名稱) 欄位中輸入
map-python-job。在「Job type」(工作類型) 區段,保持選取「 Batch」(批次)。
在「來源」部分:
在「New source」(新增來源) 面板的「Source name」(來源名稱) 欄位中,將名稱變更為
ReadFromCsvPy。在「來源類型」清單中,選取「Cloud Storage 中的 CSV」。
在「CSV location」(CSV 位置) 欄位中輸入:
cloud-samples-data/dataflow/tutorials/restaurant-data.csv按一下 [完成]。
在「Transforms」(轉換) 部分:
按一下「新增轉換作業」。
在「轉換名稱」欄位中,輸入
MapToFieldsPy。在「轉換類型」清單中,選取「對應欄位 (Python)」。
保留「保留現有欄位」的選取狀態。
在「對應欄位」部分,按一下「新增欄位」。
在開啟的「新欄位」面板中,將
Lowercase_menu_item設為「欄位名稱」。在「Python expression」(Python 運算式) 欄位中,輸入
Item.lower()。按一下 [完成]。
在同一個「對應欄位」部分,再次點按「新增欄位」。
在開啟的「新欄位」面板中,將
Total_price設為「欄位名稱」。在「Python expression」(Python 運算式) 欄位中,輸入
Price + Tax。在「New field」(新欄位) 面板中,按一下「Done」(完成)。
在「New transform」(新增轉換) 面板中,按一下「Done」(完成)。
在「Sinks」(接收器) 部分:
在「Sink name」(接收器名稱) 欄位中,將名稱變更為
WriteToJsonPy。在「接收器類型」清單中,選取「Cloud Storage 中的 JSON 檔案」。
在「JSON location」(JSON 位置) 欄位中輸入:
BUCKET_NAME/output/restaurant-data_map-fields.json請將
BUCKET_NAME改成您的 Cloud Storage 值區名稱。在「Input step for the sink」(接收器的輸入步驟) 清單中,保留選取的
MapToFieldsPy。按一下 [完成]。
在「Dataflow Options」部分,按一下「Run job」。
檢查工作輸出內容
工作完成後,請完成下列步驟,查看管道的輸出內容:
在 Google Cloud 控制台,前往「Cloud Storage bucket」頁面。
在值區清單中,按一下您在「建立 Cloud Storage 值區」中建立的值區名稱。
按一下名為
restaurant-data_map-fields.json-00000-of-00001的檔案。在「物件詳細資料」頁面中,按一下已驗證的網址,即可查看管道輸出內容。
輸出內容應如下所示:
{"Item":"Classic Cheeseburger","Category":"Entree","Price":9.99,"Tax":0.7,"Lowercase_menu_item":"classic cheeseburger","Total_price":10.69}
{"Item":"Margherita Pizza","Category":"Entree","Price":14.5,"Tax":1.02,"Lowercase_menu_item":"margherita pizza","Total_price":15.52}
{"Item":"Grilled Salmon with Asparagus","Category":"Entree","Price":21.99,"Tax":1.54,"Lowercase_menu_item":"grilled salmon with asparagus","Total_price":23.53}
{"Item":"Chicken Caesar Salad","Category":"Salad","Price":12.75,"Tax":0.89,"Lowercase_menu_item":"chicken caesar salad","Total_price":13.64}
{"Item":"Spaghetti Carbonara","Category":"Entree","Price":16.25,"Tax":1.14,"Lowercase_menu_item":"spaghetti carbonara","Total_price":17.39}
{"Item":"Beef Tacos (3)","Category":"Entree","Price":10.5,"Tax":0.74,"Lowercase_menu_item":"beef tacos (3)","Total_price":11.24}
[...]
使用 SQL 轉換資料
Sql
transform
可讓您對資料執行 SQL 查詢。以下範例會依類別 (例如 Entree、Beverage 或 Dessert) 將菜單項目分組,並新增一個資料欄,其中包含每個類別中的項目數量。
如要使用工作建構工具 UI 建立管道,請按照下列步驟操作:
前往 Google Cloud 控制台的 Dataflow「Jobs」(工作) 頁面。
按一下 「Create job from builder」(從建構工具建立工作)。
在「Job builder」(工作建立工具) 分頁的「Job name」(工作名稱) 欄位中,輸入
sql-transform-job。在「Job type」(工作類型) 區段,保持選取「 Batch」(批次)。
在「來源」部分:
在「Source name」(來源名稱) 欄位中,將名稱變更為
SqlTransformSource。在「新來源」分頁中,選取「來源類型」的「Cloud Storage 中的 CSV」。系統會開啟「CSV location」(CSV 位置) 欄位。
在「CSV location」(CSV 檔案位置) 中輸入:
cloud-samples-data/dataflow/tutorials/restaurant-data.csv按一下 [完成]。
在「Transforms」(轉換) 部分:
按一下「新增轉換作業」。
在「轉換名稱」欄位中,將名稱更新為
SqlTransform。在「轉換類型」部分,選取「SQL 轉換」。系統會開啟「SQL 轉換」選項。
在「SQL expression」(SQL 運算式) 欄位中輸入:
select Category, count(*) as category_count from PCOLLECTION group by Category按一下 [完成]。
在「Sinks」(接收器) 部分:
在「Sink name」(接收器名稱) 中輸入
SqlTransformSink。在「Sink type」(接收器類型) 中,選取「JSON files on Cloud Storage」(Cloud Storage 中的 JSON 檔案)。「將資料寫入 Cloud Storage 中的 JSON 檔案」選項隨即開啟。
在「JSON location」(JSON 檔案位置) 中輸入:
BUCKET_NAME/output/restaurant-data_transform-sql.json請將
BUCKET_NAME改成您的 Cloud Storage 值區名稱。按一下 [完成]。
選用:查看這個管道產生的 YAML 定義。
前往「工作建立工具」分頁頂端。
選取「YAML 編輯器」。您應該會看到 YAML 定義。畫面應如下所示:
系統產生的 YAML 規格
pipeline:
  transforms:
    - name: SqlTransformSource
      type: ReadFromCsv
      config:
        path: 'gs://cloud-samples-data/dataflow/tutorials/restaurant-data.csv'
    - name: SqlTransform
      type: Sql
      config:
        query: >-
          select Category, count(*) as category_count from PCOLLECTION group by
          Category
      input:
        input0: SqlTransformSource
    - name: SqlTransformSink
      type: WriteToJson
      input: SqlTransform
      config:
        path: 'gs://BUCKET_NAME/output/restaurant-data_transform-sql.json'
在「Dataflow Options」(Dataflow 選項) 部分,按一下「Run job」(執行工作)。
檢查工作輸出內容
工作完成後,請完成下列步驟,查看管道的輸出內容:
在 Google Cloud 控制台,前往「Cloud Storage bucket」頁面。
在值區清單中,按一下您在「建立 Cloud Storage 值區」中建立的值區名稱。
按一下名為
restaurant-data_transform-sql.json-00000-of-00001的檔案。在「物件詳細資料」頁面中,按一下已驗證的網址,即可查看管道輸出內容。
輸出內容應如下所示:
{"Category":"Entree","category_count":16}
{"Category":"Beverage","category_count":14}
{"Category":"Appetizer\/Side","category_count":7}
{"Category":"Dessert","category_count":5}
{"Category":"Breakfast","category_count":6}
{"Category":"Salad","category_count":3}
清除所用資源
為避免因為本教學課程所用資源,導致系統向 Google Cloud 收取費用,請刪除含有相關資源的專案,或者保留專案但刪除個別資源。
刪除專案
- 前往 Google Cloud 控制台的「Manage resources」(管理資源) 頁面。
- 在專案清單中選取要刪除的專案,然後點選「Delete」(刪除)。
- 在對話方塊中輸入專案 ID,然後按一下 [Shut down] (關閉) 以刪除專案。
刪除個別資源
如要重複使用專案,可以保留專案,但要刪除您在教學課程中建立的資源。
停止 Dataflow 管道
前往 Google Cloud 控制台的 Dataflow「Jobs」(工作) 頁面。
按一下要停止的工作。
如要停止工作,工作狀態必須為「執行中」。
在工作詳細資料頁面中,按一下「停止」。
按一下「取消」。
如要確認所選項目,請按一下「停止工作」。
刪除 Cloud Storage 值區
- 前往 Google Cloud 控制台的 Cloud Storage「Buckets」(值區) 頁面。
- 按一下要刪除的值區旁的核取方塊。
- 如要刪除值區,請依序點選 「Delete」(刪除),然後按照指示操作。
後續步驟
- 如要進一步瞭解如何使用 Google Cloud 控制台中的工作建構工具使用者介面建立工作,請參閱相關 Google Cloud 總覽。
- 如要瞭解工作建構工具自訂工作,請參閱「使用工作建構工具建立自訂工作」。
- 閱讀 Beam YAML API 總覽。
- 查看更多 Beam YAML 範例。