
This tutorial shows you how to use Apache Beam YAML syntax to create Dataflow data processing pipelines. You'll learn how to read data from a file, apply transformations, and write the results to another file, using the job builder UI in the Google Cloud console. This tutorial is intended for developers who are new to Apache Beam or want to learn how to use the YAML API for building pipelines.
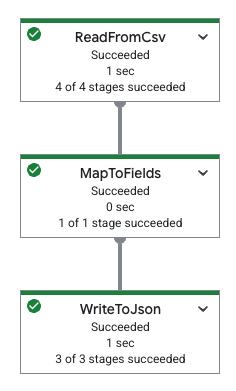
The following table shows a pipeline graph in the Google Cloud console and its corresponding YAML specification.
|
pipeline: transforms: - name: ReadFromCsv type: ReadFromCsv config: path: 'gs://[...]/restaurant-data.csv' - name: MapToFields type: MapToFields input: ReadFromCsv config: language: python fields: Lowercase_menu_item: Item.lower() Total_price: Price + Tax append: true - name: WriteToJson type: WriteToJson input: MapToFields config: path: 'gs://[...]/restaurant-data_map-fields.json' |
Objectives
In this tutorial, you will learn how to do the following:
- Create Beam YAML pipelines that read, write, and transform data.
- Filter data based on content.
- Map fields using Python expressions.
- Use SQL to query and aggregate data.
- Build and run Beam YAML pipelines using the builder form in the job builder UI in the Google Cloud console.
Costs
In this document, you use the following billable components of Google Cloud:
To generate a cost estimate based on your projected usage,
use the pricing calculator.
When you finish the tasks that are described in this document, you can avoid continued billing by deleting the resources that you created. For more information, see Clean up.
Before you begin
Complete the following steps before running your pipeline.
Set up your project
- Sign in to your Google Cloud account. If you're new to Google Cloud, create an account to evaluate how our products perform in real-world scenarios. New customers also get $300 in free credits to run, test, and deploy workloads.
-
In the Google Cloud console, on the project selector page, select or create a Google Cloud project.
Roles required to select or create a project
- Select a project: Selecting a project doesn't require a specific IAM role—you can select any project that you've been granted a role on.
-
Create a project: To create a project, you need the Project Creator role
(
roles/resourcemanager.projectCreator), which contains theresourcemanager.projects.createpermission. Learn how to grant roles.
-
Verify that billing is enabled for your Google Cloud project.
Enable the Dataflow, Compute Engine, Cloud Storage APIs.
Roles required to enable APIs
To enable APIs, you need the
serviceusage.services.enablepermission. If you created the project, then you likely already have this permission through the Owner role (roles/owner). Otherwise, you can get this permission through the Service Usage Admin role (roles/serviceusage.serviceUsageAdmin). Learn how to grant roles.-
In the Google Cloud console, on the project selector page, select or create a Google Cloud project.
Roles required to select or create a project
- Select a project: Selecting a project doesn't require a specific IAM role—you can select any project that you've been granted a role on.
-
Create a project: To create a project, you need the Project Creator role
(
roles/resourcemanager.projectCreator), which contains theresourcemanager.projects.createpermission. Learn how to grant roles.
-
Verify that billing is enabled for your Google Cloud project.
Enable the Dataflow, Compute Engine, Cloud Storage APIs.
Roles required to enable APIs
To enable APIs, you need the
serviceusage.services.enablepermission. If you created the project, then you likely already have this permission through the Owner role (roles/owner). Otherwise, you can get this permission through the Service Usage Admin role (roles/serviceusage.serviceUsageAdmin). Learn how to grant roles.
Create a Cloud Storage bucket
Before you can run a pipeline, you must create a Cloud Storage bucket.
Create a Cloud Storage bucket:
- In the Google Cloud console, go to the Cloud Storage Buckets page.
- Click Create.
- On the Create a bucket page, enter your bucket information. To go to the next
step, click Continue.
- For Name your bucket, enter a unique bucket name. Don't include sensitive information in the bucket name, because the bucket namespace is global and publicly visible.
-
In the Choose where to store your data section, do the following:
- Select a Location type.
- Choose a location where your bucket's data is permanently stored from the Location type drop-down menu.
- If you select the dual-region location type, you can also choose to enable turbo replication by using the relevant checkbox.
- To set up cross-bucket replication, select
Add cross-bucket replication via Storage Transfer Service and
follow these steps:
Set up cross-bucket replication
- In the Bucket menu, select a bucket.
In the Replication settings section, click Configure to configure settings for the replication job.
The Configure cross-bucket replication pane appears.
- To filter objects to replicate by object name prefix, enter a prefix that you want to include or exclude objects from, then click Add a prefix.
- To set a storage class for the replicated objects, select a storage class from the Storage class menu. If you skip this step, the replicated objects will use the destination bucket's storage class by default.
- Click Done.
-
In the Choose how to store your data section, do the following:
- In the Set a default class section, select the following: Standard.
- To enable hierarchical namespace, in the Optimize storage for data-intensive workloads section, select Enable hierarchical namespace on this bucket.
- In the Choose how to control access to objects section, select whether or not your bucket enforces public access prevention, and select an access control method for your bucket's objects.
-
In the Choose how to protect object data section, do the
following:
- Select any of the options under Data protection that you
want to set for your bucket.
- To enable soft delete, click the Soft delete policy (For data recovery) checkbox, and specify the number of days you want to retain objects after deletion.
- To set Object Versioning, click the Object versioning (For version control) checkbox, and specify the maximum number of versions per object and the number of days after which the noncurrent versions expire.
- To enable the retention policy on objects and buckets, click the Retention (For compliance) checkbox, and then do the following:
- To enable Object Retention Lock, click the Enable object retention checkbox.
- To enable Bucket Lock, click the Set bucket retention policy checkbox, and choose a unit of time and a length of time for your retention period.
- To choose how your object data will be encrypted, expand the Data encryption section (), and select a Data encryption method.
- Select any of the options under Data protection that you
want to set for your bucket.
- Click Create.
Copy the following, as you need them in a later section:
- Your Cloud Storage bucket name.
- Your Google Cloud project ID.
To find this ID, see Identifying projects.
VPC network
By default, each new project starts with a default
network. If the default network for your project
is disabled or was deleted, you need to have a
network in your project for which your user account has the Compute Network
User role
(roles/compute.networkUser).
Read, write, and transform data
This section shows how you can use Beam YAML syntax with Dataflow to read, write, and filter data using the following:
- User interface-driven development to build and run jobs in the job builder UI in the Google Cloud console. Specifically, you'll use the builder form in the job builder UI, so you don't manually need to create the YAML files.
CSV file data stored in a publicly-viewable Cloud Storage bucket. This data contains mock restaurant menu data and looks like the following:
restaurant-data.csvMenu item,Category,Price,Tax Classic Cheeseburger,Entree,9.99,0.7 Margherita Pizza,Entree,14.50,1.02 Grilled Salmon with Asparagus,Entree,21.99,1.54 Chicken Caesar Salad,Salad,12.75,0.89 Spaghetti Carbonara,Entree,16.25,1.14 Beef Tacos (3),Entree,10.50,0.74 Vegetable Stir-Fry,Entree,13.00,0.91 Shrimp Scampi,Entree,19.75,1.38 Chicken Pot Pie,Entree,15.50,1.09 Steak Frites,Entree,28.00,1.96 Lobster Mac and Cheese,Entree,25.50,1.79 Pork Belly Bao Buns (2),Appetizer/Side,11.25,0.79 Mushroom Risotto,Entree,17.50,1.23 Fish and Chips,Entree,14.00,0.98 Buffalo Wings (6),Appetizer/Side,9.50,0.67 French Onion Soup,Appetizer/Side,7.00,0.49 Tomato Soup with Grilled Cheese,Appetizer/Side,10.00,0.7 Avocado Toast,Appetizer/Side,8.50,0.6 Quesadilla with Chicken,Appetizer/Side,11.75,0.82 Pad Thai,Entree,15.00,1.05 Chicken Tikka Masala,Entree,18.50,1.3 Burrito Bowl,Entree,13.50,0.95 Sushi Combo (8 pieces),Entree,22.00,1.54 Greek Salad,Salad,11.00,0.77 Clam Chowder,Appetizer/Side,8.00,0.56 New York Cheesecake,Dessert,6.50,0.46 Chocolate Lava Cake,Dessert,7.50,0.53 Apple Pie,Dessert,5.00,0.35 Tiramisu,Dessert,8.00,0.56 Crème brûlée,Dessert,7.00,0.49 Iced Coffee,Beverage,3.50,0.25 Lemonade,Beverage,3.00,0.21 Orange Juice,Beverage,4.00,0.28 Soda,Beverage,2.50,0.18 Craft Beer,Beverage,6.00,0.42 Glass of Wine,Beverage,9.00,0.63 Margarita,Beverage,12.00,0.84 Moscow Mule,Beverage,11.50,0.81 Old Fashioned,Beverage,13.00,0.91 Espresso,Beverage,3.00,0.21 Cappuccino,Beverage,4.50,0.32 Latte,Beverage,5.00,0.35 Mocha,Beverage,5.50,0.39 Hot Chocolate,Beverage,4.00,0.28 Breakfast Burrito,Breakfast,10.50,0.74 Pancakes (3),Breakfast,8.00,0.56 Waffles,Breakfast,9.00,0.63 Eggs Benedict,Breakfast,14.00,0.98 Omelette,Breakfast,11.00,0.77 Fruit Salad,Salad,7.50,0.53 Yogurt Parfait,Breakfast,6.00,0.42
Read and filter data
The following example shows you how to read data from a CSV file, filter it for specific information, and write the filtered data to a JSON file.
This sample uses the Filter
transform, which
lets you selectively keep data that meets certain criteria. The following
example filters a dataset to keep only the records where the Price is greater
than or equal to 20.00.
To read the CSV data and output filtered JSON content, complete the following steps:
In the Google Cloud console, go to the Dataflow Jobs page.
Click Create Job From Builder.
On the Job builder tab, leave Builder form selected.
In the Job name field, enter
filter-python-job.For Job type, leave Batch selected.
In the Sources section:
In the Source name field in the New source panel, change the name to
ReadCsv.In the Source type list, select CSV from Cloud Storage.
In the CSV location field, enter:
cloud-samples-data/dataflow/tutorials/restaurant-data.csvClick Done.
In the Transforms section:
Click Add a transform.
In the Transform name field, enter
FilterPrice.In the Transform type list, select Filter (Python).
In the Python filter expression field, enter
Price >= 20.00.In the Input step for the transform list, leave
ReadCsvselected.Click Done.
In the Sinks section:
In the Sink name field, change the name to
WriteJson.In the Sink type list, select JSON files on Cloud Storage.
In the JSON location field, enter:
BUCKET_NAME/output/restaurant-data_filtered.jsonReplace
BUCKET_NAMEwith the name of your Cloud Storage bucket.In the Input step for the sink list, leave
FilterPriceselected.Click Done.
In the Dataflow Options section, click Run job.
Examine the job output
When the job completes, complete the following steps to see the output from the pipeline:
In the Google Cloud console, go to the Cloud Storage Buckets page.
In the bucket list, click the name of the bucket that you created in Create a Cloud Storage bucket.
Click the file named
restaurant-data_filtered.json-00000-of-00001.In the Object details page, click the authenticated URL to view the pipeline output.
The output should look similar to the following:
{"Item":"Grilled Salmon with Asparagus","Category":"Entree","Price":21.99,"Tax":1.54}
{"Item":"Steak Frites","Category":"Entree","Price":28.0,"Tax":1.96}
{"Item":"Lobster Mac and Cheese","Category":"Entree","Price":25.5,"Tax":1.79}
{"Item":"Sushi Combo (8 pieces)","Category":"Entree","Price":22.0,"Tax":1.54}
Map fields using Python
With the MapToFields
transform, you can create
new fields based on existing ones. The following example creates a lowercase
version of a menu item, calculates a total price, and appends the values after
the existing values.
Go to the Dataflow Jobs page in the Google Cloud console.
Click Create job from builder.
On the Job builder tab, leave Builder form selected.
In the Job name field, enter
map-python-job.For Job type, leave Batch selected.
In the Sources section:
In the Source name field in the New source panel, change the name to
ReadFromCsvPy.In the Source type list, select CSV from Cloud Storage.
In the CSV location field, enter:
cloud-samples-data/dataflow/tutorials/restaurant-data.csvClick Done.
In the Transforms section:
Click Add a transform.
In the Transform name field, enter
MapToFieldsPy.In the Transform type list, select Map fields (Python).
Leave Preserve existing fields selected.
In the Mapped fields section, click Add a field.
In the New field panel that opens, put
Lowercase_menu_itemas the Field name.In the Python expression field, put
Item.lower().Click Done.
In the same Mapped fields section, click Add a field again.
In the New field panel that opens, put
Total_priceas the Field name.In the Python expression field, put
Price + Tax.In this New field panel, click Done.
In this New transform panel, click Done.
In the Sinks section:
In the Sink name field, change the name to
WriteToJsonPy.In the Sink type list, select JSON files on Cloud Storage.
In the JSON location field, enter:
BUCKET_NAME/output/restaurant-data_map-fields.jsonReplace
BUCKET_NAMEwith the name of your Cloud Storage bucket.In the Input step for the sink list, leave
MapToFieldsPyselected.Click Done.
In the Dataflow Options section, click Run job.
Examine the job output
When the job completes, complete the following steps to see the output from the pipeline:
In the Google Cloud console, go to the Cloud Storage Buckets page.
In the bucket list, click the name of the bucket that you created in Create a Cloud Storage bucket.
Click the file named
restaurant-data_map-fields.json-00000-of-00001.In the Object details page, click the authenticated URL to view the pipeline output.
The output should look similar to the following:
{"Item":"Classic Cheeseburger","Category":"Entree","Price":9.99,"Tax":0.7,"Lowercase_menu_item":"classic cheeseburger","Total_price":10.69}
{"Item":"Margherita Pizza","Category":"Entree","Price":14.5,"Tax":1.02,"Lowercase_menu_item":"margherita pizza","Total_price":15.52}
{"Item":"Grilled Salmon with Asparagus","Category":"Entree","Price":21.99,"Tax":1.54,"Lowercase_menu_item":"grilled salmon with asparagus","Total_price":23.53}
{"Item":"Chicken Caesar Salad","Category":"Salad","Price":12.75,"Tax":0.89,"Lowercase_menu_item":"chicken caesar salad","Total_price":13.64}
{"Item":"Spaghetti Carbonara","Category":"Entree","Price":16.25,"Tax":1.14,"Lowercase_menu_item":"spaghetti carbonara","Total_price":17.39}
{"Item":"Beef Tacos (3)","Category":"Entree","Price":10.5,"Tax":0.74,"Lowercase_menu_item":"beef tacos (3)","Total_price":11.24}
[...]
Transform data using SQL
The Sql
transform
lets you run SQL queries on your data. The following example groups menu items
by category (such as Entree, Beverage, or Dessert) and adds a column with
the count of the items in each category.
To use the job builder UI to create your pipeline, follow these steps:
Go to the Dataflow Jobs page in the Google Cloud console.
Click Create job from builder.
In the Job builder tab, in the Job name field, enter
sql-transform-job.For Job type, leave Batch selected.
In the Sources section:
In the Source name field, change the name to
SqlTransformSource.In the New source tab, for Source type, select CSV from Cloud Storage. The CSV location field opens.
For CSV location, enter:
cloud-samples-data/dataflow/tutorials/restaurant-data.csvClick Done.
In the Transforms section:
Click Add a transform.
In the Transform name field, update the name to
SqlTransform.For Transform type, select SQL transform. The SQL transform options open.
In the SQL expression field, enter:
select Category, count(*) as category_count from PCOLLECTION group by CategoryClick Done.
In the Sinks section:
For Sink name, enter
SqlTransformSink.For Sink type, select JSON files on Cloud Storage. The Write to JSON files on Cloud Storage options open.
For JSON location, enter:
BUCKET_NAME/output/restaurant-data_transform-sql.jsonReplace
BUCKET_NAMEwith the name of your Cloud Storage bucket.Click Done.
Optional: View the generated YAML definition for this pipeline.
Navigate to the top of the Job builder tab.
Select YAML editor. You should see the YAML definition. It should look like the following:
Generated YAML specification
pipeline:
  transforms:
    - name: SqlTransformSource
      type: ReadFromCsv
      config:
        path: 'gs://cloud-samples-data/dataflow/tutorials/restaurant-data.csv'
    - name: SqlTransform
      type: Sql
      config:
        query: >-
          select Category, count(*) as category_count from PCOLLECTION group by
          Category
      input:
        input0: SqlTransformSource
    - name: SqlTransformSink
      type: WriteToJson
      input: SqlTransform
      config:
        path: 'gs://BUCKET_NAME/output/restaurant-data_transform-sql.json'
In the Dataflow Options section, click Run job.
Examine the job output
When the job completes, complete the following steps to see the output from the pipeline:
In the Google Cloud console, go to the Cloud Storage Buckets page.
In the bucket list, click the name of the bucket that you created in Create a Cloud Storage bucket.
Click the file named
restaurant-data_transform-sql.json-00000-of-00001.In the Object details page, click the authenticated URL to view the pipeline output.
The output should look similar to the following:
{"Category":"Entree","category_count":16}
{"Category":"Beverage","category_count":14}
{"Category":"Appetizer\/Side","category_count":7}
{"Category":"Dessert","category_count":5}
{"Category":"Breakfast","category_count":6}
{"Category":"Salad","category_count":3}
Clean up
To avoid incurring charges to your Google Cloud account for the resources used in this tutorial, either delete the project that contains the resources, or keep the project and delete the individual resources.
Delete the project
- In the Google Cloud console, go to the Manage resources page.
- In the project list, select the project that you want to delete, and then click Delete.
- In the dialog, type the project ID, and then click Shut down to delete the project.
Delete the individual resources
If you want to reuse the project later, you can keep the project but delete the resources that you created during the tutorial.
Stop the Dataflow pipeline
In the Google Cloud console, go to the Dataflow Jobs page.
Click the job that you want to stop.
To stop a job, the status of the job must be running.
In the job details page, click Stop.
Click Cancel.
To confirm your choice, click Stop Job.
Delete your Cloud Storage bucket
- In the Google Cloud console, go to the Cloud Storage Buckets page.
- Click the checkbox for the bucket that you want to delete.
- To delete the bucket, click Delete, and then follow the instructions.
What's next
- Learn more about creating jobs using the job builder UI overview in the Google Cloud console.
- Learn about job builder custom jobs in Create a custom job with the job builder.
- Read the Beam YAML API overview.
- View more Beam YAML examples.