
Menjalankan pipeline menggunakan builder tugas
Panduan memulai cepat ini menunjukkan cara menjalankan tugas Dataflow menggunakan builder tugas Dataflow. Builder tugas adalah UI visual untuk membangun dan menjalankan pipeline Dataflow di Google Cloud konsol, tanpa perlu menulis kode.
Dalam panduan memulai cepat ini, Anda akan memuat contoh pipeline ke builder tugas, menjalankan tugas, dan memverifikasi bahwa tugas tersebut membuat output.
Sebelum memulai
Selesaikan langkah-langkah berikut sebelum menjalankan pipeline.
Menyiapkan project
- Login keakun Anda. Google Cloud Jika Anda baru menggunakan Google Cloud, buat akun untuk mengevaluasi performa produk kami dalam skenario dunia nyata. Pelanggan baru juga mendapatkan kredit gratis senilai $300 untuk menjalankan, menguji, dan men-deploy workload.
-
In the Google Cloud console, on the project selector page, select or create a Google Cloud project.
Roles required to select or create a project
- Select a project: Selecting a project doesn't require a specific IAM role—you can select any project that you've been granted a role on.
-
Create a project: To create a project, you need the Project Creator role
(
roles/resourcemanager.projectCreator), which contains theresourcemanager.projects.createpermission. Learn how to grant roles.
-
Verify that billing is enabled for your Google Cloud project.
Enable the Dataflow, Compute Engine, Cloud Logging, Cloud Storage, Google Cloud Storage JSON, and Resource Manager APIs.
Roles required to enable APIs
To enable APIs, you need the Service Usage Admin IAM role (
roles/serviceusage.serviceUsageAdmin), which contains theserviceusage.services.enablepermission. Learn how to grant roles.-
In the Google Cloud console, on the project selector page, select or create a Google Cloud project.
Roles required to select or create a project
- Select a project: Selecting a project doesn't require a specific IAM role—you can select any project that you've been granted a role on.
-
Create a project: To create a project, you need the Project Creator role
(
roles/resourcemanager.projectCreator), which contains theresourcemanager.projects.createpermission. Learn how to grant roles.
-
Verify that billing is enabled for your Google Cloud project.
Enable the Dataflow, Compute Engine, Cloud Logging, Cloud Storage, Google Cloud Storage JSON, and Resource Manager APIs.
Roles required to enable APIs
To enable APIs, you need the Service Usage Admin IAM role (
roles/serviceusage.serviceUsageAdmin), which contains theserviceusage.services.enablepermission. Learn how to grant roles.- Membuat bucket Cloud Storage:
- Di Google Cloud konsol, buka halaman Buckets Cloud Storage.
- Klik Create.
- Di halaman Create a bucket, masukkan informasi bucket Anda. Untuk melanjutkan ke langkah berikutnya, klik Continue.
- Untuk Name your bucket, masukkan nama bucket yang unik. Jangan sertakan informasi sensitif informasi pada nama bucket, karena namespace bucket bersifat global dan dapat dilihat publik publik.
-
Di bagian Choose where to store your data, lakukan tindakan berikut:
- Pilih Jenis lokasi.
- Pilih lokasi tempat data bucket Anda disimpan secara permanen dari menu drop-down Location type.
- Jika memilih jenis lokasi dual-region, Anda juga dapat memilih untuk mengaktifkan replikasi turbo menggunakan kotak centang yang relevan.
- Untuk menyiapkan replikasi lintas bucket, pilih
Add cross-bucket replication via Storage Transfer Service , lalu
ikuti langkah-langkah berikut:
Menyiapkan replikasi lintas bucket
- Di menu Bucket, pilih bucket.
Di bagian Replication settings , klik Configure untuk mengonfigurasi setelan tugas replikasi.
Panel Configure cross-bucket replication akan muncul muncul.
- Untuk memfilter objek yang akan direplikasi berdasarkan awalan nama objek, masukkan awalan yang ingin Anda sertakan atau kecualikan objeknya, lalu klik Add a prefix.
- Untuk menetapkan kelas penyimpanan bagi objek yang direplikasi, pilih kelas penyimpanan dari menu Storage class. Jika Anda melewati langkah ini, objek yang direplikasi akan menggunakan kelas penyimpanan bucket tujuan secara default.
- Klik Done.
-
Di bagian Choose how to store your data, lakukan tindakan berikut:
- Di bagian Set a default class, pilih Standard.
- Untuk mengaktifkan namespace hierarkis, di bagian Optimize storage for data-intensive workloads, pilih Enable hierarchical namespace on this bucket.
- Di bagian Choose how to control access to objects, pilih apakah bucket Anda menerapkan pencegahan akses publik atau tidak, lalu pilih metode kontrol akses untuk objek bucket Anda.
-
Di bagian Choose how to protect object data, lakukan tindakan berikut:
- Pilih salah satu opsi di bagian Data protection yang Anda
ingin Anda tetapkan untuk bucket Anda.
- Untuk mengaktifkan penghapusan sementara, klik kotak centang Soft delete policy (For data recovery), lalu tentukan jumlah hari Anda ingin menyimpan objek setelah dihapus.
- Untuk menetapkan Pembuatan Versi Objek, klik kotak centang Object versioning (For version control) , lalu tentukan jumlah maksimum versi per objek dan jumlah hari setelah versi lama berakhir masa berlakunya.
- Untuk mengaktifkan kebijakan retensi pada objek dan bucket, klik kotak centang Retention (For compliance), lalu lakukan tindakan berikut:
- Untuk mengaktifkan Kunci Retensi Objek, klik kotak centang Enable object retention.
- Untuk mengaktifkan Kunci Bucket, klik kotak centang Set bucket retention policy, lalu pilih satuan waktu dan lama untuk periode retensi data.
- Untuk memilih cara data objek Anda akan dienkripsi, luaskan bagian Data encryption (), lalu pilih metode Data encryption.
- Pilih salah satu opsi di bagian Data protection yang Anda
ingin Anda tetapkan untuk bucket Anda.
- Klik Create.
Peran yang diperlukan
Untuk mendapatkan izin yang Anda perlukan untuk menjalankan panduan memulai cepat ini, minta administrator Anda untuk memberi Anda peran IAM berikut di project Anda:
- Developer Dataflow (
roles/dataflow.developer) - Pengguna Akun Layanan (
roles/iam.serviceAccountUser)
Untuk mengetahui informasi selengkapnya tentang pemberian peran, lihat Mengelola akses ke project, folder, dan organisasi.
Anda mungkin juga bisa mendapatkan izin yang diperlukan melalui peran khusus atau peran bawaan lainnya.
Untuk memastikan bahwa akun layanan memiliki izin yang diperlukan untuk menjalankan panduan memulai cepat ini, minta administrator Anda untuk memberikan peran IAM berikut ke akun layanan di project Anda:
- Dataflow Worker (
roles/dataflow.worker) - Storage Object Admin (
roles/storage.objectAdmin)
Untuk mengetahui informasi selengkapnya tentang pemberian peran, lihat Mengelola akses ke project, folder, dan organisasi.
Administrator Anda mungkin juga dapat memberikan izin yang diperlukan kepada akun layanan melalui peran khusus atau peran bawaan lainnya.
Jaringan VPC
Secara default, setiap project baru dimulai dengan a
jaringan default.
Jika jaringan default untuk project Anda dinonaktifkan
atau dihapus, Anda harus memiliki jaringan di project Anda yang
akun penggunanya memiliki
peran Pengguna Jaringan Compute
(roles/compute.networkUser).
Memuat contoh pipeline
Pada langkah ini, Anda akan memuat contoh pipeline yang menghitung jumlah kata dalam King Lear karya Shakespeare.
Buka halaman Jobs di Google Cloud konsol.
Klik Create job from template.
Klik Job builder.
Klik Load Blueprints.
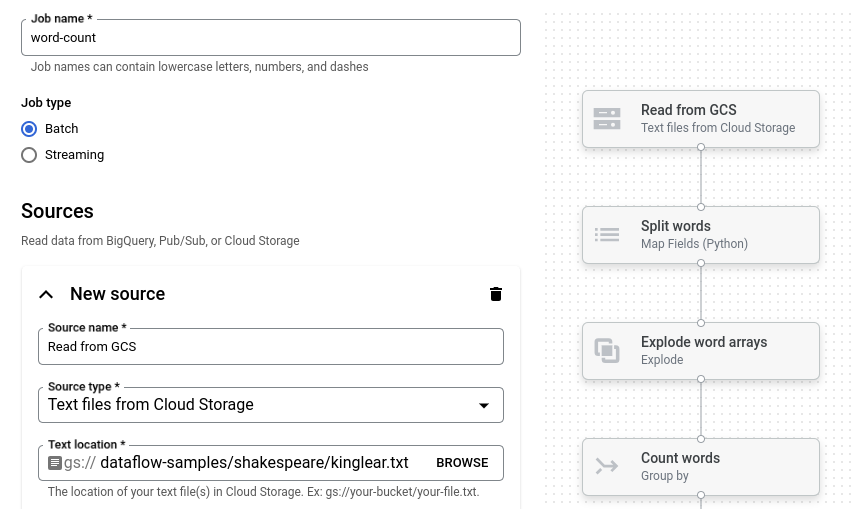
Klik Word Count. Builder tugas akan diisi dengan representasi grafis pipeline.
Untuk setiap langkah pipeline, builder tugas menampilkan kartu yang menentukan parameter konfigurasi untuk langkah tersebut. Misalnya, langkah pertama membaca file teks dari Cloud Storage. Lokasi data sumber sudah terisi di kotak Text location.
Menetapkan lokasi output
Pada langkah ini, Anda akan menentukan bucket Cloud Storage tempat pipeline menulis output.
Temukan kartu berjudul New sink. Anda mungkin perlu men-scroll.
Di kotak Text location, klik Browse.
Pilih nama bucket Cloud Storage yang Anda buat di Sebelum memulai.
Klik View child resources.
Di kotak Filename, masukkan
words.Klik Select.
Menjalankan tugas
Klik Run job. Builder tugas akan membuat tugas Dataflow, lalu membuka grafik tugas. Saat tugas dimulai, grafik tugas akan menampilkan representasi grafis pipeline, yang mirip dengan yang ditampilkan di builder tugas. Saat setiap langkah pipeline berjalan, status akan diperbarui di grafik tugas.
Panel Job info menampilkan status keseluruhan tugas. Jika tugas berhasil diselesaikan, kolom Job status akan diperbarui menjadi Succeeded.
Memeriksa output tugas
Setelah tugas selesai, lakukan langkah-langkah berikut untuk melihat output dari pipeline:
Di Google Cloud konsol, buka halaman Buckets Cloud Storage.
Di daftar bucket, klik nama bucket yang Anda buat di bagian Sebelum memulai.
Klik file bernama
words-00000-of-00001.Di halaman Object details, klik URL yang diautentikasi untuk melihat output pipeline.
Output-nya akan terlihat seperti berikut:
brother: 20
deeper: 1
wrinkles: 1
'alack: 1
territory: 1
dismiss'd: 1
[....]
Pembersihan
Agar akunAnda tidak dikenai biaya untuk resource yang digunakan pada halaman ini, ikuti langkah-langkah berikut. Google Cloud
Menghapus project
Cara termudah untuk menghilangkan penagihan adalah dengan menghapus Google Cloud project yang Anda buat untuk panduan memulai cepat.
- Di Google Cloud konsol, buka halaman Manage resources.
- Pada daftar project, pilih project yang Anda ingin Anda hapus, lalu klik Delete.
- Pada dialog, ketik project ID, lalu klik Shut down untuk menghapus project.
Menghapus resource satu per satu
Jika Anda ingin menyimpan Google Cloud project yang Anda gunakan dalam panduan memulai cepat ini, hapus bucket Cloud Storage:
- Di Google Cloud konsol, buka halaman Buckets Cloud Storage.
- Klik kotak centang untuk bucket yang ingin Anda dihapus.
- Untuk menghapus bucket, klik Delete, lalu ikuti petunjuk.