
Managed Airflow (דור 3) | Managed Airflow (דור 2) | Managed Airflow (דור 1 מדור קודם)
בדף הזה מוסבר איך להשתמש ב-DataflowTemplateOperator כדי להפעיל צינורות של Dataflow מ-Managed Airflow.
הצינור Cloud Storage Text to BigQuery הוא צינור אצווה שמאפשר להעלות קובצי טקסט שמאוחסנים ב-Cloud Storage, להמיר אותם באמצעות פונקציה מוגדרת על ידי המשתמש (UDF) ב-JavaScript שאתם מספקים, ולפלט את התוצאות ל-BigQuery.
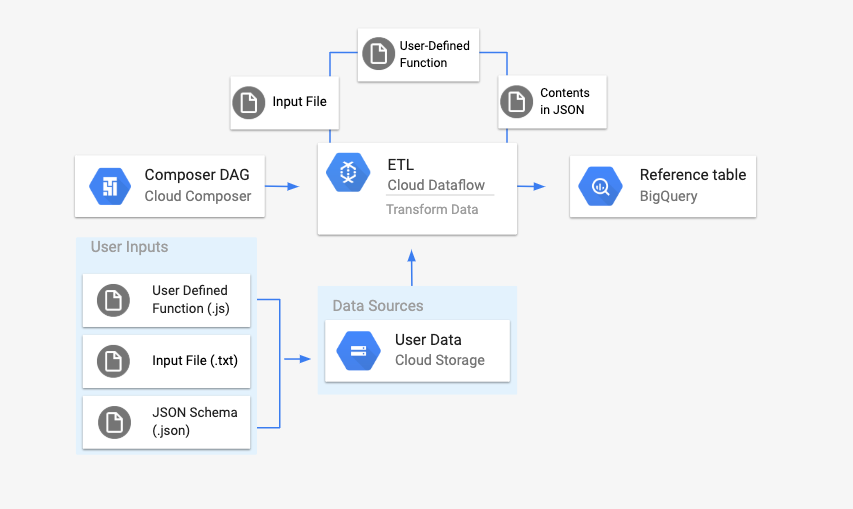
סקירה כללית
לפני שמתחילים את תהליך העבודה, צריך ליצור את הישויות הבאות:
טבלת BigQuery ריקה ממערך נתונים ריק, שתכיל את עמודות המידע הבאות:
location,average_temperature, month, ואופציונלית,inches_of_rain, is_currentו-latest_measurement.קובץ JSON שינרמל את הנתונים מהקובץ לפורמט הנכון עבור הסכימה של טבלת BigQuery.
.txtאובייקט ה-JSON יכלול מערך שלBigQuery Schema, שבו כל אובייקט יכיל שם עמודה, סוג קלט וציון אם זה שדה חובה.קובץ קלט
.txtשיכיל את הנתונים שיועלו בשיטת batch לטבלה ב-BigQuery.פונקציה שמוגדרת על ידי המשתמש ונכתבת ב-JavaScript, שתמיר כל שורה בקובץ
.txtלמשתנים הרלוונטיים לטבלה שלנו.קובץ Airflow DAG שיפנה למיקום של הקבצים האלה.
בשלב הבא, מעלים את הקובץ
.txt, את קובץ ה-UDF.jsואת קובץ הסכימה.jsonלקטגוריה של Cloud Storage. תצטרכו גם להעלות את ה-DAG לסביבת Managed Airflow.אחרי שה-DAG מועלה, Airflow מריץ משימה ממנו. המשימה הזו תפעיל צינור Dataflow שיחיל את הפונקציה שהוגדרה על ידי המשתמש על הקובץ
.txtויעצב אותו בהתאם לסכימת ה-JSON.לבסוף, הנתונים יועלו לטבלה ב-BigQuery שיצרתם קודם.
לפני שמתחילים
- כדי לכתוב את הפונקציה המוגדרת על ידי המשתמש, צריך להכיר את JavaScript.
- במדריך הזה, אנחנו יוצאים מנקודת הנחה שכבר יש לכם סביבת Managed Airflow. כדי ליצור סביבה, אפשר לעיין במאמר בנושא יצירת סביבה. אפשר להשתמש בכל גרסה של Managed Airflow עם המדריך הזה.
מפעילים את ממשקי ה-API של Managed Service for Apache Airflow, Dataflow, Cloud Storage ו-BigQuery.
תפקידים שנדרשים להפעלת ממשקי API
כדי להפעיל ממשקי API, צריך את תפקיד ה-IAM 'אדמין של Service Usage' (
roles/serviceusage.serviceUsageAdmin), שכולל את ההרשאהserviceusage.services.enable. איך מקצים תפקידיםחשוב לוודא שיש לכם את ההרשאות הבאות:
- תפקידים ב-Managed Airflow: יצירת סביבה (אם אין לכם סביבה), ניהול אובייקטים בקטגוריה של הסביבה, הפעלת DAG וגישה לממשק המשתמש של Airflow.
- תפקידים ב-Cloud Storage: יצירת קטגוריה וניהול אובייקטים בתוכה.
- תפקידים ב-BigQuery: יצירת מערך נתונים וטבלה, שינוי נתונים בטבלה, שינוי סכימה ומטא-נתונים של טבלה.
- תפקידים ב-Dataflow: צפייה במשימות ב-Dataflow.
צריך לוודא שלחשבון השירות של הסביבה יש הרשאות ליצור משימות Dataflow, לגשת לקטגוריית Cloud Storage ולקרוא ולעדכן נתונים בטבלה ב-BigQuery.
יצירת טבלה ריקה ב-BigQuery עם הגדרת סכימה
יוצרים טבלה ב-BigQuery עם הגדרת סכימה. בהמשך המדריך הזה תשתמשו בהגדרת הסכימה הזו. הטבלה הזו ב-BigQuery תכיל את התוצאות של ההעלאה באצווה.
כדי ליצור טבלה ריקה עם הגדרת סכימה:
המסוף
במסוף Google Cloud , עוברים לדף BigQuery:
בחלונית הניווט, בקטע Resources, מרחיבים את הפרויקט.
בחלונית הפרטים, לוחצים על יצירת מערך נתונים.
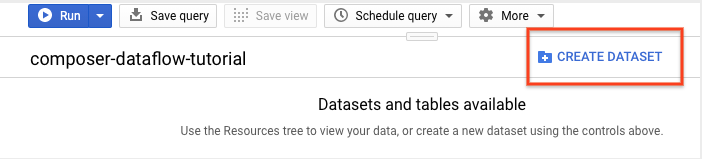
בדף 'יצירת מערך נתונים', בקטע מזהה מערך הנתונים, נותנים שם למערך הנתונים
average_weather. בכל שאר השדות משאירים את ערכי ברירת המחדל.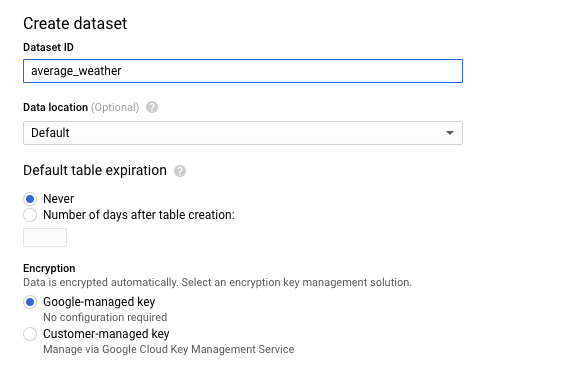
לוחצים על יצירת מערך נתונים.
חוזרים לחלונית הניווט, בקטע Resources (משאבים), מרחיבים את הפרויקט. לאחר מכן, לוחצים על מערך הנתונים
average_weather.בחלונית הפרטים, לוחצים על יצירת טבלה.
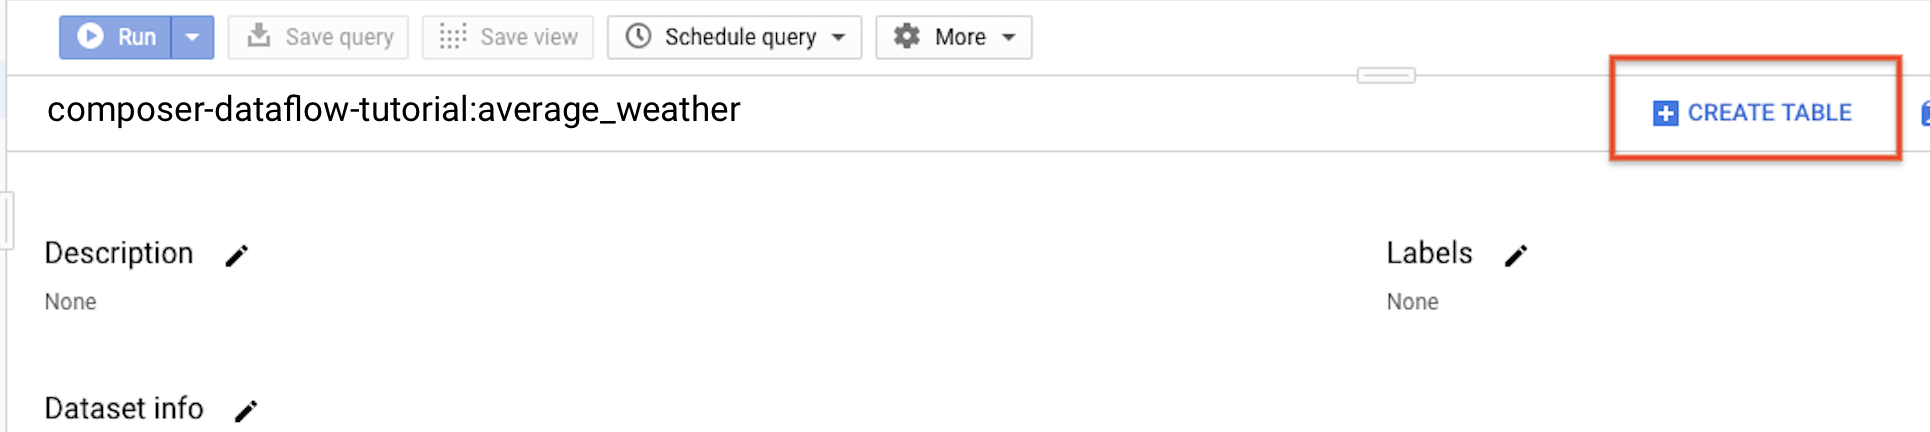
בדף יצירת טבלה, בקטע מקור, בוחרים באפשרות טבלה ריקה.
בדף יצירת טבלה, בקטע יעד:
בשדה Dataset name (שם מערך הנתונים), בוחרים את מערך הנתונים
average_weather.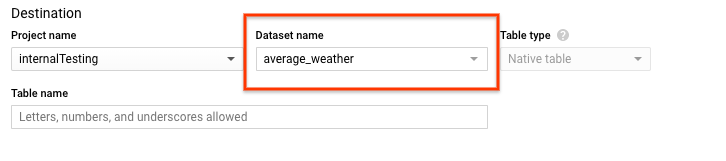
בשדה Table name (שם הטבלה), מזינים את השם
average_weather.מוודאים שההגדרה של Table type היא Native table.
בקטע Schema (סכימה), מזינים את הגדרת הסכימה. אפשר להשתמש באחת מהגישות הבאות:
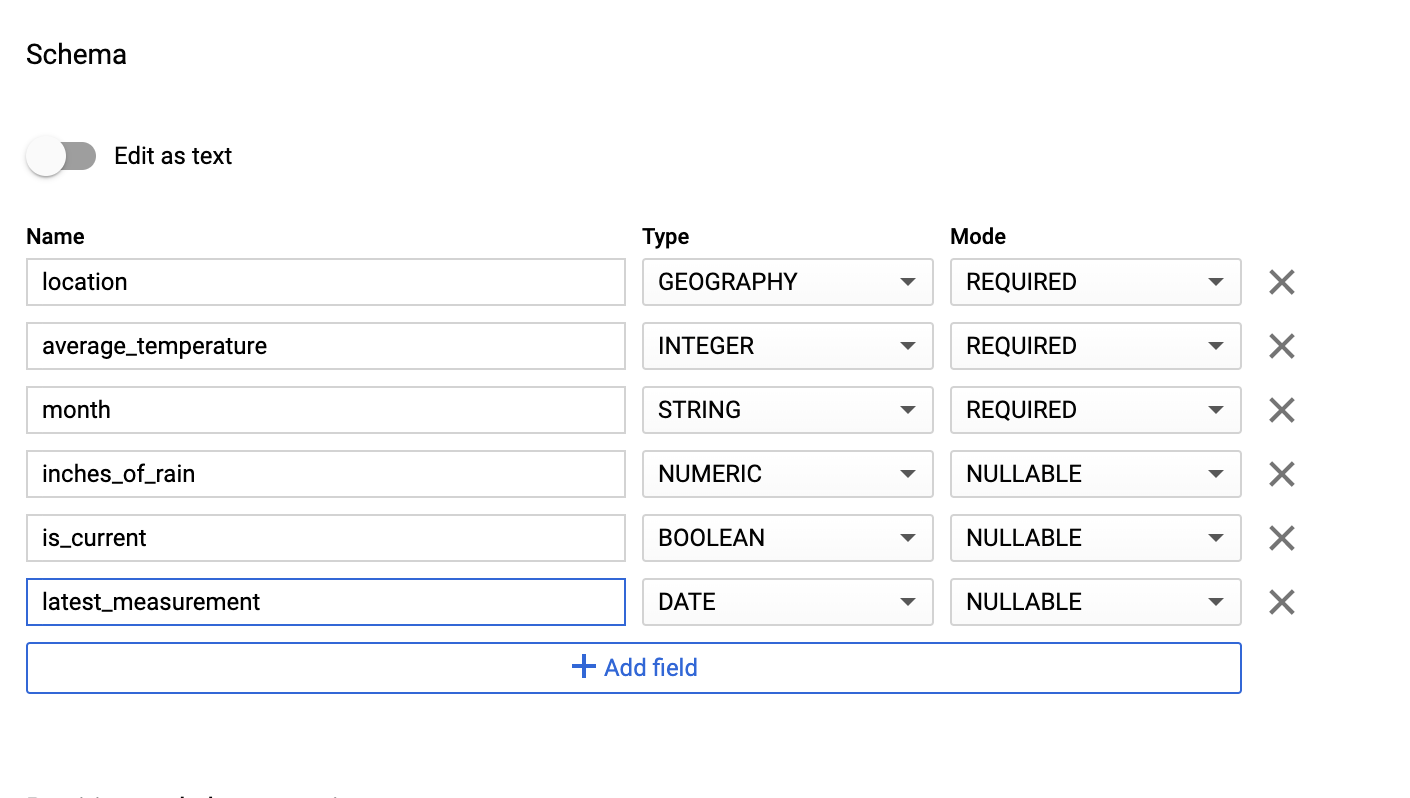
כדי להזין פרטי סכימה באופן ידני, מפעילים את האפשרות עריכה כטקסט ומזינים את סכימת הטבלה כמערך JSON. מקלידים את השדות הבאים:
[
    {
        "name": "location",
        "type": "GEOGRAPHY",
        "mode": "REQUIRED"
    },
    {
        "name": "average_temperature",
        "type": "INTEGER",
        "mode": "REQUIRED"
    },
    {
        "name": "month",
        "type": "STRING",
        "mode": "REQUIRED"
    },
    {
        "name": "inches_of_rain",
        "type": "NUMERIC"
    },
    {
        "name": "is_current",
        "type": "BOOLEAN"
    },
    {
        "name": "latest_measurement",
        "type": "DATE"
    }
]
משתמשים באפשרות הוספת שדה כדי להזין את הסכימה באופן ידני:
בקטע הגדרות של מחיצה ושל אשכול, משאירים את ערך ברירת המחדל,
No partitioning.בקטע אפשרויות מתקדמות, בשדה הצפנה, משאירים את ערך ברירת המחדל,
Google-owned and managed key.לוחצים על יצירת טבלה.
BQ
משתמשים בפקודה bq mk כדי ליצור מערך נתונים ריק וטבלה במערך הנתונים הזה.
מריצים את הפקודה הבאה כדי ליצור מערך נתונים של מזג האוויר הממוצע בעולם:
bq --location=LOCATION mk \
    --dataset PROJECT_ID:average_weather
מחליפים את מה שכתוב בשדות הבאים:
-
LOCATION: האזור שבו נמצאת הסביבה. -
PROJECT_ID: מזהה הפרויקט.
מריצים את הפקודה הבאה כדי ליצור טבלה ריקה במערך הנתונים הזה עם הגדרת הסכימה:
bq mk --table \
PROJECT_ID:average_weather.average_weather \
location:GEOGRAPHY,average_temperature:INTEGER,month:STRING,inches_of_rain:NUMERIC,is_current:BOOLEAN,latest_measurement:DATE
אחרי שיוצרים את הטבלה, אפשר לעדכן את תאריך התפוגה, התיאור והתוויות שלה. אפשר גם לשנות את הגדרת הסכימה.
Python
שומרים את הקוד הזה בשם
dataflowtemplateoperator_create_dataset_and_table_helper.py
מעדכנים את המשתנים בקוד כך שישקפו את הפרויקט והמיקום, ואז מפעילים פתרונות חכמים באמצעות הפקודה הבאה:
python dataflowtemplateoperator_create_dataset_and_table_helper.py
Python
כדי לבצע אימות ב-Managed Airflow, צריך להגדיר את Application Default Credentials. מידע נוסף זמין במאמר הגדרת אימות לסביבת פיתוח מקומית.
יצירת קטגוריה של Cloud Storage
יוצרים מאגר (bucket) שיכיל את כל הקבצים שנדרשים לתהליך העבודה. ה-DAG שתיצרו בהמשך המדריך הזה יפנה לקבצים שתעלו לקטגוריית האחסון הזו. כדי ליצור קטגוריית אחסון חדשה:
המסוף
פותחים את Cloud Storage במסוף Google Cloud .
לוחצים על Create Bucket (יצירת קטגוריה) כדי לפתוח את הטופס ליצירת קטגוריה.
מזינים את פרטי הקטגוריה ולוחצים על Continue כדי להשלים כל שלב:
מזינים Name (שם) ייחודי בהיקף גלובלי לקטגוריה. במדריך הזה נשתמש ב-
bucketNameכדוגמה.בוחרים באפשרות Region בשביל סוג המיקום. לאחר מכן בוחרים Location שבו יישמרו נתוני הקטגוריה.
בוחרים באפשרות Standard כסוג האחסון (storage class) שמוגדר כברירת מחדל לנתונים.
בוחרים באפשרות Uniform בקרת גישה כדי לגשת לאובייקטים.
לוחצים על סיום.
gcloud
משתמשים בפקודה gcloud storage buckets create:
gcloud storage buckets create gs://bucketName/
מחליפים את מה שכתוב בשדות הבאים:
-
bucketName: השם של הקטגוריה שיצרתם קודם במדריך הזה.
דוגמאות קוד
C#
כדי לבצע אימות ב-Managed Airflow, צריך להגדיר את Application Default Credentials. מידע נוסף זמין במאמר הגדרת אימות לסביבת פיתוח מקומית.
Go
כדי לבצע אימות ב-Managed Airflow, צריך להגדיר את Application Default Credentials. מידע נוסף זמין במאמר הגדרת אימות לסביבת פיתוח מקומית.
Java
כדי לבצע אימות ב-Managed Airflow, צריך להגדיר את Application Default Credentials. מידע נוסף זמין במאמר הגדרת אימות לסביבת פיתוח מקומית.
Python
כדי לבצע אימות ב-Managed Airflow, צריך להגדיר את Application Default Credentials. מידע נוסף זמין במאמר הגדרת אימות לסביבת פיתוח מקומית.
Ruby
כדי לבצע אימות ב-Managed Airflow, צריך להגדיר את Application Default Credentials. מידע נוסף זמין במאמר הגדרת אימות לסביבת פיתוח מקומית.
יצירת סכימת BigQuery בפורמט JSON לטבלת הפלט
יוצרים קובץ סכימה בפורמט JSON של BigQuery שתואם לטבלת הפלט שיצרתם קודם. חשוב לשים לב ששמות השדות, הסוגים והמצבים צריכים להיות זהים לאלה שהוגדרו קודם בסכימת הטבלה ב-BigQuery. הקובץ הזה ינרמל את הנתונים מהקובץ .txt לפורמט שתואם לסכימה של BigQuery. מה שם הקובץ הזה?
jsonSchema.json
{
    "BigQuery Schema": [
    {
        "name": "location",
        "type": "GEOGRAPHY",
        "mode": "REQUIRED"
    },
    {
        "name": "average_temperature",
        "type": "INTEGER",
        "mode": "REQUIRED"
    },
    {
        "name": "month",
        "type": "STRING",
        "mode": "REQUIRED"
    },
    {
        "name": "inches_of_rain",
        "type": "NUMERIC"
    },
    {
        "name": "is_current",
        "type": "BOOLEAN"
    },
    {
        "name": "latest_measurement",
        "type": "DATE"
    }]
}
יצירת קובץ JavaScript לעיצוב הנתונים
בקובץ הזה מגדירים את הפונקציה המוגדרת על ידי המשתמש (UDF) שמספקת את הלוגיקה להמרת שורות הטקסט בקובץ הקלט. שימו לב שהפונקציה הזו מקבלת כל שורת טקסט בקובץ הקלט כארגומנט נפרד, ולכן הפונקציה תפעל פעם אחת לכל שורה בקובץ הקלט. מה שם הקובץ הזה?
transformCSVtoJSON.js
יצירת קובץ קלט
הקובץ הזה יכיל את המידע שאתם רוצים להעלות לטבלה ב-BigQuery. מעתיקים את הקובץ הזה באופן מקומי ונותנים לו את השם inputFile.txt.
POINT(40.7128 74.006),45,'July',null,true,2020-02-16
POINT(41.8781 87.6298),23,'October',13,false,2015-02-13
POINT(48.8566 2.3522),80,'December',null,true,null
POINT(6.5244 3.3792),15,'March',14,true,null
העלאת הקבצים לקטגוריה
מעלים את הקבצים הבאים לקטגוריה של Cloud Storage שיצרתם קודם:
- סכימת BigQuery בפורמט JSON (
.json) - פונקציה מוגדרת על ידי המשתמש ב-JavaScript (
transformCSVtoJSON.js) קובץ הקלט של הטקסט שרוצים לעבד (
.txt)
המסוף
- במסוף Google Cloud , נכנסים לדף Buckets של Cloud Storage.
ברשימת הקטגוריות, לוחצים על הקטגוריה הרצויה.
בכרטיסייה Objects של הקטגוריה, מבצעים אחת מהפעולות הבאות:
גוררים את הקבצים הרצויים משולחן העבודה או ממנהל הקבצים ומשחררים אותם בחלונית הראשית של Google Cloud המסוף.
לוחצים על הלחצן העלאת קבצים, בוחרים את הקבצים שרוצים להעלות בתיבת הדו-שיח שמופיעה ולוחצים על פתיחה.
gcloud
מריצים את הפקודה gcloud storage cp:
gcloud storage cp OBJECT_LOCATION gs://bucketName
מחליפים את מה שכתוב בשדות הבאים:
-
bucketName: השם של הקטגוריה שיצרתם קודם במדריך הזה. -
OBJECT_LOCATION: הנתיב המקומי לאובייקט. לדוגמה,Desktop/transformCSVtoJSON.js.
דוגמאות קוד
Python
כדי לבצע אימות ב-Managed Airflow, צריך להגדיר את Application Default Credentials. מידע נוסף זמין במאמר הגדרת אימות לסביבת פיתוח מקומית.
Ruby
כדי לבצע אימות ב-Managed Airflow, צריך להגדיר את Application Default Credentials. מידע נוסף זמין במאמר הגדרת אימות לסביבת פיתוח מקומית.
הגדרה של DataflowTemplateOperator
לפני שמריצים את ה-DAG, צריך להגדיר את משתני Airflow הבאים.
| משתנה Airflow | ערך |
|---|---|
project_id
|
מזהה הפרויקט. דוגמה: example-project. |
gce_zone
|
התחום (zone) ב-Compute Engine שבו צריך ליצור את אשכול Dataflow. דוגמה: us-central1-a מידע נוסף על אזורים חוקיים זמין במאמר אזורים ותחומים. |
bucket_path
|
המיקום של קטגוריה של Cloud Storage שיצרתם קודם. לדוגמה: gs://example-bucket |
עכשיו תשתמשו בקבצים שיצרתם קודם כדי ליצור DAG שמפעיל את תהליך העבודה של Dataflow. מעתיקים את ה-DAG הזה ושומרים אותו באופן מקומי בשם composer-dataflow-dag.py.
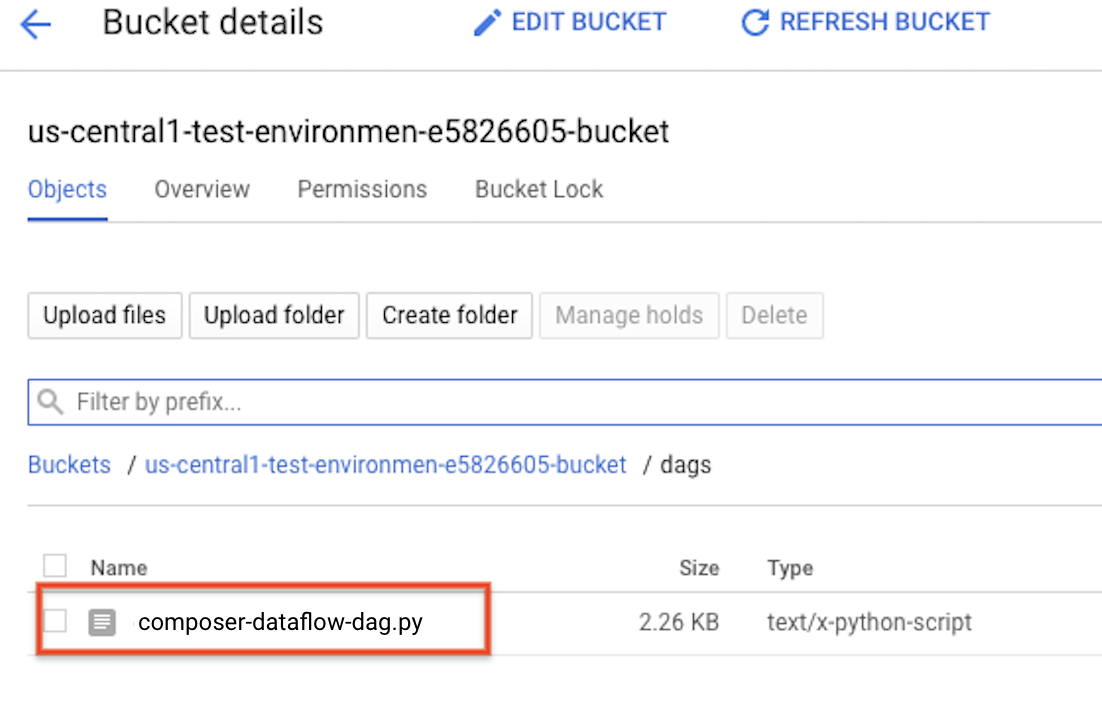
העלאת ה-DAG ל-Cloud Storage
מעלים את ה-DAG לתיקייה /dags בקטגוריה של הסביבה. אחרי שההעלאה מסתיימת בהצלחה, אפשר לראות אותה בלחיצה על הקישור DAGs Folder בדף Managed Airflow Environments.
צפייה בסטטוס של המשימה
- עוברים אל ממשק האינטרנט של Airflow.
- בדף DAGs, לוחצים על שם ה-DAG (למשל
composerDataflowDAG). - בדף הפרטים של DAG, לוחצים על תצוגת גרף.
בדיקת הסטטוס:
Failed: המשימה מוקפת בתיבה אדומה. אפשר גם להעביר את מצביע העכבר מעל המשימה ולחפש את הסטטוס: נכשל.
Success: המשימה מוקפת בתיבה ירוקה. אפשר גם להעביר את מצביע העכבר מעל המשימה ולבדוק אם מופיע State: Success.
אחרי כמה דקות, אפשר לבדוק את התוצאות ב-Dataflow וב-BigQuery.
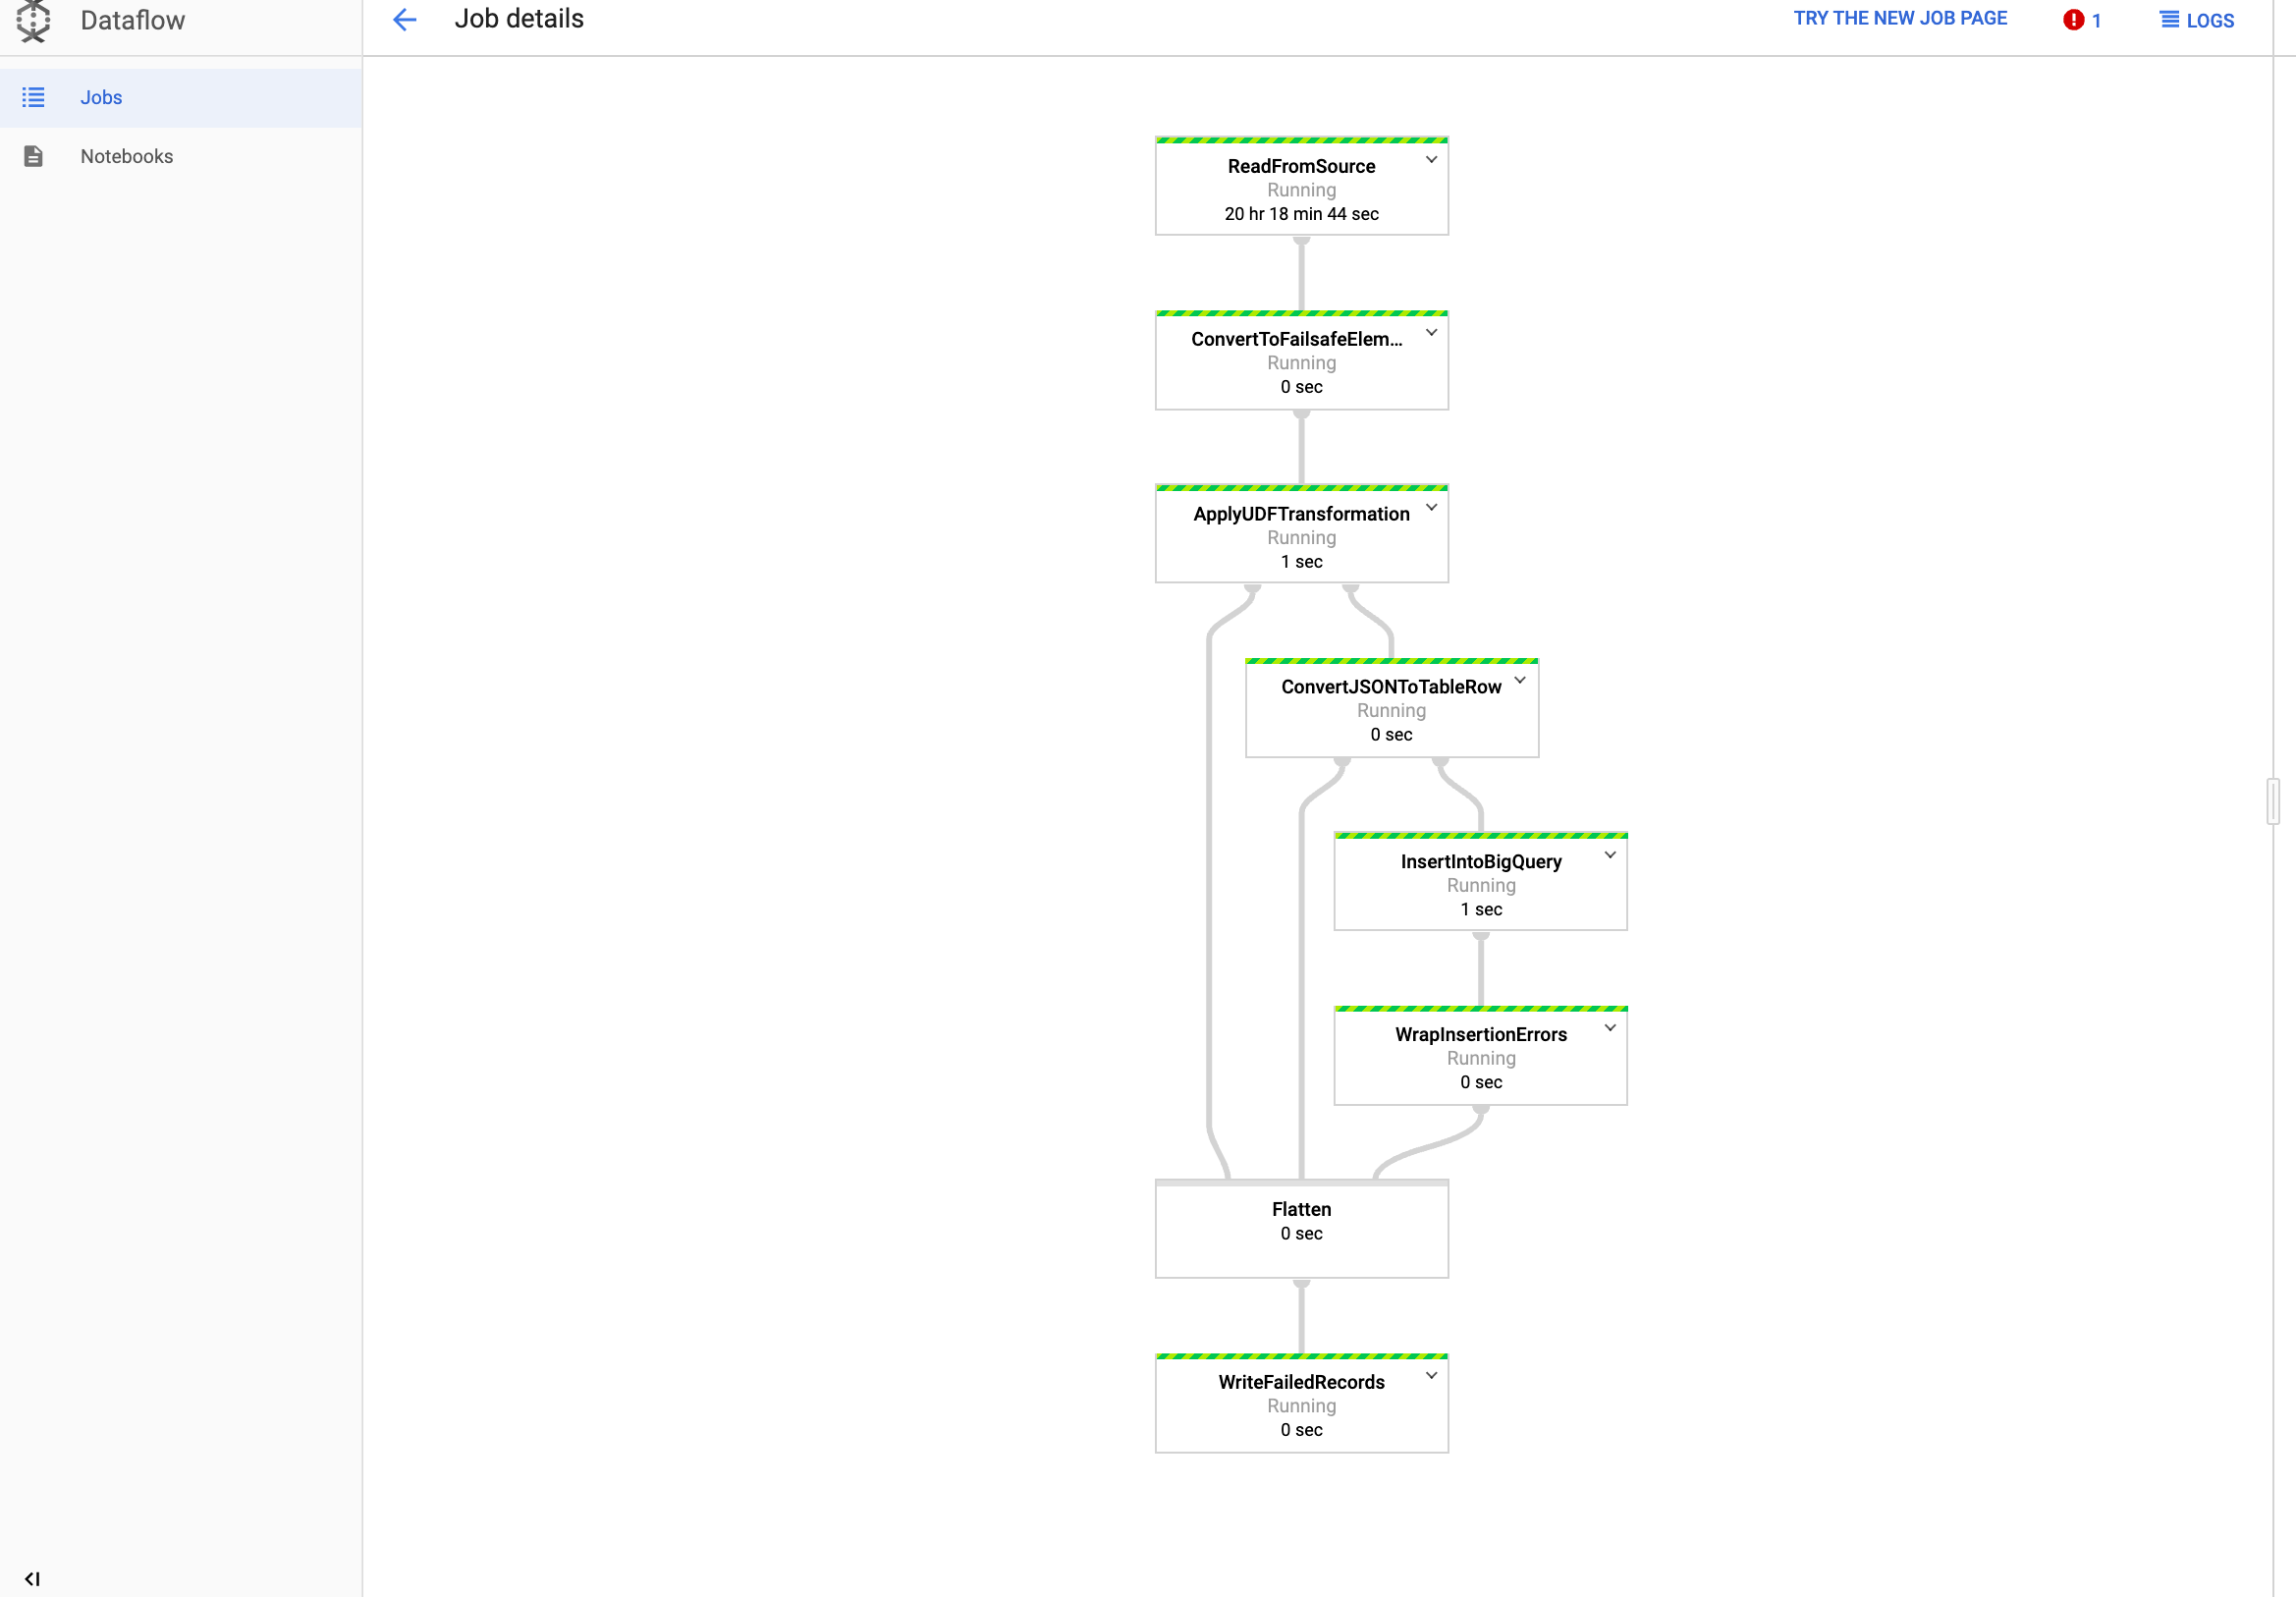
הצגת העבודה ב-Dataflow
נכנסים לדף Dataflow במסוף Google Cloud .
שם העבודה הוא
dataflow_operator_transform_csv_to_bqעם מזהה ייחודי שמצורף לסוף השם עם מקף, כך:
כדי לראות את פרטי המשרה, לוחצים על השם.
הצגת התוצאות ב-BigQuery
במסוף Google Cloud , עוברים לדף BigQuery.
אפשר להגיש שאילתות באמצעות SQL סטנדרטי. כדי לראות את השורות שנוספו לטבלה, משתמשים בשאילתה הבאה:
SELECT * FROM projectId.average_weather.average_weather