


יצירה והרצה של build במאגר פרטי
בדף הזה מוסבר איך ליצור מאגר פרטי של Cloud Build שמחובר לרשת של בעלי השירות המנוהל, ולהריץ בנייה במאגר הפרטי.
הרשת של בעלי השירות המנוהל היא הרשת שמארחת את המאגר הפרטי. כברירת מחדל, מאגר פרטי מוגדר לשימוש ברשת של בעלי השירות המנוהל, שמספקת סביבת בנייה עם:
- סוגי מכונות שניתן להגדיר
- גודלי דיסקים שניתנים להגדרה
- גישה למשאבים באינטרנט הציבורי, כמו משאבים במאגר או במרשם
בלחיצה על תראו לי איך תקבלו הסבר מפורט על המשימה ישירות ב-Cloud Shell Editor:
לפני שמתחילים
- נכנסים לחשבון Google Cloud . אנחנו ממליצים למשתמשים חדשים ב- Google Cloud ליצור חשבון כדי שיוכלו להעריך את הביצועים של המוצרים שלנו בתרחישים מהעולם האמיתי. לקוחות חדשים מקבלים בחינם גם קרדיט בשווי 300$ להרצה, לבדיקה ולפריסה של עומסי העבודה.
-
In the Google Cloud console, on the project selector page, select or create a Google Cloud project.
Roles required to select or create a project
- Select a project: Selecting a project doesn't require a specific IAM role—you can select any project that you've been granted a role on.
-
Create a project: To create a project, you need the Project Creator role
(
roles/resourcemanager.projectCreator), which contains theresourcemanager.projects.createpermission. Learn how to grant roles.
-
Verify that billing is enabled for your Google Cloud project.
Enable the Cloud Build API, if it is not already enabled.
Roles required to enable APIs
To enable APIs, you need the
serviceusage.services.enablepermission. If you created the project, then you likely already have this permission through the Owner role (roles/owner). Otherwise, you can get this permission through the Service Usage Admin role (roles/serviceusage.serviceUsageAdmin). Learn how to grant roles.-
Install the Google Cloud CLI.
-
If you're using an external identity provider (IdP), you must first sign in to the gcloud CLI with your federated identity.
-
To initialize the gcloud CLI, run the following command:
gcloud init -
In the Google Cloud console, on the project selector page, select or create a Google Cloud project.
Roles required to select or create a project
- Select a project: Selecting a project doesn't require a specific IAM role—you can select any project that you've been granted a role on.
-
Create a project: To create a project, you need the Project Creator role
(
roles/resourcemanager.projectCreator), which contains theresourcemanager.projects.createpermission. Learn how to grant roles.
-
Verify that billing is enabled for your Google Cloud project.
Enable the Cloud Build API, if it is not already enabled.
Roles required to enable APIs
To enable APIs, you need the
serviceusage.services.enablepermission. If you created the project, then you likely already have this permission through the Owner role (roles/owner). Otherwise, you can get this permission through the Service Usage Admin role (roles/serviceusage.serviceUsageAdmin). Learn how to grant roles.-
Install the Google Cloud CLI.
-
If you're using an external identity provider (IdP), you must first sign in to the gcloud CLI with your federated identity.
-
To initialize the gcloud CLI, run the following command:
gcloud init
יצירת מאגר פרטי
במסוף Google Cloud , פותחים את הכרטיסייה Cloud Build Worker pool:
לוחצים על
יצירה .בחלונית Create private pool, מזינים את ההגדרות הבאות:
בשדה
Name , מזיניםmy-first-privatepool.בשדה
אזור , בוחרים באפשרותus-central1.בשדה
סוג מכונה , בוחרים באפשרותe2-standard-2.בשדה
גודל הדיסק הזמין , מזינים800.משאירים את השדה
מספר פרויקט ברשת ריק.משאירים את השדה
Network (רשת) ריק.מוודאים שהאפשרות
Assign external IPs (הקצאת כתובות IP חיצוניות) נבחרה.
לוחצים על
צריך להמתין זמן קצר עד ליצירת המאגר הפרטי. אחרי שיוצרים את המאגר הפרטי, הוא מופיע בכרטיסייה מאגר עובדים.

הפעלת build במאגר פרטי
פותחים חלון טרמינל.
יוצרים ספרייה חדשה בשם
quickstart-private-poolועוברים אליה:mkdir quickstart-private-pool cd quickstart-private-poolיוצרים קובץ בשם
cloudbuild.yamlעם התוכן הבא:steps: - name: "bash" script: echo "I am running in a private pool!" options: pool: name: "projects/$PROJECT_ID/locations/us-central1/workerPools/my-first-privatepool"מפעילים את ה-build באמצעות קובץ התצורה של ה-build:
gcloud builds submit
בסיום ה-build יופיע פלט שדומה לזה:
I am running in a private pool!
PUSH
DONE
------------------------------------------------------------------------------------------------------------------------------------     ------------------------------------------------------------------------

ID                                    CREATE_TIME                DURATION  SOURCE                                                                                       IMAGES  STATUS
5df45735-6414-40b7-9e10-e6d2023c8cea  2020-08-31T13:16:18+00:00  10S       gs://private-pool-test_cloudbuild/source/1598879777.206444-    58901ecbd14e431f8cdacc85d5dd0fc3.tgz  -       SUCCESS
הצגת פרטי הגרסה
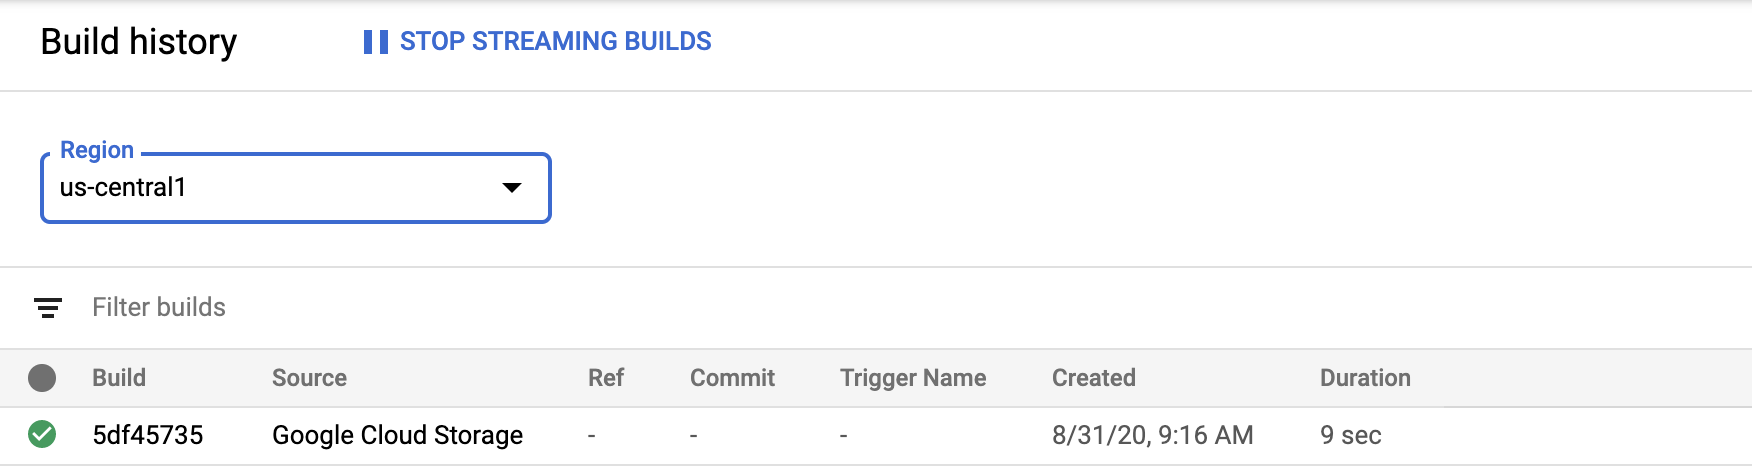
פותחים את הדף Build history במסוף Google Cloud .
בתפריט הנפתח
ה-build שהפעלתם יופיע במאגר הפרטי.אזור , בוחרים באפשרות us-central1.לוחצים על ה-build כדי לראות את פרטי ה-build, כמו סיכום ה-build והפריטים שנוצרו.
הסרת המשאבים
כדי לא לצבור חיובים לחשבון Google Cloud על המשאבים שבהם השתמשתם בדף הזה:
פותחים את הדף Worker pool במסוף Google Cloud :
בשורת המאגר הפרטי, לוחצים על סמל האשפה.
בתיבת החלון הקופץ Delete private pool? (מחיקת מאגר פרטי?), לוחצים על Delete (מחיקה).
המאגר הפרטי שיצרתם במסגרת המדריך למתחילים הזה נמחק עכשיו. יכול להיות שתצטרכו לרענן את המסך כדי למחוק את המאגר הפרטי מהדף Worker pool.