
更新二進位授權政策
本文將更新政策,豁免 Artifact Registry 中的容器映像檔,使其不受二進位授權強制執行機制限制,並將預設規則設為禁止部署所有其他容器。
事前準備
- 登入 Google Cloud 帳戶。如果您是 Google Cloud新手,歡迎 建立帳戶,親自評估產品在實際工作環境中的成效。新客戶還能獲得價值 $300 美元的免費抵免額,可用於執行、測試及部署工作負載。
-
In the Google Cloud console, on the project selector page, select or create a Google Cloud project.
Roles required to select or create a project
- Select a project: Selecting a project doesn't require a specific IAM role—you can select any project that you've been granted a role on.
-
Create a project: To create a project, you need the Project Creator role
(
roles/resourcemanager.projectCreator), which contains theresourcemanager.projects.createpermission. Learn how to grant roles.
-
Verify that billing is enabled for your Google Cloud project.
Enable the Artifact Registry, Binary Authorization APIs.
Roles required to enable APIs
To enable APIs, you need the Service Usage Admin IAM role (
roles/serviceusage.serviceUsageAdmin), which contains theserviceusage.services.enablepermission. Learn how to grant roles.-
安裝 Google Cloud CLI。
-
若您採用的是外部識別資訊提供者 (IdP),請先使用聯合身分登入 gcloud CLI。
-
執行下列指令,初始化 gcloud CLI:
gcloud init -
In the Google Cloud console, on the project selector page, select or create a Google Cloud project.
Roles required to select or create a project
- Select a project: Selecting a project doesn't require a specific IAM role—you can select any project that you've been granted a role on.
-
Create a project: To create a project, you need the Project Creator role
(
roles/resourcemanager.projectCreator), which contains theresourcemanager.projects.createpermission. Learn how to grant roles.
-
Verify that billing is enabled for your Google Cloud project.
Enable the Artifact Registry, Binary Authorization APIs.
Roles required to enable APIs
To enable APIs, you need the Service Usage Admin IAM role (
roles/serviceusage.serviceUsageAdmin), which contains theserviceusage.services.enablepermission. Learn how to grant roles.-
安裝 Google Cloud CLI。
-
若您採用的是外部識別資訊提供者 (IdP),請先使用聯合身分登入 gcloud CLI。
-
執行下列指令,初始化 gcloud CLI:
gcloud init - 如果未使用 Cloud Shell,請安裝
kubectl。
建立啟用二進位授權的叢集
建立啟用二進位授權的 GKE 叢集。這是要執行已部署容器映像檔的叢集。
Google Cloud 控制台
前往Google Cloud 控制台的 GKE「Clusters」(叢集) 頁面。
主控台會顯示 Google Cloud 專案中的 GKE 叢集清單。
點選「建立叢集」。
在「Name」(名稱) 欄位中輸入
test-cluster。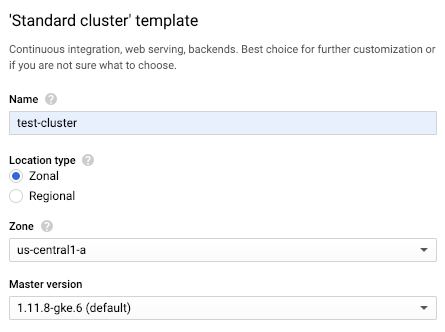
在「位置類型」選項中選取「區域」。
從「可用區」下拉式清單中選取「
us-central1-a」。按一下「安全性」連結,即可顯示「安全性」面板。
在「安全性」面板中,選取「啟用二進位授權」。
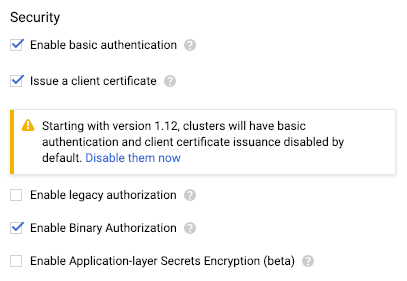
選取「僅強制執行」。
點選「建立」。
gcloud
啟用 --binauthz-evaluation-mode=PROJECT_SINGLETON_POLICY_ENFORCE 旗標並執行 gcloud container clusters create。
gcloud container clusters create \
    --binauthz-evaluation-mode=PROJECT_SINGLETON_POLICY_ENFORCE \
    --zone us-central1-a \
    test-cluster
查看預設政策
根據預設,二進位授權政策會允許部署所有容器映像檔。
Google Cloud 控制台
如要查看預設政策,請按照下列步驟操作:
前往 Google Cloud 控制台的「Binary Authorization」(二進位授權) 頁面。
控制台會顯示政策的詳細資料。
點選「編輯政策」。
在「專案預設規則」中,選取「允許所有圖片」選項。
gcloud
如要查看預設政策,請匯出政策 YAML 檔案,方法如下:
gcloud container binauthz policy export
根據預設,檔案包含下列內容:
globalPolicyEvaluationMode: ENABLE
defaultAdmissionRule:
  evaluationMode: ALWAYS_ALLOW
  enforcementMode: ENFORCED_BLOCK_AND_AUDIT_LOG
name: projects/<var>PROJECT_ID</var>/policy
REST API
如要查看預設政策,請以 JSON 格式擷取政策,方法如下:
curl \
    -H "Authorization: Bearer $(gcloud auth application-default print-access-token)" \
    -H "x-goog-user-project: ${PROJECT_ID}" \
    "https://binaryauthorization.googleapis.com/v1/projects/${PROJECT_ID}/policy"
REST API 會傳回以下內容:
{
  "name": "projects/PROJECT_ID/policy",
  "globalPolicyEvaluationMode": "ENABLE",
  "defaultAdmissionRule": {
    "evaluationMode": "ALWAYS_ALLOW",
    "enforcementMode": "ENFORCED_BLOCK_AND_AUDIT_LOG"
  }
}
只允許豁免圖片
本節說明如何修改政策,豁免映像檔並禁止部署所有其他映像檔。
Google Cloud 控制台
如要修改政策,請按照下列步驟操作:
返回 Google Cloud 控制台的「Binary Authorization」(二進位授權) 頁面。
點選「編輯政策」。
選取「禁止顯示所有圖片」。
在「Images exempt from deployment rules」(不受部署規則限制的映像檔) 下方,展開「Image paths」(映像檔路徑)。
按一下「新增圖片路徑」。
Artifact Registry
在「New image path」(新映像檔路徑) 中,貼上 Artifact Registry 存放區的下列路徑:
us-docker.pkg.dev/google-samples/containers/gke/hello-app:1.0按一下「完成」即可儲存圖片路徑。
點選 [儲存政策]。
gcloud
如要修改政策,允許使用 Artifact Registry 中的範例映像檔,請按照下列步驟操作:
匯出政策 YAML 檔案:
gcloud container binauthz policy export > /tmp/policy.yaml
在文字編輯器中,將
evaluationMode從ALWAYS_ALLOW變更為ALWAYS_DENY,並將豁免圖片新增至admissionWhitelistPatterns。如要從 Artifact Registry 排除下列範例圖片,請按照下列方式修改政策 YAML 檔案:
admissionWhitelistPatterns:
- namePattern: us-docker.pkg.dev/google-samples/containers/gke/hello-app:1.0
globalPolicyEvaluationMode: ENABLE
defaultAdmissionRule:
  evaluationMode: ALWAYS_DENY
  enforcementMode: ENFORCED_BLOCK_AND_AUDIT_LOG
name: projects/<var>PROJECT_ID</var>/policy
將政策 YAML 檔案匯回二進位授權:
gcloud container binauthz policy import /tmp/policy.yaml
REST API
如要修改政策,請按照下列步驟操作:
以 JSON 格式建立含有更新政策的文字檔:
cat > /tmp/policy.json << EOM
{
  "name": "projects/${PROJECT_ID}/policy",
  "admissionWhitelistPatterns": [
    {
      "namePattern": "us-docker.pkg.dev/google-samples/containers/gke/hello-app:1.0"
    }
  ],
  "globalPolicyEvaluationMode": "ENABLE",
  "defaultAdmissionRule": {
    "evaluationMode": "ALWAYS_DENY",
    "enforcementMode": "ENFORCED_BLOCK_AND_AUDIT_LOG"
  }
}
EOM
將更新後的政策傳送至 REST API:
curl -X PUT \
    -H "Content-Type: application/json" \
    -H "Authorization: Bearer $(gcloud auth application-default print-access-token)" \
    -H "x-goog-user-project: ${PROJECT_ID}" \
    --data-binary @/tmp/policy.json  \
    "https://binaryauthorization.googleapis.com/v1/projects/${PROJECT_ID}/policy"
測試政策
如要測試政策,請部署您新增至Exempt image允許清單的映像檔,然後按照下列步驟操作:
將豁免映像檔部署至叢集。
Google Cloud 控制台
部署豁免映像檔:
前往Google Cloud 控制台的 GKE「Clusters」(叢集) 頁面。
點選「Deploy」(部署)。
控制台會提示您輸入部署作業的詳細資料。
選取「現有容器映像檔」。
輸入容器映像檔路徑。
Artifact Registry
如要從 Artifact Registry 部署映像檔,請輸入下列內容:
us-docker.pkg.dev/google-samples/containers/gke/hello-app:1.0按一下「繼續」。
在「Application Name」(應用程式名稱) 欄位中輸入
hello-server。點選「Deploy」(部署)。
kubectl
Artifact Registry
從 Artifact Registry 部署映像檔:
kubectl run hello-server --image us-docker.pkg.dev/google-samples/containers/gke/hello-app:1.0 --port 8080
確認系統允許部署映像檔:
Google Cloud 控制台
如要確認映像檔是否已部署,請執行下列操作:
- 前往 GKE 頁面。
- 前往「Workloads」(工作負載) 頁面。
hello-server工作負載會顯示綠色圖示,表示正在執行。kubectl
如要確認映像檔是否允許部署,請輸入下列指令:
kubectl get pods
您會看到映像檔正在執行。
刪除 pod。
Google Cloud 控制台
在 GKE「Workloads」(工作負載) 頁面中:
選取「hello-server」工作負載。
點選「刪除」。
系統提示刪除資源時,按一下「刪除」。
kubectl
kubectl delete pod hello-server
清除所用資源
為了避免系統向您的 Google Cloud 帳戶收取本頁面所用資源的費用,請按照下列步驟操作。
刪除您在 GKE 中建立的叢集:
控制台
如要刪除叢集,請按照下列步驟操作:
前往Google Cloud 控制台的 GKE「Clusters」(叢集) 頁面。
選取
test-cluster叢集,然後按一下「刪除」。
gcloud
如要刪除叢集,請輸入下列指令:
gcloud container clusters delete \
    --zone=us-central1-a \
    test-cluster
後續步驟
- 如要進一步瞭解如何排除圖片,包括使用萬用字元排除多張圖片,請參閱「排除圖片」。
- 如需端對端教學課程,瞭解如何設定及強制執行需要認證的政策,請參閱下列內容:
- 參閱DevOps相關資源,並探索 DevOps Research and Assessment (DORA) 研究計畫。