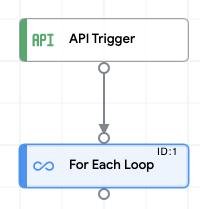
הפעלת שילוב משנה כדי לשלוח אימייל

באמצעות המשימה For Each Loop (לכל לולאה), מפעילים שילוב משני שמקבל קלט מהשילוב הראשי כדי לשלוח התראות באימייל.

דוגמת קוד: שילוב משני

{
  "triggerConfigs": [{
    "label": "API Trigger",
    "startTasks": [{
      "taskId": "1"
    }],
    "properties": {
      "Trigger name": "SubIntegrationSendEmailDemo_API_1"
    },
    "triggerType": "API",
    "triggerNumber": "1",
    "triggerId": "api_trigger/SubIntegrationSendEmailDemo_API_1"
  }],
  "taskConfigs": [{
    "task": "EmailTask",
    "taskId": "1",
    "parameters": {
      "Cc": {
        "key": "Cc",
        "value": {
          "stringArray": {
          }
        }
      },
      "TextBody": {
        "key": "TextBody",
        "value": {
          "stringValue": "$EmailContent$"
        }
      },
      "Bcc": {
        "key": "Bcc",
        "value": {
          "stringArray": {
          }
        }
      },
      "AttachmentPath": {
        "key": "AttachmentPath",
        "value": {
          "stringArray": {
          }
        }
      },
      "To": {
        "key": "To",
        "value": {
          "stringArray": {
            "stringValues": ["$Recipients$"]
          }
        }
      },
      "BodyFormat": {
        "key": "BodyFormat",
        "value": {
          "stringValue": "text"
        }
      },
      "EmailConfigInput": {
        "key": "EmailConfigInput",
        "value": {
          "jsonValue": "{\n  \"@type\": \"type.googleapis.com/enterprise.crm.eventbus.proto.EmailConfig\"\n}"
        }
      },
      "Subject": {
        "key": "Subject",
        "value": {
          "stringValue": "$Email_Subject$"
        }
      }
    },
    "taskExecutionStrategy": "WHEN_ALL_SUCCEED",
    "displayName": "Send Email"
  }],
  "integrationParameters": [{
    "key": "EmailContent",
    "dataType": "STRING_VALUE",
    "defaultValue": {
      "stringValue": ""
    },
    "displayName": "EmailContent",
    "inputOutputType": "IN"
  }, {
    "key": "Recipients",
    "dataType": "STRING_VALUE",
    "defaultValue": {
      "stringValue": ""
    },
    "displayName": "Recipients",
    "inputOutputType": "IN"
  }, {
    "key": "Email_Subject",
    "dataType": "STRING_VALUE",
    "defaultValue": {
      "stringValue": ""
    },
    "displayName": "Email_Subject",
    "inputOutputType": "IN"
  }]
}

דוגמת קוד: שילוב ראשי

{
  "triggerConfigs": [{
    "label": "API Trigger",
    "startTasks": [{
      "taskId": "1"
    }],
    "properties": {
      "Trigger name": "ForEachLoopDemo_API_1"
    },
    "triggerType": "API",
    "triggerNumber": "1",
    "triggerId": "api_trigger/ForEachLoopDemo_API_1"
  }],
  "taskConfigs": [{
    "task": "SubWorkflowForEachLoopV2Task",
    "taskId": "1",
    "parameters": {
      "iterationElementMapping": {
        "key": "iterationElementMapping",
        "value": {
          "stringValue": "EmailContent"
        }
      },
      "aggregatorParameterMapping": {
        "key": "aggregatorParameterMapping"
      },
      "triggerId": {
        "key": "triggerId",
        "value": {
          "stringValue": "api_trigger/SubIntegrationSendEmailDemo_API_1"
        }
      },
      "loopMetadata": {
        "key": "loopMetadata",
        "value": {
          "stringArray": {
            "stringValues": ["$`Task_1_loopMetadata`$"]
          }
        }
      },
      "disableEucPropagation": {
        "key": "disableEucPropagation",
        "value": {
          "booleanValue": false
        }
      },
      "listToIterate": {
        "key": "listToIterate",
        "value": {
          "stringValue": "$ListOfEmailContent$"
        }
      },
      "workflowName": {
        "key": "workflowName",
        "value": {
          "stringValue": "SubIntegrationSendEmailDemo"
        }
      },
      "requestParameterMapping": {
        "key": "requestParameterMapping",
        "value": {
          "jsonValue": "{\n  \"@type\": \"type.googleapis.com/enterprise.crm.eventbus.proto.ParameterMap\",\n  \"entries\": [{\n    \"key\": {\n      \"literalValue\": {\n        \"stringValue\": \"Recipients\"\n      }\n    },\n    \"value\": {\n      \"literalValue\": {\n        \"stringValue\": \"Recipients\"\n      }\n    }\n  }, {\n    \"key\": {\n      \"literalValue\": {\n        \"stringValue\": \"Email_Subject\"\n      }\n    },\n    \"value\": {\n      \"literalValue\": {\n        \"stringValue\": \"Email_Subject\"\n      }\n    }\n  }]\n}"
        }
      },
      "overrideParameterMapping": {
        "key": "overrideParameterMapping"
      }
    },
    "taskExecutionStrategy": "WHEN_ALL_SUCCEED",
    "displayName": "For Each Loop"
  }],
  "integrationParameters": [{
    "key": "`Task_1_loopMetadata`",
    "dataType": "JSON_VALUE",
    "displayName": "`Task_1_loopMetadata`",
    "isTransient": true,
    "producer": "1_1"
  }, {
    "key": "Recipients",
    "dataType": "STRING_VALUE",
    "defaultValue": {
      "stringValue": ""
    },
    "displayName": "Recipients",
    "inputOutputType": "IN"
  }, {
    "key": "Email_Subject",
    "dataType": "STRING_VALUE",
    "defaultValue": {
      "stringValue": ""
    },
    "displayName": "Email_Subject",
    "inputOutputType": "IN"
  }, {
    "key": "ListOfEmailContent",
    "dataType": "STRING_ARRAY",
    "defaultValue": {
      "stringArray": {
        "stringValues": ["\"Content 1\"", "\"Content 2\"", "\"Content 3\"", "\"Content 4\""]
      }
    },
    "displayName": "ListOfEmailContent",
    "inputOutputType": "IN"
  }]
}

זרימת שילוב לדוגמה

בתמונות הבאות מוצגת דוגמה לפריסה של כלי העריכה של השילוב עבור דוגמת קוד השילוב הזו.

שילוב משני
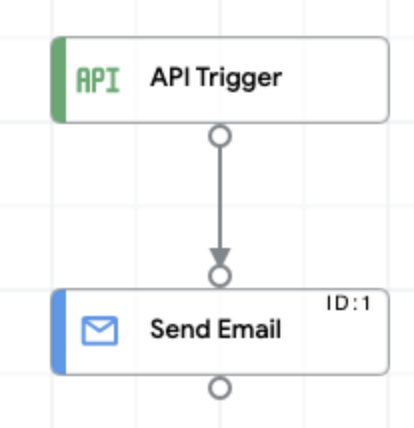
תמונה שבה מוצגת זרימת משנה לדוגמה של שילוב תמונה שבה מוצגת זרימת משנה לדוגמה של שילוב

שילוב ראשי

תמונה שמציגה את זרימת השילוב הראשית לדוגמה תמונה שמציגה את זרימת השילוב הראשית לדוגמה

העלאה והרצה של השילוב לדוגמה

כדי להעלות ולהריץ את השילוב לדוגמה:

  1. שומרים את הדוגמה לשילוב כקובץ ‎ .json במערכת.
  2. במסוף Google Cloud, עוברים לדף Application Integration.

    מעבר אל Application Integration

  3. בתפריט הניווט שמימין, לוחצים על שילובים כדי לפתוח את הדף שילובים.
  4. בוחרים שילוב קיים או יוצרים שילוב חדש באמצעות לחיצה על יצירת שילוב.

    אם יוצרים שילוב חדש:

    1. מזינים שם ותיאור בתיבת הדו-שיח יצירת שילוב.
    2. בוחרים אזור לשילוב.
    3. בוחרים חשבון שירות לאינטגרציה. אפשר לשנות או לעדכן את פרטי חשבון השירות של שילוב בכל שלב מחלונית סיכום השילוב בסרגל הכלים של השילוב.
    4. לוחצים על יצירה.

    השילוב ייפתח בכלי לעריכת שילובים.

  5. בכלי לעריכת שילובים, לוחצים על תפריט העלאה/הורדה ואז בוחרים באפשרות העלאת שילוב.
  6. בתיבת הדו-שיח של סייר הקבצים, בוחרים את הקובץ ששמרתם בשלב 1 ולוחצים על פתיחה.

    נוצרת גרסה חדשה של השילוב באמצעות הקובץ שהועלה.

  7. בעורך השילובים, לוחצים על בדיקה.
  8. לוחצים על Test integration (בדיקת השילוב). הפעולה הזו מריצה את השילוב ומציגה את תוצאת ההרצה בחלונית Test Integration.