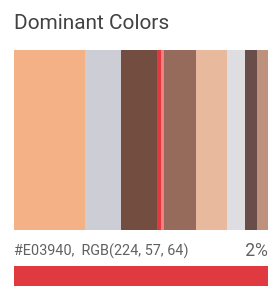
Fitur Properti Gambar mendeteksi atribut umum gambar, seperti warna dominan.
Warna dominan yang terdeteksi:
Permintaan deteksi properti gambar
Menyiapkan project dan autentikasi Google Cloud
Jika Anda belum membuat Google Cloud project, lakukan sekarang. Luaskan bagian ini untuk menampilkan petunjuk.
- Sign in to your Google Cloud account. If you're new to Google Cloud, create an account to evaluate how our products perform in real-world scenarios. New customers also get $300 in free credits to run, test, and deploy workloads.
-
In the Google Cloud console, on the project selector page, select or create a Google Cloud project.
Roles required to select or create a project
- Select a project: Selecting a project doesn't require a specific IAM role—you can select any project that you've been granted a role on.
-
Create a project: To create a project, you need the Project Creator role
(
roles/resourcemanager.projectCreator), which contains theresourcemanager.projects.createpermission. Learn how to grant roles.
-
Verify that billing is enabled for your Google Cloud project.
-
Enable the Vision API.
Roles required to enable APIs
To enable APIs, you need the Service Usage Admin IAM role (
roles/serviceusage.serviceUsageAdmin), which contains theserviceusage.services.enablepermission. Learn how to grant roles. -
Install the Google Cloud CLI.
-
Jika Anda menggunakan penyedia identitas (IdP) eksternal, Anda harus login ke gcloud CLI dengan identitas gabungan Anda terlebih dahulu.
-
Untuk melakukan inisialisasi gcloud CLI, jalankan perintah berikut:
gcloud init -
In the Google Cloud console, on the project selector page, select or create a Google Cloud project.
Roles required to select or create a project
- Select a project: Selecting a project doesn't require a specific IAM role—you can select any project that you've been granted a role on.
-
Create a project: To create a project, you need the Project Creator role
(
roles/resourcemanager.projectCreator), which contains theresourcemanager.projects.createpermission. Learn how to grant roles.
-
Verify that billing is enabled for your Google Cloud project.
-
Enable the Vision API.
Roles required to enable APIs
To enable APIs, you need the Service Usage Admin IAM role (
roles/serviceusage.serviceUsageAdmin), which contains theserviceusage.services.enablepermission. Learn how to grant roles. -
Install the Google Cloud CLI.
-
Jika Anda menggunakan penyedia identitas (IdP) eksternal, Anda harus login ke gcloud CLI dengan identitas gabungan Anda terlebih dahulu.
-
Untuk melakukan inisialisasi gcloud CLI, jalankan perintah berikut:
gcloud init - BASE64_ENCODED_IMAGE: Representasi
base64 (string ASCII) dari data gambar biner Anda. String ini akan terlihat seperti
string berikut:
/9j/4QAYRXhpZgAA...9tAVx/zDQDlGxn//2Q==
- RESULTS_INT: (Opsional) Nilai bilangan bulat dari hasil yang akan
ditampilkan. Jika Anda menghilangkan kolom
"maxResults"dan nilainya, API akan menampilkan nilai default 10 hasil. Kolom ini tidak berlaku untuk jenis fitur berikut:TEXT_DETECTION,DOCUMENT_TEXT_DETECTION, atauCROP_HINTS. - PROJECT_ID: Project ID Google Cloud Anda.
- CLOUD_STORAGE_IMAGE_URI: jalur ke file gambar
yang valid di bucket Cloud Storage. Anda setidaknya harus memiliki hak istimewa baca ke file tersebut.
Contoh:
gs://cloud-samples-data/vision/image_properties/bali.jpeg
- RESULTS_INT: (Opsional) Nilai bilangan bulat dari hasil yang akan
ditampilkan. Jika Anda menghilangkan kolom
"maxResults"dan nilainya, API akan menampilkan nilai default 10 hasil. Kolom ini tidak berlaku untuk jenis fitur berikut:TEXT_DETECTION,DOCUMENT_TEXT_DETECTION, atauCROP_HINTS. - PROJECT_ID: Project ID Google Cloud Anda.
Mendeteksi Properti Gambar pada gambar lokal
Anda dapat menggunakan Vision API untuk melakukan deteksi fitur pada file gambar lokal.
Untuk permintaan REST, kirim konten file gambar sebagai string yang berenkode base64 dalam isi permintaan Anda.
Untuk permintaan gcloud library klien, tentukan jalur ke gambar lokal dalam permintaan
Anda.
Kolom
ColorInfo
tidak berisi informasi tentang
ruang warna absolut yang harus
digunakan untuk menafsirkan nilai RGB (misalnya sRGB,
Adobe RGB, DCI-P3, BT.2020, dll.). Secara default, aplikasi harus mengasumsikan
ruang warna sRGB.
REST
Sebelum menggunakan salah satu data permintaan, buat penggantian berikut:
Metode HTTP dan URL:
POST https://vision.googleapis.com/v1/images:annotate
Meminta isi JSON:
{
"requests": [
{
"image": {
"content": "BASE64_ENCODED_IMAGE"
},
"features": [
{
"maxResults": RESULTS_INT,
"type": "IMAGE_PROPERTIES"
},
]
}
]
}
Untuk mengirim permintaan Anda, pilih salah satu opsi berikut:
curl
Simpan isi permintaan dalam file bernama request.json,
dan jalankan perintah berikut:
curl -X POST \
-H "Authorization: Bearer $(gcloud auth print-access-token)" \
-H "x-goog-user-project: PROJECT_ID" \
-H "Content-Type: application/json; charset=utf-8" \
-d @request.json \
"https://vision.googleapis.com/v1/images:annotate"
PowerShell
Simpan isi permintaan dalam file bernama request.json,
dan jalankan perintah berikut:
$cred = gcloud auth print-access-token
$headers = @{ "Authorization" = "Bearer $cred"; "x-goog-user-project" = "PROJECT_ID" }
Invoke-WebRequest `
-Method POST `
-Headers $headers `
-ContentType: "application/json; charset=utf-8" `
-InFile request.json `
-Uri "https://vision.googleapis.com/v1/images:annotate" | Select-Object -Expand Content
Jika permintaan berhasil, server akan menampilkan kode status HTTP 200 OK dan
respons dalam format JSON.
Respons:
Respons
{
"responses": [
{
"imagePropertiesAnnotation": {
"dominantColors": {
"colors": [
{
"color": {
"red": 243,
"green": 177,
"blue": 133
},
"score": 0.18074834,
"pixelFraction": 0.013533333
},
{
"color": {
"red": 204,
"green": 205,
"blue": 213
},
"score": 0.092455424,
"pixelFraction": 0.19266666
},
{
"color": {
"red": 114,
"green": 77,
"blue": 64
},
"score": 0.090447456,
"pixelFraction": 0.034133334
},
{
"color": {
"red": 224,
"green": 57,
"blue": 64
},
"score": 0.010952942,
"pixelFraction": 0.014266667
},
{
"color": {
"red": 248,
"green": 125,
"blue": 130
},
"score": 0.006984347,
"pixelFraction": 0.0057333335
},
{
"color": {
"red": 150,
"green": 107,
"blue": 92
},
"score": 0.081589326,
"pixelFraction": 0.019666666
},
{
"color": {
"red": 233,
"green": 185,
"blue": 158
},
"score": 0.08035342,
"pixelFraction": 0.0122
},
{
"color": {
"red": 221,
"green": 221,
"blue": 226
},
"score": 0.045200635,
"pixelFraction": 0.202
},
{
"color": {
"red": 105,
"green": 77,
"blue": 75
},
"score": 0.030223774,
"pixelFraction": 0.013866667
},
{
"color": {
"red": 189,
"green": 145,
"blue": 123
},
"score": 0.028689377,
"pixelFraction": 0.0069333334
}
]
}
},
"cropHintsAnnotation": {
"cropHints": [
{
"boundingPoly": {
"vertices": [
{},
{
"x": 2549
},
{
"x": 2549,
"y": 1699
},
{
"y": 1699
}
]
},
"confidence": 0.79999995,
"importanceFraction": 1
}
]
}
}
]
}
Go
Sebelum mencoba contoh ini, ikuti petunjuk penyiapan Go di Panduan memulai Vision menggunakan library klien. Untuk mengetahui informasi selengkapnya, lihat dokumentasi referensi Vision Go API.
Untuk melakukan autentikasi ke Vision, siapkan Kredensial Default Aplikasi. Untuk mengetahui informasi selengkapnya, lihat Menyiapkan autentikasi untuk lingkungan pengembangan lokal.
// detectProperties gets image properties from the Vision API for an image at the given file path.
func detectProperties(w io.Writer, file string) error {
ctx := context.Background()
client, err := vision.NewImageAnnotatorClient(ctx)
if err != nil {
return err
}
f, err := os.Open(file)
if err != nil {
return err
}
defer f.Close()
image, err := vision.NewImageFromReader(f)
if err != nil {
return err
}
props, err := client.DetectImageProperties(ctx, image, nil)
if err != nil {
return err
}
fmt.Fprintln(w, "Dominant colors:")
for _, quantized := range props.DominantColors.Colors {
color := quantized.Color
r := int(color.Red) & 0xff
g := int(color.Green) & 0xff
b := int(color.Blue) & 0xff
fmt.Fprintf(w, "%2.1f%% - #%02x%02x%02x\n", quantized.PixelFraction*100, r, g, b)
}
return nil
}
Java
Sebelum mencoba contoh ini, ikuti petunjuk penyiapan Java di Panduan Memulai Vision API Menggunakan Library Klien. Untuk mengetahui informasi selengkapnya, lihat dokumentasi referensi Java Vision API.
import com.google.cloud.vision.v1.AnnotateImageRequest;
import com.google.cloud.vision.v1.AnnotateImageResponse;
import com.google.cloud.vision.v1.BatchAnnotateImagesResponse;
import com.google.cloud.vision.v1.ColorInfo;
import com.google.cloud.vision.v1.DominantColorsAnnotation;
import com.google.cloud.vision.v1.Feature;
import com.google.cloud.vision.v1.Image;
import com.google.cloud.vision.v1.ImageAnnotatorClient;
import com.google.protobuf.ByteString;
import java.io.FileInputStream;
import java.io.IOException;
import java.util.ArrayList;
import java.util.List;
public class DetectProperties {
public static void detectProperties() throws IOException {
// TODO(developer): Replace these variables before running the sample.
String filePath = "path/to/your/image/file.jpg";
detectProperties(filePath);
}
// Detects image properties such as color frequency from the specified local image.
public static void detectProperties(String filePath) throws IOException {
List<AnnotateImageRequest> requests = new ArrayList<>();
ByteString imgBytes = ByteString.readFrom(new FileInputStream(filePath));
Image img = Image.newBuilder().setContent(imgBytes).build();
Feature feat = Feature.newBuilder().setType(Feature.Type.IMAGE_PROPERTIES).build();
AnnotateImageRequest request =
AnnotateImageRequest.newBuilder().addFeatures(feat).setImage(img).build();
requests.add(request);
// Initialize client that will be used to send requests. This client only needs to be created
// once, and can be reused for multiple requests. After completing all of your requests, call
// the "close" method on the client to safely clean up any remaining background resources.
try (ImageAnnotatorClient client = ImageAnnotatorClient.create()) {
BatchAnnotateImagesResponse response = client.batchAnnotateImages(requests);
List<AnnotateImageResponse> responses = response.getResponsesList();
for (AnnotateImageResponse res : responses) {
if (res.hasError()) {
System.out.format("Error: %s%n", res.getError().getMessage());
return;
}
// For full list of available annotations, see http://g.co/cloud/vision/docs
DominantColorsAnnotation colors = res.getImagePropertiesAnnotation().getDominantColors();
for (ColorInfo color : colors.getColorsList()) {
System.out.format(
"fraction: %f%nr: %f, g: %f, b: %f%n",
color.getPixelFraction(),
color.getColor().getRed(),
color.getColor().getGreen(),
color.getColor().getBlue());
}
}
}
}
}Node.js
Sebelum mencoba contoh ini, ikuti petunjuk penyiapan Node.js di Panduan memulai Vision menggunakan library klien. Untuk mengetahui informasi selengkapnya, lihat dokumentasi referensi Vision Node.js API.
Untuk melakukan autentikasi ke Vision, siapkan Kredensial Default Aplikasi. Untuk mengetahui informasi selengkapnya, lihat Menyiapkan autentikasi untuk lingkungan pengembangan lokal.
const vision = require('@google-cloud/vision');
// Creates a client
const client = new vision.ImageAnnotatorClient();
/**
* TODO(developer): Uncomment the following line before running the sample.
*/
// const fileName = 'Local image file, e.g. /path/to/image.png';
// Performs property detection on the local file
const [result] = await client.imageProperties(fileName);
const colors = result.imagePropertiesAnnotation.dominantColors.colors;
colors.forEach(color => console.log(color));Python
Sebelum mencoba contoh ini, ikuti petunjuk penyiapan Python di Panduan memulai Vision menggunakan library klien. Untuk mengetahui informasi selengkapnya, lihat dokumentasi referensi Vision Python API.
Untuk melakukan autentikasi ke Vision, siapkan Kredensial Default Aplikasi. Untuk mengetahui informasi selengkapnya, lihat Menyiapkan autentikasi untuk lingkungan pengembangan lokal.
def detect_properties(path):
"""Detects image properties in the file."""
from google.cloud import vision
client = vision.ImageAnnotatorClient()
with open(path, "rb") as image_file:
content = image_file.read()
image = vision.Image(content=content)
response = client.image_properties(image=image)
props = response.image_properties_annotation
print("Properties:")
for color in props.dominant_colors.colors:
print(f"fraction: {color.pixel_fraction}")
print(f"\tr: {color.color.red}")
print(f"\tg: {color.color.green}")
print(f"\tb: {color.color.blue}")
print(f"\ta: {color.color.alpha}")
if response.error.message:
raise Exception(
"{}\nFor more info on error messages, check: "
"https://cloud.google.com/apis/design/errors".format(response.error.message)
)
Bahasa tambahan
C#: Ikuti petunjuk penyiapan C# di halaman library klien, lalu buka dokumentasi referensi Vision untuk .NET.
PHP: Ikuti Petunjuk penyiapan PHP di halaman library klien, lalu buka Dokumentasi referensi Vision untuk PHP.
Ruby: Ikuti Petunjuk penyiapan Ruby di halaman library klien, lalu buka Dokumentasi referensi Vision untuk Ruby.
Mendeteksi Properti Gambar pada gambar jarak jauh
Anda dapat menggunakan Vision API untuk melakukan deteksi fitur pada file gambar jarak jauh yang terletak di Cloud Storage atau di Web. Untuk mengirim permintaan file jarak jauh, tentukan URL Web atau Cloud Storage URI file dalam isi permintaan.
Kolom
ColorInfo
tidak berisi informasi tentang
ruang warna absolut yang harus
digunakan untuk menafsirkan nilai RGB (misalnya sRGB,
Adobe RGB, DCI-P3, BT.2020, dll.). Secara default, aplikasi harus mengasumsikan
ruang warna sRGB.
REST
Sebelum menggunakan salah satu data permintaan, buat penggantian berikut:
Metode HTTP dan URL:
POST https://vision.googleapis.com/v1/images:annotate
Meminta isi JSON:
{
"requests": [
{
"image": {
"source": {
"gcsImageUri": "CLOUD_STORAGE_IMAGE_URI"
}
},
"features": [
{
"maxResults": RESULTS_INT,
"type": "IMAGE_PROPERTIES"
},
]
}
]
}
Untuk mengirim permintaan Anda, pilih salah satu opsi berikut:
curl
Simpan isi permintaan dalam file bernama request.json,
dan jalankan perintah berikut:
curl -X POST \
-H "Authorization: Bearer $(gcloud auth print-access-token)" \
-H "x-goog-user-project: PROJECT_ID" \
-H "Content-Type: application/json; charset=utf-8" \
-d @request.json \
"https://vision.googleapis.com/v1/images:annotate"
PowerShell
Simpan isi permintaan dalam file bernama request.json,
dan jalankan perintah berikut:
$cred = gcloud auth print-access-token
$headers = @{ "Authorization" = "Bearer $cred"; "x-goog-user-project" = "PROJECT_ID" }
Invoke-WebRequest `
-Method POST `
-Headers $headers `
-ContentType: "application/json; charset=utf-8" `
-InFile request.json `
-Uri "https://vision.googleapis.com/v1/images:annotate" | Select-Object -Expand Content
Jika permintaan berhasil, server akan menampilkan kode status HTTP 200 OK dan
respons dalam format JSON.
Respons:
Respons
{
"responses": [
{
"imagePropertiesAnnotation": {
"dominantColors": {
"colors": [
{
"color": {
"red": 243,
"green": 177,
"blue": 133
},
"score": 0.18074834,
"pixelFraction": 0.013533333
},
{
"color": {
"red": 204,
"green": 205,
"blue": 213
},
"score": 0.092455424,
"pixelFraction": 0.19266666
},
{
"color": {
"red": 114,
"green": 77,
"blue": 64
},
"score": 0.090447456,
"pixelFraction": 0.034133334
},
{
"color": {
"red": 224,
"green": 57,
"blue": 64
},
"score": 0.010952942,
"pixelFraction": 0.014266667
},
{
"color": {
"red": 248,
"green": 125,
"blue": 130
},
"score": 0.006984347,
"pixelFraction": 0.0057333335
},
{
"color": {
"red": 150,
"green": 107,
"blue": 92
},
"score": 0.081589326,
"pixelFraction": 0.019666666
},
{
"color": {
"red": 233,
"green": 185,
"blue": 158
},
"score": 0.08035342,
"pixelFraction": 0.0122
},
{
"color": {
"red": 221,
"green": 221,
"blue": 226
},
"score": 0.045200635,
"pixelFraction": 0.202
},
{
"color": {
"red": 105,
"green": 77,
"blue": 75
},
"score": 0.030223774,
"pixelFraction": 0.013866667
},
{
"color": {
"red": 189,
"green": 145,
"blue": 123
},
"score": 0.028689377,
"pixelFraction": 0.0069333334
}
]
}
},
"cropHintsAnnotation": {
"cropHints": [
{
"boundingPoly": {
"vertices": [
{},
{
"x": 2549
},
{
"x": 2549,
"y": 1699
},
{
"y": 1699
}
]
},
"confidence": 0.79999995,
"importanceFraction": 1
}
]
}
}
]
}
Go
Sebelum mencoba contoh ini, ikuti petunjuk penyiapan Go di Panduan memulai Vision menggunakan library klien. Untuk mengetahui informasi selengkapnya, lihat dokumentasi referensi Vision Go API.
Untuk melakukan autentikasi ke Vision, siapkan Kredensial Default Aplikasi. Untuk mengetahui informasi selengkapnya, lihat Menyiapkan autentikasi untuk lingkungan pengembangan lokal.
// detectProperties gets image properties from the Vision API for an image at the given file path.
func detectPropertiesURI(w io.Writer, file string) error {
ctx := context.Background()
client, err := vision.NewImageAnnotatorClient(ctx)
if err != nil {
return err
}
image := vision.NewImageFromURI(file)
props, err := client.DetectImageProperties(ctx, image, nil)
if err != nil {
return err
}
fmt.Fprintln(w, "Dominant colors:")
for _, quantized := range props.DominantColors.Colors {
color := quantized.Color
r := int(color.Red) & 0xff
g := int(color.Green) & 0xff
b := int(color.Blue) & 0xff
fmt.Fprintf(w, "%2.1f%% - #%02x%02x%02x\n", quantized.PixelFraction*100, r, g, b)
}
return nil
}
Java
Sebelum mencoba contoh ini, ikuti petunjuk penyiapan Java di Panduan memulai Vision menggunakan library klien. Untuk mengetahui informasi selengkapnya, lihat dokumentasi referensi Vision Java API.
Untuk melakukan autentikasi ke Vision, siapkan Kredensial Default Aplikasi. Untuk mengetahui informasi selengkapnya, lihat Menyiapkan autentikasi untuk lingkungan pengembangan lokal.
import com.google.cloud.vision.v1.AnnotateImageRequest;
import com.google.cloud.vision.v1.AnnotateImageResponse;
import com.google.cloud.vision.v1.BatchAnnotateImagesResponse;
import com.google.cloud.vision.v1.ColorInfo;
import com.google.cloud.vision.v1.DominantColorsAnnotation;
import com.google.cloud.vision.v1.Feature;
import com.google.cloud.vision.v1.Image;
import com.google.cloud.vision.v1.ImageAnnotatorClient;
import com.google.cloud.vision.v1.ImageSource;
import java.io.IOException;
import java.util.ArrayList;
import java.util.List;
public class DetectPropertiesGcs {
public static void detectPropertiesGcs() throws IOException {
// TODO(developer): Replace these variables before running the sample.
String filePath = "gs://your-gcs-bucket/path/to/image/file.jpg";
detectPropertiesGcs(filePath);
}
// Detects image properties such as color frequency from the specified remote image on Google
// Cloud Storage.
public static void detectPropertiesGcs(String gcsPath) throws IOException {
List<AnnotateImageRequest> requests = new ArrayList<>();
ImageSource imgSource = ImageSource.newBuilder().setGcsImageUri(gcsPath).build();
Image img = Image.newBuilder().setSource(imgSource).build();
Feature feat = Feature.newBuilder().setType(Feature.Type.IMAGE_PROPERTIES).build();
AnnotateImageRequest request =
AnnotateImageRequest.newBuilder().addFeatures(feat).setImage(img).build();
requests.add(request);
// Initialize client that will be used to send requests. This client only needs to be created
// once, and can be reused for multiple requests. After completing all of your requests, call
// the "close" method on the client to safely clean up any remaining background resources.
try (ImageAnnotatorClient client = ImageAnnotatorClient.create()) {
BatchAnnotateImagesResponse response = client.batchAnnotateImages(requests);
List<AnnotateImageResponse> responses = response.getResponsesList();
for (AnnotateImageResponse res : responses) {
if (res.hasError()) {
System.out.format("Error: %s%n", res.getError().getMessage());
return;
}
// For full list of available annotations, see http://g.co/cloud/vision/docs
DominantColorsAnnotation colors = res.getImagePropertiesAnnotation().getDominantColors();
for (ColorInfo color : colors.getColorsList()) {
System.out.format(
"fraction: %f%nr: %f, g: %f, b: %f%n",
color.getPixelFraction(),
color.getColor().getRed(),
color.getColor().getGreen(),
color.getColor().getBlue());
}
}
}
}
}Node.js
Sebelum mencoba contoh ini, ikuti petunjuk penyiapan Node.js di Panduan memulai Vision menggunakan library klien. Untuk mengetahui informasi selengkapnya, lihat dokumentasi referensi Vision Node.js API.
Untuk melakukan autentikasi ke Vision, siapkan Kredensial Default Aplikasi. Untuk mengetahui informasi selengkapnya, lihat Menyiapkan autentikasi untuk lingkungan pengembangan lokal.
// Imports the Google Cloud client libraries
const vision = require('@google-cloud/vision');
// Creates a client
const client = new vision.ImageAnnotatorClient();
/**
* TODO(developer): Uncomment the following lines before running the sample.
*/
// const bucketName = 'Bucket where the file resides, e.g. my-bucket';
// const fileName = 'Path to file within bucket, e.g. path/to/image.png';
// Performs property detection on the gcs file
const [result] = await client.imageProperties(
`gs://${bucketName}/${fileName}`
);
const colors = result.imagePropertiesAnnotation.dominantColors.colors;
colors.forEach(color => console.log(color));Python
Sebelum mencoba contoh ini, ikuti petunjuk penyiapan Python di Panduan memulai Vision menggunakan library klien. Untuk mengetahui informasi selengkapnya, lihat dokumentasi referensi Vision Python API.
Untuk melakukan autentikasi ke Vision, siapkan Kredensial Default Aplikasi. Untuk mengetahui informasi selengkapnya, lihat Menyiapkan autentikasi untuk lingkungan pengembangan lokal.
def detect_properties_uri(uri):
"""Detects image properties in the file located in Google Cloud Storage or
on the Web."""
from google.cloud import vision
client = vision.ImageAnnotatorClient()
image = vision.Image()
image.source.image_uri = uri
response = client.image_properties(image=image)
props = response.image_properties_annotation
print("Properties:")
for color in props.dominant_colors.colors:
print(f"frac: {color.pixel_fraction}")
print(f"\tr: {color.color.red}")
print(f"\tg: {color.color.green}")
print(f"\tb: {color.color.blue}")
print(f"\ta: {color.color.alpha}")
if response.error.message:
raise Exception(
"{}\nFor more info on error messages, check: "
"https://cloud.google.com/apis/design/errors".format(response.error.message)
)
gcloud
Untuk melakukan deteksi properti gambar, gunakan
gcloud ml vision detect-image-properties
perintah seperti yang ditunjukkan pada contoh berikut:
gcloud ml vision detect-image-properties gs://cloud-samples-data/vision/image_properties/bali.jpeg
Bahasa tambahan
C#: Ikuti petunjuk penyiapan C# di halaman library klien, lalu buka dokumentasi referensi Vision untuk .NET.
PHP: Ikuti Petunjuk penyiapan PHP di halaman library klien, lalu buka Dokumentasi referensi Vision untuk PHP.
Ruby: Ikuti Petunjuk penyiapan Ruby di halaman library klien, lalu buka Dokumentasi referensi Vision untuk Ruby.
Cobalah
Coba deteksi properti gambar di bawah ini. Anda dapat menggunakan
gambar yang sudah ditetapkan (gs://cloud-samples-data/vision/image_properties/bali.jpeg)
atau menentukan gambar Anda sendiri sebagai gantinya. Kirim permintaan dengan memilih
Jalankan.
Isi permintaan:
{
"requests": [
{
"features": [
{
"maxResults": 10,
"type": "IMAGE_PROPERTIES"
}
],
"image": {
"source": {
"imageUri": "gs://cloud-samples-data/vision/image_properties/bali.jpeg"
}
}
}
]
}